- Company Articles
- Products and Technology
- Installation And Maintenance
- How to Repair Damaged 4040A EU Standard Aluminum Profile Components

How to Repair Damaged 4040A EU Standard Aluminum Profile Components
Related Product
4040A EU Standard Aluminum Profile
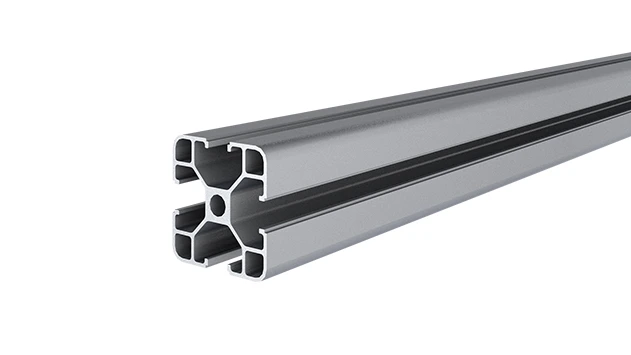
4040A is a 4.00x4.00 CM fractional 40 series square extrusion T-slot profile with four open T-slots, each side with 4.00cm face.
In the fast-paced world of manufacturing and industrial setups, aluminum profiles are the unsung heroes that keep operations running smoothly. Among these, the 4040A EU Standard Aluminum Profile stands out for its versatility, strength, and adaptability—found in everything from workbenches and material racks to conveyor systems and assembly lines. But even the most durable components face wear and tear over time. Scratches, loose connectors, or damaged end caps can compromise not just the profile's appearance, but its functionality and safety. In this guide, we'll walk through the ins and outs of repairing damaged 4040A aluminum profile components, using common aluminum profile accessories and simple techniques to restore your setup to peak condition.
Understanding 4040A Aluminum Profile Components
Before diving into repairs, it's essential to understand what makes up a 4040A EU Standard Aluminum Profile system. The "4040" refers to its dimensions—40mm in width and 40mm in height—while the "A" denotes its specific groove design, a standard in EU industrial applications. This profile isn't just a single piece of aluminum; it relies on a network of accessories to function as part of a larger structure. Let's break down the key components:
The Profile Itself
The 4040A profile is an extruded aluminum piece with T-slots running along its length. These slots are critical for attaching accessories like brackets, connectors, and panels. The profile's hollow interior reduces weight while maintaining rigidity, making it ideal for both light and medium-duty applications.
Aluminum Profile Accessories
These are the unsung heroes that hold the system together. Common accessories include:
- Aluminum Profile End Caps: Plastic or aluminum caps that seal the ends of the profile, preventing dust, debris, and moisture from entering the hollow interior. They also add a finished look and protect workers from sharp edges.
- Aluminum Profile Connectors: These join two or more profiles at angles (90°, 45°, 135°) or straight lines. Examples include 90° aluminum profile connectors for right-angle joints and T-shaped connectors for branching structures.
- Aluminum Pipe Clamps: Used to secure panels, shelves, or other components to the profile's T-slots. They come in various designs to accommodate different thicknesses and mounting needs.
- Mounting Brackets and Plates: Attach the profile to walls, floors, or other surfaces, ensuring stability in larger structures like workbenches or material racks.
Each of these accessories plays a role in the profile's overall integrity. A loose connector, for instance, can cause a workbench to wobble, while a missing end cap might lead to internal corrosion over time. Now, let's look at the most common damage scenarios you might encounter.
Common Damage Scenarios
4040A profiles are tough, but they're not invincible. Here are the most frequent issues that call for repair:
Scratches and Surface Dents
These are the most cosmetic of issues but can still be problematic. Scratches often occur during material handling—when tools or parts rub against the profile—or from accidental impacts. Deep scratches might expose the aluminum to moisture, increasing the risk of corrosion. Dents, on the other hand, are usually caused by heavy objects dropping or colliding with the profile, which can weaken the structural integrity if they're deep or near a joint.
Loose or Damaged Aluminum Profile Connectors
Connectors are the glue (literally and figuratively) of any aluminum profile system. Over time, vibrations from machinery or repeated adjustments can loosen the screws holding connectors in place. In severe cases, the connector itself might crack or break, especially if the profile is under heavy load. A loose 90° aluminum profile connector, for example, could cause a shelf to sag or a workbench to become unstable.
Missing or Cracked Aluminum Profile End Caps
End caps are easy to overlook, but they serve a vital purpose. Without them, dirt, debris, and liquids can seep into the profile's hollow core, leading to internal corrosion. They also prevent workers from catching their hands on sharp, unfinished edges. End caps can pop off due to impact or wear, or crack from repeated stress (e.g., if the profile is frequently moved or adjusted).
Bent or Deformed Sections
While aluminum is strong, excessive force (like a forklift bump or a heavy load dropped on a material rack) can bend the profile. Bent sections are more than just unsightly—they can throw off the alignment of connected components, making shelves uneven or conveyors misaligned. This is especially risky in precision environments, where even a 1mm bend can disrupt workflow.

Pre-Repair Assessment: Is It Repairable?
Not every "damage" requires a full repair. Sometimes, a minor scratch is just cosmetic, while a severely bent profile might need replacement. Before grabbing your tools, take time to assess the damage:
Step 1: Inspect the Damage Thoroughly
Start with a visual inspection. For scratches, check their depth—surface-level scratches (those you can't feel with your fingernail) are easy to buff out. Dents should be checked for sharp creases; a smooth dent might be repairable, but a crease could weaken the aluminum. For connectors, wiggle them gently to see if they're loose or if the plastic/metal has cracked. End caps should be checked for cracks or if they no longer fit snugly into the profile's end.
Pro Tip:
Use a flashlight to look inside the profile if the end cap is missing—you might find debris that needs cleaning before replacing the cap.
Step 2: Check for Structural Impact
Ask: Does the damage affect the profile's ability to support weight or maintain alignment? A wobbly connector on a material rack holding heavy parts is a safety hazard and needs immediate repair. A scratch on a non-load-bearing section of a workbench, however, might be low priority.
Step 3: Decide Repair vs. Replacement
As a general rule: If the damage is limited to surface scratches, loose connectors, or damaged end caps, repair is feasible. If the profile is bent beyond 5° (use a level to check), has cracks along the T-slots, or the mounting holes are stripped, it's safer to replace the section. Aluminum profile accessories like connectors and end caps are inexpensive, so replacing a cracked connector is almost always better than trying to glue it back together.
Essential Tools and Materials
Repairing 4040A aluminum profile components doesn't require specialized industrial tools. Here's what you'll need, organized by repair type:
| Repair Task | Tools Needed | Materials Needed |
|---|---|---|
| Scratch/Dent Repair | Sandpaper (800-grit and 1200-grit), rubber mallet, metal file, microfiber cloth | Aluminum polish, touch-up paint (matching profile color) |
| Connector Repair/Replacement | Hex keys (metric, typically 3mm-6mm), Phillips/slotted screwdrivers, pliers | Replacement aluminum profile connectors, thread-locking adhesive (e.g., Loctite) |
| End Cap Replacement | Flathead screwdriver (for prying old caps), rubber mallet | Replacement aluminum profile end caps, silicone adhesive (optional, for tight fits) |
| Minor Bend Correction | Rubber mallet, vice (with soft jaws), level | Wooden block (to protect the profile during hammering) |
Most of these tools and materials are available at hardware stores or from your aluminum profile supplier. For specialized parts like 4040-specific end caps or connectors, check with your supplier—they'll have exact matches for the EU standard.
Step-by-Step Repair Guides
Now, let's get hands-on. Below are detailed guides for the most common repairs, using simple techniques and aluminum profile accessories.
Repair 1: Fixing Scratches and Surface Dents
What You'll Need: 800-grit and 1200-grit sandpaper, rubber mallet, metal file, microfiber cloth, aluminum polish, touch-up paint (if needed).
Steps:
- Clean the Area: Wipe the scratched/dented section with a microfiber cloth and mild soap to remove dirt and grease. Dry thoroughly.
- Buff Scratches: For surface scratches, start with 800-grit sandpaper. Fold the sandpaper into a small square and sand the scratch in the direction of the aluminum's grain (usually along the length of the profile). Apply light pressure—you're trying to smooth the edges of the scratch, not remove material. Switch to 1200-grit sandpaper to refine the area, then wipe away dust with the cloth.
- Polish: Apply a small amount of aluminum polish to the microfiber cloth and rub the area in circular motions until the scratch is no longer visible. For deeper scratches, you may need to repeat the sanding and polishing steps.
- Fix Minor Dents: For small, smooth dents (no creases), place a wooden block over the dent to protect the profile. Gently tap the block with a rubber mallet to push the dent out. Work slowly—too much force can make the dent worse. If the dent is on the inside of a profile (e.g., from a dropped tool), reach inside with a wooden dowel and push outward while tapping the outside with the mallet.
- Touch-Up Paint (Optional): If the scratch was deep enough to remove the anodized finish, apply a small amount of touch-up paint (matching the profile's color) with a fine brush. Let dry completely before using the profile.
Repair 2: Replacing a Loose or Damaged Connector
What You'll Need: Hex key (size matching the connector screws), replacement aluminum profile connector, thread-locking adhesive, pliers (if screws are stuck).
Steps:
- Remove the Old Connector: Locate the set screws on the connector—these are usually in the T-slots of the profile. Use the hex key to loosen the screws counterclockwise. If the connector is cracked or broken, you may need to wiggle it gently with pliers to free it from the profile.
- Clean the T-Slots: Use a dry cloth or small brush to remove dust and debris from the T-slots where the new connector will sit. This ensures a tight fit.
- Install the New Connector: Slide the replacement connector into the T-slots, aligning it with the adjacent profile (if applicable). Hand-tighten the set screws to hold the connector in place. Use a level to ensure the profiles are straight or at the correct angle (e.g., 90° for a corner joint).
- Secure with Adhesive (Optional): For extra security—especially on connectors in high-vibration areas—apply a drop of thread-locking adhesive to the set screws before final tightening. This prevents the screws from loosening over time.
- Tighten Fully: Use the hex key to tighten the set screws until they're snug. Don't over-tighten—this can strip the threads or crack the connector.
Pro Tip:
If you don't have a replacement connector on hand, you can temporarily tighten a loose connector by adding a small washer under the set screw to increase friction. This is a short-term fix, though—replace the connector as soon as possible.
Repair 3: Replacing a Damaged End Cap
What You'll Need: Flathead screwdriver, replacement aluminum profile end cap, rubber mallet, silicone adhesive (optional).
Steps:
- Remove the Old End Cap: If the end cap is cracked or loose, gently pry it off with a flathead screwdriver. insert the screwdriver between the cap and the profile, then twist slightly to pop it out. Be careful not to scratch the profile's edges.
- Clean the Profile End: Wipe the inside and outside of the profile's end with a dry cloth to remove dust, dirt, or old adhesive residue.
- Prepare the New End Cap: Check that the new end cap matches the profile's dimensions (40x40mm) and has the correct design (some end caps have holes for cables or additional mounting). If the cap is a friction fit (most common), no adhesive is needed. If it's loose, apply a tiny amount of silicone adhesive to the inside of the cap (avoid getting adhesive in the T-slots).
- Install the New End Cap: Align the end cap with the profile's end, ensuring any tabs or notches fit into the T-slots. Press firmly with your hands to seat it, then tap gently with a rubber mallet to secure it. If using adhesive, let it dry for 24 hours before handling the profile.
Repair 4: Fixing Stripped Mounting Holes
Over time, repeatedly screwing into the same mounting hole can strip the threads, making it hard to secure accessories. Here's how to fix it:
What You'll Need: Tap and die set (metric, matching the hole size), thread-locking adhesive, larger screw (if tapping isn't possible).
Steps:
- Tap the Hole: select a tap (thread-cutting tool) one size larger than the original hole. Apply a drop of cutting oil to the tap, then slowly turn it clockwise into the stripped hole to cut new threads. Turn counterclockwise every 1-2 rotations to clear metal shavings. Wipe away shavings and oil with a cloth.
- Use a Larger Screw: Install a screw that matches the new thread size. Apply thread-locking adhesive to prevent future stripping.
- Alternative: Use a Thread insert (For Heavy-Duty Cases): If the hole is in a load-bearing area, insert a helical thread insert (a small metal coil) into the tapped hole. This reinforces the threads and allows you to use the original screw size.
Preventive Maintenance to Avoid Future Damage
The best repair is the one you don't have to do. With regular maintenance, you can extend the life of your 4040A aluminum profile components and reduce wear and tear:
- Inspect Regularly: Do a quick visual check of profiles, connectors, and end caps every month. Tighten loose screws on connectors and replace damaged accessories immediately.
- Clean Profiles: Wipe down profiles with a damp cloth to remove dust and debris, especially in the T-slots. This prevents buildup that can make connectors loose.
- Use Protective Edging: For profiles in high-traffic areas (e.g., near doorways or walkways), add rubber edge guards to prevent dents from collisions.
- Don't Overload: Respect the weight limits of your profiles and accessories. Overloading a material rack or workbench can bend profiles or crack connectors.
- Store Properly: If storing extra profiles, keep them flat or upright to prevent bending. Avoid stacking heavy objects on top of them.
Conclusion
Repairing damaged 4040A EU Standard Aluminum Profile components doesn't have to be a daunting task. With a little know-how, the right tools, and quality aluminum profile accessories, you can restore your industrial setup to its former strength and functionality. Whether you're fixing a scratch, replacing a connector, or installing a new end cap, the key is to assess the damage thoroughly, use the right techniques, and prioritize safety. By taking care of these small repairs, you'll save time and money in the long run, ensuring your aluminum profiles continue to support your operations for years to come.
Remember: A well-maintained workspace is a productive workspace. So grab your hex key, stock up on replacement end caps, and give your 4040A profiles the care they deserve.