- Company Articles
- Products and Technology
- Installation And Maintenance
- How to Repair Damaged Chrome on Four Way Straight Lean Pipe Joints

How to Repair Damaged Chrome on Four Way Straight Lean Pipe Joints
Related Product
Four Way Straight Lean Pipe Joint
Four way lean pipe joint for 4 pcs 28MM lean pipe connection in straight angle, which used widely in workbench, flow rack, hand trolley frame connection.
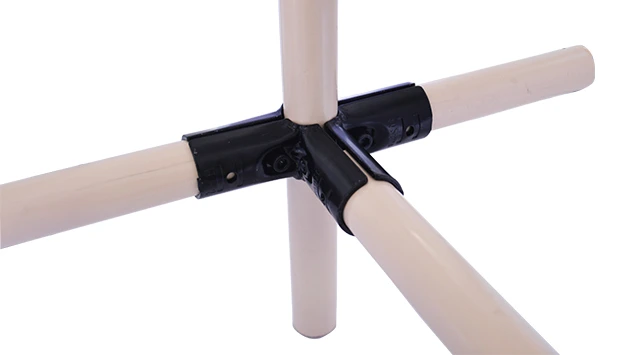
In the world of lean manufacturing, every component plays a silent but critical role in keeping operations running smoothly. From the workbenches where assembly happens to the flow racks that move materials efficiently, the backbone of these systems often comes down to small but mighty parts: lean pipe joints. Among these, the four way straight lean pipe joint stands out as a workhorse, connecting multiple pipes at once to form sturdy, adaptable structures. But like any hardworking component, it's prone to wear—especially its chrome plating, which protects against rust and keeps the joint looking sharp. If you've noticed scratches, chips, or rust on your four way straight lean pipe joints, don't worry: with a little know-how and the right tools, you can restore them to their former glory. Let's walk through the process step by step.
Understanding Chrome Damage on Lean Pipe Joints
First, let's talk about why chrome matters. Chrome plating is more than just a shiny finish; it's a thin layer of chromium applied to the metal surface of the joint to prevent corrosion, reduce friction, and resist scratches. When this layer gets damaged, the underlying metal (often steel) is exposed to moisture, chemicals, and daily wear, which can lead to rust, weakened structural integrity, and even system failures over time. So, spotting and repairing chrome damage early is key to maintaining a reliable lean system .
Common types of chrome damage on four way straight lean pipe joints include:
- Minor Scratches: Thin, shallow marks from tools, parts, or accidental bumps. These might not look like much, but they can trap dirt and moisture.
- Deep Chips: Flakes or chunks of chrome missing, exposing the bare metal underneath. Often caused by heavy impacts or over-tightening pipes during assembly.
- Rust Spots: Orange or brown discoloration, usually starting in scratches or chips where moisture has reached the metal. Left unchecked, rust can spread quickly.
Preparing for the Repair: Tools and Materials You'll Need
Before diving in, gather your supplies. Most items can be found at hardware stores, but for specialized parts like chrome repair kits or replacement joint components, consider reaching out to your lean pipe supplier —they often carry high-quality, compatible materials. Here's what you'll need:
| Type of Damage | Tools & Materials | Why You Need It |
|---|---|---|
| Minor Scratches | Chrome polish, microfiber cloth, mild detergent, water | Polish fills in tiny scratches and restores shine; detergent cleans dirt that could worsen damage. |
| Deep Chips | Epoxy filler, sandpaper (fine-grit), chrome spray paint, primer, masking tape, gloves, goggles | Filler rebuilds the chipped area; sandpaper smooths the surface; spray paint mimics the chrome finish. |
| Rust Spots | Wire brush (stiff-bristled), rust converter, primer, chrome spray paint, rags, gloves | Wire brush removes loose rust; converter stops rust from spreading; primer and paint protect the repaired area. |
Pro tip: Always work in a well-ventilated area, especially when using spray paints or chemicals. And don't forget safety gear—gloves protect your hands from sharp edges, and goggles keep debris out of your eyes.

Step-by-Step Repair Guide
1. Assess the Damage
Start by closely examining the four way straight lean pipe joint. Is it a surface scratch, a deep chip, or rust? This will determine your approach. For example, a tiny scratch might only need polishing, while a chip with exposed metal requires filler and painting. If the damage is severe—like a cracked joint or extensive rust that weakens the metal—you might need to replace the joint entirely (check with your lean pipe supplier for compatible replacements).
2. Clean the Area Thoroughly
No repair works well on a dirty surface. Mix mild detergent with warm water and use a rag to wipe the joint. For stubborn grime or oil, add a drop of degreaser. Rinse with clean water and dry completely—moisture can interfere with fillers, paints, or polish. For rust spots, use a wire brush to scrub away loose rust before cleaning; this ensures the rust converter can penetrate the remaining rust.
3. Repair Minor Scratches
For shallow scratches, chrome polish is your best friend. Apply a small amount of polish to a microfiber cloth and rub the scratch in circular motions. Apply gentle pressure—too much can wear away more chrome. Keep polishing until the scratch fades and the area shines. Wipe away excess polish with a clean part of the cloth. You might need to repeat this 2-3 times for deeper scratches, but avoid over-polishing, as chrome is a thin layer.
4. Fix Deep Chips
Deep chips require a bit more work, but they're manageable. Start by sanding the edges of the chip with fine-grit sandpaper (220-grit or higher) to smooth any rough edges—this helps the filler adhere. Wipe away dust with a dry cloth.
Next, apply epoxy filler. Follow the product instructions—most require mixing two parts (resin and hardener) until they're uniform. Use a small putty knife to apply the filler to the chip, overfilling slightly (it will shrink as it dries). Let it cure completely—this can take 1-2 hours, depending on the product. Once dry, sand the filler with fine-grit sandpaper until it's flush with the surrounding chrome. Wipe away dust again.
Now, it's time to paint. Use masking tape to cover the areas around the joint you don't want painted (like the pipes connected to it). Shake the chrome spray paint can for 1-2 minutes, then apply thin, even coats. Hold the can 6-8 inches from the joint and move in a steady back-and-forth motion. Let each coat dry for 10-15 minutes before applying the next—3-4 thin coats work better than one thick one. After the final coat, let it dry for 24 hours before handling.
5. Treat Rust Spots
Rust is sneaky, so you need to stop it in its tracks. After cleaning and wire-brushing the rusted area, apply rust converter with a brush. Rust converter reacts with rust to form a stable, black layer that prevents further corrosion. Let it dry for the time specified on the product (usually 20-30 minutes). Once dry, sand the area lightly to smooth the surface, then apply a coat of primer designed for metal. Let the primer dry, then follow the same chrome spray painting steps as for deep chips. The result? A rust-free joint that blends in with the rest.

Preventing Future Damage
Repairing chrome damage is great, but preventing it is even better. Here are a few tips to keep your four way straight lean pipe joints (and other lean pipe and accessories ) in top shape:
- Inspect Regularly: Make a habit of checking joints during weekly equipment checks. Catching a small scratch early is easier than fixing a rusted chip later.
- Clean Often: Wipe down joints with a dry cloth weekly to remove dust and moisture. For high-use areas, a monthly wipe with mild detergent keeps grime at bay.
- Use Protective Caps: If the joint is at risk of impacts (like in a busy assembly area), add plastic end caps or bumpers (available from lean pipe suppliers) to absorb shocks.
- Avoid Over-Tightening: When assembling or adjusting lean pipe structures, don't crank down on joints too hard—this can crack the chrome or warp the joint.
- Control the Environment: If possible, keep lean systems away from excessive moisture or chemicals. A dehumidifier in damp areas can work wonders for preventing rust.
When to replace Instead of Repair
Sometimes, a joint is beyond repair. If you notice any of these signs, it's time to replace it with a new four way straight lean pipe joint:
- The metal itself is cracked, bent, or warped (not just the chrome).
- Rust has spread deep into the joint, weakening its structure.
- The joint no longer holds pipes securely, even after tightening.
Your lean pipe supplier can help you find the right replacement joint—just make sure to match the size and type to your existing system for a seamless fit.
Final Thoughts
A well-maintained lean system is a productive lean system, and that starts with the small parts—like the four way straight lean pipe joint. By taking the time to repair minor chrome damage, you're not just keeping your equipment looking good; you're ensuring it stays strong, reliable, and ready to support your workflow for years to come. With the right tools, a little patience, and proactive care, you can tackle most chrome repairs yourself. And remember: when in doubt, your lean pipe supplier is there to help with parts, advice, or replacement joints. Here's to smooth operations and shiny, sturdy lean systems!