- Company Articles
- Products and Technology
- Installation And Maintenance
- How to Secure Aluminum Profile 3 Way Connectors for Heavy-Duty Use

How to Secure Aluminum Profile 3 Way Connectors for Heavy-Duty Use
Related Product
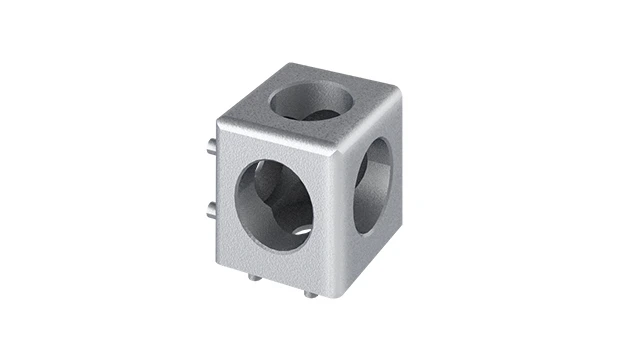
Aluminum Profile 3 Way Connector
The 3 way - squared corner connector is an external fastening method that is typically used to create a corner connection between three profiles. It is a heavy-duty connection that is simple to use and provides a polished look.
Let's start with a story we've all heard (or maybe even lived): A small manufacturing shop invests in a shiny new workbench, built with sleek aluminum extrusion profiles. The team assembles it over a weekend, tightening the connectors by hand, and by Monday, it's loaded with power tools, metal parts, and boxes of supplies. Three weeks later, during a busy shift, a loud creak echoes through the shop—the corner of the workbench sags, and a drill press teeters dangerously close to the edge. The culprit? A loose aluminum profile 3 way connector, the unsung hero (or villain, if neglected) that holds the whole structure together.
If you've ever worked with aluminum profiles, you know their magic lies in versatility. Lightweight yet surprisingly strong, they're the backbone of everything from workbenches to production lines. But that versatility hinges on one critical detail: how well you secure the connectors. And when it comes to heavy-duty use—think daily loads of 200+ pounds, constant vibration, or repeated impacts—cutting corners on connector installation isn't just risky; it's a guarantee of future headaches.
In this guide, we're diving deep into the art (and science) of securing aluminum profile 3 way connectors for heavy-duty applications. Whether you're building a workshop workbench, a material rack, or a custom assembly line, these tips will help you create a structure that doesn't just stand up to the job—it outlasts it.
1. Understanding the Basics: Aluminum Profiles and 3 Way Connectors
Before we get into the "how," let's make sure we're on the same page about the "what." Aluminum profiles—those modular, T-slot wonders—are typically made via extrusion (hence "aluminum extrusion profile"), a process where heated aluminum is pushed through a die to create consistent cross-sections. This method gives them their signature strength: the uniform walls and internal ribs distribute weight evenly, making them ideal for heavy loads without the bulk of steel.
Now, the 3 way connector. As the name suggests, these little workhorses join three aluminum profiles at once—think a vertical post meeting two horizontal beams, or a T-junction where a shelf connects to a frame. They come in all shapes and sizes, but for heavy-duty use, you'll most often encounter two types: cast aluminum connectors (molded for basic strength) and machined aluminum connectors (precision-cut for tighter tolerances and higher load capacities). Both fall under the umbrella of "aluminum profile accessories," but not all accessories are created equal—especially when weight is involved.
Pro Tip: When shopping for 3 way connectors, check the load rating. A good rule of thumb for heavy-duty use: aim for connectors rated to handle at least 1.5 times the maximum load you expect to place on the structure. This "safety buffer" accounts for sudden impacts or uneven weight distribution.
2. Why Heavy-Duty Security Matters (More Than You Think)
Let's talk consequences. Loose connectors don't just make a structure wobbly—they create a domino effect. Imagine a material rack in a warehouse, loaded with 50-pound boxes. If a 3 way connector at the base loosens, the rack tilts slightly. Now, the weight shifts to the adjacent connectors, which weren't designed to bear the extra load. One by one, they strain, bend, or fail. The result? A collapsed rack, damaged inventory, and worst-case scenario, injured workers.
Even in less dramatic settings, like a home workshop workbench, loose connectors cost time and money. A wobbly surface makes precise work impossible—try using a circular saw on a table that shifts mid-cut. Over time, the constant movement wears down the T-slots in the aluminum profiles, turning a $20 connector repair into a $200 profile replacement.
The bottom line: Heavy-duty use demands heavy-duty security. It's not just about "tightening bolts"—it's about engineering a connection that can handle the chaos of real-world use.

3. Tools and Materials: What You'll Need (and Why)
You wouldn't build a house with a butter knife, right? The same logic applies here. Using the right tools and materials is half the battle. Here's your checklist:
| Tool/Material | Purpose | Heavy-Duty Hack |
|---|---|---|
| Hex Keys (Ball-Ended, Long-Handle) | Tightening connector bolts; ball ends allow angled access in tight spaces. | Invest in a set with a torque handle—critical for consistent bolt tension. |
| Deburring Tool | Removes sharp edges from cut aluminum profiles, preventing damage to gaskets/connectors. | Run it along T-slots too—burrs here can prevent bolts from seating properly. |
| Thread Locker (Medium-Strength, e.g., Loctite Blue) | Prevents bolts from vibrating loose under heavy loads. | Avoid "permanent" thread locker (red)—you'll need to disassemble someday! |
| Digital Torque Wrench | Ensures bolts are tightened to the manufacturer's specs (usually 8-12 Nm for aluminum connectors). | Calibrate it yearly—an off wrench leads to over/under-tightening. |
| Rubber Mallet | Gently seats profiles into connectors without damaging the aluminum finish. | Wrap the head in tape for extra protection on anodized profiles. |
| Aluminum Profile Gaskets (Optional) | Fills gaps between profiles and connectors, reducing vibration. | Use silicone-based gaskets for heavy vibration—they're more durable than rubber. |
And of course, the stars of the show: your aluminum extrusion profiles and 3 way connectors. When selecting profiles, opt for thicker walls (1.5mm+ for heavy-duty) and look for "T-slot" designs with undercut grooves—these lock bolts in place better than shallow slots. For connectors, machined aluminum is worth the extra cost; cast versions can crack under repeated stress.

4. Step-by-Step: Installing 3 Way Connectors the Heavy-Duty Way
Let's walk through the process, start to finish. I'll use a common scenario: building a heavy-duty workbench with 40x40mm aluminum profiles, joined by 3 way connectors at each corner.
Step 1: Prep the Profiles
First, cut your aluminum extrusion profiles to length (if not pre-cut). Use a miter saw with a fine-tooth blade to avoid bending the edges. Then, grab your deburring tool and run it along all cut edges—even a tiny burr can prevent a connector from seating flush. Finally, wipe down the T-slots with a dry cloth to remove dust or aluminum shavings; debris here is a silent enemy of tight connections.
Step 2: Inspect the Connectors
Before assembly, take 30 seconds to check each 3 way connector. Look for cracks in the metal, stripped threads, or bent bolts—defects that might not be obvious at first glance. If a connector feels "cheap" (e.g., lightweight plastic or thin aluminum), swap it out. Remember: aluminum profile accessories are like insurance—you don't skimp on the important ones.
Step 3: Dry-Fit First (Yes, Really)
Dry-fitting is non-negotiable. Slide the connectors onto the profiles without tightening the bolts, and assemble the structure loosely. This lets you check alignment: Are the profiles straight? Do the connectors sit flush against the profile walls? If something's off, now's the time to adjust—tightening misaligned parts will warp the structure and strain the connectors.
Step 4: Add Thread Locker (Strategically)
Apply a drop of medium-strength thread locker to the threads of each connector bolt— not the head or the T-slot. Too much locker can seep into the slot and gunk up future adjustments, but too little won't hold. A good rule: one drop per bolt for 4mm threads, two drops for 5mm+. Let it sit for 30 seconds to start activating.
Step 5: Tighten in a "Star Pattern"
Here's where the pros separate from the amateurs: tightening order. For a 3 way connector, which has 3-6 bolts (depending on design), tighten them in a star pattern (like tightening lug nuts on a car). This ensures even pressure, preventing the connector from tilting or binding. Start with a hex key to snug the bolts, then switch to the torque wrench—set it to the manufacturer's recommended torque (usually 10 Nm for 40mm profiles). Pull slowly until you hear the wrench "click"—that's your signal to stop.
Pro Move: After tightening, mark the bolt heads with a permanent marker, aligned with the connector. Later, you can check if the bolt has loosened by seeing if the mark has shifted.
Step 6: Let It Cure
Thread locker needs time to fully set—typically 24 hours. Resist the urge to load the structure immediately! I once helped a friend assemble a material rack and he stacked boxes on it the same day; by evening, two bolts had worked loose. Patience here pays off.
4. Common Mistakes That Sabotage Heavy-Duty Security
Even with the best intentions, it's easy to slip up. Here are the top mistakes I've seen (and made!) over the years:
Mistake #1: Over-Tightening (Yes, It's a Thing)
You might think, "Tighter is better!" Wrong. Aluminum is a soft metal—cranking bolts past the recommended torque can strip the threads in the connector or the T-slot. I once watched a DIYer snap a connector bolt by using a pipe cheater bar on a hex key. The result? A $15 connector ruined, and a very frustrated builder.
Mistake #2: Ignoring Vibration
Heavy-duty use often means vibration—think a workbench near a CNC machine or a material rack in a busy warehouse. Without thread locker, even properly torqued bolts will loosen over time. I visited a auto shop once where the tool carts, made with aluminum profiles, were constantly wobbly. The fix? A $5 bottle of thread locker and 20 minutes of re-tightening. Problem solved.
Mistake #3: Mismatched Profiles and Connectors
Not all aluminum profiles are the same. A 3 way connector designed for 20x20mm profiles will never secure a 40x40mm profile properly—even if you force it. Always check the connector's spec sheet to ensure it matches your profile size and slot type (metric vs. imperial T-slots).
5. Testing: Prove It Can Handle the Load
You've assembled the structure—now it's time to put it to the test. Heavy-duty security isn't about hope; it's about data. Here's how to verify your work:
Static Load Test
Start with 50% of your expected maximum load. For a workbench rated for 300 pounds, pile on 150 pounds of sandbags or concrete blocks, and let it sit for 24 hours. Check for sagging, creaking, or bolt movement (use your marker lines!). If it holds, bump it up to 75%, then 100%. If any connector shifts, re-tighten and test again.
Dynamic Load Test
Real-world use isn't static. Simulate movement by gently pushing or pulling on the structure (wear gloves!). For a material rack, slide heavy boxes across the shelves to mimic daily use. Listen for unusual noises—squeaks or clicks often mean a connector is working loose.
Torque Re-Check
After testing, use your torque wrench to re-check the bolts. It's normal for them to loosen slightly during the first load cycle (this is called "settling"). Re-tighten to the recommended torque, and you're good to go.
6. Maintenance: Keep It Tight for the Long Haul
Securing connectors isn't a "set it and forget it" job. Heavy-duty use means regular wear, so schedule maintenance checks:
- Monthly Inspections: Check for loose bolts (using your marker lines), cracks in connectors, or bent profiles.
- Quarterly Torque Checks: Re-tighten bolts to the recommended torque—vibration and temperature changes can loosen them over time.
- Annual Overhaul: Disassemble the structure (if possible) to clean T-slots, replace worn connectors, and re-apply thread locker to all bolts.
For outdoor or high-moisture environments (like a garage), add a yearly coating of anti-corrosion spray to the connectors—aluminum resists rust, but the bolts and steel components in some connectors don't.
7. Real-World Win: The Workbench That Outlasted the Shop
A few years back, I helped a local woodworker, Maria, build a custom workbench for her small shop. She needed it to handle slab saws, clamps, and 200-pound logs of hardwood—definitely heavy-duty. We used 40x40mm aluminum extrusion profiles and machined 3 way connectors, following the steps above: dry-fitting, thread locker, torque wrench, the works.
Five years later, Maria expanded her shop and moved the workbench to a new location. When we disassembled it, the connectors were still tight—the bolts required a torque wrench to loosen, and the T-slots showed almost no wear. "I thought I'd need to replace it after two years," she told me. "Now I'm taking it with me to the new space. Best $300 I ever spent."
That's the power of proper connector security: it turns a "temporary" solution into a long-term investment.
8. Troubleshooting: When Connectors Loosen (and How to Fix Them)
Even with perfect installation, life happens. If you notice a loose connector, don't panic—here's how to fix it:
Signs of Trouble:
- Visible gaps between the connector and profile
- Creaking or rattling during use
- Profiles that shift when pushed
- Bolts that spin freely (stripped threads)
Fixes:
For Minor Loosening: Re-tighten the bolts with a torque wrench. If they loosen again within a week, clean the threads with alcohol, apply fresh thread locker, and re-tighten.
For Stripped Threads: replace the bolt first—often, the bolt is the weak link. If the connector's threads are stripped, swap in a new connector (it's cheaper than replacing the profile).
For Bent Connectors: Bent connectors can't distribute load evenly—replace them immediately. A bent connector is a ticking time bomb for heavy loads.
Final Thoughts: Security Starts with You
Securing aluminum profile 3 way connectors for heavy-duty use isn't about being "handy"—it's about respect for the job. Every bolt you tighten, every drop of thread locker you apply, is a promise that the structure will stand up when it matters most. Whether you're building a workbench for your garage or a production line for a factory, the principles are the same: prep, precision, and patience.
So the next time you reach for that hex key, remember: you're not just building something—you're building trust. Trust that the workbench won't wobble, the rack won't collapse, and the people using it can focus on the job, not worrying about the structure holding it all together.
Now go build something that lasts.