- Company Articles
- Products and Technology
- Installation And Maintenance
- How to Secure Lean Pipe Clamp Chrome Properly: Avoiding Loose Connections

How to Secure Lean Pipe Clamp Chrome Properly: Avoiding Loose Connections
Related Product
Lean Pipe Clamp Chrome
Lean pipe clamp is used for rack system hang monitor or other panel for workbenck, flowrack in production daily use.
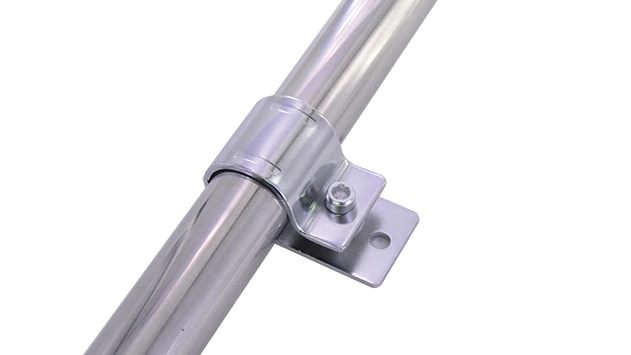
The Hidden Cost of a Wobbly Connection
Picture this: It's a busy Tuesday morning on your production floor. Your team is racing to meet a deadline, and the assembly line is humming. Suddenly, a loud clatter echoes through the space. You rush over to find a section of your workbench has tilted—again. A quick inspection reveals the culprit: a loose lean pipe clamp chrome that's been slipping for weeks. Now, you're down five minutes of production time, scrambling to fix it, and silently fuming over the third time this month. Sound familiar?
In the world of lean manufacturing, where efficiency is king, even the smallest inefficiency can snowball into bigger problems. Loose clamps aren't just a minor annoyance; they disrupt workflow, compromise safety, and chip away at the very "lean" principles your system is built on. A single wobbly connection can lead to misaligned materials, damaged parts, or even workplace accidents. And let's not forget the hidden cost: the mental drain of constant fixes, the frustration of unreliable equipment, and the wasted hours that could have been spent innovating instead of troubleshooting.
But here's the good news: Securing a lean pipe clamp chrome properly isn't rocket science. It's a skill that, once mastered, turns those daily headaches into a thing of the past. Whether you're setting up a new workbench, maintaining an existing flow rack, or upgrading your lean system, getting this right will make your operation smoother, safer, and more efficient. Let's dive into how to do it—step by step, with no jargon, just practical advice from someone who's been there.
What Even Is a Lean Pipe Clamp Chrome, Anyway?
Before we get into the "how," let's make sure we're all on the same page about the "what." A lean pipe clamp chrome is a small but mighty component in the world of lean systems. Think of it as the glue that holds your workspace together—literally. These clamps are designed to connect lean pipes (those versatile, often aluminum or steel tubes) to joints, forming the framework for everything from workbenches and flow racks to conveyor systems and material trolleys.
What makes the "chrome" variety stand out? Chrome plating adds a layer of durability, resisting rust and corrosion—perfect for factory floors where spills, humidity, or regular wear and tear are part of the daily grind. Unlike plastic or basic steel clamps, these chrome-coated workhorses are built to last, even in tough environments. But here's the catch: their strength only matters if they're installed correctly. A high-quality clamp is useless if it's not tightened properly or paired with the right lean pipe joint.
So, why does this matter for your lean system? Lean manufacturing is all about eliminating waste—waste of time, waste of materials, waste of effort. A secure clamp ensures that your structures stay stable, your materials flow smoothly, and your team can focus on their work instead of playing fix-it. It's the foundation of a system that works
with
you, not against you.

Why Do Clamps Loosen? The Usual Suspects
Let's start with the basics: Why do lean pipe clamp chrome connections loosen in the first place? It's rarely a manufacturing defect—most of the time, it's a mix of human error, environmental factors, and good old-fashioned wear and tear. Let's break down the usual suspects:
Vibration: The Silent Saboteur
Production floors are noisy places, and that noise comes with constant vibration. Every machine, every conveyor belt, every footstep sends tiny tremors through your workbench or rack. Over time, those vibrations act like a slow-motion wrench, gradually loosening the clamp's grip on the lean pipe joint. If you've ever noticed a clamp that's tight one day and loose the next, vibration is likely the culprit.
Improper Installation: Rushing the "Quick Fix"
We've all been there: You're in a hurry to set up a new workbench, so you tighten the clamp "just enough" and call it a day. But "just enough" often isn't enough. Maybe you didn't align the clamp and joint properly, or you used a regular wrench instead of a torque tool, leaving it undertightened. Or worse, you overtightened it, stripping the threads or warping the clamp—now it's loose
and
damaged.
Wear and Tear: When Parts Get Tired
Even the toughest chrome clamps don't last forever. After months (or years) of holding up heavy loads, the threads on the clamp or joint can wear down. The rubber or plastic components inside the clamp might degrade, losing their grip. Or maybe the lean pipe itself has developed a slight bend, throwing off the fit. Over time, these small changes add up, and suddenly, your once-sturdy connection is wobbly.
Environmental Factors: Moisture, Dust, and Temperature Swings
If your workspace is prone to humidity, dust, or extreme temperatures, those elements can take a toll. Moisture can cause rust (even on chrome), making threads stick or seize. Dust and debris can get trapped between the clamp and pipe, preventing a tight seal. And temperature swings? Metal expands and contracts, which can loosen even the most carefully tightened connections over time.
The good news? Most of these issues are preventable. With the right tools, a little patience, and a few pro tips, you can secure your lean pipe clamp chrome connections so well that they'll outlast the daily chaos of your production floor.
Step-by-Step: How to Secure Your Lean Pipe Clamp Chrome Like a Pro
Securing a lean pipe clamp chrome isn't about brute force—it's about precision. Follow these steps, and you'll create connections that stay tight, even under the stress of daily use.
Step 1: Prep the Area (Yes, This Matters)
Before you even touch a clamp, take 30 seconds to clean the workspace. Wipe down the lean pipe and joint with a dry cloth to remove dust, oil, or debris. Even a tiny speck of dirt can create a gap between the clamp and pipe, weakening the connection. If there's rust or corrosion (common in older setups), gently sand it away with a fine-grit sandpaper—chrome is tough, but rust can eat into threads.
Step 2: Choose the Right Lean Pipe Joint (Don't Mix and Match)
Not all joints are created equal. Your lean pipe clamp chrome is designed to work with specific joint types—usually the same brand or model. Mixing and matching (say, a generic joint with a premium clamp) is a recipe for slippage. Check the manufacturer's specs to ensure compatibility. For example, a 90-degree crossing lean pipe joint requires a clamp with a wider grip than a straight two-way joint. Using the wrong pair is like trying to fit a square peg in a round hole—you'll never get a tight seal.
Step 3: Align, Align, Align
Hold the pipe and joint in place, and double-check the alignment. Is the pipe sitting flush against the joint's grooves? Are the clamp's bolts lined up with the joint's holes? A misaligned connection will never tighten properly—even if you crank the bolts until your arm aches. Take an extra second to adjust: a level can help here, especially for horizontal or vertical pipes that need to stay straight.
Step 4: Tighten with the Right Tool (Skip the Adjustable Wrench)
Here's where most people go wrong: using a regular adjustable wrench. Those tools are great for plumbing, but they're imprecise for lean clamps. Instead, use a torque wrench or a hex key (Allen wrench) that fits the clamp's bolts perfectly. A snug fit prevents stripping the bolt heads.
Now, the tightening technique: Start by hand-tightening the bolts until they're just snug. Then, use the tool to turn them 1/4 to 1/2 a turn more—no more. Overtightening is just as bad as undertightening: it can warp the clamp, strip the threads, or even crack the joint. Think of it like closing a jar of pickles—you want it tight enough to stay closed, but not so tight you need a rubber grip to open it later.
Step 5: Test the Connection (Give It a Wiggle)
Once tightened, give the pipe a gentle but firm shake. Does it move? If yes, check the alignment again—you might have missed a spot. If it's still loose, try tightening the bolts another 1/8 turn (but stop if you feel resistance). If it's rock-solid, you're good to go. Pro tip: Mark the clamp and pipe with a small dot of paint after tightening. Later, you can check if the dots have shifted—an easy way to spot loosening before it becomes a problem.
Step 6: Repeat for All Connections (Consistency Is Key)
Don't stop at one clamp. If you're setting up a workbench or flow rack, go through every connection with the same care. A single loose clamp in a larger structure can put extra stress on neighboring clamps, causing them to loosen too. It's like a chain—only as strong as its weakest link.
Tools of the Trade: What You'll Need (No Fancy Gear Required)
You don't need a fully stocked toolbox to secure lean pipe clamp chrome connections, but having the right tools makes the job faster and more effective. Here's what to keep on hand:
Hex Keys (Allen Wrenches):
Most clamps use hex bolts, so a set of SAE and metric hex keys is a must. Look for ones with a ball end—they're easier to use in tight spaces.
Torque Wrench (Optional but Recommended):
If you're serious about precision, a small torque wrench (set to 10-15 Nm, depending on the clamp size) takes the guesswork out of tightening. It ensures you never overtighten.
Level:
A 2-foot bubble level helps keep pipes straight during installation, preventing uneven stress on clamps.
Wire Brush or Sandpaper:
For cleaning rust or debris off pipes and joints.
Anti-Seize Lubricant (A Small Tub Goes a Long Way):
Applying a tiny dab of anti-seize to the bolt threads (avoiding the clamp's grip surface) prevents rust and makes future adjustments easier.
Marker or Paint Pen:
For marking tightened connections, as mentioned earlier.
That's it—no need for power tools or specialty equipment. These basics will cover 99% of your clamp-securing needs.
Troubleshooting Common Clamp Issues
Even with perfect installation, problems can pop up. Here's how to diagnose and fix the most common lean pipe clamp chrome issues:
Remember, prevention is better than cure. A quick weekly check of your clamps—especially those near high-vibration equipment—can catch issues before they escalate. Add it to your team's routine maintenance checklist; five minutes a week beats an hour of downtime later.
| Problem | What's Likely Causing It | Quick Fix |
|---|---|---|
| Clamp loosens within days | Vibration from nearby machinery; undertightened bolts | Retighten with a torque wrench (1/8 turn more); add a lock washer under the bolt head |
| Bolt head strips when tightening | Using the wrong size hex key; overtightening | replace the bolt with a new one; use a hex key that fits snugly |
| Pipe slides inside the clamp | Dust/debris on the pipe; clamp not aligned with joint grooves | Clean the pipe with alcohol; realign clamp to sit in joint grooves |
| Clamp cracks or warps | Overtightening; using a clamp that's too small for the pipe | replace the clamp with a larger size; avoid overtightening |
| Joint feels "spongy" when shaken | Worn joint threads; damaged lean pipe | replace the joint; check pipe for bends and straighten if needed |
Beyond Installation: Maintaining Tight Connections
Securing your lean pipe clamp chrome is a one-time job, but keeping them tight is an ongoing process. Here's how to make those connections last:
Schedule Regular Inspections
Set a calendar reminder to check clamps monthly (or weekly for high-traffic areas like workbenches). Walk the floor with a torque wrench and give each bolt a gentle tug—if it moves, retighten it. Look for signs of wear: rust on bolts, cracks in the clamp, or pipe damage. Catching these early saves you from bigger repairs later.
Lubricate Threads Seasonally
Twice a year, apply a small amount of anti-seize lubricant to the clamp bolts. This prevents rust, makes future adjustments easier, and reduces friction during tightening. Just be careful not to get lubricant on the clamp's grip surface—that could actually weaken the connection.
Train Your Team to Spot Issues
Your frontline workers are the first to notice a wobbly pipe or loose clamp. Teach them the basics: what a secure connection feels like, how to report looseness, and when to stop using a structure that's unsafe. Empowering your team turns everyone into a maintenance detective, catching small problems before they become big ones.
replace Worn Parts Proactively
If a clamp is cracked, a bolt is stripped, or a joint is bent, replace it immediately. It's tempting to "make do" with a damaged part, but that's a gamble. A $5 clamp isn't worth risking a $500 production delay or a workplace injury. Keep a small stock of spare clamps, bolts, and joints on hand—you'll thank yourself when an emergency hits.
Real-World Impact: From the Factory Floor to Your Workbench
Let's bring this back to your daily life. Imagine your workbench: it's where your team assembles products, sorts materials, and keeps the line moving. If the frame is held together with loose clamps, that workbench becomes a source of frustration. Parts slide off, tools get knocked over, and everyone's constantly adjusting instead of working.
Now, picture that same workbench with properly secured lean pipe clamp chrome connections. It's stable. It doesn't wobble when someone leans on it. Materials glide smoothly across the surface, and your team can focus on their tasks instead of the furniture. That's the power of tight clamps: they turn a flimsy structure into a reliable tool that supports your team's best work.
And it's not just workbenches. Flow racks, conveyor systems, and material trolleys all rely on secure clamp connections. A well-built lean system with tight clamps reduces waste, speeds up production, and makes your workplace feel more professional. Your team notices when the tools they use daily are reliable—it boosts morale, too. After all, no one likes working with equipment that feels like it's held together with duct tape.
Conclusion: Tight Clamps, Tighter Operations
At the end of the day, securing a lean pipe clamp chrome is about more than just tightening bolts. It's about respecting the lean principles that drive your operation: eliminating waste, prioritizing efficiency, and creating a workplace where your team can thrive. A tight clamp is a small detail, but small details add up to big results.
So, the next time you're setting up a new structure or maintaining an old one, take the extra minute to do it right. Clean the pipe, align the joint, use the right tool, and test the connection. Your future self (and your team) will thank you for it. No more Tuesday morning clatters, no more wasted time fixing what shouldn't break, and no more letting loose connections slow you down.
Remember: In lean manufacturing, every component matters—even the ones you can't see. And when it comes to lean pipe clamp chrome, tight is right.