- Company Articles
- Products and Technology
- Installation And Maintenance
- How to Securely Attach a Castor Install Base to Steel Lean Tubes

How to Securely Attach a Castor Install Base to Steel Lean Tubes
Related Product
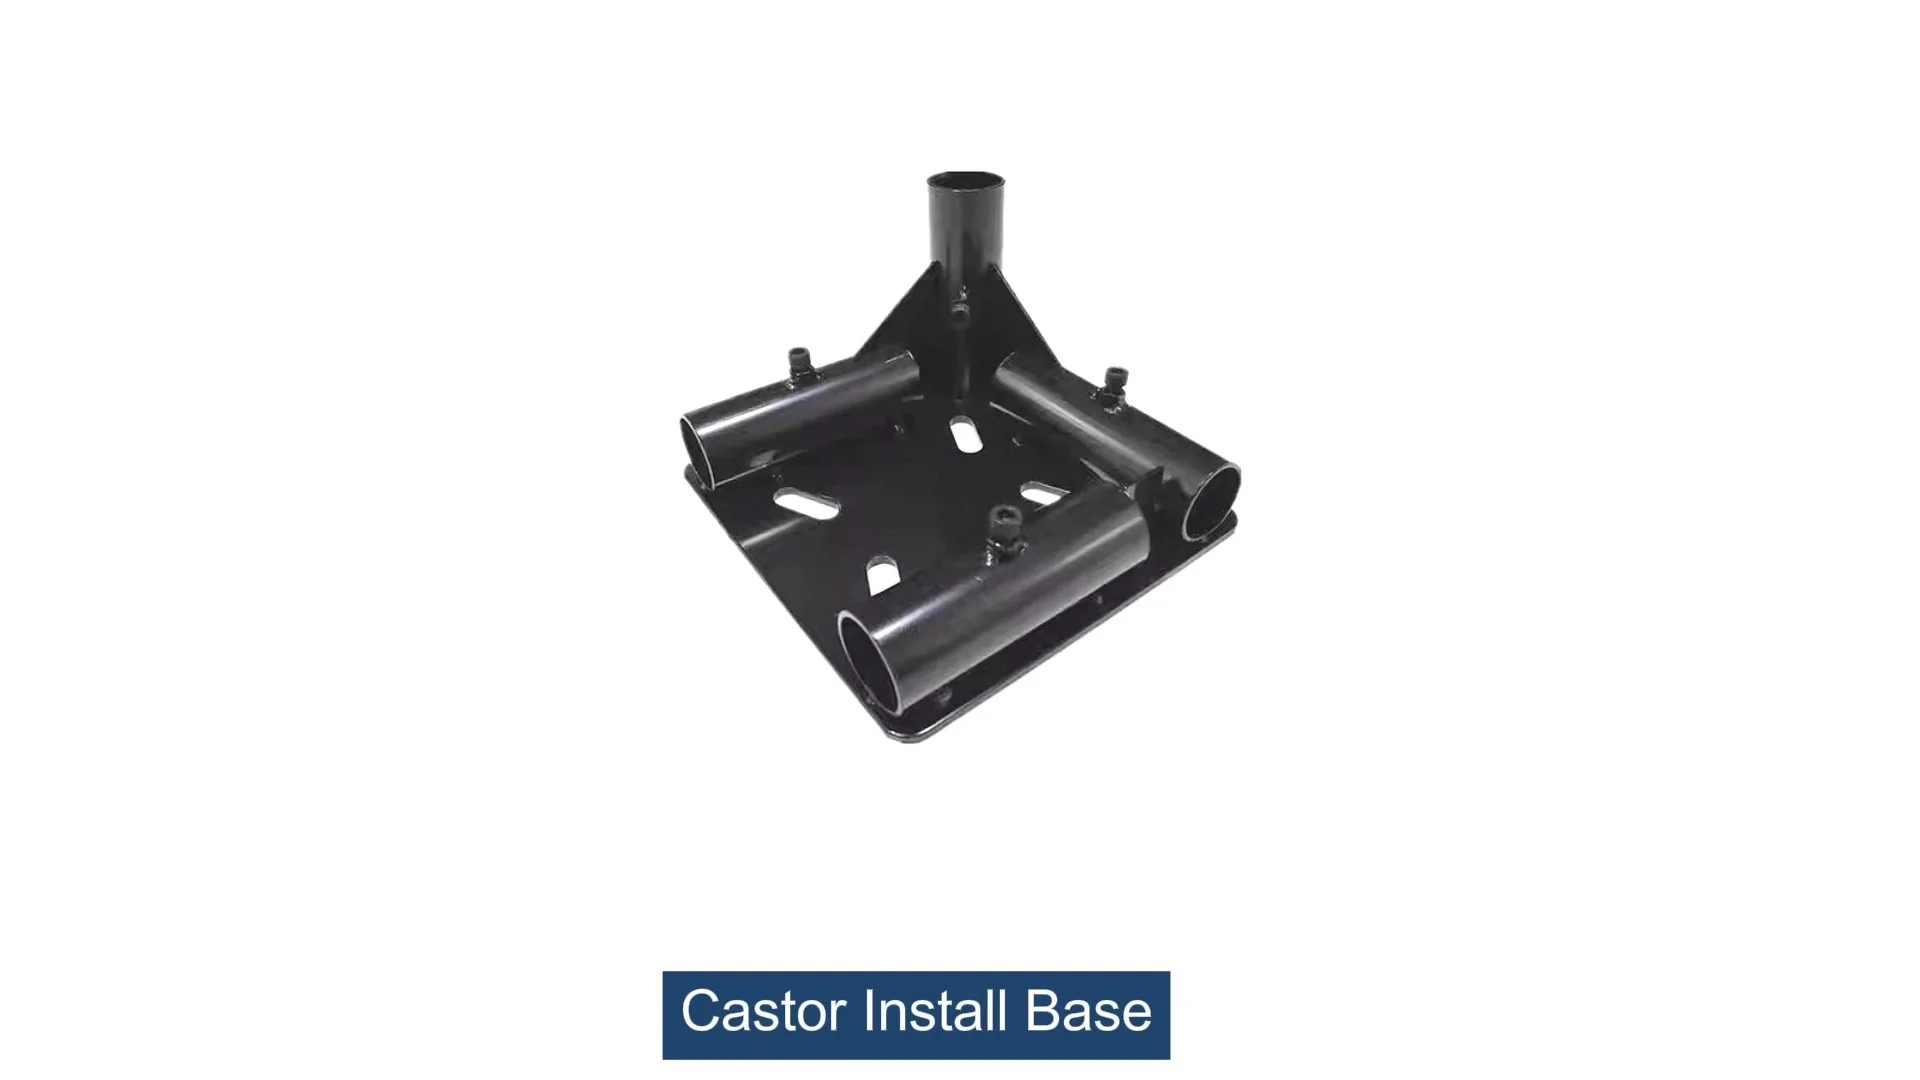
Castor Install Base
Castor install base, used for connection between pipe and castor, it can connect 4 pcs pipe by 1 pcs castor base, to make the structure strong and stable.
Introduction: The Backbone of Efficient Workspaces
Walk into any well-organized factory, workshop, or warehouse, and you'll likely spot a common hero: the humble lean pipe structure. From workbenches that glide smoothly across the floor to turnover trolleys that carry heavy loads with ease, these setups rely on one critical detail often overlooked—how securely the castor install base is attached to the steel lean tubes. A shaky connection here isn't just an annoyance; it can slow down production, risk damage to materials, or even lead to accidents.
Think about it: if your workbench's castors wobble every time you lean on it, you're constantly readjusting tools or catching falling parts instead of focusing on the task at hand. Or imagine a turnover trolley loaded with sensitive components—if the castor install base isn't properly fixed to the lean pipe, a sudden jolt could send everything crashing. That's why getting this attachment right isn't just about "putting parts together"—it's about building a foundation for efficiency, safety, and reliability.
In this guide, we'll break down the process step by step, from understanding the key components like lean pipes and lean pipe joints to testing the final setup. Whether you're a seasoned facility manager or a small business owner setting up your first workspace, these insights will help you create structures that stand the test of time (and daily wear and tear).
Understanding the Stars of the Show: Key Components
Before diving into the "how," let's get familiar with the "what." When attaching a castor install base to steel lean tubes, you're working with a few core components—each playing a unique role in ensuring stability and functionality.
1. Steel Lean Pipe: The Skeleton
Steel lean pipes are the backbone of these structures. Typically made from high-grade steel with a protective coating (like PE coating for durability), they're strong enough to support heavy loads while remaining lightweight enough for easy assembly. Their smooth, cylindrical shape makes them ideal for connecting with joints, but that same shape means proper attachment is key—there's no room for slippage here.
2. Castor Install Base: The Bridge
The castor install base is exactly what it sounds like: the plate or bracket that connects the caster wheel to the lean pipe structure. Think of it as the middleman—too flimsy, and it bends under pressure; poorly designed, and it won't distribute weight evenly. Most bases are made from thick steel or aluminum, with pre-drilled holes to align with lean pipe joints and caster accessories.
3. Lean Pipe Joint: The Glue (Without the Mess)
Lean pipe joints are the unsung heroes here. These small, often metal connectors lock the castor install base to the lean pipe, ensuring they move as one. From fixed 90-degree joints for rigid setups to swivel joints for adjustable structures, choosing the right joint type is critical. For castor bases, fixed joints are usually preferred—they minimize movement and keep the structure stable, even when rolling over uneven floors.
4. Caster Accessories: The Finishing Touches
Once the base is attached, caster accessories like wheels, brakes, and washers come into play. These might seem minor, but a cheap caster wheel or a missing washer can undo all your hard work. For example, brake mechanisms need to be securely fastened to the castor install base to ensure they engage properly when you need to lock the structure in place.

Why "Good Enough" Isn't Enough: The Risks of Shoddy Attachment
You might be tempted to rush through attaching the castor install base—"It's just a few bolts, right?"—but cutting corners here can lead to bigger problems down the line. Let's break down the risks:
Safety First: Avoiding Accidents
A loose castor install base is a safety hazard waiting to happen. If the base shifts while someone is pushing a loaded trolley, the structure could tip, spilling contents or causing injury. In busy environments, even a small wobble can lead to collisions with other equipment or workers.
Efficiency Drain: Time Wasted on Fixes
Imagine spending 10 minutes every morning tightening loose lean pipe joints on your workbench because the castor install base wasn't secured properly. Multiply that by weeks or months, and you're losing hours of productive time. Worse, a wobbly structure might require frequent replacements of caster accessories (like wheels or brakes), adding unnecessary costs.
Damage Control: Protecting Your Investment
Lean pipe structures aren't cheap, and neither are the materials they carry. A poorly attached castor install base can cause the lean pipe itself to bend or crack over time, requiring full replacements instead of simple repairs. Sensitive components on a wobbly workbench might get scratched or dented, leading to product defects or waste.

Gearing Up: Tools and Materials You'll Need
Before you start, gather these tools and materials. Having everything on hand will save you trips to the toolbox and ensure the process goes smoothly.
| Tools | Materials |
|---|---|
| Adjustable wrench (or socket set, depending on bolt size) | Steel lean pipes (cut to your desired length) |
| Level (bubble or digital, for checking alignment) | Castor install base (matching the size of your lean pipe) |
| Tape measure (for precise spacing) | Lean pipe joints (fixed 90-degree joints recommended for stability) |
| Marker or pencil (for marking drill points) | Caster accessories: wheels, brakes, bolts, washers, and locknuts |
| Rubber mallet (for gently tapping joints into place) | Thread locker (optional, but recommended for long-term security) |
| Torque wrench (for precise bolt tightening, ideal for heavy-duty setups) | Sandpaper (to clean rust or debris from lean pipe surfaces) |
Pro Tip:
Always check the weight rating of your castor install base and lean pipe joints. If you're building a workbench that will hold 500 lbs, don't skimp on a base rated for 300 lbs—it's better to over-engineer than under-deliver.

Step-by-Step: Attaching the Castor Install Base to Steel Lean Tubes
Now, let's get to the hands-on part. Follow these steps, and you'll have a rock-solid connection in no time.
Step 1: Prep Work: Measure Twice, Drill Once
Start by measuring your steel lean pipes. If you're attaching castors to a workbench, for example, you'll need to decide where the castors go—usually at the corners for stability. Mark the spots on the lean pipe where the castor install base will attach, using a tape measure to ensure equal spacing (this prevents the structure from tilting). Clean the marked areas with sandpaper to remove rust, dirt, or oil—this helps the lean pipe joint grip better.
Next, check the castor install base itself. Are the pre-drilled holes aligned with the lean pipe joint's holes? If not, you may need to drill new holes (use a drill bit slightly smaller than the bolt diameter to avoid stripping). Lay the base flat on a work surface and test-fit the lean pipe joint to ensure everything lines up—now's the time to fix alignment issues, not later.
Step 2: Choosing the Right Lean Pipe Joint
Not all lean pipe joints are created equal. For castor install bases, fixed joints (like 90-degree or straight joints) are best—they don't swivel, so they keep the base rigidly attached to the lean pipe. Avoid using swivel or multi-angle joints here unless the design specifically calls for movement (which is rare for castor bases). If your setup uses multiple lean pipes (e.g., a rectangular frame for a trolley), use three-way or four-way lean pipe joints to connect the pipes at the corners, then attach the castor install base to the bottom of those joints.
Step 3: Aligning and Attaching the Base to the Lean Pipe
Now, position the castor install base against the marked spot on the lean pipe. Slide the lean pipe joint over the pipe and align its holes with the base's holes. insert the bolts through the joint and base, adding washers on both sides (this distributes pressure and prevents the bolt from digging into the metal). Tighten the bolts by hand first to ensure they thread correctly—cross-threading here is a common mistake that can ruin the joint.
Once hand-tight, use an adjustable wrench or socket set to snug the bolts. If you have a torque wrench, aim for the manufacturer's recommended torque (usually around 25-30 Nm for steel lean pipes and joints). Don't over-tighten—this can strip the threads or warp the castor install base. A good rule of thumb: stop when you feel resistance, then give it a quarter-turn more.
Step 4: Adding Caster Accessories: Wheels and Brakes
With the castor install base secured to the lean pipe, it's time to attach the caster accessories. Start by inserting the caster wheel into the base's mounting plate. Most wheels come with a stem or bolt that fits through the base—align it, then secure it with a locknut. Tighten the nut until the wheel spins freely but doesn't wobble side-to-side. If your casters have brakes, test them now: flip the brake lever and ensure it locks the wheel firmly. If it slips, check that the brake pad is aligned with the wheel's surface—adjust the nut slightly if needed.
Step 5: Testing the Setup: The "Wiggle, Roll, and Weight" Test
You're almost done, but don't skip this critical step. First, give the castor install base a firm wiggle—there should be no movement between the base and lean pipe. If it shifts, check the bolts and retighten. Next, roll the structure back and forth (if it's a trolley or mobile workbench). The wheels should spin smoothly, and the entire setup should move in a straight line—no veering or dragging. Finally, add weight to the structure (use sandbags or boxes to simulate your typical load) and test again. If the base holds without bending or creaking, you're good to go!
Troubleshooting: Fixing Common Hiccups
Even with careful work, issues can pop up. Here's how to fix the most common problems:
Problem: The Castor Install Base Wobbles
Cause: Loose bolts or misaligned lean pipe joint. Fix: Retighten the bolts with a wrench. If that doesn't work, check if the joint is centered on the lean pipe—shifting it slightly might improve alignment. Add thread locker to the bolts if they keep coming loose.
Problem: The Wheels Don't Roll Straight
Cause: Casters aren't aligned or the castor install base is bent. Fix: Use a level to check if the base is straight. If bent, replace it (a warped base can't be fixed). If the wheels are misaligned, loosen the bolts holding the caster to the base, realign the wheel, and retighten.
Problem: The Lean Pipe Bends Under Weight
Cause: The lean pipe is too thin or the castor install base is attached too high (creating leverage). Fix: replace the lean pipe with a thicker, higher-grade steel version. Attach the base as low as possible on the pipe to reduce bending stress.
Maintenance: Keeping It Tight for the Long Haul
Even the best attachment needs a little TLC. Here's how to maintain your setup:
- Weekly Checks: Give the castor install base and lean pipe joint a quick wiggle. Tighten any loose bolts with a wrench.
- Monthly Cleanup: Wipe down the lean pipe and joint with a dry cloth to remove dust and debris. If the pipe is PE-coated, avoid harsh chemicals that could damage the finish.
- Quarterly Inspections: Check caster accessories for wear—replace wheels with flat spots or brakes that no longer lock. Inspect the lean pipe for cracks or rust, especially near the joint.
- Annual Overhaul: For heavy-use structures (like factory trolleys), disassemble the castor install base and lean pipe joint, clean all parts, and replace any worn bolts or washers. Reassemble with fresh thread locker for extra security.
Real-World Example: Building a Mobile Workbench
Let's put this all together with a practical example: building a mobile workbench using steel lean pipes, a castor install base, and lean pipe joints. Here's how it might look:
1. Frame Assembly: Use four steel lean pipes (2m long each) and four-way lean pipe joints to build a rectangular frame (1.2m x 0.8m). Connect the joints at the corners to form the top frame, then add vertical lean pipes (0.8m long) at each corner to create the legs.
2. Adding the Castor Install Base: At the bottom of each vertical leg, attach a castor install base using fixed 90-degree lean pipe joints. Ensure the bases are all at the same height (use a level across the legs to check).
3. Installing Casters: Attach swivel caster wheels with brakes to each base—swivel wheels make the workbench easy to maneuver, while brakes lock it in place during use.
4. Testing: Load the workbench with tools (simulating daily use), roll it around the workshop, and test the brakes. If everything stays stable, you've built a workbench that's both mobile and secure!
Conclusion: The Small Step That Makes a Big Difference
Attaching a castor install base to steel lean tubes might seem like a small part of building a workspace, but it's the difference between a setup that frustrates and one that fuels productivity. By taking the time to align properly, choose the right lean pipe joints, and test thoroughly, you're not just "assembling parts"—you're creating a foundation for efficiency, safety, and reliability.
Remember: every tight bolt, aligned joint, and secure caster accessory adds up to a workspace that works for you, not against you. So next time you're setting up a lean pipe structure, give that castor install base the attention it deserves. Your team, your materials, and your bottom line will thank you.