- Company Articles
- Products and Technology
- Product knowledge
- How to Test the Durability of One Side Rotatory Parallel Lean Pipe Joints

How to Test the Durability of One Side Rotatory Parallel Lean Pipe Joints
Related Product
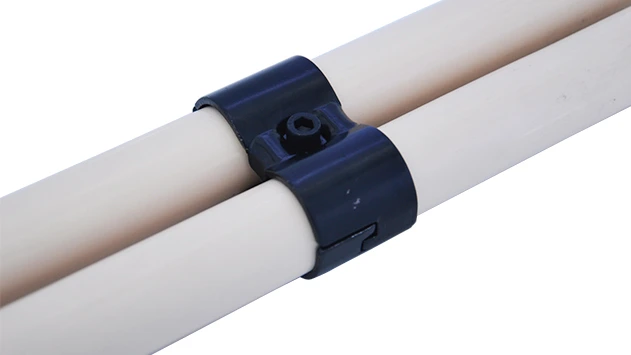
Parallel Lean Pipe Joint
Parallel lean pipe joint used for 2 pcs 28MM lean pipe connection in parallel direction to enhance frame structure, usually for heavy payload requirement for workbench. flow rack, hand trolley.
Introduction: The Unsung Hero of Lean Systems
Walk into any well-run manufacturing facility, and you'll likely spot a symphony of moving parts: conveyor belts gliding, workbenches holding tools, and material racks stacked with components. Behind this harmony lies a critical, often overlooked component: the lean pipe joint . These small connectors are the backbone of lean systems, holding together everything from aluminum lean pipe workbenches to roller track assemblies. But what happens when a joint fails? Imagine a production line grinding to a halt because a flimsy joint couldn't handle the daily wear—delays, frustrated workers, and lost revenue follow. That's why testing the durability of one side rotatory parallel lean pipe joints isn't just a "nice-to-do"—it's the difference between a smooth operation and a costly disaster.
One side rotatory parallel lean pipe joints are unique. Unlike fixed joints, they allow controlled rotation, making them ideal for adjustable workbenches, rotating material racks, and dynamic assembly lines. Their ability to pivot while maintaining stability is what makes them indispensable. But this flexibility also adds complexity to durability testing. How do you ensure a joint that moves daily can still withstand years of use? In this guide, we'll break down the process step by step, from understanding the joint's role in lean systems to conducting rigorous tests that mimic real-world stress. Whether you're a plant manager, a maintenance tech, or a lean system enthusiast, this article will equip you with the knowledge to keep your operations running—and your joints holding strong.
Understanding One Side Rotatory Parallel Lean Pipe Joints
Before diving into testing, let's get familiar with the star of the show: the one side rotatory parallel lean pipe joint. These joints are designed to connect two parallel lean pipes (often aluminum lean pipe or steel) while allowing one side to rotate around a fixed axis. Think of them as the "hinges" of the lean system world—they let sections of a workbench or roller track tilt, swivel, or adjust without disconnecting the entire structure. For example, a workbench with these joints might let operators rotate a tool tray for easier access, or a material rack could pivot to unload goods from different angles.
Most of these joints are made from die-cast aluminum or steel, coated with anti-corrosive finishes to withstand factory environments. They typically feature internal bearings or bushings to reduce friction during rotation, and their load capacity varies—from light-duty (for small workbenches) to heavy-duty (for conveyor systems). What sets them apart from standard joints is their dual role: they must both secure the pipes and allow smooth movement. This duality is where durability becomes tricky. A joint that's too stiff won't rotate; one that's too loose won't hold weight. Striking that balance requires careful testing.
Common applications include: adjustable workbenches (like the "Workbench E (single deck-without caster)" often used in electronics assembly), rotating roller tracks for material flow, and mobile turnover trolleys. In each case, the joint is subjected to a mix of static loads (weight sitting on the structure) and dynamic stress (movement, vibration, and repeated rotation). Over time, even small flaws—like a cracked bearing or a worn thread—can escalate into failure. That's why testing isn't just about checking if the joint works on day one; it's about ensuring it works consistently for months, or even years.

Key Factors That Make or Break Durability
Durability isn't a single trait—it's a combination of factors that determine how well a joint holds up over time. Let's break down the most critical ones:
Material Quality: Not all aluminum or steel is created equal. A joint made from low-grade aluminum might corrode quickly in humid factories, while a steel joint with a shoddy coating could rust. High-quality joints use aerospace-grade aluminum or stainless steel, with treatments like anodization (for aluminum) or zinc plating (for steel) to resist wear and corrosion.
Design Integrity: The joint's geometry matters. Look for rounded edges (to reduce stress points), reinforced connection points (where the joint attaches to the pipe), and precision-machined bearings. A poorly designed joint might have sharp corners that crack under pressure or loose tolerances that cause wobbling during rotation.
Load Capacity: Every joint has a maximum weight it can support, both statically (when stationary) and dynamically (when moving). Exceeding this capacity is a surefire way to shorten its lifespan. For example, a joint rated for 50kg shouldn't be used on a workbench holding 100kg of tools.
Environmental Stress: Factories are tough places. Dust, moisture, extreme temperatures, and even chemicals can degrade joints. A joint that works perfectly in a clean electronics lab might fail in a automotive shop with oil and grease. Testing must account for these real-world conditions.
Installation Quality: Even the best joint will fail if installed incorrectly. Over-tightening can strip threads; under-tightening leads to looseness. Using mismatched pipes (e.g., a 20mm joint with 15mm aluminum lean pipe) creates uneven stress. Testing should include checking how well the joint performs after proper vs. improper installation—though we always recommend proper installation, of course!

Tools You'll Need: Building Your Testing Kit
Testing durability isn't guesswork—it requires the right tools. Here's what you'll need to set up a basic testing station:
- Load Cell or Force Gauge: To measure how much weight the joint can handle before bending or breaking. Look for a digital gauge with a capacity of at least 2x the joint's rated load (e.g., a 100kg gauge for a 50kg joint).
- Torque Wrench: To simulate the tightness of pipe connections. Over-tightening is a common issue, so a torque wrench ensures you apply the manufacturer's recommended force (usually 15-25 Nm for aluminum joints).
- Durability Tester (or DIY Setup): A machine that can repeatedly rotate the joint to simulate months of use in hours. If you don't have a commercial tester, you can rig a setup with a motor, pulley, and timer to rotate the joint back and forth.
- Environmental Chamber (Optional but Ideal): To test resistance to humidity, temperature, or chemicals. For smaller operations, a simple spray bottle (for moisture) or heat lamp (for temperature) can work as a budget alternative.
- Visual Inspection Tools: A magnifying glass or digital microscope to check for cracks, wear, or deformation. A dial indicator helps measure small shifts in alignment after testing.
- Sample Joints and Pipes: Always test multiple samples (at least 3) to account for manufacturing variations. Use the same type of lean pipe (aluminum lean pipe is standard) and accessories (like end caps or clamps) that you'd use in real installations.
Pro tip: Label each sample with a unique ID (e.g., "Joint A-1," "Joint B-3") to track results. This helps spot patterns—like if all joints from a certain batch fail at the same load.
Step-by-Step Testing Process: From Setup to Results
Now, let's walk through the testing process. We'll cover five key tests, each targeting a different aspect of durability. For consistency, we'll use a heavy-duty aluminum one side rotatory parallel lean pipe joint (rated for 80kg static load) as our example.
1. Pre-Test Visual Inspection: The "First Impression" Check
Before applying any stress, inspect the joint closely. Look for:
- Cracks or dents in the metal (especially around the rotation axis).
- Loose or missing components (e.g., bearings, washers, or locking pins).
- Uneven plating or coating (signs of poor manufacturing).
- Smooth rotation by hand—there should be no "sticking" or grinding.
Record your observations (photos help!). Any red flags here mean the joint might fail early, even if it passes later tests.
2. Static Load Testing: How Much Weight Can It Hold?
Static load testing checks if the joint can support weight without deforming when stationary. Here's how to do it:
- Assemble the Test Rig: Connect the joint to two aluminum lean pipes (1m long each) using the recommended torque (e.g., 20 Nm). Mount one pipe horizontally to a sturdy frame (like a workbench) and leave the other pipe hanging vertically.
- Apply Load Gradually: Hang weight plates from the vertical pipe, starting at 25% of the rated load (20kg for our 80kg joint). Wait 5 minutes, then check for bending, cracks, or loosening.
- Increase Load: Add 10kg increments every 5 minutes until you reach 150% of the rated load (120kg). If the joint bends more than 2mm or cracks, it fails. If it holds, move to dynamic testing.
Why 150%? Because real-world use often includes sudden "shock loads"—like dropping a tool on the workbench. A joint that can handle 1.5x its rated load is less likely to fail in these scenarios.
3. Dynamic Rotation Testing: Simulating Months of Movement
Static load is important, but these joints are made to move. Dynamic testing simulates the wear and tear of daily rotation. Here's the setup:
- Reuse the Test Rig: Keep the joint connected to the aluminum lean pipes, but this time, attach the vertical pipe to a motorized arm that rotates it 90° back and forth (mimicking a workbench tray being adjusted).
- Add a Constant Load: Hang 50% of the rated load (40kg) on the vertical pipe—this mimics the weight of tools or materials during use.
- Set the Cycle: Rotate the joint 10,000 times (about 3 months of daily use, assuming 100 rotations/day). Track the rotation resistance—if it starts to feel stiffer or looser, note it.
-
Post-Cycle Inspection:
After 10,000 cycles, check for:
- Worn bearings (grinding or uneven rotation)
- Loose threads (the joint should still require the same torque to tighten)
- Metal fatigue (cracks around the rotation axis)
A passing joint should rotate smoothly with no visible damage. If it's stiff or cracked, it's not durable enough for long-term use.
4. Environmental Testing: Can It Handle the Factory Floor?
Factories aren't clean rooms. Dust, oil, and moisture can take a toll on joints. Let's test resistance to two common culprits: humidity and corrosion.
Humidity Test: Place the joint (still connected to pipes with 40kg load) in a sealed container with a damp sponge (to create ~85% humidity). Leave it for 72 hours. Afterward, check for rust, mold, or seized rotation.
Corrosion Test: For metal joints, spray a 5% saltwater solution (mimicking sweat or factory chemicals) on the joint daily for a week. Wipe it dry and check for pitting or discoloration. Aluminum joints should resist this well; steel joints may show surface rust, but it shouldn't affect functionality.
5. Final Torque and Load Check: Ensuring Long-Term Stability
After all tests, it's time for a final check. Re-tighten the joint with the torque wrench—if it requires less force than before (e.g., 15 Nm instead of 20 Nm), the threads may be worn. Then, repeat the static load test at 100% rated load (80kg). If the joint holds without issues, congratulations—it's durable!
What the Results Mean: Pass, Fail, or "Meh"?
Testing is only useful if you know how to interpret the results. Here's a quick guide to what's acceptable and what's not:
| Test Type | Pass Criteria | Fail Criteria |
|---|---|---|
| Static Load (150% rated) | No bending >2mm; no cracks | Bends >2mm; visible cracks |
| Dynamic Rotation (10,000 cycles) | Smooth rotation; no loose parts or cracks | Stiff/loose rotation; worn bearings |
| Humidity/Corrosion | No rust, mold, or seized movement | Heavy rust; rotation seized |
| Final Torque/Load | Same torque required; holds 100% load | Reduced torque needed; fails 100% load |
If a joint fails any test, ask: Is this a one-off defect (bad batch) or a design flaw? Test 2-3 more joints from the same supplier. If they all fail, it's time to look for a new lean pipe supplier—your lean system deserves better.
Pro Tips to Boost Durability (Beyond Testing)
Testing helps you pick the right joint, but proper use and maintenance will make it last even longer. Here are our top tips:
Choose the Right Material: Aluminum lean pipe joints are lighter and resist corrosion better than steel—ideal for humid or clean environments. Steel joints are stronger for heavy loads but need regular coating checks.
Don't Overload: Even a durable joint will fail if you exceed its rated load. Post the load limit on workbenches or racks as a reminder.
Lubricate Regularly: Apply a light machine oil to the joint's rotation axis every 3 months to reduce friction and wear.
Inspect Monthly: A quick 5-minute check for looseness, rust, or cracks can catch issues before they escalate. Tighten loose joints with a torque wrench—don't just "hand-tighten."
Pair with Quality Pipes: A great joint can't save a cheap, bendable pipe. Use aluminum lean pipe or steel pipes with a wall thickness of at least 1.5mm for best results.
Conclusion: Durability = Reliability = Profit
At the end of the day, testing the durability of one side rotatory parallel lean pipe joints isn't just about avoiding failures—it's about building a lean system that's reliable, efficient, and cost-effective. A joint that passes all these tests will keep your production line moving, your workers safe, and your maintenance costs low. Remember: the goal of lean manufacturing is to eliminate waste, and nothing wastes time or money like a broken joint.
So, the next time you're setting up a new workbench or upgrading your roller track, take a moment to test those joints. Your future self (and your bottom line) will thank you. After all, in the world of lean systems, the smallest components often make the biggest difference.