- Company Articles
- Products and Technology
- Product knowledge
- How to Test the Load Capacity of Four Way Straight Lean Pipe Joint in Your Facility

How to Test the Load Capacity of Four Way Straight Lean Pipe Joint in Your Facility
Related Product
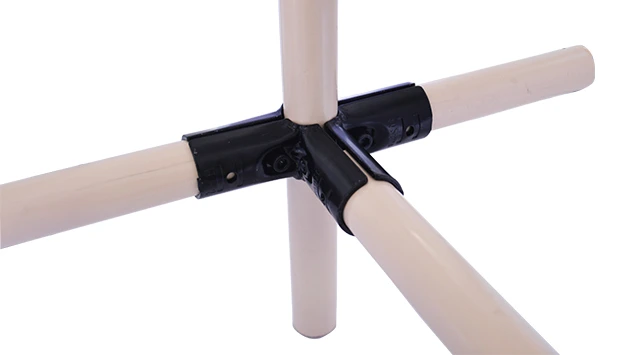
Four Way Straight Lean Pipe Joint
Four way lean pipe joint for 4 pcs 28MM lean pipe connection in straight angle, which used widely in workbench, flow rack, hand trolley frame connection.
In the fast-paced world of manufacturing, warehousing, and assembly, efficiency and reliability are the cornerstones of success. At the heart of many of these operations lies the lean pipe system—a versatile, modular solution that forms the backbone of workbenches, flow racks, roller tracks, and material handling structures. While the system's flexibility is a major advantage, its strength ultimately hinges on one critical component: the joints. Among these, the four way straight lean pipe joint stands out as a workhorse, connecting multiple pipes to create stable, multi-directional structures. But how do you ensure this small yet vital part can handle the demands of your facility? Testing its load capacity isn't just a box-checking exercise—it's a proactive step to prevent downtime, protect workers, and maintain the integrity of your entire lean system. In this guide, we'll walk through the why, how, and what of testing the load capacity of four way straight lean pipe joints, with practical steps, real-world insights, and safety at the forefront.
Understanding the Four Way Straight Lean Pipe Joint: A Hero
Before diving into testing, let's take a moment to appreciate the design and role of the four way straight lean pipe joint. Unlike simpler two-way or three-way joints, this component is engineered to connect four pipes in a straight, cross-like configuration—think of it as the intersection where horizontal and vertical pipes meet, distributing weight across multiple axes. Its design varies by material: some are made of durable plastic, others of metal alloys like zinc-plated steel or even aluminum profile for lightweight, corrosion-resistant applications. No matter the material, its job is simple yet critical: hold everything together, even when heavy tools, materials, or products are stacked on the structure it supports.
In a typical lean pipe system, you'll find these joints in high-stress areas: the corners of a lean pipe workbench, the vertical supports of a flow rack, or the junctions of a roller track system that moves boxes across a warehouse floor. Imagine a busy assembly line where workers rely on a lean pipe workbench loaded with electronic components—each time a technician places a 20kg toolbox on the bench, the four way joints beneath absorb that weight, transferring it to the floor via the supporting pipes. If a joint fails here, the bench could collapse, damaging equipment and risking injury. That's why understanding its load limits isn't just about engineering—it's about keeping your operation running smoothly.
Why Test Load Capacity? The Consequences of Cutting Corners
You might be thinking, "The manufacturer says this joint can handle 500kg—why test it myself?" While manufacturer specs are a good starting point, real-world conditions rarely match the controlled environments of a lab. Factors like improper installation (over-tightened or loose bolts), wear and tear from daily use, exposure to chemicals or moisture, or even minor defects in the joint itself can all reduce load capacity. For example, a joint that's been in service for a year, exposed to the vibrations of nearby machinery, might have developed micro-cracks invisible to the naked eye. Testing in your facility lets you account for these variables, ensuring the joint performs as expected in your specific setup .
The consequences of skipping this step can be costly. A failed joint might lead to damaged inventory, production delays, or worse, workplace accidents. In 2023, a automotive parts supplier reported a $200,000 loss after a lean pipe flow rack collapsed due to a weakened four way joint, destroying a batch of precision components and halting the line for two days. An investigation later revealed the joint had never been load-tested after installation, and corrosion from the facility's high humidity had compromised its integrity. Don't let that be your facility—testing is an investment in reliability.

Preparing for the Test: Safety, Tools, and Setup
Testing load capacity isn't something you do on a whim. Proper preparation ensures accurate results and, most importantly, keeps everyone safe. Let's break down the steps to get ready.
Step 1: Prioritize Safety First
Before touching any equipment, outline your safety protocol. This includes:
- Personal Protective Equipment (PPE): Safety glasses, steel-toed boots, gloves, and a hard hat are non-negotiable. If you're using hydraulic tools, add ear protection to muffle noise.
- Secure the Test Area: Use caution tape or barriers to keep unauthorized personnel out. Post signs warning of "Heavy Load Testing in Progress."
- Stabilize the Test Setup: The structure holding the joint during testing must be rock-solid. Use concrete anchors or heavy-duty weights to prevent tipping.
- Assign Roles: Have at least two people present: one to operate the testing equipment and a spotter to monitor the joint for signs of failure (bending, cracking, or shifting).
Step 2: Gather Your Tools
You'll need a mix of measuring, loading, and documentation tools. Here's your checklist:
- Load Application Tools: A hydraulic jack or manual winch to apply controlled weight, plus load cells (digital or analog) to measure force in kilograms or pounds.
- Measurement Tools: A dial indicator or laser level to track deflection (how much the joint bends under load), a tape measure for pipe lengths, and a torque wrench to check bolt tightness.
- Documentation Tools: A notebook or tablet for recording data, a camera or smartphone to take photos/videos of the joint during testing, and a calibration certificate for your load cell (to prove accuracy).
- Spare Parts: Extra bolts, washers, and a pipe cutter in case you need to adjust the test setup mid-process.
Step 3: select Your Test Sample
Which joint should you test? Ideally, use a sample that reflects real-world conditions. If you're testing for a new installation, use a brand-new joint from the same batch you'll be installing. If you're evaluating existing joints, pull one from a structure that's been in use (but avoid joints that are obviously damaged). For comparison, test multiple samples—new, used, and even a "control" joint straight from the manufacturer— to see how age affects performance.
Also, consider the materials. If your facility uses aluminum lean pipe, test an aluminum joint; if you have stainless steel pipe series, use a stainless steel joint. Material matters—aluminum is lighter but may have different load limits than steel.
Step 4: Build the Test Structure
To mimic how the joint performs in your facility, replicate its real-world setup. For example, if the joint will be part of a lean pipe workbench, build a small-scale version: attach four pipes to the joint (two horizontal, two vertical) using the same bolts and torque as you would on the shop floor. Ensure the pipes are cut to the same length as in your actual structure—longer pipes can flex more, affecting how the joint distributes weight. Secure the base of the vertical pipes to a sturdy platform (like a steel plate bolted to the floor) and leave the horizontal pipes free to support the test load.
Pro tip: Use a level to ensure the structure is plumb (vertical pipes straight up) and square (horizontal pipes at 90-degree angles to vertical ones). A crooked setup can skew results, making the joint seem weaker than it is.

Testing Methods: Static, Dynamic, and Cyclic Loads
Now that you're prepared, it's time to test. There are three primary methods to evaluate load capacity, each targeting different types of stress the joint might face. Let's explore each one.
| Test Method | Purpose | Equipment Needed | Step-by-Step Procedure | Key Metrics to Measure |
|---|---|---|---|---|
| Static Load Test | Measures how the joint handles a constant, non-moving load (e.g., stacked boxes on a shelf). | Hydraulic jack, load cell, dial indicator, level. |
1. Apply load gradually (50kg increments) to the horizontal pipes.
2. Pause for 5 minutes at each increment to let the joint settle. 3. Record deflection (bending) with the dial indicator. 4. Continue until the joint deforms permanently or fails. |
Maximum static load before deformation; deflection at 50%, 75%, and 100% of manufacturer's rated capacity. |
| Dynamic Load Test | Evaluates how the joint handles sudden, moving loads (e.g., a cart rolling onto a roller track). | Weighted trolley, roller track, load cell, high-speed camera. |
1. Place a weighted trolley on a roller track leading to the test structure.
2. Release the trolley from a set height to simulate impact. 3. Use the load cell to measure the force of impact on the joint. 4. Repeat with increasing trolley weights (10kg, 20kg, etc.). |
Impact force at which the joint loosens or cracks; noise/vibration during impact (unusual sounds may signal internal damage). |
| Cyclic Load Test | Tests durability under repeated loading/unloading (e.g., daily use of a lean pipe workbench). | Motorized load applicator, cycle counter, load cell. |
1. Apply a load equal to 75% of the manufacturer's rated capacity.
2. Unload completely, then reload—repeat this cycle 1,000 times. 3. After 1,000 cycles, check for cracks, loose bolts, or deformation. 4. If the joint holds, increase to 100% capacity and repeat. |
Number of cycles before failure; change in deflection after cycling (e.g., does the joint bend more after 500 cycles?) |
Static Load Test: The Foundation of Reliability
The static load test is the most common method, as it measures the joint's ability to handle steady, long-term weight—think of a shelf holding inventory for weeks at a time. Let's walk through it in detail.
Start by zeroing out your load cell and attaching it to the hydraulic jack. Position the jack under one of the horizontal pipes (the "loading arm") of the test structure. The dial indicator should be mounted on the opposite horizontal pipe, with its probe touching the joint—this will track how much the joint bends as you add weight.
Begin applying load in small increments (we recommend 50kg steps for joints rated up to 500kg). At each step, pause for 5 minutes to allow the joint to settle, then record the load and deflection. You'll notice that initially, the joint may bend slightly but spring back when the load is removed—this is "elastic deformation," which is normal. The red flag is "plastic deformation," where the joint doesn't return to its original shape after unloading. This is the point where the joint has been stressed beyond its limits.
Continue until the joint either deforms permanently or reaches the manufacturer's rated capacity. For example, if the spec says 500kg, keep going until 550kg to test for a safety margin. If the joint holds at 550kg with only minor elastic deformation, you've got a buffer—ideal for real-world use where loads can sometimes spike.
Dynamic Load Test: Simulating Real-World Impact
Static loads are predictable, but what about when a heavy cart slams into a roller track connected to the joint? That's where dynamic testing comes in. For this, you'll need a roller track (like the ones used in your facility) and a weighted trolley. Set up the roller track so that the trolley rolls directly into the horizontal pipe of the test structure, transferring its kinetic energy to the joint.
Start with a light trolley (10kg) and release it from a low height (10cm). As it hits the test structure, the load cell will measure the impact force, and your spotter will watch for signs of stress: creaking, shifting, or visible cracks. Gradually increase the trolley weight (20kg, 30kg) and height (20cm, 30cm) to simulate heavier, faster impacts. A joint that handles static loads well might fail here if its design isn't rigid enough—for example, plastic joints may crack under sudden impact, while aluminum profile joints might bend but not break.
Cyclic Load Test: Testing for Longevity
Even if a joint passes static and dynamic tests, it needs to hold up to daily use. The cyclic test mimics the wear and tear of repeated loading—like a worker placing tools on a lean pipe workbench 50 times a day. For this, a motorized load applicator (which can automatically apply and release load) is a time-saver, but you can do it manually if needed (though it's tedious!).
Set the applicator to apply 75% of the manufacturer's rated load (e.g., 375kg for a 500kg joint), hold for 10 seconds, then unload for 10 seconds. Repeat this cycle 1,000 times—this roughly equals six months of daily use. After 1,000 cycles, inspect the joint for loose bolts, cracks, or increased deflection. If it still performs like new, repeat the test at 100% capacity (500kg). A joint that survives 1,000 cycles at full load is a keeper—it's built to last.
Interpreting Results: What Do the Numbers Mean?
Once testing is done, you'll have a pile of data—now what? The goal is to answer one question: "Can this joint safely support the loads it will face in my facility?" Let's break down how to analyze the results.
Compare to Manufacturer Specs
Start by comparing your maximum static load to the manufacturer's rating. If your test shows the joint fails at 450kg but the spec says 500kg, there's a problem—either the joint is defective, your setup was off, or the manufacturer's numbers are optimistic. If it fails at 550kg, you've got a safety margin—great news. For dynamic loads, most manufacturers don't publish specs, so use your facility's typical impact forces as a benchmark (e.g., if carts in your warehouse rarely exceed 30kg at 20cm height, a joint that handles 40kg at 30cm is more than sufficient).
Look for Failure Modes
How the joint fails is just as important as when. Common failure modes include:
- Bolt Shear: The bolts holding the joint to the pipes snap. This suggests the bolts are underrated for the load—upgrade to higher-strength bolts.
- Joint Cracking: A crack forms in the joint body. This points to material weakness—consider switching to a metal joint (like aluminum profile) instead of plastic.
- Loosening: The joint slips on the pipes without breaking. This is usually due to under-tightened bolts—use a torque wrench to ensure proper tension during installation.
Account for Environmental Factors
Did you test in a hot, humid warehouse or a cool, dry workshop? Temperature and moisture can affect material performance. For example, plastic joints may become brittle in cold environments, while steel joints can corrode in high humidity, weakening over time. If your facility has extreme conditions, factor that into your results—you may need to derate the joint's capacity by 10-20% for safety.
Safety During Testing: Avoiding Accidents
We can't stress this enough: testing load capacity involves heavy weights and potential failure. Even with preparation, accidents can happen—here's how to stay safe.
Never Overload Beyond Reason: Pushing a joint to destruction is tempting to find its absolute limit, but it's risky. Stop testing once you see signs of plastic deformation (permanent bending) or hear unusual noises—further loading could cause the structure to collapse.
Secure the Load: If you're stacking weights on the test structure, use straps or chains to prevent them from falling if the joint fails. A 500kg weight crashing to the floor can crush feet or damage equipment.
Document Everything: If a joint fails, take photos from multiple angles and note the load, time, and conditions. This documentation can help the manufacturer investigate defects or improve their design—and protect you if there's a workplace incident later.
Real-World Application: From Test Results to Facility Design
So you've tested the joint and have the data—how does this inform your facility's lean pipe systems? Let's say your tests show the four way straight lean pipe joint can safely handle 450kg static load, 30kg dynamic impact, and 1,000 cycles at 400kg. Here's how to apply that:
- Lean Pipe Workbenches: If your workbenches typically hold 300kg of tools and materials, you've got a 150kg buffer—safe. Avoid overloading with 500kg items, even temporarily.
- Flow Racks: For a three-level flow rack using these joints, distribute weight evenly (150kg per level) instead of piling 400kg on one shelf. This reduces stress on individual joints.
- Roller Tracks: Limit trolley weights to 25kg (below the 30kg dynamic impact limit) to prevent joint damage over time.
You can also use test results to choose between joint materials. For example, if aluminum profile joints outperformed plastic ones in your dynamic tests, invest in aluminum for high-traffic areas like roller tracks. If stainless steel joints held up better in cyclic tests, use them in humid environments like food processing facilities.
Troubleshooting Common Issues: When Tests Don't Go as Planned
Not every test will give clear results. Here's how to handle common problems:
Results Are Inconsistent: If one joint holds 500kg and another (same model) fails at 400kg, there's likely a quality control issue with the manufacturer. Contact them for a replacement batch and retest.
Deflection Is Higher Than Expected: If the joint bends a lot under load but doesn't fail, it may still be usable—just avoid placing sensitive equipment (like electronics) on structures with high deflection, as movement can damage components.
Joint Fails at Well Below Spec: This could mean improper installation (e.g., using the wrong bolts) or a counterfeit product. Check that you used the manufacturer's recommended accessories (like specific nuts or washers) and verify the joint's authenticity with the supplier.
Conclusion: Testing as a Habit, Not a One-Time Task
Testing the load capacity of four way straight lean pipe joints isn't a one-and-done chore—it's part of a proactive maintenance strategy. As your facility grows, as loads change, or as joints age, repeat the tests to ensure they still meet your needs. A joint that performed well five years ago might not hold up today after thousands of cycles of use.
By investing time in testing, you're investing in the reliability of your lean pipe systems, the safety of your team, and the efficiency of your operation. After all, in manufacturing and warehousing, the smallest components often have the biggest impact—and a strong joint is the foundation of a strong facility.