- Company Articles
- Products and Technology
- Installation And Maintenance
- How to Troubleshoot Common Issues with One Side Rotatory Chrome Parallel Lean Pipe Joints

How to Troubleshoot Common Issues with One Side Rotatory Chrome Parallel Lean Pipe Joints
Related Product
Parallel Lean Pipe Joint
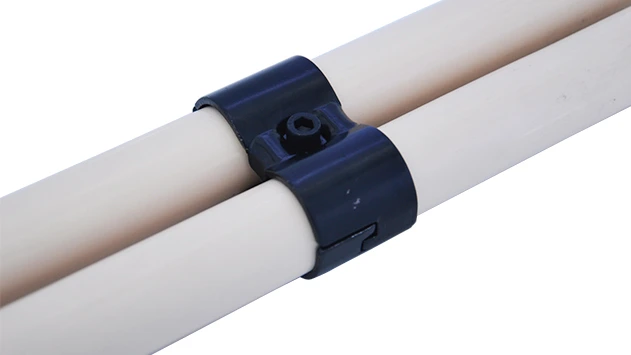
Parallel lean pipe joint used for 2 pcs 28MM lean pipe connection in parallel direction to enhance frame structure, usually for heavy payload requirement for workbench. flow rack, hand trolley.
Imagine walking onto a busy production floor: the hum of machinery, the rhythmic movement of assembly lines, and teams working in sync to meet the day's targets. At the heart of this efficiency is often a network of lean systems—workbenches, roller tracks, and material racks—all held together by components like the one side rotatory chrome parallel lean pipe joint. These unassuming little connectors might not grab attention, but when they fail, the whole operation can grind to a halt. A stiff joint slowing down a roller track, a loose connection making a workbench wobble, or corrosion eating away at a critical link—these are the kinds of problems that turn smooth workflows into frustrating delays.
Whether you're a maintenance technician, a production supervisor, or someone who just wants to keep their lean setup running like clockwork, understanding how to troubleshoot these joints is key. In this guide, we'll break down the most common issues with one side rotatory chrome parallel lean pipe joints, why they happen, and exactly how to fix them. We'll also share tips to prevent problems before they start, so you can spend less time troubleshooting and more time keeping your operations lean and efficient.
Understanding the One Side Rotatory Chrome Parallel Lean Pipe Joint
Before diving into troubleshooting, let's make sure we're all on the same page about what these joints are and why they matter. The one side rotatory chrome parallel lean pipe joint is a specialized connector used in lean manufacturing systems to join lean pipes (often steel or aluminum) into structures like workbenches, roller tracks, and material racks. Its "one side rotatory" design means one end can pivot, allowing for adjustable angles or movement in the structure—think of a workbench shelf that can tilt slightly to better access tools, or a roller track that needs to align with a conveyor at a gentle angle.
The "chrome" finish isn't just for looks; it adds a layer of protection against corrosion and wear, making the joint durable enough for daily use in industrial environments. And "parallel" refers to its ability to keep connected pipes aligned in parallel, ensuring stability in the overall structure. When paired with aluminum pipe accessories or other lean pipe components, these joints become the backbone of flexible, customizable workspaces—exactly what lean systems are all about.
Real-World Example: The Assembly Line Workbench
A typical electronics assembly line might use a workbench built with lean pipes and one side rotatory chrome parallel lean pipe joints. The joint allows the upper shelf to rotate 30 degrees, making it easier for workers to grab components without straining. If that joint seizes up, workers have to reach farther, slowing down each task and increasing the risk of errors. Multiply that by 50 workers over a shift, and suddenly a small joint issue becomes a big productivity problem.
Now that we know why these joints are important, let's look at the most common issues you might encounter—and how to fix them.
Common Issues and How to Troubleshoot Them
Like any mechanical component, one side rotatory chrome parallel lean pipe joints face wear and tear over time. Let's walk through the top problems, their root causes, and step-by-step solutions.
1. Stiff or Jerky Rotation
One of the most frustrating issues is when the joint's rotating side becomes stiff, making it hard to adjust, or starts moving in a jerky, uneven way. This is especially common in joints that are used frequently—like those on adjustable workbenches or movable roller track sections.
Symptoms:
- You have to use extra force to rotate the joint (it might feel "stuck").
- There's a grinding or squeaking noise when moving the joint.
- Rotation is uneven—sometimes smooth, sometimes suddenly tight.
Common Causes:
Dirt, dust, or debris buildup in the joint's rotating mechanism is the number one culprit. Over time, particles from the production environment (like metal shavings, sawdust, or even grease residue) can work their way into the small gaps between the joint's moving parts, creating friction. Another cause is a lack of lubrication—without proper oil or grease, the metal-on-metal contact wears down surfaces, leading to stiffness. In rare cases, the joint might be bent or misaligned, but this is usually due to impact or overloading.
Troubleshooting Steps:
- Clean the joint thoroughly: Start by wiping away any visible dirt with a dry cloth. For stubborn grime, use a soft-bristled brush (an old toothbrush works well) to gently scrub the crevices around the rotating mechanism. Avoid using harsh chemicals, as they can damage the chrome finish—warm, soapy water (dish soap is fine) on a damp cloth is safer. Dry the joint completely with a clean towel to prevent moisture buildup.
- Check for debris in the rotation points: Look closely at where the rotating side meets the fixed side—there might be small particles lodged there. Use compressed air (from a can or air compressor) to blow out any remaining dust or dirt. Be careful not to use too much pressure, as this could damage delicate parts.
- Lubricate the joint: Apply a small amount of lubricant designed for metal joints—silicone-based lubricants or light machine oil work best (avoid heavy greases, which can attract more dirt). Put a drop or two on the pivot points, then manually rotate the joint back and forth several times to work the lubricant in. Wipe away any excess to prevent dust from sticking.
- Inspect for damage: If cleaning and lubricating don't fix the issue, check if the joint is bent or warped. Look for visible signs of deformation, like a misaligned rotating plate or a cracked housing. If you see damage, the joint will likely need to be replaced—bending it back into shape can weaken the metal and lead to future failures.
Troubleshooting in Action: The Stiff Roller Track Joint
A maintenance tech notices that a section of roller track used to feed parts to an assembly line isn't rotating smoothly. Workers have to push harder to move bins along the track, causing delays. The tech follows the steps above: first, they clean the joint with a brush and soapy water, removing a buildup of metal shavings and oil residue. Then they spray compressed air to clear out a small piece of plastic that was stuck in the pivot. A drop of silicone lubricant later, the joint rotates like new—and the roller track is back to gliding smoothly.
2. Loosening or Instability
Another common problem is the joint coming loose over time, leading to wobbling in the structure it's holding together. This is dangerous because a loose joint can make a workbench, rack, or roller track unstable, risking damage to materials or even injury to workers.
Symptoms:
- The joint shifts or moves when pressure is applied (e.g., when placing a heavy bin on a rack).
- The structure feels wobbly—for example, a workbench top rocks when you lean on it.
- You hear rattling noises from the joint during operation (common in roller tracks or conveyors with vibrating parts).
Common Causes:
Loosening is often caused by vibration. In busy production environments, constant movement (from machinery, foot traffic, or even nearby conveyors) can shake the joint's fasteners loose over time. Improper installation is another culprit—if the joint wasn't tightened enough during setup, it will start to wiggle almost immediately. Worn threads on the joint's bolts or nuts can also lead to loosening, as the connection can no longer grip securely.
Troubleshooting Steps:
- Tighten the fasteners: Start by checking the bolts or screws that hold the joint together. Use the right tool—a wrench or screwdriver that fits the fastener head (using the wrong size can strip the head). Tighten them firmly, but don't overdo it—over-tightening can strip threads or crack the joint's plastic or metal housing.
- Check for worn threads: If the fastener spins without getting tighter, the threads are likely worn. Remove the bolt or screw and inspect the threads—if they're flattened, bent, or stripped, replace the fastener with a new one of the same size and material (chrome-plated steel is best for compatibility).
- Use thread-locking adhesive: For joints in high-vibration areas (like near motors or heavy machinery), apply a small amount of thread-locking adhesive (like Loctite) to the fastener threads before tightening. This prevents the bolt from loosening due to vibration, but still allows for future removal if needed (use a medium-strength formula—permanent adhesives can make disassembly impossible).
- Inspect the joint's mating surfaces: Sometimes, the joint itself isn't loose, but the lean pipe it's connected to is slipping. Check if the pipe is securely inserted into the joint—if it's wiggling, remove it, clean the pipe and joint interior, then reinsert and tighten. For extra grip, you can wrap a small piece of Teflon tape around the pipe (avoid overdoing it, as this can make removal hard later).
3. Corrosion or Rust
Even with a chrome finish, these joints can develop corrosion or rust, especially in humid environments, areas with chemical exposure (like cleaning agents), or where moisture isn't quickly dried.
Symptoms:
- Small reddish-brown spots (rust) on the chrome surface.
- Pitting or flaking of the chrome finish, exposing the underlying metal.
- A sticky or gritty feeling when rotating the joint (rust particles can act like sandpaper, causing more damage).
Common Causes:
Moisture is the main enemy here. Leaks, spills, or high humidity can get trapped in the joint's crevices, leading to oxidation. Chemicals like degreasers or cleaning solutions (especially acidic ones) can also eat away at the chrome plating, making the metal vulnerable. In some cases, the chrome finish might have been scratched during installation, creating a weak spot for corrosion to start.
Troubleshooting Steps:
- Clean the affected area: For light rust spots, mix equal parts white vinegar and water, dip a soft cloth in the solution, and gently rub the rust. The acid in vinegar helps dissolve rust without damaging chrome. For tougher spots, use a chrome polish or a paste made from baking soda and water (apply with a cloth, rub in a circular motion, then rinse and dry).
- Remove pitting or flaking: If the chrome has started to flake, use fine-grit sandpaper (400-600 grit) to gently sand the area, feathering the edges to smooth out rough spots. Be careful not to sand too hard—you don't want to remove more chrome than necessary. After sanding, clean the area with soap and water, dry thoroughly, and apply a chrome sealant to protect the exposed metal.
- Prevent future corrosion: Apply a thin coat of car wax or chrome protectant to the joint after cleaning. This creates a barrier against moisture and chemicals. In humid areas, consider installing a dehumidifier near the lean system, or wiping down joints with a dry cloth at the end of each shift to remove condensation.
- replace severely damaged joints: If the corrosion has eaten through the chrome and into the underlying metal (you'll see deep pitting or holes), the joint is compromised. Rust weakens the metal, making the joint prone to breaking. In this case, replace the joint immediately—safety first!
4. Misalignment with Connected Pipes
Sometimes, the joint itself works fine, but the pipes it's connecting are misaligned—either not parallel or at the wrong angle. This can put extra stress on the joint, leading to premature wear, stiffness, or even breakage.
Symptoms:
- The joint looks "crooked"—one pipe is higher or lower than the other, or they're not straight.
- The structure feels unstable, even when all fasteners are tight.
- Other components (like roller track guides or workbench shelves) don't line up correctly with the joint.
Common Causes:
Misalignment usually happens during installation—if the pipes are cut to uneven lengths, or the joint is forced into place instead of aligned properly. Over time, uneven loading (e.g., placing all heavy items on one side of a workbench) can also pull the joint out of alignment. In some cases, the lean pipe itself might be bent, causing the joint to sit at an angle.
Troubleshooting Steps:
- Check pipe lengths: Use a tape measure to ensure the lean pipes on either side of the joint are the same length. If one is longer, the joint will tilt to compensate. replace the shorter pipe with a properly cut one, or adjust the position of adjacent joints to balance the length.
- Realign the joint: Loosen the fasteners holding the joint to the pipes, then gently adjust the pipes until they're parallel and straight. Use a level to check—place the level along the top of the pipes to ensure they're even horizontally, and along the side to check vertical alignment. Once aligned, retighten the fasteners.
- Inspect for bent pipes: Roll the lean pipe on a flat surface—if it wobbles, it's bent. replace bent pipes, as straightening them rarely works perfectly and can weaken the metal. For aluminum pipes (a common alternative to steel), bending is even more risky, as aluminum is more brittle than steel.
- Redistribute the load: If the misalignment is due to uneven loading, rearrange materials on the structure to spread weight evenly. For example, on a material rack, place heavy bins on lower shelves and lighter items on upper ones to reduce stress on joints.
5. Damage to Joint Components (Cracks, Breaks, or Missing Parts)
Accidents happen—maybe a heavy bin slams into a joint, or a tool is dropped on it. Over time, this can lead to cracks, breaks, or missing parts (like a lost washer or broken pivot pin).
Symptoms:
- Visible cracks in the joint's plastic or metal housing.
- Parts falling off (e.g., a washer, cotter pin, or pivot pin).
- The joint feels "floppy" or no longer holds its position when rotated.
Troubleshooting Steps:
The fix here depends on the severity of the damage:
- replace missing small parts: If a washer, cotter pin, or screw is missing, find a replacement of the same size and material. Hardware stores or lean pipe suppliers often carry these small parts—keep a stock on hand for quick fixes.
- Repair minor cracks (for plastic components): If the joint has a small crack in a plastic housing (some joints have plastic covers), you can use epoxy glue designed for plastics. Clean the area, apply the epoxy, clamp the crack closed, and let it dry fully (follow the glue's instructions). Note: This is a temporary fix—replace the joint as soon as a new one arrives, as plastic cracks can spread under stress.
- replace the joint for major damage: For metal cracks, broken pivot pins, or large chunks missing, replacement is the only safe option. A damaged joint can't support the weight of the lean system, putting workers and materials at risk. When replacing, make sure to get the exact same model—different brands or sizes might not fit your existing pipes or accessories.

Quick Reference Troubleshooting Table
| Issue | Common Causes | Key Symptoms | First Step to Fix | When to replace the Joint |
|---|---|---|---|---|
| Stiff rotation | Dirt buildup, lack of lubrication, bent joint | Hard to turn, grinding noise | Clean and lubricate the joint | If bent or cracked |
| Loosening | Vibration, improper installation, worn threads | Wobbling structure, rattling noise | Tighten fasteners; use thread lock | If threads are stripped or housing is cracked |
| Corrosion/rust | Moisture, chemical exposure, scratched chrome | Rust spots, pitting, flaking chrome | Clean with vinegar or polish; apply protectant | If pitting is deep or metal is weakened |
| Misalignment | Uneven pipe lengths, bent pipes, uneven loading | Crooked pipes, extra stress on joint | Realign pipes; check for bent sections | If pipes are bent beyond repair |
| Damage (cracks, breaks) | Impact, overloading, wear and tear | Visible cracks, missing parts, "floppy" movement | replace missing parts; use epoxy for small plastic cracks | For metal cracks, broken pins, or large damage |

Preventive Maintenance: Keep Joints Working Longer
The best way to deal with joint issues is to prevent them from happening in the first place. A little regular maintenance goes a long way in extending the life of your one side rotatory chrome parallel lean pipe joints.
Create a Maintenance Schedule
Set up a routine to inspect and service joints. How often? It depends on usage: joints on high-traffic roller tracks or adjustable workbenches might need weekly checks, while those on stationary racks can be checked monthly. Assign a team member to lead the inspections—consistency is key.
Clean and Lubricate Regularly
Make cleaning and lubricating part of the routine. Wipe down joints with a dry cloth to remove dust, then apply lubricant every 2-3 months (more often in dirty or humid environments). This prevents dirt buildup and keeps rotation smooth.
Train Teams on Proper Use
Many joint issues stem from misuse—like overloading a workbench or forcing a stiff joint to rotate. Train your team to:
- Never stand or sit on lean system structures (they're not designed for human weight).
- Avoid slamming bins or tools into joints.
- Report stiff, loose, or damaged joints immediately (don't wait for them to break).
Stock Spare Parts
Keep a small inventory of replacement joints, fasteners, and lubricants on hand. This way, you can fix issues quickly without waiting for a supplier to deliver. Label parts clearly so anyone can grab what they need in an emergency.
Conclusion: Small Joints, Big Impact
One side rotatory chrome parallel lean pipe joints might be small, but they play a huge role in keeping your lean system running smoothly. By understanding the common issues—stiff rotation, loosening, corrosion, misalignment, and damage—and how to troubleshoot them, you can minimize downtime, extend the life of your lean system, and keep your production floor efficient.
Remember: regular maintenance is always better than emergency repairs. A quick check of joints during your daily walkthrough, a little cleaning and lubrication, and prompt replacement of damaged parts can save you time, money, and headaches in the long run. And when in doubt, don't hesitate to reach out to your lean pipe supplier—they can help you find the right replacement parts or offer advice on tricky issues.
So the next time you pass by a workbench or roller track, take a second to appreciate those little chrome joints. With the right care, they'll keep your lean system—and your team—moving forward.