- Company Articles
- Products and Technology
- Solution
- How to Upgrade Your Workshop with Aluminum Workbench D: A Step-by-Step Plan

How to Upgrade Your Workshop with Aluminum Workbench D: A Step-by-Step Plan
Related Product
Aluminum Workbench D
Aluminum tube workbench is more flexible and durable, compared with traditional PE/ABS coated steel tube. It is easy to assemble, anti corrosion, rust protection, and recycle use after disassemble.
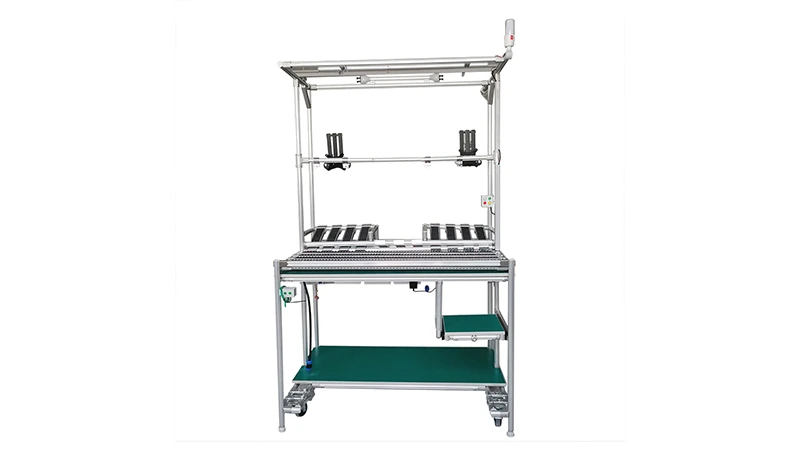
Let's start with a scenario we've all lived (or worked) through: It's 9 a.m. on a Tuesday, and your workshop floor is already humming with activity—though "chaos" might be a more accurate word. The old steel workbench in Station 3 is wobbly, its surface scarred from years of use, and tools keep sliding off the edge. Over at Station 5, the team is crowded around a rickety wooden table, juggling parts, manuals, and half-finished assemblies because there's no built-in storage. By lunchtime, you've had three requests for more space, two complaints about missing tools, and one frustrated engineer muttering, "This setup is costing us hours." Sound familiar? If your workshop feels like a patchwork of quick fixes instead of a streamlined operation, you're not alone. But here's the good news: The solution might be simpler than a full-scale renovation. It starts with a single, powerful upgrade: Aluminum Workbench D.
Aluminum Workbench D isn't just another piece of equipment—it's a quiet revolution in how workshops function. Designed with the messy, dynamic reality of production floors in mind, it's built to turn disorganization into efficiency, wasted time into productivity, and frustration into focus. In this guide, we'll walk through exactly how to integrate Aluminum Workbench D into your space, step by step. Whether you're running a small electronics assembly line, a automotive parts shop, or a custom manufacturing studio, this plan will help you transform your workflow from "surviving" to "thriving." Let's dive in.
Why Aluminum Workbench D? The Case for Ditching "Good Enough" Workbenches
Before we get to the "how," let's talk about the "why." Why spend time and resources upgrading to Aluminum Workbench D when your current setup "works"? The answer lies in the difference between "working" and "working well." Traditional workbenches—wooden, steel, or even basic plastic models—often come with hidden costs: they're heavy, hard to customize, prone to damage, or incompatible with modern lean system principles. Aluminum Workbench D, on the other hand, is built to solve these pain points from the ground up. Here's what makes it stand out:
| Feature | Aluminum Workbench D | Traditional Wooden Workbench | Standard Steel Workbench |
|---|---|---|---|
| Weight | Lightweight (easy to reposition) | Heavy (fixed in place) | Extremely heavy (requires machinery to move) |
| Durability | Scratch-resistant, rust-proof aluminum extrusion profile | Prone to warping, staining, and splintering | Resistant to dents but prone to rust if not treated |
| Customization | Modular design; compatible with aluminum profile accessories (shelves, tool hooks, bins) | Limited—requires drilling or permanent modifications | Basic add-ons, but limited flexibility |
| Lean System Fit | Designed for 5S principles (sort, set in order, shine, standardize, sustain) | Often cluttered; hard to maintain organization | Sturdy but lacks built-in workflow optimization |
| Long-Term Cost | Lower—no replacement needed for 10+ years | High—needs replacement every 3–5 years | Moderate—rust and weight limit lifespan |
The table tells the story: Aluminum Workbench D isn't just better—it's smarter. Its aluminum extrusion profile (that's the technical term for the precision-engineered aluminum framework) is both lightweight and industrial-strength, meaning you can move it when your layout changes but trust it to hold heavy tools or parts. And because it's modular, you're not stuck with a "one-size-fits-all" design. Need a shelf for small parts? Add it. Want a tool rail for hanging wrenches? Screw it on. It grows with your needs, not against them.
But perhaps the biggest win is how it aligns with lean system principles. Lean manufacturing is all about eliminating waste—whether that's wasted time, space, or motion. Aluminum Workbench D is built to cut that waste at the source. Its smooth, non-porous surface is easy to clean (no more scrubbing oil stains out of wood), its built-in storage keeps tools within arm's reach (no more walking across the shop to grab a screwdriver), and its ergonomic height reduces bending or straining (cutting down on fatigue and errors). In short, it's not just a workbench—it's a tool for making your entire operation leaner, calmer, and more profitable.
Step 1: Audit Your Current Workspace (No Judgment, Just Data)
Before you order a single part, you need to understand your workshop's unique needs. This isn't about criticizing your current setup—it's about gathering the data to make Aluminum Workbench D work for you . Grab a notebook, a tape measure, and maybe a cup of coffee, and walk through these questions:
What's Working (and What's Not)?
Start by observing your team in action. Where do they pause, sigh, or mutter under their breath? Is it when they have to reach across the table for a tool? When parts roll off the edge? When they can't find a place to set their laptop? Jot down these pain points. For example: "Station 2: Engineer spends 5 minutes/day picking up dropped screws" or "Station 4: Team uses 3 separate bins for parts—wastes time sorting."
Next, note what is working. Maybe your current workbench at Station 1 has a great height, or Station 6 has a shelf that everyone loves. You don't need to throw out the good stuff—Aluminum Workbench D can build on it.
Measure Your Space (Yes, Actually Measure It)
It sounds obvious, but you'd be surprised how many people skip this step. Grab that tape measure and note the exact dimensions of the area where the new workbench will go. Width, depth, ceiling height (if you're adding overhead shelves), and even clearance around the space (can people walk behind it? Open a door nearby?). Aluminum Workbench D comes in standard sizes, but if your space is tight, you might need a custom cut. Better to know now than after the workbench arrives and you realize it's 6 inches too wide.
Pro tip: Sketch a quick floor plan. Mark where doors, windows, power outlets, and existing equipment are. This will help you visualize how Aluminum Workbench D will fit—and avoid "oops, it blocks the power cord" moments later.
Ask Your Team: "What Would Make Your Day Easier?"
Your team uses the workbench more than anyone—so ask them what they need. Hold a quick 10-minute huddle and pose the question: "If we could design the perfect workbench for your station, what features would it have?" You'll get answers you never considered. A machinist might ask for a built-in magnet strip to catch metal shavings. An assembler might want a tilted surface to keep parts from sliding. A quality control inspector might need a light bar for better visibility. These insights will turn a "good" upgrade into a "game-changing" one.
Case in point: A small electronics shop in Ohio did this and learned their team was wasting 20 minutes/day hunting for small screws. They added a set of drawer dividers to their Aluminum Workbench D order—and cut that waste to zero. Your team's input is gold; don't skip this step.
By the end of this audit, you should have a clear list of: pain points to solve, space constraints, and must-have features. Now you're ready to move to Step 2: choosing the right Aluminum Workbench D model.

Step 2: Pick Your Aluminum Workbench D Model (It's More Than Just "A" Workbench)
Aluminum Workbench D isn't a single product—it's a family. There are different configurations to fit different needs, and choosing the right one depends on what you learned in your audit. Let's break down the most common models and which scenarios they work best for:
Model 1: Workbench D (Single Deck—Without Caster)
This is the base model: a sturdy, fixed workbench with a single flat surface. It's ideal if your workspace is permanent (no need to move it) and you need maximum stability. Think: heavy machinery assembly, where the workbench needs to stay put while tools vibrate or parts are hammered into place. It's also the most budget-friendly option, making it great for small workshops or teams just starting their lean journey.
Best for: Fixed stations, heavy-duty tasks, tight budgets.
Model 2: Workbench D (Single Deck—With Casters)
Same great surface, but with locking casters (those swiveling wheels with brakes) for mobility. This is perfect if your layout changes often—say, if you run custom projects and need to reconfigure stations for different orders. The casters lock securely, so it won't roll while you work, but unlock in seconds when you need to move it. We've seen teams use this model to create "mobile work cells" where everything they need (tools, parts, workbench) moves as a unit—cutting down on walking time dramatically.
Best for: Flexible layouts, custom manufacturing, teams that collaborate across stations.
Model 3: Workbench D (Dual Deck—With Shelves)
This model adds a lower shelf (or two!) for storage, making it a space-saver's dream. The upper deck is for working; the lower deck holds bins, manuals, or even small equipment. It's ideal for stations where parts are small and numerous—like electronics assembly or jewelry making. One customer in Texas told us this model cut their "time spent hunting for parts" by 40% because everything had a designated spot on the shelf.
Best for: Small parts, high-storage needs, clutter-prone stations.
Once you've picked a model, it's time to think about add-ons. Aluminum Workbench D is compatible with a range of workbench accessories that turn it from "great" to "exactly what I needed." Here are the most popular ones, based on workshop feedback:
- Tool Rails: A metal bar that mounts to the back of the workbench, with hooks for hanging tools. No more digging through drawers—wrenches, pliers, and tape measures hang right where you can see them.
- Drawer Dividers: Small, adjustable dividers that fit into the lower shelf or optional drawers. Perfect for organizing screws, nuts, or washers by size or type.
- LED Light Bars: Slim, under-shelf lights that brighten the work surface. Great for detailed tasks like soldering or inspecting small parts—no more squinting in dim light.
- ESD Mats: If you work with electronics, an anti-static mat (ESD stands for "electrostatic discharge") prevents static electricity from damaging sensitive components. Aluminum Workbench D's surface is ESD-compatible, so the mat lays flat and stays put.
Pro tip: Start with the basics, then add accessories later. You can always bolt on a tool rail or add a shelf six months down the line—Aluminum Workbench D is designed to be upgraded as your needs evolve.

Step 3: Assemble Like a Pro (Yes, Even If You're Not Handy)
Here's the part that makes most people nervous: putting it all together. Let's be honest—some assembly instructions read like they were written by robots, with tiny diagrams and zero context. But Aluminum Workbench D is different. Its aluminum profile system is designed for "click-and-connect" simplicity, even if you've never built anything more complex than a bookshelf. Here's how to do it in 5 easy steps:
Step 3.1: Unbox and Organize (Yes, This Matters)
When your Aluminum Workbench D arrives, it will come in a few boxes: one for the aluminum extrusion profiles (the frame pieces), one for the work surface, and one for the hardware (screws, joints, etc.). Start by emptying all boxes and laying out the parts on a clean, flat surface (a tarp or old blanket works to protect floors). Check the included manual to make sure you have everything—there should be a parts list with pictures. If something's missing, contact your supplier immediately (most keep spares in stock for quick shipping).
Pro move: Use small bowls or zip-top bags to sort screws and joints by size. Nothing slows down assembly like hunting for a tiny bolt in a pile of parts.
Step 3.2: Build the Frame (Start with the Legs)
The frame is the skeleton of your workbench, and it starts with the legs. Take four aluminum profile legs (they'll be the longest, straightest pieces) and attach them to the corner brackets using the included bolts. The brackets are pre-drilled, so you just line up the holes and tighten the screws with a hex key (included in the hardware kit). Tighten them until they're snug—you don't need to overdo it (aluminum is strong but can dent if you crank too hard).
Once the legs are attached to the brackets, stand the frame upright. It should feel steady—if it wobbles, check that all bolts are tight and the legs are aligned.
Step 3.3: Add the Work Surface (The "Wow, That Was Easy" Moment)
The work surface is a pre-cut aluminum or composite panel (depending on your model) that sits on top of the frame. Lift it into place (get a friend to help if it's large!) and line up the pre-drilled holes in the panel with the holes in the frame. Then, screw in the surface bolts—these are extra-long to ensure the panel doesn't shift. Tighten them in a "star" pattern (top-left, bottom-right, top-right, bottom-left) to keep the surface even.
Now, step back. You've got a basic workbench! It should look sturdy, clean, and ready to use. Pat yourself on the back—you're halfway there.
Step 3.4: Install Add-Ons (Shelf, Tool Rail, Etc.)
This is where you customize. If you ordered a shelf, attach the shelf brackets to the legs (using the same hex key) and then place the shelf panel on top. For a tool rail, measure where you want it (most people put it along the back edge, at shoulder height), mark the holes, and screw it into the frame. Remember: The aluminum extrusion profile has T-slots (those long, narrow grooves along the sides) that let you attach accessories anywhere—no drilling required. Just slide a T-nut into the slot, line up your accessory, and tighten the screw. It's like magic, but for workshops.
Step 3.5: Test It Out (Jump on It… Maybe Not, But Definitely Shake It)
Before you start using it, give your workbench a quick stress test. Push on the corners—does it wobble? If yes, check the bolts. Place a heavy object (like a toolbox or a bag of parts) on the surface—does it bow? It shouldn't (Aluminum Workbench D is rated to hold up to 500 lbs). If you added casters, roll it around the shop and lock the brakes—does it stay put? Perfect. You're ready to roll (literally, if you have casters).
Total assembly time? For a basic model, about 1–2 hours (even if you're taking your time). For a model with shelves and casters, maybe 2–3 hours. That's it. No welding, no power tools, no headaches. Just a few bolts, a hex key, and a little patience.
Step 4: Integrate into Your Workflow (Lean System 101)
You've built your Aluminum Workbench D—now what? The real magic happens when you weave it into your daily workflow, using lean system principles to eliminate waste. Here's how to make it stick:
Map Your Workflow (Yes, Draw It Out)
Take a piece of paper and draw the steps your team takes to complete a task at the new workbench. For example: "1. Grab parts from bin → 2. Place on workbench → 3. Assemble → 4. Test → 5. Place finished product in tote." Now, mark where tools, parts, and waste (like packaging) go at each step. The goal? Make sure everything your team needs is within "arm's reach" or "eye level." Tools should hang on the tool rail, parts in bins on the shelf, and waste in a bin under the bench. This cuts down on "motion waste"—the time spent walking, reaching, or bending.
Example: A team in Michigan mapped their workflow and realized they were walking 15 feet to grab a torque wrench 12 times a day. They added a tool hook to their Aluminum Workbench D, and suddenly, that 15-foot walk disappeared. Over a week, that saved 180 feet of walking—and 10 minutes of time. Small change, big impact.
Label Everything (No, It's Not Overkill)
Lean systems thrive on clarity, and labels are your best friend. Use adhesive labels or magnetic tags to mark where each tool, part, or bin goes on your Aluminum Workbench D. For example: "Screwdriver #2 → Tool Rail, Hook 3" or "10mm Nuts → Shelf Bin, Left." This does two things: It makes it easy for anyone (new hires included) to find what they need, and it ensures tools get put back where they belong (no more "I thought it went there!" arguments).
Pro tip: Use color-coding for bins—red for "needs inspection," green for "ready to use," yellow for "spare parts." It adds a visual cue that speeds up decision-making.
Train Your Team (Yes, Even the "Veterans")
Change is hard, even when it's good. Some team members might resist using the new workbench because "the old way worked fine." That's normal! Schedule a 15-minute training session where you walk through the new setup: show them where tools go, explain the labels, and highlight the benefits ("See how the shelf keeps parts from rolling off? No more picking up screws!"). Let them test it out—have someone assemble a simple part on the new bench and time it, then compare to the old setup. The proof is in the productivity.
One shop owner in Arizona told us his team was skeptical until they ran a "race": assembling a small circuit board on the old workbench vs. Aluminum Workbench D. The new bench won by 3 minutes—and the skeptics became converts.
Step 5: Maintain It (So It Lasts Decades, Not Years)
Aluminum Workbench D is built to last, but like any tool, it needs a little love to stay in top shape. The good news? Maintenance is minimal—no fancy cleaners or specialized tools required. Here's your 5-minute daily and monthly routine:
Daily: Wipe It Down
At the end of each shift, have your team wipe the work surface with a damp cloth (mild soap and water is fine for most messes). This removes oil, grease, or dirt that can build up over time. For sticky spots (like dried glue or tape residue), use a plastic scraper (not metal—you don't want to scratch the aluminum) and a little rubbing alcohol.
Pro move: Keep a spray bottle of soapy water and a stack of rags under the shelf for easy access. Make it part of the "end-of-shift checklist" so it doesn't get forgotten.
Monthly: Tighten Bolts and Check Casters
Once a month, grab your hex key and do a quick bolt check. Over time, vibrations from tools or movement can loosen screws—tighten them until they're snug (but not over-tightened, as aluminum can strip). If you have casters, check that the wheels spin smoothly and the brakes work. A drop of lubricating oil on the caster axles (if they start squeaking) will keep them rolling like new.
Annually: Inspect for Wear (And Upgrade If Needed)
Once a year, take a close look at your workbench. Are there any deep scratches on the surface? (If so, sand them lightly with fine-grit sandpaper and apply a coat of aluminum polish.) Are the aluminum extrusion profiles bent or dented? (Unlikely, but if yes, contact your supplier—they can replace individual parts.) And ask yourself: Has your team's needs changed? Maybe you need to add a second shelf, or swap out the fixed legs for casters. Aluminum Workbench D is designed to evolve, so don't be afraid to tweak it.
Follow this routine, and your Aluminum Workbench D will outlast most of the equipment in your shop. We've heard from customers who've had theirs for 12+ years, still going strong.
The Ripple Effect: What Happens After You Upgrade
By now, you're probably thinking, "This all sounds great, but will it really make a difference?" Let's let the numbers (and stories) speak for themselves. Here's what real workshops experienced after switching to Aluminum Workbench D:
- Productivity Up by 20–30%: A auto parts manufacturer in Indiana reported a 25% increase in units assembled per day after upgrading 5 stations to Aluminum Workbench D. Why? Less time searching for tools, fewer errors from disorganized parts, and less fatigue from awkward bending.
- Tool Loss Down by 70%: A small electronics shop in Oregon used to lose 3–5 tools a month (costing $200+ in replacements). After adding tool rails and labels to their Aluminum Workbench D, tool loss dropped to 1 per quarter.
- New Hire Training Time Cut in Half: A furniture manufacturer in North Carolina said new assemblers used to take 2 weeks to get up to speed. With labeled, organized Aluminum Workbench D stations, that dropped to 1 week—because they could focus on learning the job, not the setup.
- Team Morale Boost: This one's harder to quantify, but just as important. "People actually want to work at the new stations," one manager told us. "The old benches felt like a punishment; these feel like someone cared about making our jobs easier." Happier teams are more engaged, more creative, and less likely to quit—all wins for your bottom line.
These aren't outliers—they're the norm. Aluminum Workbench D doesn't just change how you work; it changes how you feel about work. When your space is organized, your tools are handy, and your team is supported, the whole workshop hums. Stress levels drop, smiles increase, and suddenly, that "chaos" you started with feels like a distant memory.
Your Turn: Start Small, Think Big
Upgrading your workshop doesn't have to mean shutting down for weeks, hiring contractors, or breaking the bank. It can start with one workbench—Aluminum Workbench D—and grow from there. By following the steps in this guide, you'll transform a single station into a productivity hub, then use what you learn to roll out changes across the shop.
So, what's next? Grab that notebook from Step 1, schedule 30 minutes to audit your workspace, and reach out to a supplier to get a quote for Aluminum Workbench D. (Pro tip: Ask if they offer a demo model—some suppliers will let you test one in your shop for a week before buying.)
Remember: Every lean, efficient workshop started with a single decision to stop settling for "good enough." Today, that decision is yours. Your team deserves a workspace that works for them, not against them. Aluminum Workbench D is how you give it to them.
Here's to calmer mornings, smoother workflows, and a workshop that doesn't just keep up—leads the way.