- Company Articles
- Products and Technology
- Installation And Maintenance
- Installation Guide: 38 Aluminum Roller Track White with Wheel Flange

Installation Guide: 38 Aluminum Roller Track White with Wheel Flange
Related Product
38 Aluminum Roller Track White with Wheel Flange
Heavy duty roller tracks with flanged plastic rollers for use in processing, logistics and materials handling operations. Ideal for transporting goods quickly and easily as well as for installing on shelving to aid in picking operations.
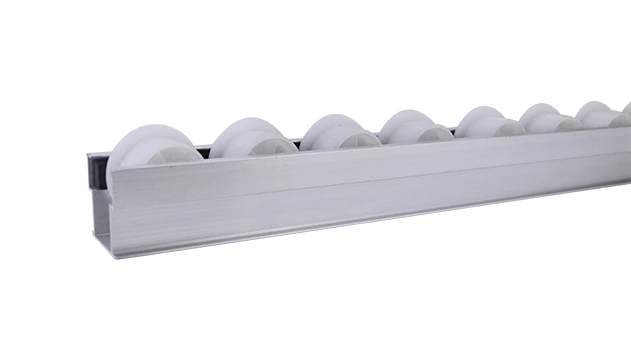
Welcome to our step-by-step installation guide for the 38 Aluminum Roller Track White with Wheel Flange! Whether you're setting up a new flow rack in your warehouse, upgrading a conveyor system on your production line, or integrating this track into a custom lean solution, this guide will walk you through every detail to ensure a smooth and successful installation. This roller track is designed with durability, flexibility, and ease of use in mind—its aluminum construction keeps it lightweight yet sturdy, the white finish adds a clean look to any workspace, and the wheel flange ensures items stay securely on track as they move. Let's dive in!
Before we get started, let's take a moment to understand why this roller track is such a popular choice. It's a key component in many lean manufacturing setups, helping teams streamline processes, reduce waste, and improve efficiency. Whether you're handling small parts in a 3C assembly line or moving boxes in a warehouse, this track can adapt to your needs. Its compatibility with various aluminum profile accessories makes it easy to integrate into existing systems or build new ones from scratch. Now, let's get ready to install!
Pre-Installation Preparation
Tools You'll Need
| Tool Name | Purpose |
|---|---|
| Phillips-head screwdriver | Tightening screws on roller track connectors |
| Adjustable wrench | Securing nuts and bolts |
| Measuring tape | Measuring installation area and track lengths |
| Level | Ensuring track is straight and aligned |
| Permanent marker | Marking positions for connectors and tracks |
| Gloves | Protecting hands during installation |
| Eye protection | Preventing debris from getting into eyes |
| Clean cloth | Wiping down tracks and components before installation |
Safety First
Before starting any installation work, it's crucial to prioritize safety. Here are a few key safety tips to keep in mind:
- Wear gloves and eye protection at all times to avoid cuts from metal edges or debris.
- Ensure your workspace is clear of any obstacles or tripping hazards.
- If you're working at height (e.g., installing tracks on upper levels of a rack), use a stable ladder and have a helper assist you.
- Check all components for damage before installation—do not use bent, cracked, or broken parts.
- Follow the manufacturer's guidelines for weight limits to prevent overloading the track.
Unboxing and Component Check
First, unbox all your components and lay them out on a flat, clean surface. This will help you easily identify each part and ensure nothing is missing. Here's what you should have:
- 38 Aluminum Roller Track White with Wheel Flange sections (quantity depends on your order)
- Roller track connectors (matching the number of track joints)
- Screws and nuts for securing connectors
- End caps (optional, for finishing the ends of the track)
- Aluminum profile accessories (if you're mounting the track onto aluminum profiles)
Take a moment to inspect each component. The roller tracks should be straight with no bent rollers, the connectors should be free of cracks, and all hardware should be intact. If you notice any damage or missing parts, contact your supplier immediately before proceeding.
Step-by-Step Installation
Step 1: Plan Your Layout
Before you start attaching any components, take time to plan your layout. Measure the area where you'll install the roller track—whether it's a flow rack, conveyor, or custom structure. Mark the positions where each track section will go using a permanent marker. Consider the direction items will move (e.g., from left to right, top to bottom) and ensure the track is aligned to facilitate smooth movement. If you're installing multiple parallel tracks, make sure they're evenly spaced to accommodate the size of the items you'll be moving.
For example, if you're setting up a flow rack for small parts bins, you might need several parallel tracks spaced a few inches apart. If you're integrating this track into a conveyor system, align it with the existing conveyor components to create a seamless path. Taking the time to plan now will save you time and frustration later!
Step 2: Prepare the Mounting Surface
Next, prepare the surface where you'll mount the roller track. If you're attaching it to aluminum profiles (a common choice for lean solutions), ensure the profiles are securely fastened and level. Use a level to check the surface—even a small tilt can cause items to roll unevenly or get stuck. If you're mounting the track onto a wooden or metal frame, make sure the frame is sturdy and can support the weight of the track and the items that will move on it.
Clean the mounting surface with a dry cloth to remove any dust, dirt, or debris. This will help the connectors adhere properly and prevent any particles from getting into the rollers later.
Step 3: Connect Track Sections
Now it's time to connect the roller track sections using the roller track connectors. Each connector is designed to join two track sections securely. Here's how:
- Take two track sections and place them end-to-end on your flat surface.
- Slide the roller track connector into the end of one track section. Make sure it fits snugly—you should feel a slight click when it's in place.
- Align the second track section with the connector. Push it into place until the two sections are flush.
- Use a Phillips-head screwdriver to tighten the screws on the connector. Be careful not to over-tighten, as this could damage the aluminum track.
- Repeat this process for all track sections until you have the desired length.
Pro tip: If you're working with a long track, have a helper hold the sections in place while you connect them. This will ensure they stay aligned and make the process easier.
Step 4: Mount the Track to the Frame
Once your track sections are connected, it's time to mount the track to your frame. Depending on your setup, you might use aluminum profile accessories like brackets or clamps to secure the track. Here's a general method:
- Place the connected track onto the mounting surface, aligning it with the marks you made earlier.
- Position the aluminum profile accessories (e.g., brackets) at regular intervals along the track—about every 12 inches is a good rule of thumb. This will ensure the track is supported evenly.
- Mark the positions of the brackets on the frame using a permanent marker.
- Secure the brackets to the frame using screws and a wrench. Make sure they're tight but not over-tightened.
- Place the track onto the brackets and secure it using the provided hardware. Again, tighten the screws until they're snug.
If you're mounting the track onto a conveyor system, follow the specific instructions for your conveyor model. The key is to ensure the track is level and aligned with the rest of the conveyor to create a smooth transition for items.
Step 5: Adjust Alignment and Test Movement
After mounting the track, it's crucial to check the alignment and test the movement of items. Here's how:
- Use a level to check that the track is perfectly horizontal. If it's tilted, adjust the brackets or mounting surface until it's level.
- Place a test item (like a small box or bin) on one end of the track. Gently push it to see if it rolls smoothly to the other end. The item should move without getting stuck or veering off the track (thanks to the wheel flange).
- If the item gets stuck, check for any debris in the rollers or misaligned track sections. Clean the rollers with a dry cloth and adjust the track as needed.
- If the item veers off the track, check the alignment of the wheel flange. Ensure it's positioned correctly to guide the item along the track.
Repeat this test several times with different items to ensure the track works well for your specific needs. This step is essential to catch any issues before you start using the track in your daily operations.
Step 6: Secure All Connections
Once you're satisfied with the alignment and movement, double-check all connections to make sure they're tight. Go through each connector and bracket, tightening any loose screws or nuts. This will prevent the track from shifting or coming apart during use.
If you're using end caps, now is the time to install them. Simply slide the end cap onto the end of the track until it fits snugly. End caps add a finished look and prevent items from falling off the ends of the track.

Troubleshooting Common Issues
Even with careful installation, you might encounter some issues. Here are solutions to the most common problems:
1. Rollers Are Stuck or Not Rolling Smoothly
Causes: Debris in the rollers, lack of lubrication, or bent rollers.
Solutions: - Clean the rollers with a dry cloth to remove any dust or dirt. - Apply a small amount of light lubricant (like silicone oil) to the rollers. Avoid using heavy oils that can attract dust. - If a roller is bent, replace it with a new one. Bent rollers can cause items to get stuck or damage the track.
2. Items Veer Off the Track
Causes: Misaligned track, loose wheel flange, or uneven mounting surface.
Solutions: - Check the track alignment with a level and adjust as needed. - Tighten the screws on the wheel flange to ensure it's securely attached. - Ensure the mounting surface is level and stable.
3. Track Sections Separate
Causes: Loose connectors or overloading the track.
Solutions: - Tighten the screws on the roller track connectors. - Check the weight limit of the track and avoid overloading it with heavy items.
4. Brackets or Clamps Come Loose
Causes: Over-tightening, vibration from use, or incorrect hardware.
Solutions: - Use the correct size screws and nuts for the brackets. - Tighten the hardware to the recommended torque (check the manufacturer's guidelines). - If vibration is an issue, add lock washers to the screws to prevent them from loosening.

Maintenance Tips for Longevity
Proper maintenance will keep your 38 Aluminum Roller Track White with Wheel Flange in top condition for years to come. Here are some tips:
1. Regular Cleaning
Clean the rollers and track surface weekly with a dry cloth. This removes dust, dirt, and debris that can affect performance. For stubborn dirt, use a mild detergent and water, then dry thoroughly.
2. Lubrication
Lubricate the rollers every month with a light silicone oil. This keeps them rolling smoothly and prevents rust. Avoid using petroleum-based lubricants, as they can damage the aluminum.
3. Inspection
Inspect the track monthly for any signs of wear or damage. Check for bent rollers, loose connectors, or worn brackets. replace any damaged parts immediately to prevent further issues.
4. Weight Management
Always follow the weight limit of the track. Overloading can cause the track to bend or break, leading to costly repairs and downtime.
5. Storage
If you need to store the track, keep it in a dry, cool place away from direct sunlight. Avoid stacking heavy items on top of the track, as this can bend the rollers.
Conclusion
Congratulations! You've successfully installed your 38 Aluminum Roller Track White with Wheel Flange. This track is a versatile and reliable component that will help you optimize your workflow, whether you're using it in a flow rack, conveyor system, or custom lean solution. By following this guide, you've ensured a safe and effective installation that will serve your team well for years to come.
Remember, regular maintenance is key to keeping your track in great shape. By cleaning, lubricating, and inspecting it regularly, you'll minimize downtime and maximize efficiency. If you have any questions or need further assistance, don't hesitate to reach out to your supplier for support.
Thank you for choosing our 38 Aluminum Roller Track White with Wheel Flange. We hope it helps you achieve your lean manufacturing goals and streamline your operations. Happy working!