- Company Articles
- Products and Technology
- Installation And Maintenance
- Installation Guide: 4080 Aluminum Profile End Caps for Material Rack B

Installation Guide: 4080 Aluminum Profile End Caps for Material Rack B
Related Product
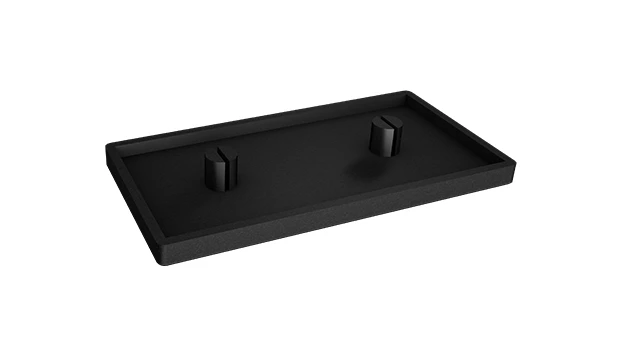
4080 Aluminum Profile End Cap
The aluminum profile end cap adds a finishing touch to your project and closes off profile ends to limit dust and debris buildup, also it can avaid some scratch for material and labor during the assemble work.
Introduction: Why End Caps Matter for Your Material Rack B
Let's start with a simple question: Have you ever run your hand along the edge of an aluminum extrusion profile and felt that sharp, unfinished edge? Ouch. Now imagine that same edge on a busy factory floor, where Material Rack B (3 row and 3 floor) holds heavy materials and team members move quickly to grab parts. That's where the 4080 aluminum profile end cap comes in—not just as a "finishing touch," but as a silent protector, a detail that turns a functional rack into a safe, polished, and professional workspace.
Material Rack B, with its three rows and three floors, is a workhorse in many production lines. It's designed to keep materials organized, accessible, and flowing smoothly—key principles of lean system design. But even the sturdiest racks need attention to detail. The 4080 aluminum extrusion profile, which forms the frame of Material Rack B, is strong and durable, but its open ends can catch on gloves, scratch equipment, or even cause minor injuries. End caps seal those ends, creating a clean look while adding a layer of safety that matters more than you might think.
In this guide, we're going to walk through installing 4080 aluminum profile end caps on your Material Rack B step by step. Whether you're setting up a new rack or upgrading an existing one, this process is straightforward, but doing it right ensures your rack stays safe, functional, and ready for years of use. We'll cover tools, prep work, common pitfalls, and even maintenance tips—because the best installations are the ones that last.
Preparation: What You'll Need Before You Start
Before diving into installation, let's gather your tools and materials. Think of this like baking a cake—skipping a tool is like forgetting the flour; it might still work, but it won't turn out as well. Here's what you'll need:
| Tool/Material | Purpose | Pro Tip |
|---|---|---|
| 4080 Aluminum Profile End Caps | To seal the open ends of the 4080 aluminum extrusion profile | Check the quantity: Material Rack B has 4 vertical posts per frame—grab extra caps in case of drops or misfits! |
| Clean Cloth or Microfiber Towel | To wipe down the profile ends before installation | Use a mild detergent (like dish soap) if there's grease or dust buildup—dirt can prevent a tight fit. |
| Rubbing Alcohol (Optional) | For extra cleaning on oily or sticky ends | Let it dry completely before installing the end cap—moisture can weaken the seal. |
| Soft Mallet or Rubber Hammer | To gently tap the end cap into place (if needed) | Avoid metal hammers—they can crack the end cap or dent the aluminum profile. |
| Measuring Tape (Optional) | To confirm the profile size is 4080 (40mm x 80mm) | Double-check if you're unsure—end caps are size-specific, and a 3030 cap won't fit a 4080 profile! |
Safety First:
Before starting, make sure Material Rack B is empty and stable. If it's already loaded with materials, unload it to avoid shifting during installation. Wear gloves to protect your hands from sharp edges—even if you're installing end caps to cover them!

Step-by-Step Installation: Putting the 4080 End Caps on Material Rack B
Now that you're prepped, let's get to work. This process takes about 10–15 minutes per rack, even if you're new to it. Take your time, and remember: patience here means a better, longer-lasting result.
Step 1: Inspect the End Caps and Profile Ends Start by laying out your 4080 aluminum profile end caps on a clean surface. Look for cracks, warping, or defects—even small flaws can affect how well they fit. Next, examine the open ends of the 4080 aluminum extrusion profile on Material Rack B. Are there burrs (tiny metal flakes) from cutting? If so, gently sand them off with fine-grit sandpaper (220 grit works best). Burrs can prevent the end cap from seating properly, leading to a loose fit later.
Step 2: Clean the Profile Ends Thoroughly Remember that clean cloth we mentioned earlier? Now's its time to shine. Wipe the inside and outside of each profile end to remove dust, oil, or metal shavings. If the ends are greasy (common in factory settings), dampen the cloth with rubbing alcohol, wipe, and let dry for 1–2 minutes. Why does this matter? Dirt acts like a barrier—if there's grime between the end cap and the profile, the cap might pop off over time, especially if the rack vibrates during use.
Step 3: Align the End Cap with the Profile Hold the end cap in one hand and the profile end in the other. Notice that the end cap has a slightly tapered edge? That's the "leading edge" that goes into the profile first. Tilt the end cap at a 45-degree angle, and slide the tapered edge into the profile opening. You should feel a slight resistance—that's the cap beginning to grip the inner walls of the aluminum extrusion profile.
Pro Alignment Trick:
If the end cap feels "stuck" before it's fully seated, don't force it. Check if the profile is bent (uncommon, but possible) or if there's leftover debris. A quick re-clean often fixes this!
Step 4: Press or Tap the End Cap into Place Once the tapered edge is in, use your thumbs to press the end cap firmly into the profile. Apply even pressure around the edges—imagine you're closing a jar lid; uneven pressure can cause the cap to sit crookedly. If the cap is tight (which is good!), gently tap it with the soft mallet. Tap around the edges , not the center—tapping the center might crack the cap. You'll know it's seated when the end cap is flush with the profile edge, and there are no gaps between the cap and the profile.
Step 5: Test the Fit and Repeat Give the end cap a gentle tug. It should stay firmly in place—no wiggling or popping out. If it moves, repeat steps 2–4: clean again, realign, and press/tap more evenly. Once one end is done, move to the next profile end on Material Rack B. The rack has vertical posts (the 4080 profiles) at each corner—don't forget the top and bottom ends of each post! For a 3-row, 3-floor rack, that's typically 8 vertical posts (4 corners, each with top and bottom ends), so 16 end caps total. Take your time—rushing here means you might miss a cap, leaving an exposed edge.

Troubleshooting: Common Issues and How to Fix Them
Even with careful prep, things can go wrong. Let's troubleshoot the most common issues you might run into:
Issue 1: The End Cap Is Too Loose and Falls Off
This is usually due to one of two things: either the profile end wasn't clean, or the end cap is the wrong size. First, check if you're using a 4080 end cap—mixing up sizes (like using a 3030 end cap on a 4080 profile) will cause a loose fit. If the size is correct, re-clean the profile end with rubbing alcohol, let it dry, and try pressing the cap in again with more even pressure. If it still falls off, the end cap might be defective (rare, but possible)—grab a new one and try again.
Issue 2: The End Cap Is Too Tight and Won't Seat Fully
Sometimes, end caps have slight manufacturing variations, or the profile end is slightly bent. First, check for burrs—even a tiny metal flake can block the cap. Sand the inside of the profile end gently with 220-grit sandpaper, then clean again. If that doesn't work, warm the end cap slightly with your hands (body heat is enough) to soften the plastic slightly—this makes it more flexible. Don't use heat tools (like hair dryers)—you could melt the cap!
Issue 3: The End Cap Cracks When Tapping
Cracking usually happens if you tap too hard, tap the center of the cap, or use a metal hammer. If a cap cracks, replace it immediately—even a small crack weakens the fit and leaves sharp edges. Next time, use a softer mallet (rubber or silicone works best) and tap only around the edges of the cap, not the middle. Think of it like tapping a nail into wood—you aim for the head, not the shaft.
Issue 4: The Profile End Is Damaged (Dented or Bent)
If the 4080 aluminum extrusion profile is bent at the end, the end cap won't seat properly. For minor dents, use a rubber mallet to gently tap the profile back into shape (support the other side of the profile with a block of wood to avoid bending it further). For major damage, you might need to cut off the damaged end with a hacksaw (wear gloves and eye protection!) and then deburr the new end before installing the cap.
Maintenance: Keeping Your End Caps (and Rack) in Top Shape
Installing end caps is just the first step—keeping them in place ensures your Material Rack B stays safe and looking great. Here's how to maintain them:
Regular Inspections
Every month, take 5 minutes to check the end caps on your Material Rack B. Look for cracks, looseness, or missing caps. In high-traffic areas, caps can get knocked loose by forklifts, pallet jacks, or heavy materials. Tighten any loose caps by pressing them firmly into place—if they won't stay, replace them. A quick monthly check prevents small issues from becoming big safety hazards.
Cleaning the End Caps
Dust and grime can build up on end caps over time, making them look dull. Wipe them down with a damp cloth during your regular rack cleaning—no harsh chemicals needed (they can damage the plastic). For stubborn stains, a little mild soap and water works wonders. Clean end caps not only look better but also last longer—grime can degrade the plastic over time.
Replacing Worn-Out Caps
Even the best end caps wear out eventually. If a cap is cracked, discolored, or won't stay in place, replace it immediately. Keep a few extra 4080 aluminum profile end caps in your toolbox—you never know when you'll need one. When replacing, follow the same installation steps: clean the profile end, align, and press firmly. It's a 2-minute fix that keeps your rack safe.
Pro Maintenance Hack:
If your Material Rack B is in a humid or corrosive environment (like near cleaning chemicals), consider using
stainless steel end caps
instead of plastic. They're more durable and resistant to rust, though they cost a bit more. For most dry factory settings, standard plastic 4080 end caps work great!
Conclusion: Small Details, Big Impact on Your Lean System
Installing 4080 aluminum profile end caps on Material Rack B might seem like a small task, but it's a perfect example of how lean system thinking works—focusing on the details that make a workspace safer, more efficient, and more professional. A rack with exposed edges isn't just a safety risk; it sends a message that "good enough" is acceptable. But a rack with neatly capped ends? That says you care about your team, your equipment, and the quality of your work.
As you finish up, step back and look at your Material Rack B. The 4080 aluminum extrusion profiles now have clean, smooth ends, the aluminum profile accessories (like connectors and brackets) blend seamlessly, and the entire rack feels more polished. Your team will notice—maybe not consciously, but they'll feel safer moving around it, and that confidence translates to better productivity.
So, the next time you walk past Material Rack B, give those end caps a little nod. They're not just plastic pieces—they're a reminder that great work starts with the details. And isn't that what lean system design is all about?