- Company Articles
- Products and Technology
- Installation And Maintenance
- Installation Guide for 3030b EU Standard Aluminum Profile: Step-by-Step Process

Installation Guide for 3030b EU Standard Aluminum Profile: Step-by-Step Process
Related Product
3030B EU Standard Aluminum Profile
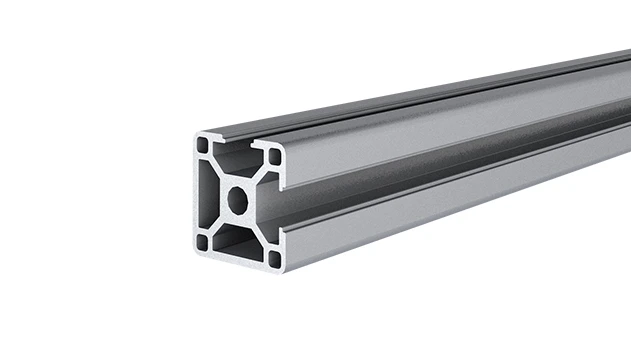
3030 is a 3.00 x 3.00CM fractional 30 series square extrusion T-slot profile with two side open T-slots, each side with 3.00cm face, 2 side with open slot, 2 side with closed face. The profile has align-a-grooves to assist in aligning connecting profiles.
If you've ever walked into a well-organized workshop, a sleek retail display, or a high-efficiency manufacturing line, chances are you've seen the handiwork of aluminum profiles in action. Lightweight, durable, and endlessly customizable, these metal frameworks are the unsung heroes of modern workspace design. And among the most popular players in this space? The 3030b EU Standard Aluminum Profile. Whether you're building a sturdy workbench, a modular shelving unit, or a custom machine guard, this profile offers the perfect blend of strength and flexibility. But here's the thing: even the best materials fall flat without proper installation. That's where this guide comes in. Today, we're breaking down the entire process of installing 3030b profiles—no jargon, no guesswork, just clear, friendly steps to help you build something that lasts. We'll cover everything from gathering your tools to tightening the final bolt, with plenty of pro tips along the way. Let's dive in!
Understanding the 3030b EU Standard Aluminum Profile
Before we grab our wrenches, let's take a quick second to get to know the star of the show: the 3030b EU Standard Aluminum Profile. At first glance, it might look like just another metal bar, but there's a lot of thought packed into its design. The "3030" refers to its dimensions: 30mm in width and 30mm in height—slim enough to fit in tight spaces but robust enough to support heavy loads. The "b" in 3030b denotes a specific groove design (those T-slots you see running along its length), which is standardized across EU markets, meaning it plays nice with a wide range of aluminum profile accessories. These T-slots are where the magic happens: they let you slide in bolts, brackets, and connectors without drilling extra holes, making customization a breeze.
What sets the 3030b apart? For starters, its aluminum construction keeps it lightweight (about 1.4kg per meter, depending on wall thickness) but surprisingly strong—think: able to support 50-80kg per linear meter when properly braced. It's also resistant to corrosion, so you won't have to worry about rust eating away at your project, even in damp garages or industrial environments. And because it's part of the EU standard system, you'll never struggle to find compatible parts. From brackets to end caps, the ecosystem of aluminum profile accessories is vast, which means your 3030b frame can evolve with your needs over time. Whether you're a DIY hobbyist or a seasoned facility manager, this profile is designed to work with you, not against you.
Tools & Materials: What You'll Need to Get Started
Ever tried to bake a cake without a mixing bowl? Frustrating, right? The same goes for installing aluminum profiles—having the right tools and materials upfront saves you from mid-project trips to the hardware store (and a whole lot of sighing). Let's break this down into two lists: the tools you'll need to get your hands on, and the materials (including those all-important aluminum profile accessories) that make up your project.
Essential Tools
- Allen Wrench Set (Hex Keys): Most aluminum profile connectors use hex bolts, so a set with sizes ranging from 2mm to 6mm is a must. Pro tip: Get a set with ball-end wrenches—they're lifesavers for tight angles.
- Tape Measure & Carpenter's Square: Precision is key here. A 5-meter tape measure will handle most projects, and a carpenter's square ensures your corners stay perfectly 90° (no wobbly frames allowed).
- Level (2ft or Longer): Even the sturdiest frame will feel off if it's not level. A bubble level or laser level helps you catch tilts before they become problems.
- Hacksaw or Miter Saw (with Aluminum Blade): If your profiles need cutting to length, a hacksaw works in a pinch, but a miter saw with a fine-tooth aluminum blade will give cleaner, faster cuts.
- Deburring Tool or Sandpaper: After cutting, aluminum edges can get sharp. A deburring tool smooths them out, protecting your hands and ensuring a snug fit for accessories like end caps.
- Marker or Pencil: For marking cut lines and bolt positions—nothing fancy, just something that shows up clearly on metal.
- Rubber Mallet: Sometimes profiles need a gentle nudge to align perfectly. A rubber mallet avoids dents or scratches (save the steel hammer for demolition day).
Materials You'll Need
Of course, the star here is the 3030b EU Standard Aluminum Profile itself, but you'll also need a few aluminum profile accessories to bring it all together. Here's a checklist to keep handy:
| Material/Accessory | Purpose | Pro Tip |
|---|---|---|
| 3030b EU Standard Aluminum Profile (cut to your project's length) | The main structural component—order 5-10% extra to account for cuts or mistakes. | Check the wall thickness! Most 3030b profiles come in 1.5mm or 2.0mm options; thicker walls mean more strength for heavy loads. |
| 90° Aluminum Profile Connector | Joins two profiles at a right angle (the most common connection in frames). | Look for "corner brackets" or "L-connectors"—some have built-in reinforcement ribs for extra stability. |
| 3030 Aluminum Profile End Cap | Covers the open ends of profiles to prevent sharp edges and keep out dust/debris. | Opt for push-fit caps for quick installs, or screw-on caps if you need a permanent seal. |
| Aluminum Profile Rubber Strip | Inserts into T-slots to seal gaps, reduce noise, and protect cables/items sliding across the profile. | Choose a color that matches your project (black is standard, but gray or white work for lighter aesthetics). |
| Hex Bolts & T-Nuts | Secures accessories (like shelves or panels) to the T-slots of the profile. | For 3030b profiles, M5 or M6 bolts are typical—length depends on how thick the accessory is (add 10mm to the accessory thickness to get the right bolt length). |
Pro Tip:
If you're new to aluminum profiles, start small! A simple 2x2ft shelf or a mini workbench lets you practice cutting, connecting, and finishing without investing in a truckload of materials. You'll learn the ropes, and then you can tackle bigger projects with confidence.

Step 1: Plan Your Project (Yes, This Matters)
Imagine building a puzzle without looking at the picture on the box—you might get there eventually, but it'll take twice as long and probably look a little wonky. Installation is no different. Taking 15-20 minutes to plan your project upfront saves hours of frustration later. Here's how to do it right:
1 Sketch Your Design (Even if You Can't Draw)
You don't need to be Picasso—just grab a piece of paper and roughly draw what you're building. Label the dimensions (height, width, depth) and mark where the 3030b profiles will go. For example, if it's a workbench, note the legs (4 vertical profiles), the top frame (4 horizontal profiles), and any cross-braces for stability. This sketch becomes your roadmap—tape it to the wall or keep it in your pocket as you work.
2 Measure Twice, Cut Once (The Golden Rule)
Grab your tape measure and confirm the space where your project will live. Let's say you're building a shelf for a garage corner—measure the height between the floor and ceiling, the width between the walls, and the depth you're willing to sacrifice (no one wants a shelf that sticks out so far you stub your toe every time). Write these numbers down, then compare them to your sketch. If your initial design is 180cm tall but your ceiling is only 175cm, now's the time to adjust—not after you've cut all your profiles.
3 Calculate Material Quantities
Using your sketch, list out every piece of 3030b profile you'll need, along with their lengths. For example: 4 legs at 80cm each, 4 top frame pieces at 120cm each, 2 cross-braces at 60cm each. Add them all up, then add 5-10% extra for mistakes (we've all miscut a piece before—no shame). Do the same for aluminum profile accessories: count how many 90° aluminum profile connectors you'll need (each corner usually needs one), plus end caps (one per open profile end) and rubber strips (measure the total length of T-slots you want to seal).
Pro Tip:
Use a free online aluminum profile configurator if you're stuck! Many suppliers offer tools where you can drag-and-drop profiles and accessories to visualize your project and auto-generate a parts list. It's like having a design assistant—minus the hourly fee.
Step 2: Cutting Your 3030b Profiles (If Needed)
Unless you ordered pre-cut profiles (smart move, if you can!), you'll need to trim your 3030b lengths to fit your project. Cutting aluminum might sound intimidating, but with the right tools and a steady hand, it's actually quite straightforward. Here's how to do it safely and cleanly:
1 Mark Your Cut Line
Lay the profile flat on a workbench or sawhorse. Use your tape measure to find the exact length you need, then make a small mark with your pencil. Now, here's the trick to straight cuts: use a carpenter's square to extend that mark all the way around the profile. Aluminum profiles have 4 sides, so you'll need a line on each one to guide your saw. If you're cutting multiple pieces to the same length, stack them (gently!) and mark them all at once—this saves time and ensures consistency.
2 Secure the Profile
Never cut a profile that's wobbling or moving—it's dangerous and leads to crooked cuts. Clamp the profile to your workbench using C-clamps or bar clamps, making sure the cut line hangs off the edge (so you don't saw into your bench). If you're using a hacksaw, position the clamp about 5cm away from the cut line to avoid vibrations. For miter saws, use the built-in fence to hold the profile steady.
3 Make the Cut
If you're using a hacksaw: Use long, slow strokes, letting the weight of the saw do the work. Push forward with gentle pressure, and pull back lightly—most of the cutting happens on the forward stroke. Keep the blade aligned with your marked lines on all 4 sides. If you're using a miter saw: Set the blade to 90° (for straight cuts) and lower it slowly into the profile. Let the saw reach full speed before making contact, and avoid forcing it through the metal—this can bend the blade or leave a ragged edge.
4 Deburr the Edges
Freshly cut aluminum has sharp, jagged edges (called "burrs") that can slice your hands or prevent accessories like end caps from fitting. Grab your deburring tool (or a piece of 120-grit sandpaper) and gently file the cut edge. Run your finger along the edge when you're done—if it feels smooth, you're good to go. Pro tip: Deburr both the inside and outside of the profile; burrs inside the T-slots can block T-nuts later.
Step 3: Assembling the Frame with 90° Aluminum Profile Connectors
Now comes the fun part: turning individual pieces of aluminum into a solid frame. This is where the 90° aluminum profile connector shines—it's the workhorse of profile assembly, letting you join pieces at right angles quickly and securely. Let's walk through building a simple rectangular frame (like the top of a workbench or a shelf frame) to master the basics.
1 Lay Out the Profile Pieces
Clear a flat, level surface (your garage floor or a large workbench works) and lay out your cut profiles in the shape of your frame. For a rectangle, you'll have two longer pieces (the top and bottom) and two shorter pieces (the sides). Arrange them so the corners meet—this is your "dry fit," and it lets you double-check that all lengths are correct before tightening anything.
2 insert T-Nuts into the T-Slots
Most 90° aluminum profile connectors attach using bolts that thread into T-nuts hidden inside the profile's T-slots. Here's how to insert them: Tilt the profile so the T-slot is facing up, then drop a T-nut into the slot. Use a small screwdriver or your finger to slide it along the slot until it's positioned where the connector will go (usually 1-2cm from the end of the profile). Repeat this for all the T-slots where you'll be attaching connectors—one T-nut per bolt hole on the connector.
3 Attach the 90° Connector
Take your 90° aluminum profile connector and hold it against the corner where two profiles meet. Align the bolt holes on the connector with the T-nuts you just inserted. Now, grab a hex bolt (M5 or M6, depending on your connector) and thread it through the connector's hole into the T-nut. Tighten it by hand first—this ensures it doesn't cross-thread. Once it's snug, use your Allen wrench to tighten it fully, but don't overdo it! Aluminum is strong, but overtightening can strip the T-nut or warp the profile. A good rule: tighten until you feel resistance, then give it a quarter-turn more.
4 Repeat for All Corners
Work your way around the frame, attaching a 90° connector to each corner. After all four corners are connected, stand back and check the frame for square: measure the diagonals (from corner to opposite corner). If the diagonals are equal, the frame is square; if not, gently push or pull the corners until they match. This step is crucial—an out-of-square frame will wobble and throw off the rest of your project.
5 Add Cross-Braces for Stability
For larger frames (over 120cm in length or width), add cross-braces to prevent sideways wobbling. Cut two more 3030b profiles to fit diagonally across the frame, then attach them using 90° connectors at each end. Think of it like adding a backbone to your frame—suddenly, that wobbly rectangle becomes a rock-solid structure. Pro tip: If you're building a vertical structure (like a shelf), add horizontal cross-braces between the legs every 60-80cm for extra support.
Pro Tip:
Don't fully tighten all connectors at once! Leave them slightly loose until you've aligned all parts of the frame. This way, you can (fine-tune) the positions without fighting tight bolts. Once everything is square and aligned, go back and fully tighten each connector—this is called "snugging up."
Step 4: Adding Finishing Touches with Aluminum Profile Accessories
Your frame is built, but it's not quite ready for prime time. Now's the moment to add those small but mighty aluminum profile accessories that turn a basic structure into a polished, functional project. We're talking end caps, rubber strips, and any custom add-ons that make your build work for you .
Installing 3030 Aluminum Profile End Caps
Open profile ends are more than just unsightly—they're sharp, they collect dust, and they can even snag clothing or cables. 3030 aluminum profile end caps solve all these problems in seconds. Here's how to install them:
- Clean the Profile Ends: Wipe the open ends of the profiles with a dry cloth to remove dust or debris—this helps the end caps stick better.
- Choose Your End Cap Type: Push-fit end caps simply snap into place—just align them with the profile end and press firmly until you hear a "click." Screw-on end caps require a small bolt (usually included) to secure them—thread the bolt through the cap and into a T-nut inside the profile.
- Check for Fit: A properly installed end cap should sit flush with the profile end and not wiggle. If it's loose, check for burrs (you might have missed one during deburring) or try a different cap—sometimes manufacturing tolerances mean a cap fits better on another profile end.
Sealing T-Slots with Aluminum Profile Rubber Strip
The T-slots on your 3030b profile are incredibly useful, but they can also let in dust, dirt, or small tools (we've all dropped a nut into a T-slot and spent 10 minutes fishing it out). Aluminum profile rubber strip is the easy fix. Here's how to install it:
- Measure and Cut the Rubber Strip: Lay the rubber strip along the length of the T-slot and cut it to size with scissors or a utility knife. Add a few extra millimeters to ensure full coverage—you can always trim off the excess later.
- insert the Strip into the T-Slot: Start at one end of the profile and press the rubber strip into the T-slot. Use your finger or a flat screwdriver (wrapped in cloth to avoid scratching the profile) to push it in until it sits flush with the slot opening. The strip should fit snugly—if it pulls out easily, it's too small; if it bulges out, it's too large.
- Smooth Out Bubbles: If the strip develops bubbles or wrinkles, peel it back slightly and reinsert, working from the bubble outward to release air. A smooth, tight fit ensures the strip stays in place and does its job.
Bonus: Rubber strips also reduce noise! If you're building a workbench where tools will slide across the profile, the rubber dampens vibrations and keeps things quieter. Small detail, big difference.
Adding Custom Accessories (Shelves, Panels, etc.)
Now that your frame is solid and finished, it's time to make it your own. Want to add shelves? Slide T-nuts into the T-slots of the vertical profiles, then bolt on shelf brackets using hex bolts. Need a pegboard for tools? Drill holes in a pegboard panel, align them with T-slots, and secure with bolts and T-nuts. The beauty of 3030b profiles is that there's no "one size fits all"—you can add lights, hooks, bins, or even a power strip by using the T-slots to mount accessories. Just remember: when adding heavy items (like a power tool on a shelf), distribute the weight evenly and use extra bolts to secure the load—better safe than sorry!
Step 5: Testing Stability & Making Final Adjustments
You're almost done! But before you call it a day, take 10 minutes to test your project's stability and make any last-minute tweaks. Trust us—this final check ensures your hard work pays off with a build that's safe, sturdy, and ready to use.
1 Check for Wobbling
Push gently on different parts of the frame—side to side, front to back. It should feel solid, with minimal movement. If it wobbles, here's what to check: Are all 90° aluminum profile connectors fully tightened? Did you add cross-braces to large frames? Are the feet (if using) level? Tighten loose connectors first—often, that's all it takes. If wobbling persists, add more cross-braces or diagonal supports.
2 Test Load Capacity (Gently!)
If you're building a shelf or workbench, test it with a load similar to what it will hold. For example, place a few heavy books on a shelf (gradually—don't dump 50kg all at once!) and see how it reacts. The profile should flex slightly (that's normal) but not bend permanently. If it sags, add more vertical supports or reinforce the shelf with a thicker panel.
3 Inspect All Connections
Walk around your project and give each hex bolt and connector a quick check with your Allen wrench. Sometimes, bolts loosen slightly as the frame settles, so a quick quarter-turn can make a big difference. Also, check that end caps are secure and rubber strips are still in place—no one wants a cap falling off or a strip peeling up after a week of use.
4 Clean Up and Admire Your Work!
Wipe down the profiles with a damp cloth to remove fingerprints, sawdust, or grease. Then step back and take a good look—you built that! Whether it's a simple shelf or a complex workbench, you've turned raw materials into something useful, and that's a big deal. Snap a photo, show it off to friends, or just stand there and smile—you deserve it.
Troubleshooting Common Issues
Even with careful planning, things can go wrong. Here are a few common hiccups and how to fix them:
- Connectors Won't Tighten: If a hex bolt spins without tightening, the T-nut inside the profile has probably shifted. Remove the bolt, use a magnet or tweezers to reposition the T-nut, and try again.
- End Caps Don't Fit: Deburr the profile end again—even a tiny burr can block the cap. If that doesn't work, check that you have the right size end cap (3030 profiles need 30mm end caps; mixing sizes is easy to do!).
- Frame is Crooked: Loosen the corner connectors, adjust the frame until the diagonals are equal, then retighten. If it keeps slipping, add temporary braces while you tighten the connectors.
- Rubber Strip Peels Up: Clean the T-slot with rubbing alcohol to remove oil or dust, then reinsert the strip. For extra hold, apply a tiny dot of super glue to the end of the strip before inserting (just don't use too much—it can damage the profile).
Final Thoughts: Enjoy Your Custom 3030b Project!
Installing 3030b EU Standard Aluminum Profiles might seem daunting at first, but as you've seen, it's all about breaking the process into small, manageable steps. From planning and cutting to assembling and finishing, each stage builds on the last to create something strong, functional, and uniquely yours. Whether you're a DIY newbie or a seasoned builder, the key is to take your time, stay patient, and don't be afraid to make mistakes—they're just part of the learning process.
Now that your project is complete, step back and enjoy it. Use that workbench to build something new, stock that shelf with tools or supplies, or show off your handiwork to anyone who visits. And remember: aluminum profiles are modular, so if you ever need to reconfigure or expand your project, you can take it apart and start fresh. That's the beauty of this system—it grows with you.
Happy building! ️