- Company Articles
- Products and Technology
- Installation And Maintenance
- Installation Guide: Parallel Lean Pipe Joint with One Side Rotatory Chrome

Installation Guide: Parallel Lean Pipe Joint with One Side Rotatory Chrome
Related Product
Parallel Lean Pipe Joint
Parallel lean pipe joint used for 2 pcs 28MM lean pipe connection in parallel direction to enhance frame structure, usually for heavy payload requirement for workbench. flow rack, hand trolley.
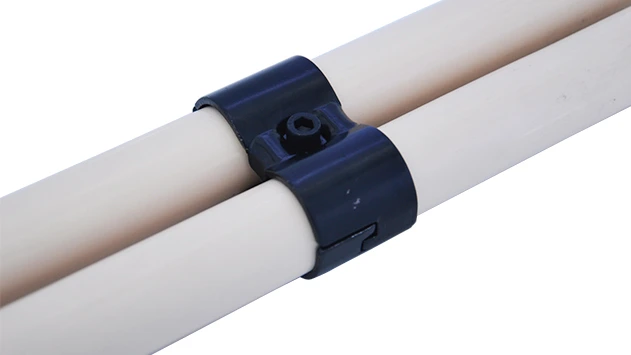
Setting up a lean manufacturing workspace or upgrading your existing setup? Chances are you've encountered the unsung hero of flexibility in lean systems: the parallel lean pipe joint with one side rotatory chrome. This small but critical component is what turns rigid metal pipes into adaptable, movable structures—think workbenches that adjust to your team's needs, material racks that shift with production demands, or trolleys that maneuver tight corners with ease. Whether you're building a lean pipe workbench from scratch or retrofitting a flow rack, getting this joint installed correctly isn't just about following steps—it's about ensuring your entire system works smarter, not harder. In this guide, we'll walk through everything you need to know, from understanding the joint's design to troubleshooting common hiccups, so you can build a setup that lasts.
What Is a Parallel Lean Pipe Joint with One Side Rotatory Chrome?
Before diving into installation, let's get familiar with the star of the show. The parallel lean pipe joint with one side rotatory chrome is a specialized connector designed to link two parallel lean pipes while allowing one side to rotate 360 degrees. Its name breaks down its key features:
- Parallel: Connects two pipes running side-by-side (think the horizontal rails of a workbench or the vertical supports of a trolley).
- One Side Rotatory: One end of the joint features a rotating collar, letting the attached pipe spin freely. The other end is fixed, keeping the second pipe stable.
- Chrome: The joint is coated in chrome, a durable, corrosion-resistant finish that stands up to daily wear, moisture, and industrial chemicals.
Why does this matter? In lean manufacturing, adaptability is king. A static workbench might work for one task, but when production shifts, you need tools that shift with it. This joint lets you rotate shelves, adjust angles, or swing components out of the way—all without disassembling the entire structure. And that chrome coating? It's not just for looks. In busy workshops where oil, coolant, or cleaning agents are common, chrome resists rust and keeps the joint sliding smoothly for years.
Pro Tip: Not all lean pipe joints are created equal. The "one side rotatory" design is distinct from fixed joints (which lock pipes in place) or fully rotatory joints (which spin on both ends). This hybrid design is perfect for scenarios where you need one stable base and one moving part—like a workbench shelf that swings down for access, then locks back up.
Key Components You'll Need
Before starting installation, gather your materials. This joint doesn't work alone—it relies on compatible lean pipe, accessories, and tools to create a solid connection. Here's what you'll need:
1. The Joint Itself
First, confirm you have the right part: parallel lean pipe joint with one side rotatory chrome. Inspect it for any defects—look for smooth chrome plating (no chips or scratches), a free-spinning rotatory collar (it should turn without sticking), and intact threads on the set screws. If the collar feels gritty or the chrome is peeling, contact your lean pipe supplier for a replacement—starting with a faulty joint is a recipe for frustration later.
2. Lean Pipe
This joint is designed for standard lean pipe, typically 28mm in diameter (the most common size in lean systems). While it works with both PE-coated steel and aluminum lean pipe, we recommend steel for heavier loads—aluminum is lighter but better suited for lighter applications like electronics assembly. Measure your project's needs first: longer pipes (over 1.5 meters) may need extra support, while shorter ones (under 60cm) are ideal for shelves or small trolleys.
3. Lean Pipe Accessories
You'll also need a few small but crucial lean pipe accessories:
- Set Screws: Most joints come with pre-installed set screws, but having extras on hand never hurts (look for M5 or M6 size, depending on your joint).
- Thread Locker: A drop of medium-strength thread locker (like Loctite 243) prevents screws from loosening over time—essential for high-vibration environments.
- Washers: Flat washers protect the pipe's surface from indentation when tightening screws, especially if using PE-coated lean pipe.
4. Tools
No installation is complete without the right tools. Here's your checklist:
| Tool | Purpose | Pro Tip |
|---|---|---|
| Hex Wrench (Allen Key) | Tightening set screws on the joint | Use a ball-end hex wrench for hard-to-reach angles |
| Pipe Cutter or Hacksaw | Cutting lean pipe to length (if needed) | For clean cuts, mark the pipe with tape first, then cut slowly |
| Deburring Tool | Removing sharp edges from cut pipe ends | Run the tool around both inner and outer edges to avoid cuts |
| Level (2ft or longer) | Ensuring pipes are parallel and straight | A magnetic level sticks to steel pipes, freeing up your hands |
| Rubber Mallet | Gently tapping pipes into place (avoiding dents) | Never use a steel hammer—you'll damage the pipe or joint |
| Measuring Tape & Pencil | Marking pipe lengths and joint positions | Use a pencil with a soft lead—easy to erase if you make a mistake |
Note: If you're installing the joint into a mobile structure (like a trolley with caster wheels), you'll also need a drill and self-tapping screws to attach the frame to the caster mounting plate. We'll cover that later in the "Integration" section!

Pre-Installation Prep: Set Yourself Up for Success
Installation goes smoother when you prep first. Here's how to avoid common pitfalls before you even pick up a tool:
1. Clear Your Workspace
Lean pipe is awkward to handle—imagine wrestling a 2-meter steel pipe in a cluttered garage. Clear a space at least twice the length of your longest pipe, with a flat surface (a workbench or even a clean floor) to lay out parts. If you're working on concrete, lay down a moving blanket or cardboard to protect the pipe's coating from scratches.
2. Inspect All Parts
Take 5 minutes to check every component:
- Joints: Spin the rotatory collar—does it move freely? If it's stiff, apply a drop of silicone lubricant (avoid WD-40; it dries out quickly). Wipe off excess to prevent attracting dust.
- Pipes: Roll them on a flat surface to check for bends. A warped pipe will make alignment impossible—replace it if it doesn't roll straight.
- Screws: Test-fit a hex wrench in the set screws. If they're stripped, use a screw extractor to remove them, then replace with new ones.
3. Measure Twice, Cut Once
Nothing derails a project faster than a pipe that's too short. Measure your design twice, then add 2cm to each pipe length—you can always trim more, but you can't add length back. For example, if your lean pipe workbench needs a 120cm shelf, cut the pipe to 122cm first, then trim to fit once the joint is attached.

Step-by-Step Installation: Putting It All Together
Now, let's get hands-on. Follow these steps, and you'll have a secure, rotating joint in no time.
Step 1: Unpack and Identify Joint Ends
Start by unpacking the parallel lean pipe joint with one side rotatory chrome. Lay it on your work surface and identify the two ends:
- Fixed End: The side without the rotating collar—this end locks the pipe in place and doesn't move.
- Rotatory End: The side with the smooth, cylindrical collar—this end spins 360 degrees. Check that the collar moves freely; if it's stuck, gently twist it back and forth while applying light pressure to loosen any factory-applied grease.
Step 2: Prepare the Lean Pipe
If you're cutting pipe to length:
- Mark your cut line with tape (masking tape works best—it won't leave residue).
- Clamp the pipe to your workbench to prevent it from rolling.
- Cut slowly with a pipe cutter or hacksaw, keeping the blade perpendicular to the pipe. For straight cuts, rotate the pipe as you cut, rather than trying to adjust the blade.
- Deburr the cut end: Use a deburring tool to remove sharp edges—run it around the inner and outer circumference until the edge feels smooth to the touch. A sharp burr can tear gloves or damage the joint's internal surface.
Pro Tip: If you're using PE-coated lean pipe, avoid cutting too quickly—this can melt the plastic coating, leaving a messy, uneven edge. A slow, steady cut with a fine-tooth hacksaw works best.
Step 3: Attach the Fixed End to the First Pipe
Now, let's attach the first pipe to the joint's fixed end:
- Slide the pipe into the fixed end of the joint until it hits the internal stop (you'll feel a slight "click" or resistance). The pipe should insert 3–4cm into the joint—any less, and it won't be secure.
- Align the set screw with the pipe: Most joints have one or two set screws on the fixed end. Position the pipe so the screw will bite into the metal (not the PE coating, if using coated pipe)—this ensures a stronger hold.
- Hand-tighten the set screw: Use your hex wrench to turn the screw until it's snug against the pipe. Don't overtighten yet—you'll need to adjust the pipe's position later.
Step 4: Attach the Rotatory End to the Second Pipe
Next, repeat the process for the rotatory end:
- Slide the second pipe into the rotatory end of the joint. Again, insert it 3–4cm until it hits the stop.
- Check the rotation: Spin the rotatory collar by hand—does the pipe move freely? If it's stuck, double-check that the pipe is fully inserted (a partially inserted pipe can bind the collar).
- Hand-tighten the set screw on the rotatory end. This screw secures the pipe to the rotating collar, so make sure it's tight enough to hold the pipe but not so tight that it restricts rotation.
Step 5: Align the Pipes Parallel
Now, the critical part: ensuring the two pipes are perfectly parallel. Misalignment here leads to wobbly structures or a rotatory collar that jams. Here's how to do it:
- Lay the assembly flat on your workbench, with both pipes extending in the same direction.
- Place your level across the pipes, midway between the joint and the pipe ends. Adjust the pipes until the bubble is centered—this means they're horizontal and parallel.
- Check vertical alignment: Stand the assembly upright (if building a vertical structure like a rack) and use the level to ensure both pipes are plumb (vertical). A leaning structure will stress the joint and shorten its lifespan.
Note: If your design calls for angled pipes (e.g., a sloped flow rack), use a protractor to measure the angle instead of a level. The joint's rotatory end can handle angles up to 45 degrees, but beyond that, the collar may bind.
Step 6: Tighten Set Screws (With Thread Locker)
Once aligned, it's time to secure the joint for good:
- Apply thread locker: Put one drop of medium-strength thread locker on each set screw (both fixed and rotatory ends). Avoid overdoing it—excess locker can seep into the rotatory collar and gum up the works.
- Tighten the fixed end first: Use your hex wrench to turn the screw until it's snug, then give it a 1/4-turn more. You should feel resistance, but the screw shouldn't strip.
- Tighten the rotatory end: Do the same for the rotatory end's set screw, but stop when the screw is just tight enough to hold the pipe—overtightening here can bend the rotating collar, making it stick.
Step 7: Test Rotation and Stability
Now, the moment of truth: test the joint. Grab the rotatory pipe and spin it 360 degrees—it should move smoothly, with no jerking or sticking. Then, gently push and pull on both pipes to check for wobble—there should be none. If the joint feels loose, double-check the set screws (they may have backed out slightly during testing) and re-tighten. If rotation is stiff, apply a small amount of silicone spray to the rotatory collar's base and spin it several times to distribute the lubricant.
Step 8: Integrate Into Your System
Finally, add the jointed assembly to your larger project. For example:
- Lean Pipe Workbench: Attach the joint to the workbench's frame, then add a shelf to the rotatory pipe—now you can swing the shelf out of the way when not in use.
- Material Trolley: Connect the joint to the trolley's handlebar and base, then add caster wheels to the base for mobility—the rotating handle makes tight turns a breeze.
- Flow Rack: Mount the joint to the rack's uprights, then attach roller track to the rotatory pipe—adjust the angle to control how quickly bins slide down.
Troubleshooting Common Issues
Even with careful installation, problems can pop up. Here's how to fix the most common ones:
Issue 1: Rotatory Collar Sticks or Grinds
If the collar won't spin smoothly, the culprit is usually debris or dry lubrication. Try this:
- Clean the Collar: Use a can of compressed air to blow out dust or metal shavings from the gap between the collar and the joint body. Follow up with a cotton swab dipped in rubbing alcohol to wipe away residue.
- Lubricate: Apply a drop of silicone-based lubricant (like 3-in-One Silicone Spray) to the collar's base. Spin it back and forth 10 times to work the lubricant into the bearings.
- Check for Misalignment: If cleaning and lubricating don't work, the pipes may be misaligned. Loosen the set screws, realign with the level, and re-tighten.
Issue a2: Pipe Wobbles in the Joint
A loose pipe is often due to undertightened screws or a pipe that's too small. Fix it by:
- Re-Tightening Screws: Use your hex wrench to give the set screws a 1/4-turn—this often solves the problem.
- Adding a Washer: If the pipe is slightly smaller than 28mm (common with cheap or off-brand lean pipe), slide a flat washer over the pipe before inserting it into the joint. The washer fills the gap, preventing wobble.
Issue 3: Chrome Coating Chips or Peels
Chrome chipping is usually caused by over-tightening screws or rough handling. To fix and prevent it:
- Touch Up Chips: Use a chrome paint pen to cover small chips—this stops rust from spreading.
- Use Proper Tools: Always use a hex wrench that fits the screw head exactly—slip tools strip screws and damage the joint's surface.
- Pad Pipes During Transport: When moving assembled structures, wrap the joint in bubble wrap to avoid impacts that chip chrome.
Maintenance: Keeping Your Joint in Top Shape
A well-maintained joint lasts years—here's how to care for it:
Monthly Checks
Spend 5 minutes each month inspecting the joint:
- Tighten Screws: Vibration from machinery or frequent rotation can loosen screws. Give each set screw a gentle 1/8-turn with your hex wrench.
- Clean the Collar: Wipe the rotatory collar with a dry cloth to remove dust—buildup here causes friction over time.
Quarterly Lubrication
Every 3 months, apply a fresh drop of silicone lubricant to the rotatory collar. This is especially important in humid or dusty environments, where moisture and debris accelerate wear.
Annual Overhaul
Once a year, fully disassemble the joint (if possible) to clean internal parts. Soak the rotatory collar in warm, soapy water to remove old lubricant and grime, then dry thoroughly and re-lubricate before reassembly.
Real-World Applications: Where This Joint Shines
Still wondering how this joint fits into your workflow? Here are three common scenarios where it makes a big difference:
1. Lean Pipe Workbench with Adjustable Shelves
A static workbench limits your team—some tasks need more space, others need tools within arm's reach. By using parallel lean pipe joints with one side rotatory chrome, you can add shelves that swing up (out of the way) or down (for easy access). For example, in an electronics assembly line, workers often need to switch between small parts bins and large equipment. A rotating shelf holds the bins, then swings up when the equipment is in use—no more wasted time moving bins around.
2. Mobile Material Trolley with Rotating Handle
Trolleys with fixed handles struggle in tight aisles. Add this joint to the handlebar, and suddenly the handle rotates 90 degrees—perfect for squeezing through doorways or around machinery. Pair it with heavy-duty caster wheels, and you've got a trolley that moves like a shopping cart, even when loaded with 50kg of parts.
3. Flow Rack with Adjustable Angle
Flow racks use gravity to slide bins from the back to the front, but not all items flow at the same speed. Heavy bins need a steeper angle, while light ones need a shallower slope. With a rotating joint, you can adjust each level's angle on the fly—no tools required. Just loosen the set screw, tilt the rack, and re-tighten. It's a game-changer for warehouses with mixed product sizes.
Final Thoughts: Invest in the Details
The parallel lean pipe joint with one side rotatory chrome might seem like a small part, but it's the difference between a rigid, frustrating setup and a flexible, efficient one. By following this guide—taking time to align properly, using the right tools, and maintaining regularly—you'll build a lean system that adapts to your needs, reduces waste, and keeps your team productive. Remember: in lean manufacturing, the little things matter most. Now go out there and build something great.