
In the world of lean manufacturing and efficient production assembly, every component plays a silent but critical role in keeping operations running smoothly. Among these unsung heroes are parallel lean pipe joints—small, unassuming connectors that hold together the backbone of workbenches, material racks, and production lines. Whether you're setting up a new workspace or reconfiguring an existing one, understanding how to properly install these joints is key to building structures that are not only sturdy but also flexible enough to adapt to changing needs. In this guide, we'll walk through the entire process, from gathering your tools to testing the final structure, with a focus on using parallel lean pipe joints alongside aluminum lean pipes—two staples in modern lean systems. By the end, you'll have the confidence to build everything from a simple workbench to a dynamic roller track-equipped material trolley, all while ensuring safety, durability, and efficiency.
Understanding the Basics: Why Parallel Lean Pipe Joints Matter
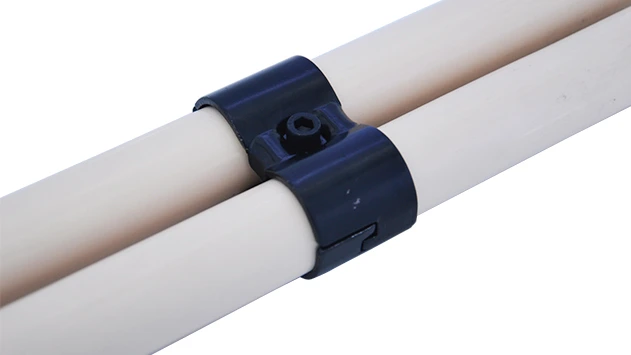
Before diving into the installation steps, let's take a moment to appreciate why parallel lean pipe joints are so essential. Unlike fixed welding or rigid fasteners, these joints allow for quick assembly and disassembly, making them perfect for lean systems that prioritize adaptability. They're designed to connect aluminum lean pipes—lightweight, corrosion-resistant tubes that strike the ideal balance between strength and maneuverability—in parallel or perpendicular orientations, forming the framework for workbenches, turnover trolleys, and even roller track systems that keep materials flowing seamlessly across the shop floor.
Imagine a busy electronics assembly line where production needs shift weekly. A workbench built with parallel lean pipe joints can be easily adjusted in height, extended in length, or even repurposed as a material rack with the addition of a roller track—all without cutting or welding. This flexibility reduces downtime, minimizes waste, and ensures your workspace evolves with your operations. But to unlock this potential, proper installation is non-negotiable. A loosely fitted joint or misaligned pipe can lead to wobbly structures, safety hazards, and inefficient workflows. Let's start by getting prepared.
Preparation: Tools, Materials, and Safety First
Gathering Your Tools
Like any DIY or industrial project, having the right tools on hand will make the installation process far smoother. Here's a list of essentials, along with why each one matters:
| Tool | Purpose | Pro Tip |
|---|---|---|
| Adjustable wrench | Tightening and loosening parallel lean pipe joints | Opt for a wrench with a rubber grip to avoid slipping during use. |
| Measuring tape (2m or longer) | Ensuring aluminum lean pipes are cut to precise lengths | Use a tape with clear markings and a locking mechanism to prevent inaccurate measurements. |
| Pipe cutter or hacksaw | Cutting aluminum lean pipes to the desired size | A pipe cutter is cleaner and faster than a hacksaw, but either works—just file down burrs afterward. |
| Spirit level (1m or longer) | Checking if the structure is plumb (vertical) and level (horizontal) | Look for a level with both horizontal and vertical vials for versatile use. |
| Rubber mallet | Gently tapping joints into place without damaging pipes | Avoid metal hammers, as they can dent or scratch aluminum lean pipes. |
| Work gloves | Protecting hands from sharp pipe edges and metal joints | Choose cut-resistant gloves if you'll be cutting pipes to prevent nicks. |
| Marker or pencil | Marking cut lines on pipes | Use a fine-tipped marker for clear, precise lines that won't smudge. |
Selecting Your Materials
For this guide, we'll focus on using parallel lean pipe joints with aluminum lean pipes, but you'll also need to consider any accessories that match your project. For example:
- Aluminum lean pipes: Choose pipes with a diameter that matches your parallel lean pipe joints (common sizes include 28mm or 30mm). Opt for anodized aluminum if corrosion resistance is a priority, especially in humid environments.
- Parallel lean pipe joints: These come in various designs—some with set screws, others with friction-fit collars. For most projects, set-screw joints offer better stability, as they clamp directly onto the pipe.
- Accessories: Depending on your build, you might need caster wheels for mobility, a roller track for material flow, or brackets to mount a workbench top. For example, adding caster wheels to a base frame turns a static workbench into a mobile trolley, while a roller track can transform a simple rack into a gravity-fed material station.
Safety First: Protecting Yourself and Your Workspace
Even simple installations can pose risks if safety is overlooked. Here are a few key precautions:
- Wear protective gear: Safety glasses are a must when cutting pipes (to guard against flying debris), and work gloves will protect your hands from sharp edges.
- Work on a flat surface: Use a sturdy table or the floor to assemble components—avoid balancing pipes on unstable surfaces, as they can roll and cause injury.
- Keep your workspace clean: Cluttered areas increase the risk of trips and falls. Clear away scraps, tools, and packaging as you go.
- Don't over-tighten: While a snug joint is essential, forcing a wrench too hard can strip threads or crack the joint's plastic components.

Step-by-Step Installation: Building with Parallel Lean Pipe Joints
Now that you're prepared, let's walk through the installation process step by step. For this example, we'll build a simple but versatile workbench frame—perfect for assembly tasks, storage, or as a base for adding a roller track later. We'll use aluminum lean pipes, parallel lean pipe joints, and a few caster wheels for mobility.
Step 1: Measure and Cut Your Aluminum Lean Pipes
The first step is to measure and cut your aluminum lean pipes to the desired lengths. For a standard workbench, we'll aim for dimensions of 120cm (length) x 60cm (width) x 85cm (height). Here's how to do it:
-
Mark the pipes:
Use your measuring tape and marker to mark the cut lines. For the workbench, you'll need:
- 4 vertical pipes (height: 85cm each)
- 4 horizontal pipes for the top frame (2 at 120cm, 2 at 60cm)
- 4 horizontal pipes for the bottom frame (2 at 120cm, 2 at 60cm) – these will support the caster wheels.
- Cut carefully: Secure the pipe in a vice (if available) to prevent it from moving. Using a pipe cutter, rotate it around the pipe, tightening slightly with each turn until the pipe snaps cleanly. If using a hacksaw, apply steady pressure and let the blade do the work—avoid sawing back and forth aggressively, as this can bend the pipe.
- Smooth the edges: After cutting, use a metal file or sandpaper to remove burrs from the pipe ends. Sharp edges can tear gloves or prevent the joint from seating properly, so take an extra minute to ensure the ends are smooth.
Step 2: Prepping the Parallel Lean Pipe Joints
Before attaching joints to pipes, take a moment to prepare them. Most parallel lean pipe joints have set screws—small bolts that tighten against the pipe to hold it in place. Loosen these screws fully using a hex key (often included with the joints) so the pipe can slide in easily. If your joints have plastic collars, ensure they're free of dirt or debris that might block the pipe.
Step 3: Assembling the Base Frame (with Caster Wheels)
The base frame is the foundation of your workbench, so it needs to be square and stable—especially if you're adding caster wheels. Here's how to build it:
- Connect the bottom horizontal pipes: Take two 120cm pipes and two 60cm pipes. Using parallel lean pipe joints, connect them into a rectangle. For each corner, insert the end of a 120cm pipe into a joint, then add a 60cm pipe to the adjacent opening. Tighten the set screws by hand first—you'll do a final tighten with a wrench later.
- Check for squareness: A frame is square if both diagonals are equal. Measure from one corner to the opposite corner (e.g., top-left to bottom-right) and note the length. Then measure the other diagonal (top-right to bottom-left). If they're different, gently push or pull the corners until the measurements match.
- Attach caster wheels: Flip the base frame upside down. Screw caster wheels into the corners using the mounting holes on the parallel lean pipe joints (many joints come with pre-threaded holes for caster installation). Tighten the caster bolts with a wrench—you want them secure enough that they don't wobble, but not so tight that you strip the threads.
Once the base is assembled, flip it right-side up and give it a gentle shake. The caster wheels should roll smoothly, and the frame shouldn't rock—if it does, double-check that the corners are square and the casters are all touching the ground evenly.
Step 4: Adding Vertical Pipes and the Top Frame
With the base in place, it's time to build upward. The vertical pipes will connect the base frame to the top frame, so alignment here is crucial for a level workbench.
- Attach vertical pipes to the base: Screw parallel lean pipe joints onto the top of each base frame corner. insert the 85cm vertical pipes into these joints, ensuring they're straight (use your spirit level to check vertically). Tighten the set screws by hand for now—you'll adjust later.
- Build the top frame: Repeat the process for the bottom frame, using the remaining 120cm and 60cm pipes to form another rectangle. Check for squareness again, then attach this frame to the top of the vertical pipes using more parallel lean pipe joints.
- Level the structure: Place your spirit level on top of the frame. If the bubble is off-center, adjust the vertical pipes by loosening the joints, shifting the pipes, and retightening. Pay special attention to the corners—even a small misalignment here can make the entire workbench wobble.
- Final tightening: Once the frame is level and square, go around all joints with a wrench and tighten the set screws. Turn each screw until it's snug, then give it a quarter-turn more—this ensures a secure grip without over-tightening.
Step 5: Adding Accessories (Optional but Impactful)
Now that the basic frame is complete, it's time to customize it with accessories that boost functionality. Two popular additions are a workbench top and a roller track for material handling:
- Installing a workbench top: Cut a piece of plywood, MDF, or aluminum sheet to fit the top frame (120cm x 60cm). Place it on the frame and secure it using pipe clamps or brackets that attach to the parallel lean pipe joints. For extra stability, add cross-braces between the vertical pipes below the top—this prevents the top from sagging under heavy loads.
- Adding a roller track: If you're using the workbench to feed materials to an assembly line, a roller track can make loading and unloading a breeze. Attach roller track brackets to one side of the top frame using screws, then snap the roller track into the brackets. Ensure the track is sloped slightly downward (1-2 degrees) to let gravity move materials along—test it with a small box to make sure it rolls smoothly without sticking.
Step 6: Testing and Adjusting the Structure
The final step is to put your structure through its paces. Here's how to ensure it's ready for action:
- Stability test: Push and pull the workbench gently from all sides. It should feel solid, with no wobbling or creaking. If it moves, check for loose joints or uneven caster wheels.
- Weight test: Place a load on the workbench top (e.g., a toolbox or stack of materials) that's similar to what you'll use in daily operations. Let it sit for 10-15 minutes, then check for sagging or bending. If the top dips, add more cross-braces or switch to a thicker top material.
- Mobility test: Roll the workbench across the floor (if using caster wheels). The wheels should turn smoothly, and the brakes (if equipped) should hold the bench in place when engaged.
- Accessory test: If you added a roller track, slide a few items along it to ensure there are no snags. Adjust the brackets if materials get stuck—sometimes a small tweak to the angle is all it takes.

Troubleshooting Common Issues
Even with careful installation, you might run into hiccups. Here's how to diagnose and fix the most common problems:
| Issue | Possible Cause | Solution |
|---|---|---|
| Joint slips on the pipe | Set screws are loose or pipe diameter is too small | Tighten set screws with a hex key; if slipping continues, use a pipe with a larger diameter (or wrap the pipe in a thin layer of tape for a tighter fit). |
| Workbench wobbles when pushed | Frame is not square or vertical pipes are misaligned | Check diagonal measurements of the top and bottom frames; adjust corners until diagonals are equal. Use a spirit level to realign vertical pipes. |
| Caster wheels don't roll smoothly | Dirt in wheel bearings or uneven floor | Clean wheels with a brush and lubricate bearings with light oil; use shims under the caster mounting plate if the floor is uneven. |
| Roller track jams | Track is misaligned or debris is stuck in rollers | Loosen brackets and reposition the track; clean rollers with compressed air or a toothbrush to remove dust or small particles. |
| Aluminum pipe bends under weight | Pipe is too thin or load exceeds capacity | replace with thicker-walled aluminum lean pipe (e.g., 2.0mm instead of 1.2mm) or add support braces under the load. |
Maintenance: Keeping Your Structure in Top Shape
A well-built structure with parallel lean pipe joints can last for years with minimal maintenance. Here's how to keep it in peak condition:
Regular Inspections
Set a monthly reminder to check for loose joints, bent pipes, or worn caster wheels. Tighten any set screws that have worked loose, and replace damaged parts immediately—small issues can turn into big problems if ignored.
Cleaning and Care
Aluminum lean pipes are resistant to rust, but they can accumulate dirt and grime. Wipe them down with a damp cloth and mild soap every few months, then dry thoroughly to prevent water spots. For caster wheels, remove hair or debris from the axles with a pick or small brush, and lubricate the bearings annually with a few drops of machine oil.
Adapting Over Time
One of the best things about parallel lean pipe joints is their reusability. If your needs change—say, you need a longer workbench or a taller material rack—simply disassemble the structure, adjust the pipe lengths, and reassemble. This flexibility is what makes lean systems so powerful, and it all starts with knowing how to properly use these versatile joints.
Conclusion: Building a Lean Workspace That Grows with You
Installing parallel lean pipe joints might seem like a small task, but it's the foundation of creating a workspace that's efficient, adaptable, and safe. By following these steps—from measuring and cutting to testing and maintenance—you'll be able to build structures that not only meet today's needs but also evolve with tomorrow's challenges. Whether you're a seasoned production manager or a small business owner setting up your first workshop, the skills you've learned here will serve you well. Remember, the goal of lean manufacturing isn't just to build things—it's to build smarter. With parallel lean pipe joints and aluminum lean pipes in your toolkit, you're well on your way to creating a workspace that does exactly that.
So go ahead—grab your tools, gather your materials, and start building. The next time you see your team working efficiently at a sturdy, well-designed workbench, you'll know you played a part in making it happen. And isn't that what lean is all about? Making work easier, better, and more human—one joint at a time.