- Company Articles
- Products and Technology
- Installation And Maintenance
- Installation Mistakes to Avoid with Lean Pipe Clamp B Chrome

Installation Mistakes to Avoid with Lean Pipe Clamp B Chrome
Related Product
Lean Pipe Clamp B Chrome
Lean pipe clamp is used for turnover trolley, workbench, flowrack adjust the frame or fix some accessory.
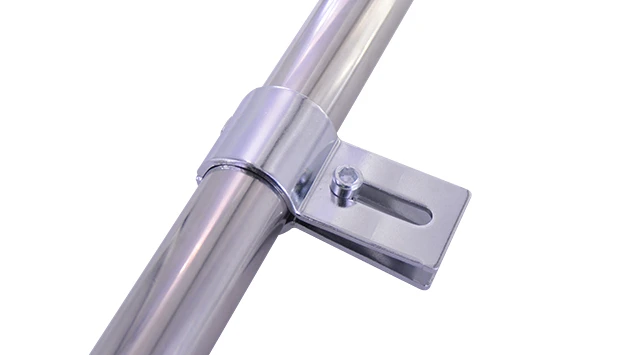
Walk into any manufacturing facility, warehouse, or assembly line, and you'll likely spot the backbone of modern lean systems: structures built with lean pipes, joints, and clamps. Among these components, the Lean Pipe Clamp B Chrome stands out as a workhorse— but critical for holding together everything from workbenches to material racks. Yet, for all its simplicity, installing this small but mighty clamp is rife with pitfalls that can turn a seamless workflow into a frustrating mess of loose connections, wobbly structures, and costly downtime. In this guide, we'll pull back the curtain on the most common installation mistakes technicians and facility managers make with Lean Pipe Clamp B Chrome, and more importantly, how to steer clear of them.
Whether you're setting up a new workbench , assembling a flow rack, or retrofitting an existing lean system, the way you install your clamps directly impacts stability, safety, and efficiency. Even a tiny misstep—like overtightening a clamp or mismatching it with the wrong lean pipe joint —can lead to structural failures, delayed production, or worse, workplace accidents. Let's dive into the errors you need to avoid, with practical tips to ensure your lean setup is as robust and reliable as it should be.
Mistake #1: Over-Tightening or Under-Tightening the Clamp
If there's one mistake we see repeated across workshops of all sizes, it's improper torque when securing Lean Pipe Clamp B Chrome. Some installers crank down on the clamp with all their might, thinking "tighter is better," while others barely snug it, assuming "it'll hold." Both approaches are equally problematic.
Let's start with over-tightening. Lean Pipe Clamp B Chrome is designed with a chrome-plated steel body and a threaded bolt that tightens against the pipe. When you wrench down too hard, you risk two issues: stripping the threads on the clamp or deforming the pipe itself. Aluminum or stainless steel pipes, in particular, are prone to denting or cracking under excessive pressure. We once visited a electronics plant where a technician used a pipe wrench to tighten the clamps on a material rack—within weeks, the pipes had warped, causing bins to slide off and damage expensive circuit boards. The root cause? Over-tightening had compromised the pipe's structural integrity.
On the flip side, under-tightening is just as dangerous. A loosely secured clamp can't withstand the vibrations of a busy assembly line or the weight of heavy tools. Imagine a workbench where the clamps holding the upper shelf are only hand-tight: as operators place tools, parts, or equipment on the shelf, the clamp slowly loosens. Over time, the shelf tilts, tools slide off, and the entire structure wobbles. In the worst cases, the shelf could collapse entirely, endangering workers and damaging inventory.
| Scenario | Consequence | Fix |
|---|---|---|
| Over-tightening with a pipe wrench | Stripped clamp threads, dented pipe | Use a torque wrench set to 15-20 Nm (check manufacturer specs) |
| Under-tightening (hand-tight only) | Loose connections, wobbling structures | Snug with a socket wrench, then add ¼ turn; test by gently shaking the structure |
Pro Tip: If you don't have a torque wrench, use the "two-finger rule." Tighten the clamp with a standard wrench until you feel resistance, then use two fingers to turn the wrench an additional ¼ inch. This mimics the recommended torque without specialized tools.
Mistake #2: Ignoring Compatibility with Lean Pipe Joints
Lean Pipe Clamp B Chrome is rarely used alone—it works in tandem with lean pipe joints to connect pipes at angles, create T-junctions, or build multi-level structures. But here's the catch: not all joints are created equal, and using the wrong joint with your clamp is a recipe for disaster.
Let's break it down. Lean pipe joints come in dozens of styles: fixed 90° joints, rotatory 180° joints, parallel joints, and more. Each is designed to work with specific pipe diameters and clamp types. Lean Pipe Clamp B Chrome, for example, is engineered for 28mm diameter pipes (the industry standard) and pairs best with fixed or semi-rotatory joints. Yet, we've seen facilities mix and match: using a 32mm joint with a 28mm pipe and Clamp B Chrome, or forcing a rotatory joint where a fixed one is needed. The result? A connection that feels secure initially but loosens the moment weight is applied or the structure vibrates.
Consider this real-world example: A automotive parts supplier was assembling a material rack using Lean Pipe Clamp B Chrome and 180° rotatory joints. The rack was meant to hold heavy plastic bins of components, but within days, the joints began to swivel under the load, causing the bins to tip. Upon inspection, we the installer had used rotatory joints (which are designed for flexible, adjustable structures) instead of fixed 90° joints (better for static, heavy loads). The clamps themselves were installed correctly, but the joint mismatch made the entire setup unstable.
To avoid this, always cross-check the clamp and joint specs before installation. Look for the "compatibility chart" in your supplier's catalog—most reputable lean pipe suppliers (yes, even us!) include detailed guides showing which clamps pair with which joints and pipe sizes. When in doubt, ask: "Is this joint rated for the pipe diameter and clamp type I'm using?" If the answer isn't a clear "yes," pause and reassess.
Mistake #3: Misaligning the Clamp with Aluminum Profiles
Many lean systems today combine traditional steel pipes with aluminum profiles —lightweight, durable, and easy to customize. When building hybrid structures (e.g., a workbench with aluminum profile legs and steel pipe shelves), Lean Pipe Clamp B Chrome is often used to bridge the two materials. But aligning the clamp with the aluminum profile's T-slots or mounting holes is trickier than it looks, and misalignment is a common blunder.
Aluminum profiles have precision-machined T-slots that run the length of the profile, allowing clamps, brackets, or accessories to be attached at any point. For Lean Pipe Clamp B Chrome to secure a pipe to an aluminum profile, the clamp's bolt must thread directly into the T-slot or a pre-drilled hole. If the clamp is even 1-2mm off-center, the bolt will catch on the profile's edge, leading to uneven pressure. Over time, this causes the clamp to loosen as the bolt works its way out of the slot, or worse, cracks the aluminum profile itself.
How do you ensure perfect alignment? Start by marking the position with a pencil or masking tape before drilling or attaching the clamp. Use a square to check that the pipe is perpendicular (or at the desired angle) to the profile. For T-slots, use a T-nut or slider block inside the slot to guide the bolt—this ensures the clamp sits flush against the profile. And always test the alignment by applying gentle pressure: if the clamp shifts or the profile flexes, you're off-center.
Pro Tip: For critical alignments (like workbench surfaces that need to be level), use a laser level to mark the pipe and profile positions before clamping. This eliminates guesswork and ensures consistency across multiple structures.
Mistake #4: Neglecting Load Capacity Ratings
"It looks strong enough" is the most dangerous phrase in lean system installation. Lean Pipe Clamp B Chrome, like all components, has a maximum load capacity—typically 50kg per clamp when used in a static structure, or 30kg in dynamic setups (e.g., mobile carts with caster wheels ). Exceeding this limit is a gamble with safety and structural integrity.
Let's do the math. Suppose you're building a workbench with a 1.2m long shelf supported by four Lean Pipe Clamp B Chrome clamps. The total load capacity would be 4 x 50kg = 200kg. But if you place a 250kg industrial printer on that shelf, you're overloading each clamp by 12.5kg. At first, the clamps might hold, but over weeks of use—with the printer vibrating, operators leaning on the shelf, or tools being placed and removed—the bolts will stretch, the clamp bodies will fatigue, and eventually, the shelf will sag or collapse.
We recently consulted with a medical device manufacturer that made this exact mistake. They installed a workbench with Lean Pipe Clamp B Chrome and loaded it with 300kg of equipment, assuming "steel clamps can handle anything." Three months later, a clamp failed, sending a cart of sterile tools crashing to the floor. The cost? Thousands in damaged equipment and a day of halted production while the structure was rebuilt.
The fix is simple: always check the load capacity rating on the clamp's packaging or datasheet. If your project requires heavier loads, add more clamps (spacing them 30-40cm apart) or upgrade to heavy-duty clamps (rated for 80-100kg each). When in doubt, calculate the total weight of the items you'll place on the structure, add 20% for "shock load" (e.g., dropping tools on the shelf), and ensure your clamps (and joints, and pipes) can handle the sum.
Mistake #5: Skipping Pre-Installation Inspection
It's easy to grab a clamp from the box and start installing, but failing to inspect Lean Pipe Clamp B Chrome (and the pipes/joints it connects) before assembly is a rookie error with big consequences. Even a tiny defect—a cracked clamp body, a bent bolt, or a pipe with a burr—can compromise the entire structure.
What should you look for? Start with the clamp itself: Check for cracks in the chrome plating (a sign of poor quality or prior damage), ensure the bolt threads are clean and undamaged, and verify that the clamp's moving parts (if any) pivot smoothly. Next, inspect the pipes: Are there dents, rust, or sharp edges that could prevent the clamp from seating flush? Finally, examine the lean pipe joint : Are the mounting holes aligned? Is the joint free of debris or corrosion?
A food packaging plant we worked with learned this lesson the hard way. They rushed to install a flow rack using Lean Pipe Clamp B Chrome that had been sitting in a damp storage room. The clamps looked fine at first glance, but hidden rust on the bolt threads caused them to seize during tightening—stripping the threads and rendering the clamps useless. By the time they realized, they'd already assembled half the rack, wasting hours of labor and materials.
Make inspection a non-negotiable step. Set up a "quality check station" where components are inspected before installation: wipe down clamps and joints with a dry cloth, run a finger along pipe edges to feel for burrs, and test-fit clamps on scrap pipes to ensure they slide on easily. It takes an extra 5 minutes per clamp, but it's far cheaper than redoing an entire structure later.
Mistake #6: Forgetting to Account for Vibration and Movement
Most lean structures aren't static—they vibrate with machinery, shift as workers bump into them, or move entirely (like mobile carts with caster wheels ). Yet, installers often treat Lean Pipe Clamp B Chrome as if it's holding together a fixed wall, ignoring the dynamic forces that will test the connection over time.
Vibration is the silent enemy. In a factory with nearby conveyor belts or stamping machines, even minor vibrations can loosen clamp bolts, especially if they're not secured with locking washers. Mobile structures face additional stress: every time the cart is pushed, stopped, or turned, the clamps absorb sudden jolts. Without proper reinforcement, these forces will eventually work the clamps loose.
The solution? Add locking mechanisms and reinforce high-stress areas. For vibrating environments, use split lock washers or thread-locking fluid (like Loctite) on the clamp bolts—this prevents them from unscrewing under vibration. For mobile carts, install gusset plates at joints (triangular metal brackets that add rigidity) and use two clamps per joint instead of one. And always test dynamic structures by rolling them across the floor, stopping abruptly, and checking for movement in the clamps afterward.
Conclusion: Clamps That Last—It's All in the Details
The Lean Pipe Clamp B Chrome may be small, but its role in your lean system is huge. Avoiding these six mistakes—improper torque, incompatible joints, misalignment, overloading, skipped inspections, and ignoring movement—will ensure your structures are stable, safe, and built to last. Remember: lean manufacturing is about eliminating waste, and nothing wastes time, money, or morale like a poorly installed clamp causing constant rework.
So, the next time you reach for that clamp, take a breath, slow down, and ask: "Is this the right joint? Am I tightening it correctly? Have I checked the load capacity?" Your future self (and your production line) will thank you.