- Company Articles
- Products and Technology
- Installation And Maintenance
- Installation Steps for 60 Aluminum Roller Track Yellow: A Complete Guide

Installation Steps for 60 Aluminum Roller Track Yellow: A Complete Guide
Related Product
60 Aluminum Roller Track Yellow
Modular syetem roller tracks aluminum gravity roller tracks are an excellent solution for transporting materials within industrial environments, warehouses and distribution centres.
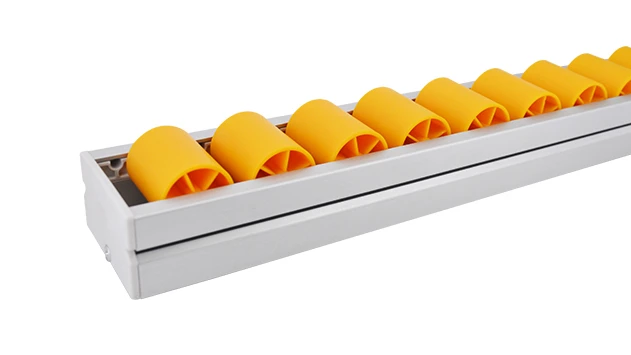
Have you ever walked into a well-organized warehouse or production line and noticed how smoothly materials glide from one station to another? Chances are, you're looking at a lean system in action, and at the heart of that efficiency might be a 60 Aluminum Roller Track Yellow. This versatile component is a staple in flow racks and conveyor setups, helping teams streamline their workflows and reduce unnecessary waste. Whether you're setting up a new lean workstation or upgrading an existing flow rack, installing this roller track correctly is key to getting the most out of your lean system. In this complete guide, we'll walk you through every step of installing the 60 Aluminum Roller Track Yellow, from pre-installation checks to maintenance tips that keep it running like new.
Pre-Installation Preparation
Before you dive into the installation, let's make sure you have everything you need and know how to stay safe.
Tools You'll Need
To get the job done right, gather these tools first:
- Phillips-head screwdriver (medium size)
- Allen wrench set (common sizes: 4mm, 5mm, 6mm)
- Adjustable wrench
- Measuring tape (at least 5 meters long)
- Spirit level (12-inch or longer)
- Rubber mallet (for gentle adjustments)
- Safety gloves (to protect your hands from sharp edges)
- Safety goggles (to shield your eyes from debris)
Safety First
Working with aluminum profiles and roller track components can involve sharp edges and small parts, so always prioritize safety:
- Wear gloves and goggles throughout the installation process.
- Keep your workspace clean and free of clutter to avoid tripping hazards.
- If you're working at height (like installing tracks on upper shelves of a flow rack), use a stable ladder and have someone spot you if possible.
- Don't force any components into place—if something doesn't fit, check for misalignment or damaged parts.
Unboxing and Verifying Parts
When you receive your 60 Aluminum Roller Track Yellow shipment, take a moment to unbox everything and verify that you have all the necessary parts. Here's a typical list of components you might find (the exact parts can vary based on your order):
| Component Name | Quantity | Description |
|---|---|---|
| 60 Aluminum Roller Track Yellow Sections | 5 | Each section is 1 meter long, with yellow plastic rollers |
| Roller Track Connectors | 4 | Used to join track sections together |
| Mounting Brackets | 10 | To attach the track to aluminum profiles |
| M5 Bolts and Nuts | 20 | For securing brackets and connectors |
| End Stops | 2 | To prevent items from sliding off the end of the track |
| Guide Rails (Yellow) | 2 | Optional, to keep items aligned on the track |
If any parts are missing or damaged, contact your supplier immediately before proceeding with installation. It's better to wait for replacement parts than to try and make do with incomplete components—this will save you time and frustration later.
Step-by-Step Installation Guide
Now that you have all your tools and parts ready, let's get to the installation. Follow these steps carefully to ensure a smooth and stable setup.
Step 1: Measure and Mark the Installation Area
First, decide where you want to install the 60 Aluminum Roller Track Yellow. It could be on a flow rack, a conveyor frame, or a custom lean workstation. Use your measuring tape to mark the exact positions where the track will go.
For example, if you're installing the track on a flow rack, measure the distance between the two side aluminum profiles to ensure the track fits perfectly. Mark the spots where the mounting brackets will attach—these should be evenly spaced along the length of the track (every 30-40 cm is a good rule of thumb) to provide adequate support.
Use a spirit level to make sure your marks are straight. A crooked track will cause items to slide to one side, which defeats the purpose of a smooth flow.
Step 2: Attach Mounting Brackets to Aluminum Profiles
Next, take your mounting brackets and attach them to the aluminum profiles using M5 bolts and nuts.
- Place a bracket on the aluminum profile at one of your marked spots.
- insert a bolt through the hole in the bracket and the corresponding slot in the aluminum profile.
- Secure the bolt with a nut, but don't tighten it all the way yet—you'll need to adjust the bracket's position later.
- Repeat this process for all the mounting brackets along the track's length.
Make sure the brackets are facing the right direction (the part that holds the track should be pointing upwards or towards the center of the flow rack, depending on your setup).
Step 3: Connect Roller Track Sections
Now it's time to join the 60 Aluminum Roller Track Yellow sections together. Take two track sections and align their ends. insert a roller track connector into the end of one section, then slide the other section onto the connector until they fit snugly.
If the connector is tight, you can gently tap it with a rubber mallet to get it in place. Avoid using a metal hammer, as this could damage the aluminum track or the plastic rollers.
Continue connecting all the track sections until you have the desired length. Double-check that the rollers are aligned and that there are no gaps between sections—gaps can cause items to get stuck when sliding.
Step 4: Secure the Track to the Brackets
Once your track is assembled, place it onto the mounting brackets. Adjust the position of the brackets so that the track sits evenly on all of them.
- For each bracket, align the holes in the track with the holes in the bracket.
- insert a bolt through both holes and secure it with a nut.
- Tighten all bolts firmly, but not so tight that you deform the aluminum track.
- Use a spirit level to check that the entire track is level. If it's not, adjust the brackets slightly until it is.
This step is crucial—an uneven track will lead to items sliding too fast or getting stuck, which can disrupt your workflow.
Step 5: Test the Roller Movement
After securing the track, it's time to test how well the rollers work. Take a small box or a piece of material that you would typically use on the track and slide it along the length.
- Does it glide smoothly? If not, check for any misaligned rollers or debris in the track.
- Are there any spots where it gets stuck? If yes, look for gaps between track sections or loose brackets.
- Does it stay centered on the track? If it veers to one side, you might need to add guide rails (we'll cover that in the next step).
Make any necessary adjustments before moving on.
Step 6: Add Optional Accessories
Depending on your needs, you might want to add accessories like end stops or guide rails to your 60 Aluminum Roller Track Yellow.
Adding End Stops:
End stops prevent items from sliding off the end of the track. To install them:
- Position an end stop at the end of the track.
- Use bolts and nuts to secure it to the track or the mounting brackets.
- Make sure it's firmly attached so it doesn't come loose when items hit it.
Adding Guide Rails:
Guide rails keep items aligned on the track. They're especially useful if you're moving items of different sizes. To install guide rails:
- Measure the width of the items you'll be moving and mark where the guide rails should go.
- Attach the guide rails to the mounting brackets or directly to the aluminum profile using bolts and nuts.
- Adjust the distance between the guide rails so that items can slide through easily but don't wobble.
Once you've added all accessories, test the track again to ensure everything works as expected.

Troubleshooting Common Issues
Even with careful installation, you might encounter some issues. Here are some common problems and how to fix them:
Problem 1: Rollers are not rolling smoothly
Possible Causes:
- Debris (like dust or small pieces of plastic) is stuck between the rollers.
- Rollers are misaligned due to a gap between track sections.
- Brackets are loose, causing the track to wobble.
Solutions:
- Use a soft brush or cloth to clean the rollers and remove any debris.
- Check the connections between track sections and reattach them if there's a gap.
- Tighten all bracket bolts to ensure the track is stable.
Problem 2: Track is uneven
Possible Causes:
- Mounting brackets are not aligned properly.
- The aluminum profile itself is uneven.
- The surface under the flow rack or workstation is not level.
Solutions:
- Adjust the position of the mounting brackets to level the track.
- If the aluminum profile is uneven, you might need to use shims under the brackets (but this is a last resort—better to use a level profile in the first place).
- Check the surface under your setup and adjust it if necessary (e.g., use leveling feet for the flow rack).
Problem 3: Connectors are coming loose
Possible Causes:
- Connectors were not inserted fully during installation.
- Vibrations from regular use have loosened the connectors.
Solutions:
- Reinsert the connectors and tap them firmly with a rubber mallet to ensure they're fully seated.
- If vibrations are an issue, you can use a small amount of thread locker on the connector (but be careful not to get it on the rollers).
Problem 4: Items are sliding off the track
Possible Causes:
- Guide rails are missing or not properly adjusted.
- The track is tilted too much.
- End stops are not installed.
Solutions:
- Install guide rails and adjust them to the correct width.
- Adjust the angle of the track (if it's on a flow rack) to be less steep.
- Add end stops to the ends of the track.

Maintenance Tips for Longevity
To ensure your 60 Aluminum Roller Track Yellow lasts a long time and continues to perform well, follow these maintenance tips:
Regular Cleaning
Dust and debris can build up on the rollers over time, causing them to slow down or get stuck. Make it a habit to clean the track at least once a week (or more often if your workspace is dusty). Use a soft brush or a damp cloth to wipe down the rollers and the track surface. Avoid using harsh chemicals, as they can damage the plastic rollers or the aluminum finish.
Lubrication
Most roller tracks don't require frequent lubrication, but if you notice the rollers are starting to squeak or slow down, a small amount of light oil (like silicone oil) can help. Apply the oil to the axles of the rollers, not directly to the roller surface—this will prevent dust from sticking to the oil and causing more problems.
Inspection
Every month, take a few minutes to inspect your track for signs of wear and tear. Look for:
- Bent or damaged aluminum track sections.
- Cracked or broken rollers.
- Loose bolts or connectors.
- Corrosion on the aluminum (especially if your workspace is humid).
If you find any damaged parts, replace them immediately. Using damaged components can lead to more serious issues down the line.
Storage
If you need to store the track for an extended period, make sure to clean it thoroughly first. Store it in a dry, cool place away from direct sunlight. Avoid stacking heavy items on top of the track, as this can bend the aluminum sections.
Applications of 60 Aluminum Roller Track Yellow
The 60 Aluminum Roller Track Yellow is a versatile component that can be used in a variety of applications. Here are some common ways it's used in lean systems:
Flow Racks
Flow racks are a key part of lean warehousing, allowing materials to be picked efficiently from the front while new stock is added from the back. The 60 Aluminum Roller Track Yellow is perfect for flow racks because it allows boxes and bins to slide easily from one end to the other. This reduces the time workers spend reaching for materials and helps keep the warehouse organized.
Conveyor Systems
In light-duty conveyor systems, the 60 Aluminum Roller Track Yellow can be used to move small parts or packages between workstations. It's lightweight and easy to install, making it a great choice for custom conveyor setups.
Lean Workstations
Lean workstations are designed to minimize waste and maximize efficiency. Adding a 60 Aluminum Roller Track Yellow to a workstation allows workers to easily move parts from a storage area to their work surface, reducing unnecessary movement and saving time.
Custom Solutions
Many companies use the 60 Aluminum Roller Track Yellow as part of custom lean solutions for industries like 3C assembly, medical equipment manufacturing, and. Its flexibility means it can be adapted to fit almost any workflow, making it a favorite among lean consultants and engineers.
Conclusion
Installing a 60 Aluminum Roller Track Yellow might seem like a simple task, but doing it correctly is essential for getting the most out of your lean system. By following the steps outlined in this guide—from pre-installation preparation to maintenance—you can ensure that your track is stable, level, and works smoothly.
Remember, the goal of lean manufacturing is to reduce waste and improve efficiency, and the 60 Aluminum Roller Track Yellow is a small but powerful tool that helps you achieve that. Whether you're using it in a flow rack, a conveyor system, or a custom workstation, taking the time to install it properly will pay off in the long run with a more organized and efficient workspace.
So, grab your tools, unbox your parts, and start building a leaner, more efficient workflow today!