- Company Articles
- Products and Technology
- Installation And Maintenance
- Installation Steps for Roller Track Placon Mount Center Support Bracket in Warehouses

Installation Steps for Roller Track Placon Mount Center Support Bracket in Warehouses
Related Product
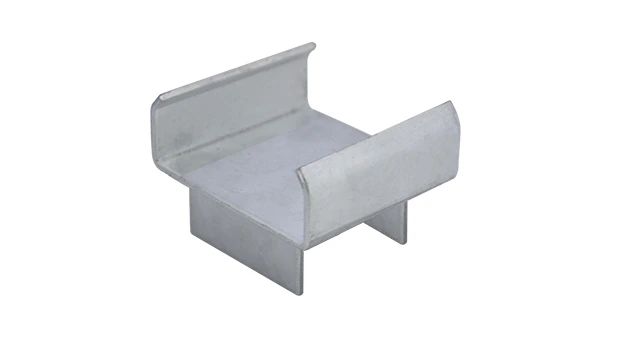
Roller Track Placon Mount Center Support Bracket
Roller track placon mount work as a connector for roller track and pipe or aluminum profile in rack syetem, it is a necessary parts in rack system which widely used in industrial plant and logistic,warehouse storage.
Warehouses are the unsung heroes of modern manufacturing and logistics—they're where raw materials transform into finished products, and where goods begin their journey to customers. At the heart of every warehouse lies a network of equipment designed to streamline movement, reduce waste, and keep operations running like clockwork. Among these essential tools, roller tracks stand out for their ability to smoothly transport everything from small components to heavy cartons, making them a staple in industries like automotive, electronics, and medical device manufacturing. But even the most durable roller track system relies on critical components to stay stable and efficient. Today, we're focusing on one such component: the Roller Track Placon Mount Center Support Bracket. This unassuming piece plays a huge role in preventing sagging, reducing vibration, and ensuring your roller track can handle daily wear and tear. Whether you're setting up a new flow rack, upgrading an existing conveyor line, or simply maintaining your warehouse's infrastructure, getting this installation right is key. Let's break down the process in simple, actionable steps—no jargon, just practical advice to help you get the job done safely and effectively.
Why the Center Support Bracket Matters
Before we dive into the steps, let's take a quick moment to understand why this bracket is so important. Imagine a long roller track spanning across your warehouse—without proper support, the middle section can start to bend under the weight of goods, leading to uneven movement, stuck items, or even track damage over time. The placon mount center support bracket acts like a backbone, reinforcing the track at its weakest point. It keeps the track level, reduces stress on the aluminum profile rails, and ensures that every item glides smoothly from start to finish. In short, it's the difference between a roller track that lasts for years and one that needs constant repairs. Now, let's get started!
Preparation: What You'll Need Before Starting
Like any project, success starts with preparation. Gather these tools and materials first to avoid running back and forth mid-installation:
| Tools | Materials | Safety Gear |
|---|---|---|
| Measuring tape (at least 5m long) | Placon mount center support bracket (check model: e.g., Roller Track Placon Mount Center Support Bracket) | Work gloves (non-slip, preferably leather or nitrile) |
| Spirit level (2ft or longer for accuracy) | Mounting screws (matching the bracket's thread size—typically M6 or M8) | Safety glasses (to protect against falling debris) |
| Cordless drill with Phillips and flat-head bits | Aluminum profile accessories (e.g., end caps, connectors if needed) | Steel-toe boots (especially if working with heavy brackets) |
| Torque wrench (to avoid over-tightening screws) | Washers (stainless steel to prevent rust) | Dust mask (if working in a dusty warehouse area) |
| Pencil or marker (for marking positions) | Thread locker (optional, for extra screw stability) | Ladder or step stool (if installing at height) |
Pro Tip:
Always double-check that your bracket model matches your roller track type. For example, a "40 Roller Track Placon Mount Flat" bracket won't fit a "85 Staggered Roller Track"—mismatched parts can lead to instability or damage. If you're unsure, refer to the product manual or contact your aluminum profile supplier for guidance.

Step 1: Safety First—Clear the Area and Check Conditions
Safety should never be an afterthought. Start by clearing the installation area of any obstacles, like boxes, tools, or loose debris. If the roller track is part of an active conveyor system, turn off the power to the entire line and lock the switch with a tag—you don't want anyone accidentally turning it on while you're working. If you're installing a new track, make sure the floor is dry and level; uneven ground can throw off your measurements later. Finally, if you're working above waist height, use a stable ladder (never a chair or stack of boxes!) and have a colleague spot you—teamwork makes the job safer and faster.

Step 2: Unpack and Inspect the Bracket and Accessories
Now that the area is safe, unpack your placon mount center support bracket and all accompanying parts. Lay them out on a clean workbench to avoid losing small pieces like screws or washers. Take a minute to inspect each item: look for cracks in the bracket's metal, bent screws, or damaged threads. If anything looks defective, don't use it—contact your supplier for a replacement. This is also a good time to confirm you have all the aluminum profile accessories listed in the manual. Common parts include the bracket itself, mounting plates, screws, and sometimes rubber gaskets to reduce noise and vibration.
Step 3: Measure and Mark the Mounting Position
Accuracy here will save you headaches later. Start by measuring the length of your roller track section—let's say it's 3 meters long. The center support bracket should be installed at the midpoint (1.5 meters from each end) to evenly distribute weight. Use your measuring tape to find this spot and mark it lightly with a pencil on both sides of the track's aluminum profile rails. Next, use the spirit level to draw a straight vertical line through the mark—this ensures the bracket will be aligned perpendicular to the track, not slanted. If you're installing multiple brackets (e.g., on a very long track), space them evenly (every 1.5–2 meters) to prevent sagging. Pro tip: Use a string line stretched between the track ends to double-check that your marks are straight—even a small misalignment can cause items to get stuck later.
Step 4: Attach the Placon Mount Base to the Aluminum Profile
Now it's time to start mounting. Most placon mount brackets attach directly to the aluminum profile rails of the roller track. Here's how:
4.1 Position the bracket
Hold the placon mount base (the flat part of the bracket that connects to the aluminum profile) against the rail, aligning its screw holes with the pre-drilled holes on the profile. If your profile doesn't have pre-drilled holes, use the bracket as a template to mark where to drill—just make sure the drill bit size matches the screws (e.g., 4.5mm drill bit for M5 screws).
4.2 insert and tighten the screws
Place a washer on each screw (this helps distribute pressure and prevents the profile from cracking) and insert them into the holes. Use your cordless drill to hand-tighten the screws first—you want them snug but not fully tight yet. This leaves room to adjust the bracket's position if needed.
4.3 Check alignment with the spirit level
Set the spirit level on top of the bracket—if the bubble is centered, you're good to go. If not, gently tap the bracket left or right until it's level. Once aligned, use the torque wrench to fully tighten the screws. Most aluminum profiles require a torque of 3–5 Nm (check the bracket's manual for specifics)—over-tightening can strip the threads, while under-tightening can lead to loosening over time.
Step 5: Install the Center Support Arm
With the base secure, it's time to attach the vertical support arm (the part that connects the base to the track). Slide the arm into the base's slot or align its holes with the base's mounting points (depending on your bracket model). insert the connecting screws and hand-tighten them. Then, use the spirit level again to ensure the arm is perfectly vertical—leaning even a little can cause the track to tilt, leading to uneven movement. Once vertical, fully tighten the screws with the torque wrench. For extra stability, apply a small drop of thread locker to the screw threads before tightening—this prevents them from loosening due to vibration.
Step 6: Secure the Bracket to the Floor or Support Structure
Depending on your setup, the bottom of the support arm may need to be anchored to the floor or a lower support beam. If anchoring to the floor: mark the hole positions using the arm's base plate, drill pilot holes, insert wall plugs (if using concrete), then secure with bolts. If attaching to a beam, use clamps or brackets that match the beam's width. Make sure the connection is rock-solid—wiggle the arm gently to test; it shouldn't move at all. If it does, check the screws or bolts and tighten them further.
Step 7: Test the Installation
You're almost done! Now it's time to test if everything works. Place a few boxes or containers of varying weights (up to the track's maximum load capacity) on the roller track and push them gently. They should glide smoothly without getting stuck or tilting. Listen for unusual noises—squeaking or grinding could mean the bracket is misaligned or the track is under too much tension. If you notice any issues, double-check the bracket's alignment, tighten any loose screws, or adjust the position slightly. Repeat the test until the movement is smooth and quiet.
Common Problem Fix:
If the track sags in the middle even after installation, the bracket might be too low. Loosen the base screws, raise the bracket slightly, and retighten. If the track tilts to one side, adjust the bracket's position left or right until level.
Step 8: Final Checks and Cleanup
Take a step back and inspect your work. Is the bracket level? Are all screws tight? Is the track movement smooth? If yes, great job! Clean up any debris, put away your tools, and remove the lockout tag from the power switch (if you turned off a conveyor). If you're installing multiple brackets, repeat the steps for each one, making sure they're evenly spaced. Finally, add a small note to your warehouse maintenance log with the installation date—this helps track when the bracket might need inspection later.
Key Tips for Long-Term Performance
To keep your roller track and bracket working well for years:
- Check monthly: Tighten any loose screws and clean debris from the bracket and track.
- Lubricate moving parts: If your bracket has pivot points, apply a small amount of silicone lubricant every 3 months to reduce friction.
- replace worn parts: If the bracket starts to bend or the screws rust, replace them immediately—don't wait for a breakdown.
- Match loads to capacity: Never exceed the bracket's weight limit (check the product label). Overloading is the #1 cause of bracket failure.
Where This Bracket Shines: Real-World Applications
This installation process isn't just for warehouses— it's a critical step in building lean, efficient workspaces across industries. Here are a few examples of where it makes a difference:
- Automotive Parts Warehouses: Heavy engine components glide smoothly on roller tracks supported by these brackets, reducing manual lifting and speeding up order fulfillment.
- 3C Electronics Assembly Lines: Small, delicate parts like circuit boards need precise movement—level, stable tracks prevent jostling and damage.
- Medical Device Manufacturing: Cleanrooms require equipment that's easy to sanitize; the bracket's simple design (no hard-to-clean crevices) keeps hygiene standards high.
- Home Appliance Production: Large items like refrigerators or washing machines rely on stable roller tracks to move through assembly stations without tipping.
In all these cases, the placon mount center support bracket isn't just a part—it's part of a larger lean solution that focuses on reducing waste, improving safety, and making workflows adaptable. After all, the best warehouse systems are ones that can grow and change with your business, and a well-installed bracket ensures your roller track can evolve too—whether you add more sections later or increase load capacity.
Wrapping Up: Your Roller Track, Stronger Than Ever
Installing a Roller Track Placon Mount Center Support Bracket might seem like a small task, but it's a big step toward building a more efficient, reliable warehouse. By taking the time to measure carefully, align properly, and test thoroughly, you're not just fixing a bracket—you're investing in smoother operations, fewer delays, and a safer workplace. And remember, this is just one part of the larger lean philosophy that drives modern manufacturing: reusability, continuous improvement, and attention to detail. So the next time you walk through your warehouse and see goods gliding effortlessly along the roller track, you'll know you played a part in making that happen. Here's to stronger tracks, smarter workflows, and a more productive future!