- Company Articles
- Products and Technology
- Installation And Maintenance
- Installation Tools for 2020 Aluminum Profile End Caps: Must-Have Equipment

Installation Tools for 2020 Aluminum Profile End Caps: Must-Have Equipment
Related Product
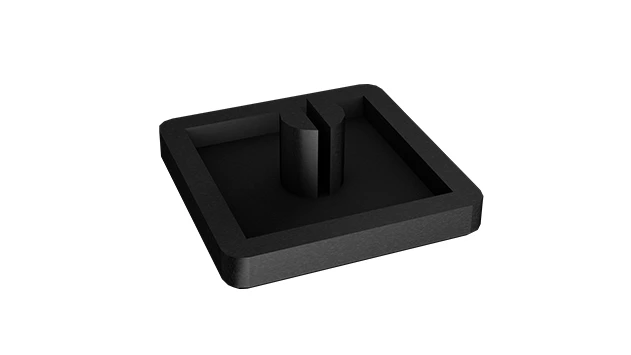
2020 Aluminum Profile End Cap
The aluminum profile end cap adds a finishing touch to your project and closes off profile ends to limit dust and debris buildup, also it can avaid some scratch for material and labor during the assemble work.
Walk into any modern workshop, manufacturing facility, or even a well-organized home garage, and you'll likely spot aluminum extrusion profiles hard at work. These versatile building blocks—lightweight, strong, and infinitely customizable—are the backbone of everything from workbenches and storage racks to production line setups and display stands. But even the most well-designed aluminum extrusion profile needs a finishing touch to truly shine: enter the end cap.
Small as they may seem, end caps play a critical role in both functionality and aesthetics. They seal the open ends of aluminum profiles, hiding sharp edges that could snag clothing or skin, preventing dust and debris from clogging internal channels, and giving your project that polished, professional look. And when it comes to common profile sizes, the 2020 aluminum profile end cap is a staple. Whether you're building a DIY workstation or outfitting an entire factory floor, getting these end caps installed correctly is key. But here's the thing: you can't do it well without the right tools. In this guide, we'll break down the must-have equipment for installing 2020 aluminum profile end caps, why each tool matters, and how to use them like a pro.
Why 2020 Aluminum Profiles and Their End Caps Matter
First, let's talk about the star of the show: the 2020 aluminum extrusion profile. Named for its 20mm x 20mm cross-section, this compact profile is a favorite for projects that need a balance of strength and maneuverability. It's commonly used in small workbenches, shelving units, 3D printer frames, and even custom furniture. What makes it so popular? Its T-slot design, which allows for easy attachment of aluminum profile accessories like brackets, panels, and—you guessed it—end caps.
End caps for 2020 profiles come in a range of materials, from durable plastic to sleek metal, and they're designed to snap, press, or screw into place. But regardless of the type, a poorly installed end cap can ruin the look of your project or, worse, fail to protect against sharp edges. That's where the right tools come in. They don't just make installation faster—they ensure a snug, secure fit that lasts.
Essential Installation Tools: A Breakdown
Installing 2020 aluminum profile end caps might seem simple, but anyone who's fumbled with a loose end cap or cracked one while trying to hammer it into place knows better. The tools you need depend on the type of end cap (snap-fit, adhesive-backed, or screw-on) and the condition of your aluminum extrusion profile. Below, we've categorized the must-haves into basic hand tools, specialized tools, and safety gear to keep you prepared for any scenario.
Basic Hand Tools: The Foundation of End Cap Installation
These are the workhorses you'll reach for first. Most DIYers and professionals already have some of these in their toolboxes, but it's worth double-checking you have the right sizes and types for aluminum profiles.
1. Hex Key Set (Allen Wrenches)
While many 2020 end caps are snap-fit, some—especially metal or heavy-duty plastic ones—use small screws to secure them in place. These screws are often hex-headed (Allen screws), so a reliable hex key set is non-negotiable. Look for a set with sizes ranging from 1.5mm to 5mm; 2mm and 2.5mm are the most common for 2020 profiles. Pro tip: Opt for ball-end hex keys if you can—they allow you to reach screws at an angle, which is handy if your profile is already mounted in a tight space.
Why it matters: Using the wrong size hex key can strip the screw head, making it impossible to tighten or remove. A well-fitted key ensures you apply even pressure without damaging the fastener or the end cap.
2. Rubber Mallet
For snap-fit end caps, a rubber mallet is your best friend. Unlike a metal hammer, which can dent or scratch the aluminum extrusion profile or crack the end cap, a rubber mallet delivers gentle, even force. Look for one with a solid rubber head (avoid hollow ones, which can lose their shape over time) and a comfortable grip. A 12-ounce mallet is usually sufficient for 2020 profiles—anything heavier might be overkill and risk damaging the end cap.
How to use it: Hold the end cap in place with one hand, aligning it with the open end of the profile. Then, tap the mallet lightly on the center of the end cap, working your way around the edges to ensure even seating. Avoid hitting too hard—snap-fit end caps rely on pressure to stay in place, not brute force.
3. Needle-Nose Pliers
Needle-nose pliers are a lifesaver for two scenarios: adjusting misaligned end caps and removing stubborn ones. Their long, narrow jaws can reach into tight spaces to gently pry a loose end cap back into place or grip and pull off an old, cracked one. Look for pliers with a rubberized grip for comfort and a spring-loaded design to reduce hand fatigue during repetitive tasks.
Pro tip: If you're working with plastic end caps, wrap the plier jaws in electrical tape to prevent scratching or marring the surface.
4. Tape Measure and Carpenter's Pencil
Okay, so you might not need a tape measure to install a single end cap, but if you're working on a project with multiple profiles (like a shelving unit with 10+ 2020 rails), accuracy matters. A quick measurement ensures all end caps are aligned evenly, giving your project a cohesive look. A small carpenter's pencil or a fine-tip marker works best for marking the profile if you need to trim it to length before installing the end cap (though most 2020 profiles come pre-cut, it never hurts to double-check).
Specialized Tools: For Tricky End Caps and Profiles
These tools are less common in basic toolboxes, but they're worth investing in if you work with aluminum extrusion profiles regularly or need to handle challenging installations.
1. Deburring Tool
Here's a step many people skip: deburring the aluminum extrusion profile before installing the end cap. When aluminum profiles are cut to length, they often leave sharp burrs or rough edges around the T-slots or open ends. These burrs can prevent the end cap from seating properly or even tear through plastic end caps. A deburring tool—either a manual hand tool with a rotating blade or an electric deburring tool—smooths these edges in seconds.
How to use it: Hold the tool at a 45-degree angle to the profile end and run the blade along the edge, applying light pressure. Rotate the profile and repeat until all burrs are removed. For T-slots, use the tool's narrow tip to clean out any debris or rough spots inside the slot—this is especially important for screw-on end caps that thread into the T-slot.
2. End Cap Press Tool
For large projects (think: installing 50+ end caps in a factory setting), a manual end cap press tool is a game-changer. This handheld tool has a flat, padded surface that distributes pressure evenly across the end cap, eliminating the risk of cracking or warping that comes with mallet taps. It's especially useful for soft plastic end caps, which are prone to damage if hit unevenly.
Most press tools are adjustable, so you can set the depth to match the thickness of your 2020 profile. Simply place the end cap on the profile, position the press tool over it, and squeeze the handles to apply pressure. It's faster than a mallet and gentler on delicate end caps.
3. Adhesive Applicator (for Glue-On End Caps)
Some heavy-duty end caps use adhesive instead of snaps or screws, especially in industrial settings where vibration might loosen snap-fit caps. If you're using adhesive-backed end caps, a small adhesive applicator (like a putty knife or a specialized glue spreader) ensures the adhesive is applied evenly to both the end cap and the profile. Too much adhesive can squeeze out and make a mess; too little won't hold. An applicator with a thin, flexible blade gives you precise control.
Pro tip: For best results, clean the profile end with rubbing alcohol before applying adhesive—dirt and oil can weaken the bond.
Safety Gear: Protect Yourself (Yes, Even for End Caps)
It's easy to overlook safety when installing something as small as an end cap, but aluminum burrs are sharp, and tools like deburring blades can slip. Here's what you need to stay safe:
- Work Gloves: A pair of lightweight nitrile or leather gloves protects your hands from burrs and sharp edges. Leather gloves are better for handling metal end caps, while nitrile works well for plastic ones.
- Safety Glasses: Deburring or cutting aluminum can send tiny metal shards flying—safety glasses with side shields are a must.
- Work Mat: A rubber or foam work mat prevents the aluminum profile from slipping while you work and protects your work surface from scratches.
Tool Comparison Table: Which Tools Do You Need?
To help you decide which tools to prioritize, we've put together a quick comparison of the essential tools, their uses, and who should invest in them.
| Tool | Primary Use | Best For | Difficulty Level | Estimated Price Range |
|---|---|---|---|---|
| Hex Key Set | Securing screw-on end caps | Metal end caps, heavy-duty plastic caps | Beginner | $5–$20 |
| Rubber Mallet | Pressing snap-fit end caps into place | Plastic snap-fit caps, basic installations | Beginner | $8–$15 |
| Deburring Tool | Smoothing rough edges on aluminum profiles | All installations (critical for plastic end caps) | Intermediate | $10–$30 (manual); $50–$150 (electric) |
| End Cap Press Tool | Even pressure for delicate or large end caps | Professional installers, bulk projects | Intermediate | $25–$50 |
| Needle-Nose Pliers | Adjusting or removing end caps | Loose or misaligned caps | Beginner | $5–$12 |

Step-by-Step Installation Guide: Putting It All Together
Now that you have your tools ready, let's walk through installing a 2020 aluminum profile end cap from start to finish. We'll use a common scenario: a plastic snap-fit end cap on a newly cut 2020 aluminum extrusion profile.
Step 1: Prepare the Aluminum Profile
Start by inspecting the end of your 2020 profile. Look for burrs, dents, or debris in the T-slots. If you see burrs, grab your deburring tool and run it along the edge at a 45-degree angle. Apply gentle pressure—you want to remove the burr, not scratch the profile's anodized finish. Wipe the end with a clean cloth to remove any metal shavings.
Step 2: select the Right End Cap
Not all 2020 end caps are created equal. Check that the end cap matches your profile's dimensions (20mm x 20mm) and style (some have a flat top, others a rounded edge). If it's a snap-fit cap, flex it slightly to ensure it's not cracked or warped—damaged caps won't hold.
Step 3: Align the End Cap
Hold the end cap with the open side facing the profile. Line up the edges so that the cap's lips (the parts that snap into the profile) align with the profile's T-slots or outer edges. For snap-fit caps, you should feel a slight resistance as the lips start to catch.
Step 4: Secure the End Cap
Using your rubber mallet, tap the center of the end cap gently. Start with light taps, then gradually increase pressure until you hear a soft "click"—this means the cap has snapped into place. If the cap is screw-on, use your hex key to tighten the screws clockwise until snug (don't overtighten—you could strip the threads or crack the cap).
Step 5: Test the Fit
Give the end cap a gentle tug to ensure it doesn't come loose. It should feel firm, with no wiggling. If it moves, check for burrs you missed or a warped end cap. For adhesive-backed caps, apply pressure for 30 seconds to ensure the glue bonds, then let it sit for 24 hours before using the profile.

Troubleshooting Common End Cap Issues
Even with the right tools, you might run into hiccups. Here's how to fix the most common problems:
Issue: End Cap Won't Snap Into Place
Cause: Burrs on the profile or a warped end cap.
Solution: Deburr the profile again, focusing on the T-slots. If the cap is warped, replace it—cheap plastic caps are prone to warping in heat or during shipping.
Issue: End Cap Falls Off Easily
Cause: Not enough pressure during installation or a mismatched cap size.
Solution: Use the rubber mallet to tap the cap more firmly (but don't crack it!). If it still falls off, check that the cap is labeled for 2020 profiles—some brands make 15mm or 30mm caps that look similar.
Issue: Screw-On Cap Strips
Cause: Using the wrong hex key size or overtightening.
Solution: Use a hex key that fits snugly in the screw head. If the threads are stripped, try a slightly larger screw (e.g., M4 instead of M3) or switch to a snap-fit cap.
Maintaining Your End Caps and Tools
End caps don't last forever—plastic ones can crack in extreme temperatures, and metal ones might corrode if exposed to moisture. Check them every 6–12 months and replace any that are damaged. As for your tools, keep hex keys clean and oiled to prevent rust, and store deburring tools with the blade covered to avoid accidental cuts.
Final Thoughts: Small Tools, Big Impact
Installing 2020 aluminum profile end caps might seem like a minor step, but it's the details that turn a functional project into a professional one. With the right tools—a reliable hex key set, rubber mallet, deburring tool, and maybe a pair of needle-nose pliers—you can ensure every end cap fits snugly, protects against sharp edges, and makes your aluminum extrusion profile project look its best.
Whether you're a DIY enthusiast building a 3D printer frame or a factory manager outfitting a production line, investing in these tools will save you time, frustration, and money in the long run. After all, a well-installed end cap is more than just a finishing touch—it's a sign of quality craftsmanship.