- Company Articles
- Products and Technology
- Installation And Maintenance
- Installation Tools Needed for T Slot Aluminum Pipe with Board Holder Assembly

Installation Tools Needed for T Slot Aluminum Pipe with Board Holder Assembly
Related Product
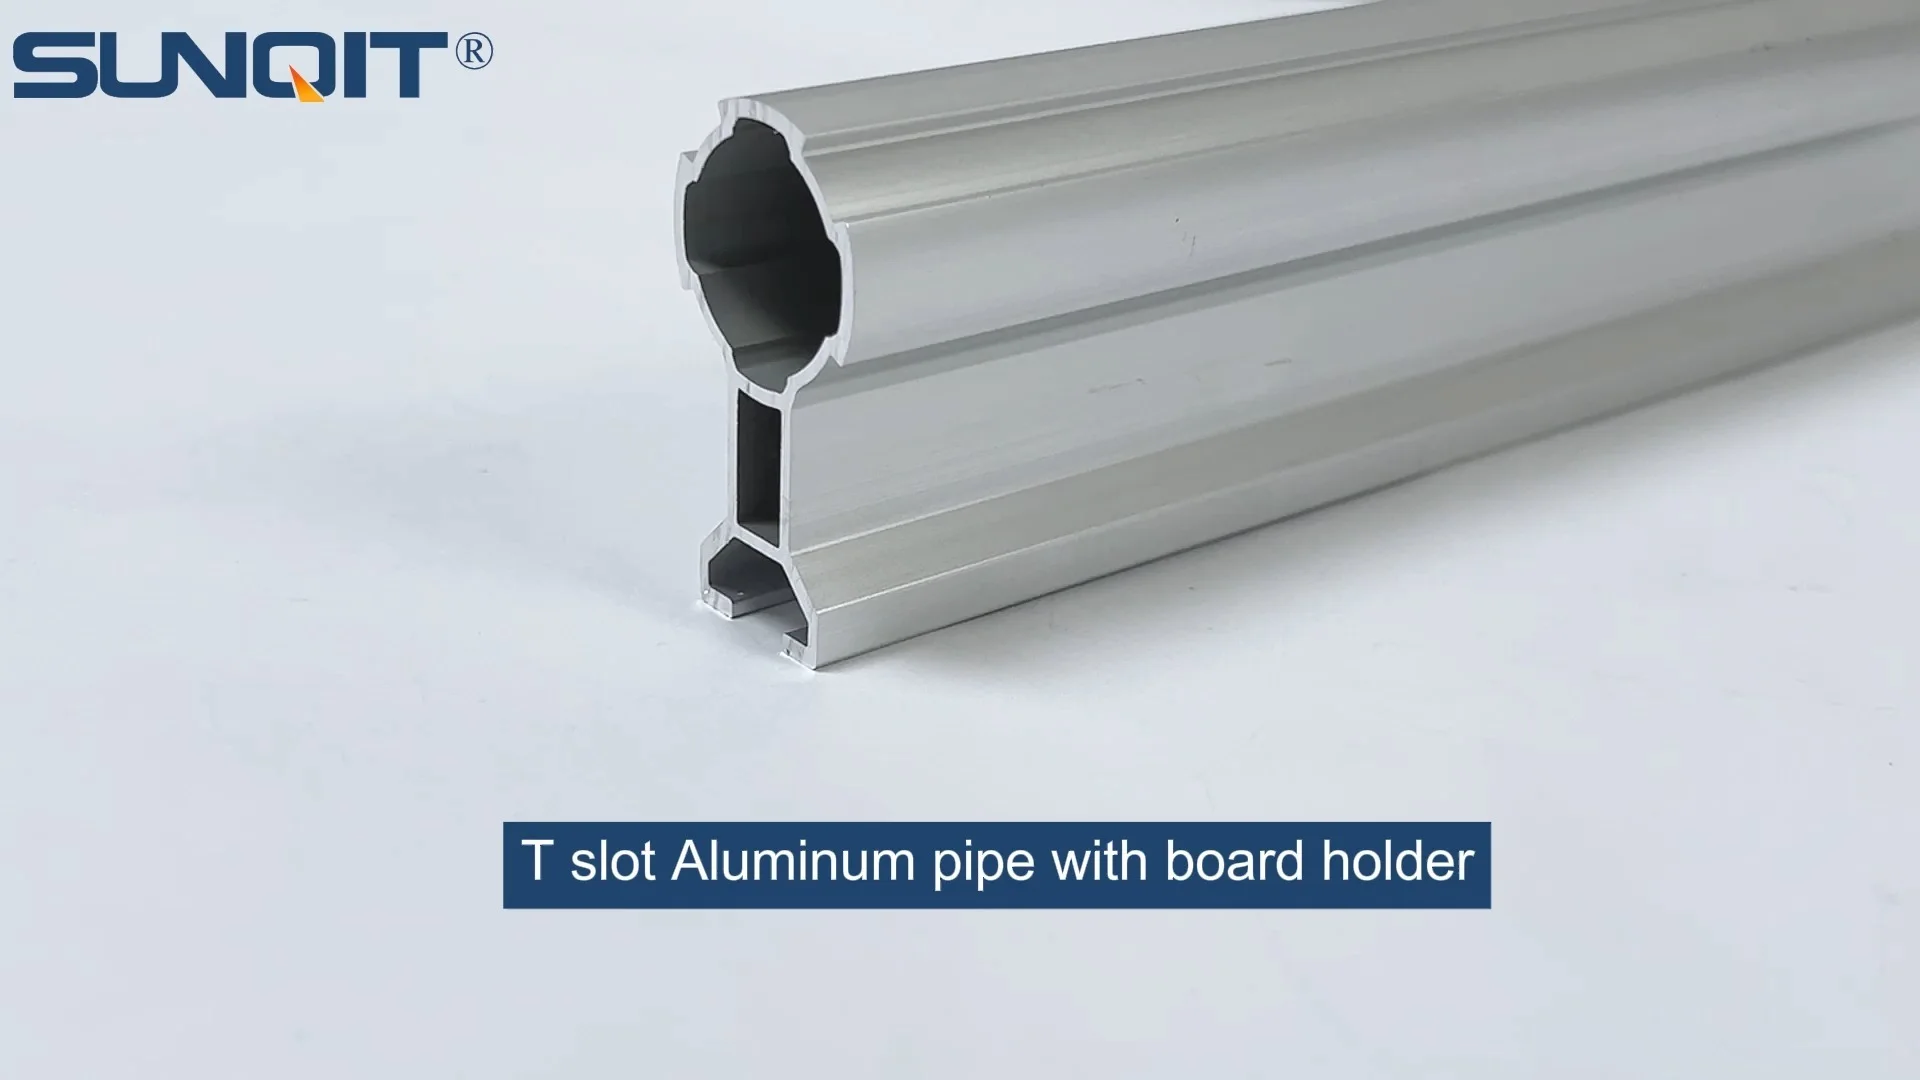
T Slot Aluminum Pipe with Board Holder
T slot Aluminum pipe with board holder,the pipe one side connected by a joint, the other side with a slot which can hold a tray or a aluminum pannel
Introduction: The Backbone of Modern Workspaces
Walk into any busy workshop, manufacturing plant, or even a well-organized garage, and you'll likely spot structures built with T-slot aluminum pipes—sleek, modular, and surprisingly sturdy. These versatile components form the backbone of workbenches, material racks, assembly lines, and yes, board holders that keep tools and materials within arm's reach. But here's the thing: even the highest-quality aluminum profile or aluminum extrusion profile won't live up to its potential without proper installation. The difference between a wobbly (rack) that sways at the slightest touch and a rock-solid structure lies in the tools you use. In this guide, we're diving deep into the essential tools that make T-slot aluminum pipe assembly not just possible, but efficient, precise, and long-lasting.
Whether you're a seasoned facility manager, a small business owner setting up a new workspace, or a DIY enthusiast building a custom workbench, understanding these tools will save you time, frustration, and costly mistakes. We'll cover everything from measuring to cutting, drilling to fastening, and even the safety gear that shouldn't be overlooked. By the end, you'll know exactly what's in a pro's toolbox—and why each item matters.
The Basics: Why Tools Matter for T-Slot Aluminum Assembly
T-slot aluminum pipes, often called aluminum lean pipes, are designed for flexibility. Their T-shaped grooves allow for easy attachment of aluminum profile accessories—joints, brackets, clamps, and yes, board holders—without welding or complex fabrication. But this modularity demands precision. A misaligned cut, a loose fastener, or a crooked joint can throw off the entire structure, leading to instability or even failure. That's where the right tools come in: they ensure measurements are accurate, cuts are clean, and connections are tight enough to hold weight but not so tight they damage the aluminum.
Consider this: when assembling a workbench with a board holder, you'll need to connect aluminum pipes at exact angles, secure them with joints, and attach the holder so it sits level. Skip a tool like a level, and your board might slope, sending tools sliding off. Use a dull saw, and the pipe's edges could burr, making it hard to fit aluminum profile accessories like internal rotatary aluminum joints. Every tool in this list plays a role in turning a pile of parts into a functional, reliable workspace solution.

Essential Tools: Breaking Down the Toolkit
Let's get to the heart of the matter: the tools. We've grouped them into categories to make it easy to follow, starting with the fundamentals and moving to specialized gear. Remember, this isn't just a shopping list—it's a guide to why each tool is critical and how to use it effectively.
1. Measuring Tools: Get It Right the First Time
"Measure twice, cut once" isn't just a cliché—it's the golden rule of assembly. Even a 1/8-inch error in measurement can lead to parts that don't line up, forcing you to start over or compromise on stability. Here are the measuring tools you can't skip:
- Tape Measure : A 25-foot retractable tape with clear markings (metric and imperial) is a must. Look for one with a lock feature to hold measurements and a sturdy hook that won't slip on aluminum surfaces.
- Speed Square : Perfect for marking 90° and 45° angles—critical for joints like the 90° aluminum profile connector or 45° aluminum pipe joint inside connection. Its triangular shape makes it easy to align against the pipe's edge for precise marks.
- Spirit Level : A 2-foot or 4-foot level ensures your structure is plumb (vertical) and level (horizontal). When attaching a board holder, even a slight tilt can make tools slide off, so this tool is non-negotiable.
- Carpenter's Pencil : A thick, dark pencil (or a fine-tip marker) for marking cut lines. Avoid using pens—ink can smudge on aluminum, and pencil marks are easy to erase if you make a mistake.
Pro tip: When measuring for a board holder, account for the thickness of the aluminum profile accessories you'll use. For example, if you're using a parallel aluminum joint a to connect the pipe to the holder, add its width to your pipe length to ensure the holder sits at the right height.
2. Cutting Tools: Making Clean, Straight Cuts
Aluminum is softer than steel, but that doesn't mean any old saw will do. A jagged cut leaves burrs that can damage T-slot accessories or make joints fit poorly. The goal is a smooth, square edge that slides easily into connectors and sits flush against brackets. Here are the tools that deliver:
- Hacksaw with Aluminum Blades : A classic choice for small projects. Look for blades with 32 teeth per inch (TPI)—finer than steel blades—to minimize tearing. Secure the pipe in a vice (we'll cover that later) and saw slowly, letting the blade do the work. Avoid applying too much pressure, which can bend the pipe.
- Miter Saw with Aluminum-Cutting Blade : For larger jobs or multiple cuts, a miter saw with a carbide-tipped blade (labeled for non-ferrous metals) is a game-changer. It makes straight, repeatable cuts in seconds. Just remember to wear eye protection—aluminum chips fly!
- Pipe Cutter : Ideal for thin-walled aluminum pipes (like basic aluminum tube). This tool clamps around the pipe and rotates, scoring the surface until it snaps cleanly. It's quick, quiet, and leaves minimal burrs—great for tight spaces where a saw won't fit.
- Deburring Tool : After cutting, use this small, handheld tool to remove sharp burrs from the pipe's inner and outer edges. A deburred pipe won't snag on gloves or damage T-slot accessories during assembly.
Fun fact: If you're working with stainless steel pipe series (sometimes used alongside aluminum for corrosion resistance), swap to a blade labeled for stainless steel—its harder composition requires a more aggressive cut.
3. Drilling Tools: Creating Holes for Custom Installations
Most T-slot assemblies rely on the grooves for fastening, but sometimes you'll need to drill holes—for example, to attach a caster wheel to a trolley base or to mount a board holder directly to a wall. Aluminum is easy to drill, but the wrong bit can cause "wandering" (the bit skidding off the mark) or overheating. Here's what you need:
- Cordless Drill/Driver : A 12V or 18V drill with variable speed. Use low speed for aluminum to prevent overheating the bit. Look for a model with a keyless chuck for quick bit changes.
- High-Speed Steel (HSS) Drill Bits : Labeled for aluminum or non-ferrous metals. Start with a small pilot bit (1/8 inch) to guide the larger bit, especially if you're drilling near the pipe's edge. For T-slot aluminum, bits up to 3/8 inch are usually sufficient.
- Center Punch and Hammer : Before drilling, tap a center punch at your mark to create a small indent. This prevents the drill bit from slipping—a must for precise hole placement, like when attaching a suction cup anti-slip foot adjuster to a workbench leg.
- Vice or Clamp : Always secure the pipe before drilling. A bench vice with rubber jaws (to avoid scratching the aluminum) or a C-clamp attached to a workbench keeps the pipe steady, ensuring the hole stays straight.
Pro tip: Lubricate the drill bit with cutting oil or even dish soap to reduce friction and extend bit life. Wipe away chips frequently to keep the bit cool.
4. Fastening Tools: Tightening Connections Without Damage
This is where the magic happens. T-slot aluminum relies on fasteners—screws, bolts, and hex keys—to hold aluminum profile accessories in place. Using the wrong tool here can strip screws, round hex keys, or even crack the aluminum. Let's break down the essentials:
- Hex Keys (Allen Wrenches) : The backbone of T-slot assembly. Most aluminum profile accessories, from internal rotatary aluminum joints to roller track placon mount brackets, use hex screws. Invest in a set with both long and short arms—long arms for hard-to-reach spots, short arms for tight spaces. Look for ball-end hex keys, which allow angled use when a straight approach isn't possible.
- Socket Set with Deep Wells : For bolts with hexagonal heads, especially those recessed in T-slots. A 1/4-inch drive set with metric sockets (6mm to 14mm) covers most aluminum fasteners. Deep-well sockets are key for bolts that extend past the nut.
- Torque Wrench : Over-tightening is a common mistake. A torque wrench ensures you apply the exact amount of force specified by the aluminum pipe supplier (usually 4-6 Nm for M5 screws). Too little torque, and the joint loosens; too much, and you risk stripping the T-slot or cracking the aluminum.
- Aluminum Pipe Clamp : Not to be confused with pipe cutters, these clamps (like parallel fixation aluminum pipe joint) hold two pipes together during assembly, keeping them aligned while you tighten fasteners. They're especially useful for long spans, like the rails of a material rack b (3 row and 3 floor).
- Magnetic Screwdriver : For small screws, like those used in swivel roller balls 1 inch or plastic roller track guide rail yellow. A magnetic tip prevents screws from dropping into hard-to-reach T-slots.
Did you know? Many aluminum lean pipe suppliers sell specialized hex keys with ergonomic handles—worth the investment if you're assembling multiple structures. They reduce hand fatigue during long sessions.
5. Assembly Aids: Making the Job Easier
Even with the right measuring, cutting, and fastening tools, assembly can get tricky. These "helper" tools keep parts aligned, reduce strain, and speed up the process:
- Bench Vice : A sturdy vice mounted to your workbench holds pipes steady while cutting, drilling, or assembling. Look for one with jaw pads to protect the aluminum's finish.
- Rubber Mallet : Sometimes, aluminum profile accessories (like a 90° aluminum crossing joint) need a gentle tap to seat fully. A rubber mallet delivers force without denting or scratching the aluminum.
- Assembly Workbench : A flat, level surface to lay out parts. If you're building a workbench e (single deck-without caster), use a temporary table or even the floor (covered with a towel to avoid scratches) to assemble components before standing them up.
- Clamps (C-Clamps and Bar Clamps) : For holding pipes together while you insert screws or bolts. A bar clamp is perfect for securing two parallel pipes (like the legs of a board holder) to ensure they're straight before fastening.
Pro tip: When assembling a roller track (like 40 steel roller track yellow wheel), use a straightedge along the rollers to ensure they're aligned. A misaligned roller track will cause materials to jam or slide unevenly.
6. Safety Gear: Protecting Yourself During Assembly
Tools are powerful, but they can also be dangerous. Don't skip these items—they're non-negotiable for avoiding injuries:
- Safety Glasses : Aluminum chips and debris fly during cutting and drilling. Even a small chip in the eye can cause serious damage. Wear ANSI-approved glasses with side shields.
- Work Gloves : Leather or cut-resistant gloves protect hands from sharp burrs, hot tools, and slippery pipes. Avoid latex gloves—they don't grip aluminum well and can tear easily.
- Dust Mask or Respirator : Cutting aluminum creates fine dust that irritates the lungs. A basic dust mask works for occasional use; for large projects, upgrade to a respirator with N95 filters.
- Ear Protection : Power tools like miter saws or drills are loud. Earplugs or earmuffs prevent hearing damage, especially during extended use.
- Steel-Toed Boots : If you're working with heavy aluminum pipes or assembling large structures (like a material rack b), steel-toed boots protect feet from dropped parts.

Step-by-Step: Tools in Action for Board Holder Assembly
Now that we've covered the tools, let's walk through a real-world example: assembling a T-slot aluminum pipe structure with a board holder. We'll map out which tools you'll use at each stage, so you can see how they work together.
Project:
A simple board holder mounted to a workbench leg, using basic aluminum tube, a two way aluminum joint, and a flat board (plywood or metal).
Step 1: Planning and Measurement
Tools needed: Tape measure, speed square, pencil, spirit level.
Start by measuring the height where you want the board holder—say, 30 inches from the floor. Mark the workbench leg at this height with your pencil. Use the speed square to draw a straight line around the leg (this is where the two way aluminum joint will attach). Then, measure the length of the board holder arm (e.g., 18 inches) and mark the aluminum pipe accordingly. Double-check with the level to ensure the mark is horizontal—no one wants a slanted board holder!
Step 2: Cutting the Aluminum Pipe
Tools needed: Hacksaw (or miter saw), vice, deburring tool, work gloves, safety glasses.
Secure the aluminum pipe in the vice, aligning your cut mark with the vice's edge. Put on gloves and safety glasses, then saw along the mark using slow, steady strokes. After cutting, use the deburring tool to smooth both ends. Test-fit the pipe into the two way aluminum joint—if it's too tight, deburr again until it slides in easily.
Step 3: Attaching the Joint to the Workbench Leg
Tools needed: Hex key, torque wrench, clamp, spirit level.
Slide the two way aluminum joint onto the workbench leg, aligning it with your earlier mark. Use a clamp to hold the joint in place (this frees up your hands to tighten the screws). insert the hex screws into the joint's T-slot, then use the hex key to snug them. Finish with the torque wrench, setting it to 5 Nm (check the joint's specs—over-tightening can crack the aluminum). Use the level to confirm the joint is horizontal before fully tightening.
Step 4: Mounting the Holder Arm
Tools needed: Hex key, aluminum pipe clamp (optional), rubber mallet.
insert the cut aluminum pipe into the open end of the two way aluminum joint. If it's a press-fit joint, tap gently with the rubber mallet until it seats flush. For screw-tightened joints, align the pipe's T-slot with the joint's screw holes, insert the hex screws, and tighten with the hex key. If the arm wobbles, use an aluminum pipe clamp to hold it steady while you tighten—this ensures the arm stays straight.
Step 5: Attaching the Board
Tools needed: Drill, pilot bit, wood/metal screws, screwdriver, spirit level.
Place the board on top of the holder arm. Use the pencil to mark where the screws will go (pre-drill holes in the board if it's wood to prevent splitting). Drill pilot holes through the board into the aluminum pipe's T-slot (use a 1/8-inch bit). Then, drive the screws into the T-slot—they'll grip the slot's edges, holding the board securely. Finally, use the level to check the board is flat—adjust if needed by loosening the joint and repositioning.
Step 6: Final Check
Tools needed: Spirit level, torque wrench, rubber mallet (for minor adjustments).
Give the board a gentle shake to test stability. If it wobbles, check the joint screws with the torque wrench. Use the level to confirm everything is still horizontal. If the board dips, tap the joint slightly with the rubber mallet to raise it—aluminum is flexible enough for small adjustments.
| Step | Key Tools | Why It Matters |
|---|---|---|
| Measurement | Tape measure, speed square | Ensures the holder is at the right height and straight |
| Cutting | Hacksaw, deburring tool | Clean cuts prevent joint damage and ensure a snug fit |
| Joint Attachment | Hex key, torque wrench | Proper torque prevents loosening or cracking |
| Board Mounting | Drill, screwdriver | Securely attaches the board without damaging the pipe |
Common Mistakes to Avoid
Even with the right tools, assembly can go wrong. Here are pitfalls to watch for:
- Using Dull Blades/Bits : A dull hacksaw blade or drill bit tears aluminum instead of cutting it, leaving ragged edges. replace blades after 10-15 cuts—they're cheap compared to redoing a project.
- Ignoring Burrs : Sharp burrs can cut hands or damage T-slot accessories. Always deburr after cutting—this small step saves big headaches.
- Overtightening Fasteners : Aluminum is soft; over-tightening hex screws can strip T-slots or crack joints. The torque wrench is your friend here—follow the supplier's specs.
- Skipping the Level : "Eye-balling" it might seem fine, but a 1-degree tilt can make tools slide off the board holder. Take 30 seconds to check with the level.
- Using Steel Tools on Aluminum : Steel vices or clamps without rubber jaws can scratch aluminum's finish. If you don't have rubber jaws, wrap the pipe in masking tape before clamping.
Tool Maintenance: Keeping Your Gear Ready for the Next Job
Your tools are investments—treat them well, and they'll last for years. Here's how to maintain the essentials:
- Clean After Use : Wipe aluminum chips off saw blades and drill bits with a dry cloth. For hex keys, remove dirt from the tips with a toothbrush—grime can cause slipping and stripped screws.
- Lubricate Moving Parts : Oil the pivot points of hacksaws and pipe cutters to keep them moving smoothly. A drop of machine oil every few uses prevents rust.
- Store Properly : Hang tools on a pegboard or store them in a toolbox with dividers. Avoid tossing them in a drawer—jostling can dull blades or bend hex keys.
- Sharpen Blades : Hacksaw blades can be sharpened with a file (for DIYers) or replaced (easier for most). Miter saw blades can be professionally sharpened when they start to drag.
Conclusion: Tools That Build Confidence
Assembling T-slot aluminum pipe with a board holder isn't rocket science, but it does require the right tools and a little know-how. From the humble tape measure to the precision torque wrench, each tool plays a role in turning raw aluminum profile and aluminum profile accessories into something functional and durable. By investing in quality tools and taking the time to use them correctly, you'll build structures that stand the test of time—whether it's a simple board holder or a full assembly line.
Remember, the goal isn't just to "get it done"—it's to build with pride. When you step back and see a board holder that's level, sturdy, and exactly where you need it, you'll know the tools were worth every penny. So grab your hex key, put on your safety glasses, and start building—your workspace (and your future self) will thank you.