- Company Articles
- Products and Technology
- Installation And Maintenance
- Installing 40 Steel Roller Track Black ESD Wheels: Step-by-Step Instructions

Installing 40 Steel Roller Track Black ESD Wheels: Step-by-Step Instructions
Related Product
40 Steel Roller Track Black ESD Wheel
The roller track can be installed with multiple accessories to create different slopes and configurations of flow racks.All steel conveyor 40 roller track accessories are engineered to perfectly fit the sliding rail.
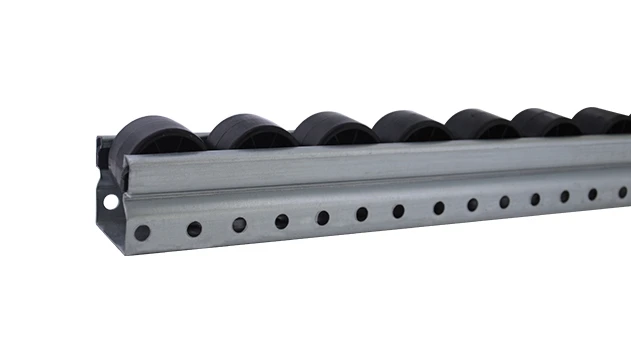
Ever walked through a busy manufacturing plant and marveled at how smoothly materials glide from one workstation to another? Chances are, you were looking at a well-installed roller track system. Today, we're diving into something that might seem small but makes a huge difference in daily operations: installing 40 Steel Roller Track Black ESD Wheels. Whether you're setting up a new production line for 3C assembly or upgrading an existing medical device workshop, getting this right ensures not just efficiency, but also protects sensitive components from static damage. Let's roll up our sleeves and turn those metal parts into a reliable, ESD-safe workhorse—because in lean manufacturing, every detail counts.
Why This Matters More Than You Think
Before we grab our tools, let's talk about why these wheels deserve your full attention. In industries like electronics or medical equipment, even a tiny static charge can fry a $1000 circuit board. That's where ESD (Electrostatic Discharge) wheels come in—they channel static away from sensitive parts, keeping your products intact. And the 40 steel roller track? It's the backbone of lean material flow. Imagine a line where boxes get stuck, workers waste time pushing heavy loads, or worse, parts get scratched because the track isn't level. A properly installed system cuts down on these headaches, letting your team focus on what they do best: building great products.
Plus, remember that "sustainable improvement" idea at the heart of lean solution? These wheels are built to last, but only if installed right. A shoddy job might mean replacing parts in 6 months; a careful install? You'll be tweaking, not replacing, for years. Let's make sure you're in the second camp.
Before You Start: Gather Your Gear & Check the Parts
Nothing kills momentum like realizing you're missing a wrench halfway through. Let's get organized first. Here's what you'll need:
Tools You'll Need
| Tool | Why You Need It |
|---|---|
| 13mm Socket Wrench | Tightening wheel bolts (they're stubborn—don't skimp on a quality wrench!) |
| Phillips Head Screwdriver (Magnetic) | Securing brackets—magnetic tips save you from dropping screws into the track |
| Spirit Level (2ft or Longer) | Making sure the track doesn't slope—even 1° off can cause jams |
| Rubber Mallet | Gently tapping wheels into place (no brute force—you don't want to bend the axle!) |
| ESD Tester (Optional but Smart) | Verifying static resistance after installation—better safe than sorry! |
Double-Check Your Parts
Open the box and lay everything out like you're solving a puzzle (a very useful puzzle!). You should have:
- 40 Steel Roller Track frame (the long metal rail with pre-drilled holes)
- Black ESD wheels (usually 4-6 per track section, depending on length)
- Axles and bearings (small metal rods and circular pieces—don't mix these up!)
- Mounting brackets and screws (match the bracket holes to the track holes)
- ESD grounding strap (a thin wire with clips—this is your static safety net)
Pro tip: Grab a piece of cardboard and draw a quick sketch of how the parts fit together before you start. It'll save you from that "wait, which way does this go?" panic later.

Step-by-Step Installation: Let's Get Those Wheels Rolling
Now for the fun part! Take your time—rushing leads to mistakes, and mistakes lead to wobbly tracks. Follow these steps, and you'll have a system that runs like butter.
Step 1: Prep the Work Area (Yes, This Counts!)
Find a flat surface—your workbench (or even the floor, if it's clean) will do. Lay down a soft cloth to protect the track from scratches (those black ESD wheels look sharp, but the frame scratches easily!). If you're installing the track onto a conveyor or existing workstation, make sure the area is powered down and marked with a "Do Not Operate" sign. Safety first, always.
Pro move: Use a tape measure to mark where the track will go. If it's part of a larger conveyor system, align the marks with the existing rollers—even a ½ inch misalignment can throw off the whole flow.
Step 2: Install Bearings into ESD Wheels
Take one ESD wheel and pop a bearing into the center hole. It should fit snugly—if it's loose, check if you have the right size (bearings come in different diameters!). If it's too tight, gently tap the bearing with the rubber mallet (hold the wheel flat on the cloth to avoid cracking it). Repeat this for all wheels—yes, all of them. It's tedious, but consistent bearings mean smooth rolling later.
Quick check: Spin the wheel with the bearing installed. It should spin freely for 5-10 seconds without wobbling. If it grinds or stops suddenly, the bearing might be misaligned—pull it out and try again.
Step 3: Attach Wheels to the Roller Track Frame
Flip the track frame upside down so the mounting holes are facing up. Take an axle and slide it through the bearing in a wheel, then align the axle with the holes on the track frame. Push gently—if it doesn't go through, don't force it! Check if the axle is straight (sometimes they get bent in shipping). Once the axle is through both holes, secure it with the small retaining clips (those tiny metal C-shaped pieces) on each end. Pinch the clips with pliers to lock them in place—you'll hear a satisfying "click" when they're secure.
Pro tip: Alternate installing wheels from left to right. For example, install the first wheel on the left, then the first on the right, then the second on the left, and so on. This keeps the frame from warping as you tighten things down.
Step 4: Connect the ESD Grounding Strap
Remember that static we talked about earlier? This is how we fight it. Locate the small metal tab on the track frame (it might be labeled "ESD GND"). Attach one end of the grounding strap to this tab using the provided screw. Run the strap to a known ground point—this could be a metal leg of your workbench, a grounding rod in the floor, or the main ESD grounding system of your facility. Clip the other end securely—no loose connections allowed here!
Fun fact: A single loose grounding strap can make the ESD wheels useless. Think of it like a garden hose with a kink—no water (or in this case, static) flows through. Take 30 extra seconds to wiggle the connections and make sure they're tight.
Step 5: Mount the Track & Level It Like a Pro
Now it's time to put the track in its permanent home. If you're mounting it to a workbench or conveyor, line up the bracket holes with the pre-drilled holes on the frame. Screw in the mounting screws by hand first—this prevents cross-threading (when the screw strips the hole, and you're stuck with a loose fit). Once all screws are hand-tight, use the socket wrench to snug them up—don't over-tighten! You want them firm, not stripped.
Here's where the spirit level comes in: Place it across the top of the track. The bubble should sit dead center. If it's leaning left, loosen the right screws slightly and tap the bracket with the rubber mallet until the bubble centers. Do the same for the other side if it's leaning right. A level track means materials glide evenly—no more boxes getting stuck on one end!
Step 6: Test It Out (And Do a Happy Dance)
You're almost there! Grab a test box (or a empty cardboard carton—something that weighs about what your actual materials will weigh) and place it on the track. Give it a gentle push. It should roll smoothly from one end to the other without stopping or veering off. If it jiggles or gets stuck, check:
- Are all wheels spinning freely? A stuck wheel might need a drop of lubricant (use ESD-safe lube only!)
- Is the track still level? Sometimes mounting screws loosen when you push on the track—double-check with the level.
- Are the ESD wheels making good contact? If the box slides instead of rolling, the wheels might be too high—adjust the brackets down slightly.
Once it rolls like a dream, grab your ESD tester (if you have one) and touch the probe to the track. The reading should be between 10⁶ and 10⁹ ohms—this means static is being grounded properly. No tester? Rub a balloon on your shirt and hold it near the track. If the balloon doesn't stick, you're good (science for the win!).

Oops! Common Issues & How to Fix Them
Even pros run into snags. Here's how to troubleshoot the most common problems:
Problem: Wheels Wobble When Spinning
Fix: Check if the bearings are seated correctly. If they're off-center, pull the axle out, realign the bearing, and push the axle back in. If the wheel itself is bent (rare, but possible), swap it with a spare—no need to fight a warped wheel.
Problem: Track is Too Noisy When Rolling
Fix: Noise usually means friction. Add a drop of ESD-safe lubricant to each bearing (don't overdo it—too much lube attracts dust). If the noise is a "clunk," check the mounting brackets—they might be loose and hitting the frame.
Problem: Static Still Builds Up (Even With the Ground Strap)
Fix: Make sure the grounding strap is connected to a true ground, not just a metal surface. Test the ground with a multimeter—if the resistance is over 10⁹ ohms, the ground point is bad. Try a different connection (like the metal leg of a nearby esd workbench).
Keep It Rolling: Maintenance Tips for Longevity
Your roller track isn't a "set it and forget it" tool—it needs a little love to keep performing. Here's how to make it last for years:
- Weekly Wipe-Down: Use a dry cloth to dust off the wheels and track. Dust buildup makes wheels sticky—gross, and bad for flow.
- Monthly Check: Tighten mounting screws and axle clips. Vibration from daily use can loosen them over time.
- Quarterly Lubrication: Add a tiny bit of ESD-safe lubricant to the bearings. Think of it like giving your track a vitamin boost.
- Yearly Inspection: replace any cracked wheels or rusted axles. It's cheaper to replace one part than the whole track!
Remember that lean solution mindset? Regular maintenance is part of "sustainable improvement." A well-cared-for track reduces downtime, which means more products out the door and happier teams.
You Did It! Now Go Boost That Production Line
Take a step back and admire your handiwork. That 40 Steel Roller Track with Black ESD Wheels isn't just metal and bolts—it's a small but powerful part of your lean manufacturing journey. It's the difference between a line that sputters and a line that sings, between frustrated workers and a team that moves with confidence.
Whether you're building medical devices that save lives or 3C products that connect people, every detail matters. And today, you mastered one of those details. So go ahead—fire up the line, load that first box, and watch it glide. You earned that front-row seat to smoother, safer, more efficient production.
Need more tips? Or maybe you're ready to expand your system with more roller track, conveyors, or custom lean solutions? You know where to find us—we're here to help you build a production line that grows with your goals. Happy rolling!