- Company Articles
- Products and Technology
- Installation And Maintenance
- Installing 4040B EU Standard Aluminum Profile Without Welding: Bolted Connections Guide

Installing 4040B EU Standard Aluminum Profile Without Welding: Bolted Connections Guide
Related Product
4040B EU Standard Aluminum Profile
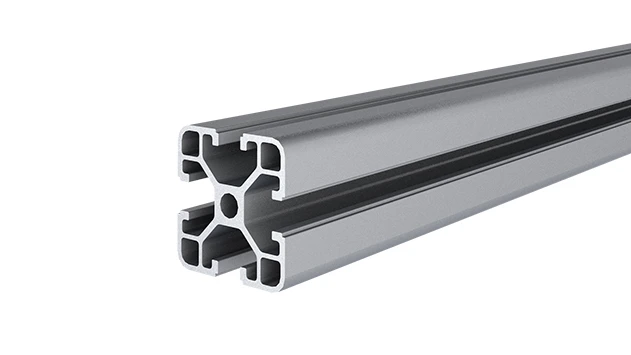
4040B is a 4.00x4.00 CM fractional 40 series square extrusion T-slot profile with four open T-slots, each side with 4.00cm face. The profile has align-a-grooves to assist in aligning connecting profiles.
Let's start with a scenario we've all been part of, or at least imagined: You walk into a workshop—maybe a friend's garage, a small manufacturing space, or even a tech startup's prototyping lab—and notice something interesting. The shelves are sturdy, the workbenches are sleek, and the storage racks look like they could handle just about anything. But here's the kicker: None of it looks "permanent." There are no messy welds, no rusted joints, and everything seems to fit together with clean, crisp lines. Chances are, you're looking at a setup built with aluminum profiles—and not just any profiles, but the versatile 4040B EU standard aluminum profile.
Whether you're a DIY enthusiast setting up a home workshop, a small business owner streamlining your production line, or someone who just loves building things that last, 4040B profiles are about to become your new best friend. And the secret to their magic? Bolted connections. No welding required, no expensive equipment, and no permanent commitments. Today, we're diving into how to install these profiles using bolted connections, from understanding the basics of the 4040B to assembling your own structures with confidence. Let's get started.
Why 4040B Aluminum Profiles? Let's Break It Down
First things first: What makes the 4040B EU standard aluminum profile so popular? Let's start with the basics. The "4040" in the name refers to its dimensions—40mm by 40mm. That square cross-section is a sweet spot for balance: it's sturdy enough to support weight (think tools, materials, or even small machinery) but not so bulky that it's hard to work with. The "B" denotes a specific design within the EU standard, typically featuring a T-slot pattern that runs along all four sides. Those T-slots are where the magic happens—they let you slide in bolts, nuts, and accessories to connect profiles without drilling random holes or welding.
But why aluminum? Unlike steel, aluminum is lightweight, resistant to rust, and surprisingly strong for its weight. It's also easy to cut (with the right tools) and modify, which is a game-changer if you're not a professional fabricator. And because it's non-magnetic and non-sparking, it's safe to use in environments where those properties matter—like electronics workshops or areas with flammable materials.
Now, let's talk about bolted connections. Welding is great for permanent structures, but it's messy, requires skill, and once you weld two pieces together, they're stuck that way. Bolted connections? They're the opposite. You can assemble, disassemble, and reconfigure your setup as many times as you want. Need to shorten a shelf? Take it apart. Want to add a crossbar for extra support? Just slide in a bolt and tighten. It's flexibility at its finest, and it's why 4040B profiles are a favorite for everything from workbenches to conveyor systems.
Anatomy of a 4040B Profile: Know Your Material
Before you start (nǐng—twisting, for my fellow non-native speakers) bolts, let's get familiar with the 4040B itself. Pick one up, and you'll notice a few key features:
- The T-Slots: Running along all four sides, these slots are the profile's "connection points." They're shaped like a "T," with a narrow opening on the surface and a wider channel inside. This design lets you insert a bolt head or nut into the slot, slide it to where you need it, and then tighten it down—no pre-drilled holes required.
- Material: Most 4040B profiles are made from 6063-T5 aluminum alloy, a blend known for its strength, corrosion resistance, and machinability. It's lightweight (about 2.7g/cm³) but can handle loads up to several hundred kilograms, depending on the setup.
- Surface Finish: You'll usually find these profiles with an anodized finish—think a smooth, matte silver or black coating. Anodizing adds a layer of protection against scratches and corrosion, so your structures will look good for years.
- Lengths: They come in standard lengths (often 2m, 3m, or 6m), but you can easily cut them to size with a miter saw or hacksaw if needed. Just be sure to deburr the edges afterward—no one wants a sharp aluminum burr catching on their sleeve.
Pro Tip:
When buying 4040B profiles, check the wall thickness. Thicker walls (usually 1.5mm to 3mm) mean more strength, but they also add weight. For most DIY projects, 2mm walls are a safe bet—strong enough for shelves, workbenches, or small racks without being overkill.

Tools and Materials: What You'll Need to Get Started
You don't need a workshop full of tools to work with 4040B profiles, but a few essentials will make the job a breeze. Let's break down what you'll need, from tools to aluminum profile accessories.
Essential Tools
| Tool | Why You Need It | Pro Tip |
|---|---|---|
| Hex Key Set (Allen Wrenches) | Most bolts and accessories for 4040B profiles use hex heads. Get a set with both metric sizes (common ones: 3mm, 4mm, 5mm) and ball-end tips for hard-to-reach angles. | Magnetic hex keys are a lifesaver—they'll hold onto bolts so you don't drop them into the T-slots. |
| Cordless Drill with Drill Bits | While T-slots let you avoid drilling most holes, you might need to drill into the ends of profiles for certain connections (like attaching a workbench top). | Use high-speed steel (HSS) bits—aluminum is soft, but dull bits will leave messy burrs. |
| Spirit Level | Nothing ruins a structure faster than being crooked. A 2-foot or 4-foot level will help you keep profiles straight and level during assembly. | Check level in both directions (horizontal and vertical) when building frames—wobbly shelves are a safety hazard! |
| Hacksaw or Miter Saw | To cut profiles to your desired length. A miter saw with a fine-tooth blade (100+ teeth per inch) will give the cleanest cuts. | Clamp the profile securely before cutting—aluminum can flex, leading to uneven cuts. |
| Deburring Tool | After cutting, aluminum leaves sharp burrs. A deburring tool (or even a file) will smooth those edges to prevent cuts and ensure accessories fit snugly. | Run the deburring tool along both the inside and outside edges of the cut—those T-slots need to stay smooth for bolts to slide. |
Materials: Profiles and Accessories
Of course, you'll need the star of the show: 4040B EU standard aluminum profiles. But profiles alone won't build a structure—you'll need aluminum profile accessories to connect them. Here are the must-haves:
- Bolts and Nuts: Look for T-slot bolts (also called "" or "hammerhead bolts")—their flat, wide heads slide into T-slots and lock in place when tightened. Pair them with flange nuts (which have a built-in washer) for extra stability.
- 90° Aluminum Profile Connector: This is your go-to for joining two profiles at a right angle (like the corner of a frame). Most 90° connectors are L-shaped, with holes that align with the T-slots on two perpendicular profiles. Just slide in bolts, tighten, and you've got a solid corner.
- End Caps: These plastic or aluminum caps slide onto the ends of profiles to cover sharp edges and keep out dust. They're optional but add a polished look—plus, they prevent small tools from falling into open profile ends.
- Angle Brackets: For extra support on corners or joints, angle brackets (L-shaped plates with holes) can reinforce connections. They're especially useful if you're building something that will hold heavy loads, like a tool rack.
- Panel Mounts: If you want to attach plywood, acrylic, or metal sheets to your structure (like a workbench top or a tool board), panel mounts slide into T-slots and provide a secure way to fasten panels without drilling through the profile itself.
Shopping Smart:
Buy a variety pack of accessories if you're just starting out. Many suppliers sell kits with 90° connectors, bolts, nuts, and end caps—perfect for small projects. And don't skimp on quality: cheap bolts can strip, and flimsy connectors will weaken your structure.
Step-by-Step: Assembling 4040B Profiles with Bolted Connections
Now, let's put it all together. We'll walk through building a simple frame—something like a small shelf or the base of a workbench—to show you how bolted connections work. Don't worry; it's easier than it looks.
Step 1: Plan Your Design (and Measure Twice!)
Before you start cutting or tightening, sketch out your design. How tall, wide, and deep do you want your structure to be? Write down the lengths of each profile you'll need. For our example, let's build a 120cm wide, 50cm deep, and 80cm tall shelf frame. That means we'll need:
- 4 vertical profiles (legs): 80cm each
- 4 horizontal profiles (top and bottom rails): 120cm (front/back) and 50cm (sides) each
Measure twice, cut once—that old saying exists for a reason. Double-check your measurements before cutting any profiles. It's easier to trim a little extra off a long piece than to fix a profile that's too short!
Step 2: Cut and Deburr Your Profiles
Using your hacksaw or miter saw, cut the profiles to your measured lengths. If you're using a miter saw, set the blade to 90° for square cuts. After cutting, use a deburring tool to smooth the edges—run it along the cut end and the inside of the T-slots to remove any burrs. Trust us, your hands (and your bolts) will thank you.
Step 3: Dry Fit First (No Bolts Yet!)
Before tightening anything, lay out all your profiles on a flat surface and "dry fit" the structure. This is your chance to make sure everything lines up: do the vertical legs stand straight? Do the horizontal rails fit snugly between them? Now's the time to adjust lengths or angles, not after you've tightened all the bolts.
Step 4: Attach the 90° Connectors (The Cornerstone of Bolted Connections)
Let's start with the corners. Take one vertical leg and one horizontal rail, and line them up at a 90° angle. Now, grab your 90° aluminum profile connector—it should have two sets of holes, one for each profile. Slide a T-slot bolt into the T-slot of the vertical leg, aligning it with one hole in the connector. Do the same for the horizontal rail and the other hole in the connector. Thread a flange nut onto each bolt, but don't tighten them all the way yet—just enough to hold the connector in place.
Repeat this for all four corners. Once all connectors are loosely attached, stand the frame up and check for square. Use your spirit level to make sure the vertical legs are straight and the horizontal rails are level. If something's off, loosen the bolts, adjust the profiles, and try again. Once everything looks square, tighten the bolts with your hex key—snug but not over-tight (aluminum can strip if you crank too hard).
Step 5: Add Cross-Braces for Stability (Optional but Recommended)
For taller structures or those holding heavy loads, add cross-braces (diagonal profiles) between the vertical legs. To attach them, use 45° angle brackets or adjustable connectors. Cross-braces prevent the frame from wobbling side-to-side, turning a flimsy rectangle into a rigid structure.
Step 6: Finish with End Caps and Extras
Slide end caps onto any exposed profile ends. If you're adding a top (like a workbench surface), use panel mounts to attach it: slide the mounts into the T-slots of the top rails, place your panel on top, and secure it with screws through the mounts. And just like that—you've built a structure with 4040B profiles and bolted connections, no welding required!
Real-World Example: Building a Workbench with 4040B Profiles
Let's make this tangible. Say you want a workbench for your garage—something sturdy enough to hold a drill press, a vice, and piles of tools. Here's how you'd use 4040B profiles and bolted connections to build it:
- Frame: Use 4 vertical 4040B legs (85cm tall), 2 horizontal front/back rails (150cm long), and 2 horizontal side rails (70cm long). Connect them with 90° aluminum profile connectors at each corner.
- Shelf: Add a lower shelf by attaching two more 150cm rails between the legs, about 30cm from the ground. Use 90° connectors and cross-braces for stability.
- Top: Cut a 150cm x 70cm piece of 3/4-inch plywood (or aluminum, if you want something more durable). Attach it to the top rails using panel mounts—slide the mounts into the T-slots, place the plywood on top, and screw through the mounts into the wood.
- Extras: Add a pegboard on the back using angle brackets, or attach a tool rail along the front with T-slot hooks. Want mobility? Add casters (with brake locks!) to the bottom of the legs using caster mounts (another handy aluminum profile accessory).
The best part? If you move, or if you need a bigger workbench later, you can take it apart, reconfigure the profiles, and build something new. No need to buy a whole new bench—just reuse the profiles and accessories.
Troubleshooting: Common Issues and How to Fix Them
Even with the best planning, things can go wrong. Here are the most common issues you might run into and how to solve them:
- Bolts Won't Tighten: If the bolt spins in the T-slot instead of tightening, the T-slot bolt head might not be seated correctly. Loosen the nut, push the bolt head firmly into the slot, and try again. If it still spins, check if the T-slot is damaged—burrs or dents can prevent the bolt from locking.
- Wobbly Frame: A wobbly frame usually means missing cross-braces or loose connections. Tighten all bolts first—sometimes they loosen during dry fitting. If that doesn't work, add angle brackets or cross-braces to the corners.
- Profiles Don't Align: If two profiles won't meet at a connector, check if they're cut square. A slightly angled cut can throw off alignment. Use a square tool when cutting, or sand the cut end with a file to straighten it.
- Stripped Threads: Over-tightening bolts is the #1 cause of stripped threads. Aluminum is softer than steel, so go easy with the hex key—tighten until the bolt is snug, but not until the tool bends. If a thread is stripped, replace the bolt (and nut, just to be safe).
Maintaining Your 4040B Structure: Keep It Looking (and Working) Like New
Your 4040B structure is built—now how do you keep it in top shape? Aluminum is low-maintenance, but a little care goes a long way:
- Clean Regularly: Wipe down profiles with a damp cloth to remove dust and grime. For tougher stains (like oil or grease), use a mild detergent—avoid harsh chemicals, which can damage the anodized finish.
- Check Bolts Quarterly: Over time, vibrations (from tools, machinery, or even just moving things around) can loosen bolts. Every few months, give each bolt a quick tighten with your hex key.
- Lubricate T-Slots (If Needed): If you're frequently reconfiguring your structure (sliding bolts or accessories in the T-slots), a little dry lubricant (like graphite powder) will keep things sliding smoothly. Avoid oil-based lubricants—they attract dust.
- Protect from Heavy Impacts: Aluminum is strong, but it can dent if hit hard. If you're using the structure in a high-traffic area, add corner guards or bumpers to protect the profiles.
Wrapping Up: The Power of Flexibility
At the end of the day, the 4040B EU standard aluminum profile and bolted connections are all about flexibility. They let you build what you need, when you need it, without being stuck with permanent structures. Whether you're a hobbyist or a professional, this system empowers you to create, adapt, and innovate—no welding, no stress, no limits.
So grab your profiles, your 90° connectors, and a hex key, and start building. Your perfect workspace (or shelf, or tool rack, or whatever you dream up) is just a few bolts away. And who knows? Maybe the next time someone walks into your workshop, they'll be the ones thinking, "Wow, how did they build that?"