- Company Articles
- Products and Technology
- Installation And Maintenance
- Installing 60 Steel Roller Track Green: Step-by-Step Guide for Manufacturing Floors

Installing 60 Steel Roller Track Green: Step-by-Step Guide for Manufacturing Floors
Related Product
60 Steel Roller Track Green
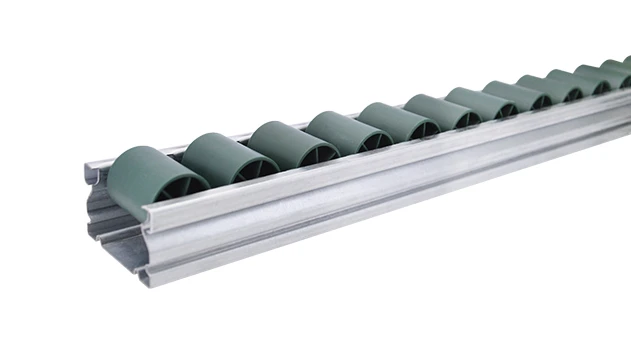
The roller track can be installed with multiple accessories to create different slopes and configurations of flow racks.All steel conveyor 60 roller track accessories are engineered to perfectly fit the sliding rail.It is enable the movement of SLC boxes.
Introduction to 60 Steel Roller Track Green
Manufacturing floors are bustling hubs where every second counts. Efficiency isn't just a buzzword—it's the backbone of keeping production lines moving, reducing downtime, and meeting customer demands. One component that plays a crucial role in streamlining material flow is the 60 Steel Roller Track Green. This robust, durable track is designed to handle heavy loads while ensuring smooth, frictionless movement of parts and products across various stages of production and storage.
Whether you're setting up a new flow rack in your warehouse, upgrading a conveyor system on your assembly line, or integrating it into a lean pipe workbench, the 60 Steel Roller Track Green is a versatile solution. It aligns perfectly with lean manufacturing principles, which focus on eliminating waste and optimizing processes—core values that many modern factories strive to embrace. In this guide, we'll walk you through every step of installing this track, from pre-installation prep to post-installation maintenance, so you can get the most out of this essential component.
Pre-Installation Preparation: What You Need to Get Started
Before you dive into the installation process, it's important to gather all the necessary tools and components, and ensure you're working in a safe environment. Let's break down what you'll need:
Tools Required
- Tape measure (at least 5 meters long for accurate measurements)
- Spirit level (to ensure everything is perfectly horizontal)
- Adjustable wrench (for tightening bolts and nuts)
- Phillips and flathead screwdrivers (depending on the fasteners used)
- Rubber mallet (for gently fitting track sections without damaging them)
- Marker or pencil (for marking installation points)
- Safety gloves (to protect your hands from sharp edges)
- Safety glasses (to shield your eyes from debris)
Components to Check
Make sure you have all the components ready before starting. Typical components for a 60 Steel Roller Track Green installation include:
| Component Name | Purpose |
|---|---|
| 60 Steel Roller Track Green sections | The main track where parts roll |
| Roller track connectors | To attach the track to the frame or structure |
| Aluminum profile accessories (if mounting on aluminum frames) | T-slot nuts, bolts, and brackets for securing connectors to profiles |
| Side guides (optional) | Plastic roller track guide rail (yellow or grey) to prevent parts from falling off |
| Fasteners (screws, bolts, nuts) | To secure all components together |
Safety First
Working on manufacturing floors can involve heavy equipment and sharp objects, so safety is paramount. Ensure the area where you're installing the track is clear of obstacles and other workers. If you're working at height, use a stable ladder or platform. Always wear your safety gloves and glasses throughout the process.

Step 1: Measure and Mark the Installation Area
Accurate measurements are the foundation of a successful installation. Without them, your track might be misaligned, leading to parts getting stuck or falling off. Here's how to do it:
First, decide where the 60 Steel Roller Track Green will be installed. For example, if it's part of a flow rack, measure the length of the rack's shelves. If it's part of a conveyor system, measure the distance between the start and end points of the track section.
Use your tape measure to mark the exact positions where the track will be placed. For a flow rack, you might need multiple parallel tracks, so mark the spacing between each track as well. The spacing should be wide enough to accommodate the parts you'll be moving but not so wide that they wobble. A good rule of thumb is to leave a gap of 1-2 cm on either side of the part.
Once you've marked the positions, use a spirit level to check that the marks are horizontal. Even a slight incline can cause parts to roll too fast or too slow, so this step is crucial. Adjust the marks if necessary until they're perfectly level.
Pro tip: If you're installing multiple tracks in parallel, use a string line to ensure all tracks are aligned straight. This will make the final setup look neat and function smoothly.

Step 2: Assemble the Supporting Frame (If Applicable)
Many installations of 60 Steel Roller Track Green require a supporting frame, especially if it's part of a flow rack or lean pipe workbench. The frame is usually made of aluminum profiles, which are lightweight yet strong, and easy to assemble. Here's how to build the frame:
Start by cutting the aluminum profiles to the required length (if not pre-cut). Use a saw designed for metal cutting to get clean edges. Then, connect the profiles using aluminum profile connectors. For example, use 90° aluminum profile connectors to join vertical and horizontal profiles at right angles.
Ensure the frame is stable by checking that all connections are tight. Use an adjustable wrench to tighten the bolts on the connectors. Once the frame is assembled, place it in the installation area and use a spirit level to make sure it's level. Adjust the feet of the frame if necessary—many aluminum frames come with adjustable leveling feet to compensate for uneven floors.
If you're integrating the track into an existing structure, like a lean pipe workbench, skip this step and proceed to attaching the connectors directly to the existing frame.
Step 3: Attach Roller Track Connectors to the Frame
Roller track connectors are the link between the track and the frame. The type of connector you use depends on the frame material. For aluminum profiles, you'll likely use T-slot connectors that fit into the slots of the profiles.
First, slide T-slot nuts into the slots of the aluminum profile at the marked positions. Then, place the roller track connector over the nut and secure it with a bolt. Tighten the bolt with an adjustable wrench until the connector is firmly attached. Repeat this process for all connectors, ensuring they're spaced evenly to support the track sections.
For other frame materials, like steel, you might use bolt-on connectors or welding (though welding is less common in lean systems because it's not reusable). Follow the manufacturer's instructions for the specific connectors you're using.
Important: Make sure the connectors are aligned correctly. If they're off by even a few millimeters, the track sections won't fit properly. Double-check the alignment with your spirit level and adjust as needed.
Step 4: Install the 60 Steel Roller Track Green Sections
Now it's time to place the track sections onto the connectors. Each section of 60 Steel Roller Track Green is designed to fit into the connectors seamlessly. Here's how:
Take one track section and align it with the connectors. Gently lower it onto the connectors, making sure each end of the track fits into the slots on the connectors. If it doesn't fit easily, use a rubber mallet to tap the track into place—be careful not to hit too hard, as this could bend the steel or damage the rollers.
Once the first section is in place, move to the next one. Align it with the previous section to ensure there's no gap between them. A small gap can cause parts to get stuck, so make sure the sections are flush against each other. Secure each section with the screws or clips provided. Depending on the design, you might need to insert screws through the bottom of the connector into the track.
Continue this process until all track sections are installed. If you're installing a long track, it's helpful to have a helper hold the sections in place while you secure them. This prevents the sections from shifting out of alignment.
Step 5: Secure and Test the Track
After all sections are installed, it's time to tighten all fasteners and test the track. This step ensures that the track is stable and functions as expected.
Go through each connector and fastener, tightening them with your wrench or screwdriver. Don't over-tighten, as this could strip the threads or damage the components. Just make sure they're firm enough to hold the track in place.
Next, test the track by rolling a sample part along it. The part should move smoothly without any resistance or sticking. If it gets stuck, check for misaligned sections or debris on the rollers. Clean any debris with a brush or cloth, and adjust any sections that are not level.
Test the track with different types of parts to ensure it works for all the items you'll be moving. For example, if you're using it for small 3C components, test with a small plastic part. If it's for heavier items, test with a metal component. This ensures the track can handle the weight and size of your materials.
Step 6: Integrate with Other Components (Optional)
Depending on your setup, you might need to add additional components to the track. For example:
- Side guides: Attach plastic roller track guide rail (yellow or grey) to the sides of the track to prevent parts from falling off. These guides can be mounted using the same T-slot connectors as the track.
- Conveyor integration: If the track is part of a conveyor system, connect it to other conveyor sections using conveyor connectors. Ensure the height and alignment match so parts can transition smoothly between sections.
- Flow rack accessories: For flow racks, add dividers between tracks to separate different parts. Dividers can be made of aluminum profiles or plastic, depending on your needs.
All these components are part of the lean system approach, which allows you to customize your setup to fit your specific manufacturing needs. The company offers a wide range of accessories, so you can find exactly what you need to complete your installation.
Post-Installation Maintenance Tips
To keep your 60 Steel Roller Track Green functioning optimally, regular maintenance is essential. Here are some tips to follow:
- Weekly checks: Inspect the track for loose bolts or connectors. Tighten any that are loose to prevent the track from shifting.
- Monthly cleaning: Use a brush or vacuum to remove debris from the rollers and track surface. Debris can cause parts to stick or damage the rollers over time.
- Quarterly lubrication: If the rollers start to feel stiff, apply a small amount of lubricant (like silicone spray) to the axles. Avoid using oil-based lubricants, as they can attract dust.
- Annual inspection: Check the rollers for wear and tear. replace any rollers that are bent, cracked, or not rolling smoothly. This ensures the track continues to function efficiently.
By following these maintenance steps, you can extend the lifespan of your track and avoid costly downtime in your production line.
Applications of 60 Steel Roller Track Green in Manufacturing
The 60 Steel Roller Track Green is a versatile component that finds use in various industries. Let's look at some examples:
3C Assembly Lines
In 3C assembly (computers, communication, consumer electronics), precision and speed are key. The 60 Steel Roller Track Green is used to move small components like circuit boards, connectors, and batteries between workstations. Its smooth surface ensures that delicate components are not damaged during transport, and its durability handles the high volume of parts in these fast-paced lines. It's often integrated into lean pipe workbenches where workers assemble devices, making the process more efficient.
Medical Device Manufacturing
Medical device manufacturing requires strict hygiene and precision. The 60 Steel Roller Track Green is easy to clean, making it ideal for this industry. It's used in flow racks that store sterile components, ensuring they are easily accessible and handled without contamination. The track's smooth movement also prevents damage to sensitive medical devices, which is crucial for maintaining product quality.
Warehouse and Logistics
In warehouses, the track is part of flow racks that organize inventory. These racks allow products to slide to the front when one is taken, making it easy to restock and access items. This reduces the time workers spend searching for products, improving overall efficiency. The track's durability handles heavy loads, making it suitable for storing boxes and pallets.
Automotive Manufacturing
Automotive factories use the track in conveyor systems that move parts like engines, doors, and panels along the assembly line. The track's strength and smooth movement ensure that heavy automotive parts are transported safely and efficiently. It's also part of lean systems that reduce waste by optimizing material flow.
Custom Solutions for Your Unique Needs
Every manufacturing facility is different, so a one-size-fits-all approach might not work. The company offers custom lean solutions tailored to your specific industry and needs. Whether you need a custom flow rack, a unique conveyor system, or a modified lean pipe workbench, their team can design and install a system that fits your space and processes.
For example, if your factory has limited space, they can design a compact flow rack using 60 Steel Roller Track Green and aluminum profiles. If you need to handle irregularly shaped parts, they can add custom side guides or dividers. All their custom solutions follow lean principles, emphasizing reusability and sustainability—so you can adapt the system as your needs change.
Conclusion
Installing 60 Steel Roller Track Green is a straightforward process when you follow the right steps. From pre-installation prep to post-maintenance checks, each step is crucial to ensuring the track functions smoothly and efficiently. This component is a key part of any lean system, helping you reduce waste, improve productivity, and create a more efficient manufacturing floor.
Whether you're setting up a new line or upgrading an existing one, the 60 Steel Roller Track Green is a reliable and versatile solution. With the right tools, components, and attention to detail, you can install it yourself or rely on the company's expert team for a custom installation. Either way, you'll be on your way to a more efficient and productive manufacturing process.