- Company Articles
- Products and Technology
- Installation And Maintenance
- Lean Pipe Clamp B Chrome Installation: Step-by-Step Tutorial for Beginners

Lean Pipe Clamp B Chrome Installation: Step-by-Step Tutorial for Beginners
Related Product
Lean Pipe Clamp B Chrome
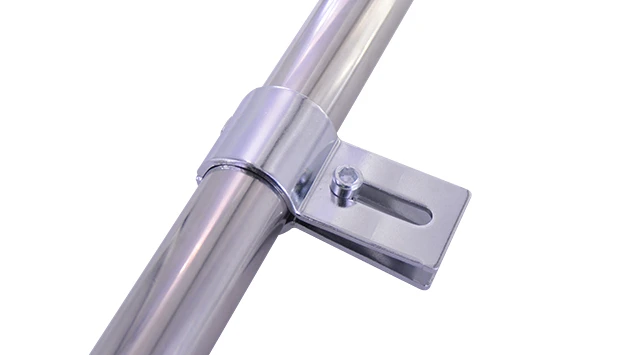
Lean pipe clamp is used for turnover trolley, workbench, flowrack adjust the frame or fix some accessory.
Introduction: Why Lean Pipe Clamp B Chrome Matters in Your Workspace
Let's start with a familiar scenario: You've just decided to upgrade your workspace. Maybe you're setting up a new production assemble line, building a custom workbench for your garage, or organizing materials in a warehouse. You've heard about "lean systems" and how they streamline processes, reduce waste, and make workflows smoother. But as you start researching, you're bombarded with terms like "lean pipe," "flow rack," "aluminum profile," and—you guessed it—"Lean Pipe Clamp B Chrome." If you're new to this, it's easy to feel overwhelmed. What even is a clamp, and why does it need to be "chrome"?
Here's the thing: Lean Pipe Clamp B Chrome isn't just another piece of hardware. It's the unsung hero that holds your lean system together—literally. Think of it as the glue (but way sturdier) that connects lean pipes, secures aluminum profiles, and ensures your workbench or material rack doesn't wobble when you're in the middle of a project. Whether you're a small business owner setting up your first assembly station or a hobbyist building a DIY workbench, knowing how to install these clamps correctly will save you time, frustration, and even money down the line. Loose clamps can lead to unstable structures, damaged materials, or worse—safety hazards.
In this guide, we're breaking down everything you need to know about installing Lean Pipe Clamp B Chrome, step by step. No jargon, no assumptions—just clear, friendly advice from someone who's been there (and made the mistakes so you don't have to). By the end, you'll not only have the skills to install these clamps like a pro, but you'll also understand how they fit into the bigger picture of lean pipe and accessories, and why they're a game-changer for any workspace. Let's dive in!
Here's the thing: Lean Pipe Clamp B Chrome isn't just another piece of hardware. It's the unsung hero that holds your lean system together—literally. Think of it as the glue (but way sturdier) that connects lean pipes, secures aluminum profiles, and ensures your workbench or material rack doesn't wobble when you're in the middle of a project. Whether you're a small business owner setting up your first assembly station or a hobbyist building a DIY workbench, knowing how to install these clamps correctly will save you time, frustration, and even money down the line. Loose clamps can lead to unstable structures, damaged materials, or worse—safety hazards.
In this guide, we're breaking down everything you need to know about installing Lean Pipe Clamp B Chrome, step by step. No jargon, no assumptions—just clear, friendly advice from someone who's been there (and made the mistakes so you don't have to). By the end, you'll not only have the skills to install these clamps like a pro, but you'll also understand how they fit into the bigger picture of lean pipe and accessories, and why they're a game-changer for any workspace. Let's dive in!
Understanding Lean Pipe Clamp B Chrome: What It Is & What It Does
Before we grab our tools, let's make sure we're on the same page about what exactly Lean Pipe Clamp B Chrome is. At its core, it's a specialized fastener designed to connect lean pipes (also called "lean tubes") to each other or to other components like aluminum profiles, workbenches, or material racks. The "B" in the name refers to its specific design—think of it as a model number that tells you it's a standard, versatile clamp, while "chrome" indicates the finish. Chrome plating isn't just for looks, though; it adds durability, resists rust, and makes the clamp easier to clean, which is a big plus in busy workshops or production environments where oil, dust, or moisture might be present.
Now, why would you choose this clamp over others? Let's compare it to a basic plastic clamp, for example. Plastic might be cheaper, but it's less sturdy and can crack under heavy weight. A standard steel clamp without chrome might rust if exposed to water or chemicals. Lean Pipe Clamp B Chrome strikes that perfect balance: strong enough to hold heavy pipes and materials, resistant to wear and tear, and designed to work seamlessly with most lean pipe systems. It's the kind of clamp you install once and forget about—until you need to reconfigure your setup (which, thanks to its design, is surprisingly easy to do).
You'll typically find these clamps used in:
Now, why would you choose this clamp over others? Let's compare it to a basic plastic clamp, for example. Plastic might be cheaper, but it's less sturdy and can crack under heavy weight. A standard steel clamp without chrome might rust if exposed to water or chemicals. Lean Pipe Clamp B Chrome strikes that perfect balance: strong enough to hold heavy pipes and materials, resistant to wear and tear, and designed to work seamlessly with most lean pipe systems. It's the kind of clamp you install once and forget about—until you need to reconfigure your setup (which, thanks to its design, is surprisingly easy to do).
You'll typically find these clamps used in:
- Workbenches: Securing the legs or shelves to the main frame.
- Material racks: Holding horizontal and vertical pipes together to create stable storage for tools or parts.
- Turnover trolleys: Keeping the frame rigid so the trolley rolls smoothly without shaking.
- Production lines: Connecting roller tracks or flow racks to ensure materials glide easily from one station to the next.
Tools You'll Need: Gather These Before You Start
You wouldn't bake a cake without a mixing bowl, right? The same goes for installing Lean Pipe Clamp B Chrome. Having the right tools on hand will make the process 10x easier and help you avoid mistakes. Here's a list of what you'll need, along with why each tool is important. I've even included a pro tip for each to help you use them like a seasoned DIYer.
| Tool Name | What It Does | Why You Need It | Pro Tip |
|---|---|---|---|
| Hex Key (Allen Wrench) | Tightens the set screw on the clamp | Most Lean Pipe Clamp B Chrome models use a hex-head set screw—no other tool will fit! | Buy a set with multiple sizes (metric, not standard). The most common size is 5mm, but double-check your clamp's specs. |
| Measuring Tape | Measures distances between pipes to ensure alignment | Misaligned pipes lead to wobbly structures. A measuring tape keeps everything straight. | Use a retractable tape with a locking mechanism to avoid holding the tape in place with one hand while marking. |
| Bubble Level | Checks if pipes are straight (horizontal or vertical) | Even a small tilt can throw off your entire system—level pipes = stable structures. | Get a 12-inch magnetic level. The magnet will stick to the pipes, freeing up your hands to adjust the clamp. |
| Rubber Mallet | Gently taps pipes into place without damaging them | Sometimes pipes need a little nudge to align perfectly—metal hammers can scratch chrome or dent pipes. | Use light, even taps. If the pipe isn't moving, stop and check for obstructions instead of hitting harder. |
| Safety Gloves | Protects your hands from sharp edges or pinch points | Chrome clamps can have burrs, and pipes might have rough spots—gloves prevent cuts. | Choose nitrile or leather gloves. Fabric gloves are too thin, and latex might slip when handling metal. |
| Permanent Marker | Marks where to position the clamp on the pipe | Visual guides prevent guessing—no more "oops, that's an inch too low." | Use a fine-tip marker for precision. Avoid using pens; they smudge or fade on metal. |
Pro Tip:
Lay out all your tools and materials on a clean, flat surface before starting. This might sound like common sense, but there's nothing worse than mid-installation realizing you left the hex key in the garage! I like to use a small tool tray to keep everything organized.
Safety First: 5 Rules to Avoid Mistakes & Injuries
Let's get serious for a second: Installing hardware might seem like a simple task, but ignoring safety can lead to scraped knuckles, dented pipes, or even collapsed structures. These rules aren't just "nice to follow"—they're essential. Let's go through them one by one.
Caution:
Never skip safety gear. I once tried to save time by installing clamps without gloves and ended up with a nasty cut from a sharp edge on a clamp. Trust me, 30 seconds to put on gloves is worth avoiding a trip to the first-aid kit.
1. Inspect Your Materials First
Before you start, take a minute to check your Lean Pipe Clamp B Chrome, lean pipes, and aluminum profiles for damage. Look for cracks in the clamps, bent pipes, or rust (even on chrome—small chips can lead to rust spots). If something looks off, don't use it! A damaged clamp might snap under pressure, and a bent pipe will never align properly. It's better to replace a faulty part now than to deal with a collapsed workbench later.
2. Secure the Workbench or Pipes
If you're installing clamps on a workbench, make sure the bench itself is stable. If it's wobbly, clamp it to a table or have someone hold it steady while you work. For freestanding pipes (like when building a material rack), lean them against a wall or use a vice to hold them upright. The last thing you want is a pipe rolling away or falling on your foot mid-installation.
3. Don't Over-Tighten the Set Screw
It's tempting to crank the hex key as hard as you can to "make sure it's tight," but this is a common mistake. Over-tightening can strip the threads on the clamp or warp the pipe, making it impossible to adjust later. You'll feel resistance when the clamp is snug—stop there. A good rule of thumb: tighten until the clamp doesn't move when you wiggle the pipe, then give the hex key a quarter-turn more. That's it.
4. Watch for Pinch Points
When aligning two pipes at a 90-degree angle (like the corner of a workbench), the clamp will sit where the pipes meet. Keep your fingers out of the space between the pipes and the clamp—if the pipe slips, it could pinch your hand. Use the rubber mallet to tap pipes into place instead of pushing with your fingers.
5. Clean Up as You Go
Tools, extra screws, or pieces of packaging left on the floor are accidents waiting to happen. After each step, take 30 seconds to put tools back in your tray and sweep up debris. A clean workspace is a safe workspace!
Before you start, take a minute to check your Lean Pipe Clamp B Chrome, lean pipes, and aluminum profiles for damage. Look for cracks in the clamps, bent pipes, or rust (even on chrome—small chips can lead to rust spots). If something looks off, don't use it! A damaged clamp might snap under pressure, and a bent pipe will never align properly. It's better to replace a faulty part now than to deal with a collapsed workbench later.
2. Secure the Workbench or Pipes
If you're installing clamps on a workbench, make sure the bench itself is stable. If it's wobbly, clamp it to a table or have someone hold it steady while you work. For freestanding pipes (like when building a material rack), lean them against a wall or use a vice to hold them upright. The last thing you want is a pipe rolling away or falling on your foot mid-installation.
3. Don't Over-Tighten the Set Screw
It's tempting to crank the hex key as hard as you can to "make sure it's tight," but this is a common mistake. Over-tightening can strip the threads on the clamp or warp the pipe, making it impossible to adjust later. You'll feel resistance when the clamp is snug—stop there. A good rule of thumb: tighten until the clamp doesn't move when you wiggle the pipe, then give the hex key a quarter-turn more. That's it.
4. Watch for Pinch Points
When aligning two pipes at a 90-degree angle (like the corner of a workbench), the clamp will sit where the pipes meet. Keep your fingers out of the space between the pipes and the clamp—if the pipe slips, it could pinch your hand. Use the rubber mallet to tap pipes into place instead of pushing with your fingers.
5. Clean Up as You Go
Tools, extra screws, or pieces of packaging left on the floor are accidents waiting to happen. After each step, take 30 seconds to put tools back in your tray and sweep up debris. A clean workspace is a safe workspace!
Step-by-Step Installation: Let's Get Those Clamps On!
Now that we're prepped and safe, let's walk through the installation process. We'll use a common scenario: installing Lean Pipe Clamp B Chrome to connect a vertical lean pipe to a horizontal aluminum profile (a typical setup for a workbench leg). Follow these steps, and you'll have a rock-solid connection in no time.
Step 1: Gather Your Lean Pipe and Accessories
First, collect all the parts you'll need for this connection:
- 1 Lean Pipe Clamp B Chrome (check that the set screw is already in place—most come pre-threaded)
- 1 vertical lean pipe (we'll use a 28mm diameter steel pipe, the standard size for most lean systems)
- 1 horizontal aluminum profile (we're using a 4040 aluminum extrusion profile, common for workbenches)
- Your tools (hex key, measuring tape, bubble level, marker, and rubber mallet—all laid out!)
Step 2: Measure and Mark the Pipe
Decide where on the vertical pipe you want the horizontal aluminum profile to sit. For a workbench, this might be 30 inches from the bottom (the height of the bench top). Use your measuring tape to mark this spot on the vertical pipe with your permanent marker.
Pro Tip:
Mark the pipe lightly at first. If you need to adjust later, you can the mark with a little rubbing alcohol. Dark, heavy marks are hard to remove and look unprofessional!
Step 3: Position the Clamp on the Aluminum Profile
Take your Lean Pipe Clamp B Chrome and slide it onto the aluminum profile. The clamp has a "jaw" that opens to fit around the profile—align the jaw with the T-slot so the set screw (the part you'll tighten with the hex key) is facing up. This makes it easier to reach later.
Slide the clamp along the profile until it's roughly where you want the vertical pipe to connect. Don't lock it in place yet—we'll adjust the position once the pipe is in place.
Step 4: Align the Vertical Pipe with the Clamp
Hold the vertical pipe upright, with the mark you made in Step 2 facing the aluminum profile. Now, open the clamp's "other jaw" (the part that wraps around the pipe) and position it so the vertical pipe sits inside. The mark on the pipe should line up with the bottom of the clamp's jaw—this ensures the pipe is at the right height.
Use your bubble level to check that the vertical pipe is straight (no leaning!) and the aluminum profile is level (horizontal). If the pipe is tilting, gently tap it with the rubber mallet to adjust. If the profile is uneven, slide the clamp along the profile until the level reads "level."
Step 5: Tighten the Set Screw (But Not Too Much!)
Now, grab your hex key and insert it into the set screw on the clamp. Turn it clockwise to tighten. Remember what we said about over-tightening—stop when you feel resistance, then give it a quarter-turn more. You want the clamp to grip the pipe and profile firmly, but not so tight that the metal bends or the threads strip.
Wiggle the vertical pipe gently to test the connection. It should not move side-to-side or up-and-down. If it does, loosen the set screw slightly, realign the pipe, and tighten again.
Step 6: Double-Check Alignment with the Bubble Level
Even after tightening, it's smart to recheck with the bubble level. Sometimes tightening the clamp can pull the pipe or profile slightly out of alignment. Place the level on the aluminum profile—if the bubble is centered, you're good! If not, loosen the clamp, adjust the profile, and retighten.
Common Mistake:
Forgetting to recheck level after tightening. I once skipped this step and later noticed my workbench top was slanting—had to take the clamp off and start over. Don't be me!
Step 7: Repeat for Additional Connections
Most structures (like a workbench) will need multiple clamps. Repeat Steps 1–6 for each connection, making sure to measure between clamps to keep everything symmetrical. For example, if you're installing two vertical legs on a workbench, the distance between the clamps on the left and right should be identical to keep the top level.
Step 8: Test the Structure's Stability
Once all clamps are installed, give your structure a good shake. Push on it gently from different angles—if it wobbles, check each clamp for tightness and each pipe for alignment. A stable structure should feel solid, with no creaking or shifting. If something feels off, revisit the loose clamp and adjust as needed.
Troubleshooting: What to Do When Things Go Wrong
Even with careful planning, things can go sideways. Here are the most common issues beginners run into when installing Lean Pipe Clamp B Chrome, and how to fix them.
Problem: The Clamp Won't Grip the Pipe—It Keeps Slipping
Why it happens: Either the pipe diameter is too small for the clamp, or the clamp's jaws are dirty (grease or dust prevents a tight grip).
Fix: First, check if you're using the right pipe size. Lean Pipe Clamp B Chrome typically fits 28mm lean pipes—if your pipe is smaller (like 20mm), you need a different clamp model. If the pipe is the right size, wipe the clamp jaws and pipe with a clean rag to remove dirt or oil. Retighten, and it should grip.
Problem: The Set Screw Strips (Won't Tighten or Loosen)
Why it happens: Over-tightening or using the wrong size hex key (a key that's too small will round out the screw head).
Fix: If the screw is stripped but still loose, use a pair of pliers to grip the screw head and turn it out. If it's stuck tight, you may need to replace the clamp (lesson learned: avoid over-tightening!). To prevent this, always use the correct hex key size and stop tightening when you feel resistance.
Problem: The Aluminum Profile Bends When Tightening the Clamp
Why it happens: The profile is too thin (e.g., using a 2020 aluminum profile for a heavy load) or the clamp is overtightened.
Fix: For thin profiles, add a small metal shim between the clamp and profile to distribute pressure. If bending is severe, upgrade to a thicker profile (like 4040 instead of 2020). And remember—tighten until snug, not until the metal bends!
Problem: The Structure Wobbles Even After Tightening All Clamps
Why it happens: Pipes are misaligned (not perpendicular or parallel), or you're missing a clamp (most structures need at least two clamps per joint for stability).
Fix: Use the bubble level to check each pipe's alignment. If vertical pipes lean, adjust the clamps to straighten them. If horizontal pipes sag, add a middle support (another vertical pipe with a clamp) to reinforce the structure.
Why it happens: Either the pipe diameter is too small for the clamp, or the clamp's jaws are dirty (grease or dust prevents a tight grip).
Fix: First, check if you're using the right pipe size. Lean Pipe Clamp B Chrome typically fits 28mm lean pipes—if your pipe is smaller (like 20mm), you need a different clamp model. If the pipe is the right size, wipe the clamp jaws and pipe with a clean rag to remove dirt or oil. Retighten, and it should grip.
Problem: The Set Screw Strips (Won't Tighten or Loosen)
Why it happens: Over-tightening or using the wrong size hex key (a key that's too small will round out the screw head).
Fix: If the screw is stripped but still loose, use a pair of pliers to grip the screw head and turn it out. If it's stuck tight, you may need to replace the clamp (lesson learned: avoid over-tightening!). To prevent this, always use the correct hex key size and stop tightening when you feel resistance.
Problem: The Aluminum Profile Bends When Tightening the Clamp
Why it happens: The profile is too thin (e.g., using a 2020 aluminum profile for a heavy load) or the clamp is overtightened.
Fix: For thin profiles, add a small metal shim between the clamp and profile to distribute pressure. If bending is severe, upgrade to a thicker profile (like 4040 instead of 2020). And remember—tighten until snug, not until the metal bends!
Problem: The Structure Wobbles Even After Tightening All Clamps
Why it happens: Pipes are misaligned (not perpendicular or parallel), or you're missing a clamp (most structures need at least two clamps per joint for stability).
Fix: Use the bubble level to check each pipe's alignment. If vertical pipes lean, adjust the clamps to straighten them. If horizontal pipes sag, add a middle support (another vertical pipe with a clamp) to reinforce the structure.
Maintenance: Keeping Your Clamps (and System) in Top Shape
Installing your clamps is just the first step—keeping them (and your entire lean system) in good condition will ensure they last for years. Here's how to maintain your Lean Pipe Clamp B Chrome:
Monthly Check-Ups
Once a month, give each clamp a quick inspection. Tighten any loose set screws (they can vibrate loose over time, especially in busy workshops). Check for rust spots on the chrome—if you find any, sand them lightly with fine-grit sandpaper, then apply a thin coat of clear nail polish to prevent further rusting.
Cleaning
Wipe the clamps with a damp cloth every few weeks to remove dust, oil, or debris. For stubborn grime, use a mild soap and water solution—avoid harsh chemicals like bleach, which can damage the chrome finish. Dry thoroughly to prevent water spots.
Lubricating the Set Screw
If the hex key starts sticking when you try to tighten or loosen the set screw, add a drop of machine oil to the threads. This keeps the screw turning smoothly and prevents stripping. Just don't overdo it—too much oil will attract dirt!
Replacing Worn Clamps
Even the best clamps wear out eventually. If you notice cracks in the clamp body, stripped threads, or jaws that no longer grip the pipe, it's time to replace them. Most suppliers sell Lean Pipe Clamp B Chrome individually, so you don't have to replace your entire system—just the worn parts.
Monthly Check-Ups
Once a month, give each clamp a quick inspection. Tighten any loose set screws (they can vibrate loose over time, especially in busy workshops). Check for rust spots on the chrome—if you find any, sand them lightly with fine-grit sandpaper, then apply a thin coat of clear nail polish to prevent further rusting.
Cleaning
Wipe the clamps with a damp cloth every few weeks to remove dust, oil, or debris. For stubborn grime, use a mild soap and water solution—avoid harsh chemicals like bleach, which can damage the chrome finish. Dry thoroughly to prevent water spots.
Lubricating the Set Screw
If the hex key starts sticking when you try to tighten or loosen the set screw, add a drop of machine oil to the threads. This keeps the screw turning smoothly and prevents stripping. Just don't overdo it—too much oil will attract dirt!
Replacing Worn Clamps
Even the best clamps wear out eventually. If you notice cracks in the clamp body, stripped threads, or jaws that no longer grip the pipe, it's time to replace them. Most suppliers sell Lean Pipe Clamp B Chrome individually, so you don't have to replace your entire system—just the worn parts.
Conclusion: You're Now a Lean Pipe Clamp Pro!
Let's take a step back and celebrate: You've learned what Lean Pipe Clamp B Chrome is, why it matters, how to install it safely, and even how to fix common issues. That's no small feat! The next time you look at your workbench, material rack, or production line, you'll know exactly what's holding it all together—and you'll have the confidence to tweak, expand, or rebuild your lean system whenever you need to.
Remember, lean systems are all about flexibility and efficiency. With your new clamp-installing skills, you can adapt your workspace to fit your needs—whether that means adding a shelf to your workbench, expanding a flow rack, or building a custom trolley from scratch. And if you ever hit a snag, refer back to this guide or reach out to your lean pipe supplier—most are happy to help beginners troubleshoot.
So go ahead: grab your tools, gather your lean pipe and accessories, and start building. The only limit is your imagination (and maybe the number of clamps you have on hand). Happy building!
Remember, lean systems are all about flexibility and efficiency. With your new clamp-installing skills, you can adapt your workspace to fit your needs—whether that means adding a shelf to your workbench, expanding a flow rack, or building a custom trolley from scratch. And if you ever hit a snag, refer back to this guide or reach out to your lean pipe supplier—most are happy to help beginners troubleshoot.
So go ahead: grab your tools, gather your lean pipe and accessories, and start building. The only limit is your imagination (and maybe the number of clamps you have on hand). Happy building!