- Company Articles
- Products and Technology
- Installation And Maintenance
- Lean Pipe Clamp Chrome Cleaning Guide: Removing Rust and Debris

Lean Pipe Clamp Chrome Cleaning Guide: Removing Rust and Debris
Related Product
Lean Pipe Clamp Chrome
Lean pipe clamp is used for rack system hang monitor or other panel for workbenck, flowrack in production daily use.
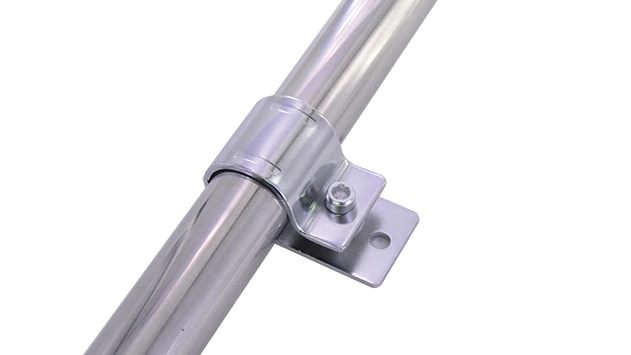
Walk into any well-organized factory or workshop, and you'll likely spot the backbone of efficient production: lean systems. From flow racks that keep materials moving to workbenches where assembly happens, these setups rely on countless small components working in harmony. Among these unsung heroes are lean pipe clamp chrome —those shiny, sturdy connectors that hold lean pipes together, ensuring stability and flexibility. But when rust creeps in or debris builds up, even these tough little clamps can start to falter. A sticky or corroded clamp might slow down adjustments to your workstation, create uneven surfaces on your flow rack, or worse, compromise the safety of the entire setup. Let's dive into how to give these clamps the care they deserve, so your lean system keeps running as smoothly as the day it was built.
Why Cleaning Lean Pipe Clamp Chrome Matters More Than You Think
You might be thinking, "They're just clamps—why spend time cleaning them?" But in the world of lean manufacturing, every detail counts. Let's break down why keeping your chrome clamps spotless is non-negotiable.
Functionality: Keeping the Flow Smooth
Lean systems thrive on adaptability. Need to reconfigure your workbench to fit a new product? Adjust a flow rack to speed up material handling? Your lean pipe clamp chrome is what makes that possible. When debris like dust, oil, or metal shavings gunk up the clamp's mechanism, tightening or loosening it becomes a hassle. You might find yourself struggling with a wrench, wasting precious minutes that could be spent on production. Rust is even worse—it can seize the clamp entirely, turning a quick adjustment into a frustrating ordeal. A clean clamp, on the other hand, moves smoothly, letting you tweak your setup in seconds and keep your workflow uninterrupted.
Safety: No More Snags or Slips
A rusted clamp isn't just an annoyance—it's a safety risk. Imagine a worker adjusting a lean pipe workbench ; if the clamp slips because rust has weakened its grip, the whole structure could wobble or collapse, putting tools, materials, or even hands at risk. Debris on clamps can also create uneven surfaces. For example, a dusty clamp might leave gaps between pipes, making your flow rack unstable. Over time, that instability could lead to materials falling or jamming the roller tracks. By keeping clamps clean, you're not just maintaining efficiency—you're keeping your team safe.
Longevity: Protecting Your Investment
Lean pipe systems are built to last, but their lifespan depends on how well you care for them. Chrome plating is designed to resist corrosion, but it's not invincible. When rust starts to form, it eats away at that protective layer, exposing the underlying metal to more damage. Left unchecked, a small rust spot can spread, turning a functional clamp into a useless one. Replacing clamps might seem cheap at first, but costs add up—especially if you're replacing dozens across your facility. Regular cleaning? It's a tiny investment of time that saves you from buying new parts down the line.
Gathering Your Cleaning Arsenal: Tools and Materials You'll Need
Cleaning chrome clamps doesn't require fancy equipment—chances are, you already have most of what you need in your workshop or even your kitchen. Here's a breakdown of the essentials, plus why each one matters:
| Tool/Material | Purpose | Tips for Use |
|---|---|---|
| Soft microfiber cloths | Wiping away dust and drying clamps without scratching | Avoid paper towels—they can leave lint or small scratches. |
| Non-abrasive sponge or soft-bristle brush (old toothbrush works!) | Scrubbing away stuck-on debris in crevices | Use the toothbrush for tight spots around the clamp's screw or joint. |
| Mild dish soap (unscented, no bleach) | Cutting through grease and oil | Mix a few drops with warm water to make a gentle cleaning solution. |
| White vinegar (distilled) | Natural acid to dissolve light rust | Dilute with equal parts water for sensitive chrome surfaces. |
| Baking soda | Mild abrasive for tougher rust spots | Make a paste with water (1:1 ratio) to avoid scratching. |
| Chrome polish (optional, but recommended) | Adding a protective layer and restoring shine | Look for a polish with corrosion inhibitors for extra protection. |
| Protective gloves | Keeping hands clean and safe from chemicals | Nitrile gloves work best—they're resistant to vinegar and oils. |
| Small bucket or bowl | Holding cleaning solutions | Use a dedicated container to avoid mixing with other workshop chemicals. |
Pro Tip: Avoid harsh tools like steel wool, wire brushes, or abrasive scouring pads. Chrome plating is thin, and these can scratch the surface, making it easier for rust to take hold later. Stick to soft materials—your clamps will thank you.

Step-by-Step Guide: Restoring Shine and Function to Your Clamps
Now that you've got your tools ready, let's walk through the cleaning process. We'll start with the basics (debris removal) and move up to tackling rust, so even heavily soiled clamps will be back in shape in no time.
Step 1: Preparation – Clear the Area and Disassemble (If Needed)
First, find a clean, well-lit workspace. If the clamp is still attached to your lean pipe setup, decide whether to remove it or clean it in place. For quick touch-ups, cleaning in place is fine—just make sure the area around the clamp is free of loose materials (you don't want dust from the workbench falling onto your freshly cleaned clamp!). For clamps with heavy rust or debris, though, removing them is better. Use a wrench to loosen the clamp from the lean pipe joint , being careful not to drop any small parts (like washers) in the process. Lay out a clean towel to place the clamps on—this keeps them from picking up new dirt while you work.
Step 2: Removing Loose Debris – The First Line of Defense
Before diving into cleaning solutions, start with dry debris. Grab your microfiber cloth and gently wipe the entire surface of the clamp. Pay extra attention to crevices where dust and dirt like to hide—around the screw head, between the clamp's jaws, or where it connects to the pipe. If there's caked-on grime (like dried oil or paint splatters), use the soft-bristle brush to loosen it. Think of this step as sweeping before mopping—getting rid of loose particles first makes the rest of the cleaning process much more effective.
Step 3: Tackling Rust – Gentle Methods for Chrome Surfaces
Rust on chrome can look intimidating, but with the right approach, it's usually removable. Let's start with the mildest method and work up, just to be safe.
For light rust spots: Mix equal parts white vinegar and water in your bowl. Dip a microfiber cloth into the solution, wring it out so it's damp (not soaking), and gently rub the rusted area. Let the vinegar sit for 5-10 minutes—this gives the acid time to dissolve the rust. Then, use the cloth to wipe away the residue. If the spot is still there, repeat the process. Vinegar is gentle enough that it won't damage the chrome, but it's strong enough to tackle surface rust.
For tougher rust: Make a paste with baking soda and water (start with 1 tablespoon of baking soda and add water until it forms a thick, toothpaste-like consistency). Apply a small amount to the rusted area with your finger or a soft cloth, then rub gently in a circular motion. The baking soda acts as a mild abrasive, helping to lift the rust without scratching the chrome. Let it sit for 10 minutes, then wipe it off with a damp cloth. Rinse the area with clean water to remove any leftover paste—baking soda is alkaline, and leaving it on could dull the chrome over time.
A note on severe rust: If the rust has eaten through the chrome and you can see the underlying metal, it might be time to replace the clamp. Severe corrosion weakens the clamp's structure, and no amount of cleaning will fix that. Better to swap it out now than risk a failure later.
Step 4: Polishing – Bringing Back the Chrome Shine
Once the rust and debris are gone, your clamp might look clean, but it might not have that signature chrome sparkle. That's where polish comes in. Apply a small amount of chrome polish to a clean microfiber cloth (a pea-sized drop is usually enough for one clamp). Rub the polish onto the clamp in small, circular motions, covering the entire surface. Let it sit for 30 seconds to a minute (check the polish's instructions—some need more time), then buff it off with a dry microfiber cloth. You'll notice the cloth picking up a grayish residue—that's the polish lifting any remaining tarnish and leaving a protective layer behind. This layer helps repel water and dust, keeping rust at bay longer.
Step 5: Drying and Reassembling – Ensuring Long-Lasting Results
Moisture is rust's best friend, so don't skip this step! Use a dry microfiber cloth to thoroughly dry every part of the clamp, including those hard-to-reach crevices. If you disassembled the clamp, now's the time to put it back together. Before reattaching it to your lean pipe setup, take a quick look at the lean pipe joint it connects to—wipe away any dust or rust there too, so the clamp has a clean surface to grip. Tighten the clamp just enough to hold the pipe securely, but don't over-tighten—this can strip the threads or warp the clamp, making future adjustments harder.
Preventing Future Rust: Maintenance Habits That Save Time and Money
Cleaning your clamps is great, but preventing rust and debris in the first place is even better. Here are simple habits to keep your chrome clamps in top shape for months (or years!) to come.
Regular Inspections: Catching Issues Early
Make it a part of your weekly or monthly routine to check on your lean system's clamps. Walk around your flow racks, workbenches, and turnover trolleys, and give each clamp a quick once-over. Look for early signs of rust (tiny brown spots), debris buildup (grease, dust in crevices), or looseness. Catching a small rust spot when it's the size of a pinhead takes 2 minutes to clean; letting it grow into a quarter-sized patch could take 20 minutes (or require a replacement). A little time now saves a lot later.
Keeping It Dry: Moisture Is the Enemy
Chrome resists rust, but it's no match for constant moisture. If your workshop is prone to humidity (or if you're cleaning up spills near your lean system), take extra steps to dry clamps. After mopping the floor, use a fan to speed up drying, or wipe down nearby clamps with a dry cloth. If you live in a coastal area with salty air (which accelerates rust), consider applying a thin coat of chrome polish every 2-3 months—this adds an extra barrier against corrosion.
Protective Coatings: An Extra Layer of Defense
For clamps in high-use or high-moisture areas (like near washing stations or outdoor loading docks), a protective coating can work wonders. Look for a clear, spray-on chrome sealant (available at auto parts stores or online). Follow the instructions to apply a thin, even layer—this creates a barrier that repels water, oil, and dust. Just be sure to clean the clamp thoroughly before applying the sealant—you don't want to trap debris under the coating!
Checking Lean Pipe Joints: A Holistic Approach
Your clamp is only as good as the pipe and joint it's attached to. If the lean pipe joint itself is rusty or damaged, it can transfer moisture or debris to the clamp. When you inspect your clamps, take a second to check the joints too. Wipe them down with a dry cloth, and tighten any loose connections. A little care for the whole system means less work for your clamps in the long run.
Common Mistakes to Avoid: What Not to Do When Cleaning Chrome Clamps
Even with the best intentions, it's easy to make missteps that can harm your clamps. Here are the biggest pitfalls to steer clear of:
Using Abrasive Tools: Scratches Mean Rust Risks
It's tempting to grab a wire brush or steel wool when you see tough rust, but resist the urge! These tools scratch the chrome plating, creating tiny grooves where moisture and dirt can hide. Once the chrome is scratched, rust will form faster than before. Stick to soft brushes, sponges, and microfiber cloths—patience beats force here.
Overlooking Small Spots: Rust Spreads Quickly
That tiny brown dot on the edge of the clamp? It won't stay tiny for long. Rust spreads through contact with moisture and oxygen, so a small spot can grow into a large patch in weeks (especially in humid environments). Take the time to clean even the smallest spots—your future self will thank you.
Skipping the Dry: Moisture Trapped = Future Problems
You've scrubbed, polished, and your clamp looks brand new—but if you put it back wet, you're just asking for rust. Water left in crevices (like under the clamp's jaw) will start to corrode the chrome from the inside out. Always, always dry thoroughly—use a cloth, then let it air-dry for a few minutes if you're unsure.
Using Harsh Chemicals: Damaging the Chrome Finish
Bleach, ammonia, or heavy-duty industrial cleaners might seem like they'll "power through" grime, but they're terrible for chrome. These chemicals can strip the protective plating, leaving the metal exposed. Stick to mild soap, vinegar, and baking soda—they're just as effective, and they won't ruin your clamps.
Conclusion: Small Clamps, Big Impact – Invest in Care
At the end of the day, lean pipe clamp chrome might be small, but their role in your lean system is huge. They're the reason you can reconfigure a workbench in 10 minutes instead of 2 hours, the reason your flow rack stays stable even when loaded with heavy materials, and the reason your team can work safely and efficiently. Taking 15 minutes every month to clean and inspect these clamps isn't just maintenance—it's an investment in the productivity and longevity of your entire operation.
So grab your microfiber cloth, mix up some vinegar solution, and give those clamps a little love. Your lean system will hum along smoother, your tools will last longer, and you'll avoid the headaches (and costs) of unexpected breakdowns. After all, in lean manufacturing, efficiency starts with the details—and that includes the shiny little clamps holding it all together.