- Company Articles
- Products and Technology
- Installation And Maintenance
- Lean Pipe Clamp Chrome Installation Tutorial: Step-by-Step Guide

Lean Pipe Clamp Chrome Installation Tutorial: Step-by-Step Guide
Related Product
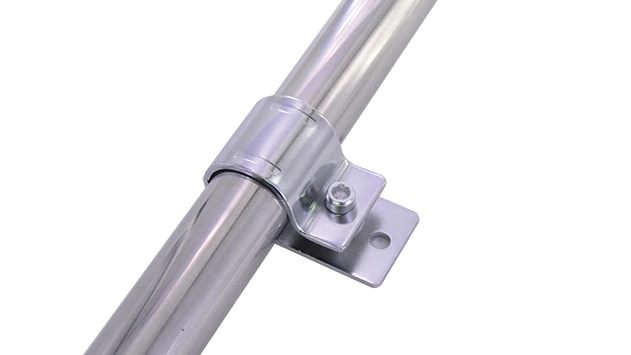
Lean Pipe Clamp Chrome
Lean pipe clamp is used for rack system hang monitor or other panel for workbenck, flowrack in production daily use.
Introduction: Why Proper Installation Matters
If you've ever walked through a busy production floor or a warehouse, you've probably seen structures like workbenches, flow racks, or turnover trolleys quietly keeping operations running. What you might not notice at first glance is the unsung hero holding many of these setups together: the lean pipe clamp chrome. These small but mighty components are the backbone of lean systems, ensuring stability, flexibility, and durability in dynamic work environments. But here's the thing: even the best lean pipe clamp chrome won't live up to its potential if installed incorrectly. A loose clamp can lead to wobbly workbenches, misaligned roller tracks, or even safety hazards—all of which slow down production and frustrate teams.
This guide is designed to take the guesswork out of installing lean pipe clamp chrome. Whether you're setting up a new aluminum profile workstation, upgrading a flow rack, or repairing a wobbly turnover trolley, we'll walk you through every step with clear, conversational advice. We'll cover tools, prep work, common mistakes to avoid, and even maintenance tips to keep your setup strong for years. By the end, you'll not only know how to install these clamps—you'll understand why each step matters, and how it contributes to a smoother, more efficient workspace.
Understanding Your Components: Lean Pipe Clamp Chrome and Beyond
Before diving into installation, let's make sure we're all on the same page about the parts involved. At the center of this tutorial is the lean pipe clamp chrome —a metal clamp, often chrome-plated for corrosion resistance, designed to secure lean pipes (or aluminum profiles) to joints, frames, or other components. But it rarely works alone. You'll likely be working with:
- Lean pipe joints : These connect pipes at angles (90°, 45°, etc.) and are often the anchor points for clamps.
- Aluminum profiles : Lightweight, durable rails used in modern lean systems, compatible with clamps for building workbenches or racks.
- Caster wheels : Sometimes attached via clamps to add mobility to trolleys or workbenches.
Each of these components plays a role in the final structure. For example, a typical workbench might use aluminum profiles as the frame, lean pipe joints to connect the vertical and horizontal supports, and lean pipe clamp chrome to secure accessories like tool holders or side guards. If any part is misaligned or loosely clamped, the entire setup can sag, wobble, or even collapse under weight.
Pro Tip:
Always check that your lean pipe clamp chrome is compatible with your pipes or profiles. Most clamps are designed for specific pipe diameters (e.g., 28mm for standard lean pipes or 40mm for aluminum profiles). Using the wrong size can lead to slippage or damage.

Tools You'll Need: Gather These Before You Start
Installing lean pipe clamp chrome doesn't require a fully stocked machine shop, but having the right tools on hand will save you time and frustration. Here's a breakdown of what you'll need, along with why each tool matters:
| Tool | Purpose | Pro Tips |
|---|---|---|
| Hex Key Set (Allen Wrenches) | Tightening clamp bolts (most lean pipe clamps use hex-head screws). | Choose a set with both metric and imperial sizes—many clamps use M5 or 1/4" bolts. |
| Adjustable Wrench | Holding joints steady while tightening clamps; loosening stuck bolts. | Look for a wrench with a non-slip grip to avoid hand fatigue. |
| Level (Bubble or Digital) | Ensuring pipes and profiles are straight and level during assembly. | A 2-foot level works best for most lean system projects. |
| Tape Measure | Measuring pipe lengths and spacing between joints/clamps. | Opt for a retractable tape with a locking mechanism to keep measurements steady. |
| Rubber Mallet | Gently tapping joints or pipes into alignment without damaging them. | Avoid metal hammers—they can dent chrome plating or aluminum profiles. |
| Wire Brush | Cleaning rust or debris from clamp threads or pipe surfaces. | Use a brass brush for chrome parts to avoid scratching the finish. |
| Thread Locking Compound (Optional) | Preventing clamp bolts from loosening due to vibration (e.g., in moving trolleys). | Use a low-strength formula (like Loctite Blue) so you can still disassemble later if needed. |
Caution:
Never use power tools (like impact drivers) to tighten lean pipe clamp chrome. The high torque can strip the threads on the clamp or joint, making them useless. Stick to hand tools for precision.
Pre-Installation Prep: Set Yourself Up for Success
Rushing into installation without prep work is a common mistake. Take 10–15 minutes to do these checks, and you'll avoid headaches later:
1. Inspect Your Parts for Damage
Lay out all components—lean pipe clamp chrome, lean pipe joints, aluminum profiles, etc.—on a clean, flat surface. Check for:
- Bent or cracked clamps : A warped clamp won't grip the pipe evenly.
- Stripped threads : If the bolt in the clamp spins without tightening, it's damaged and needs replacement.
- Rust or corrosion : On chrome parts, this can weaken the metal and make tightening difficult (use a wire brush to clean minor rust).
- Debris in joints : Dirt or metal shavings inside lean pipe joints can prevent pipes from seating fully.
If you spot damaged parts, replace them before starting. Using faulty components is a safety risk and will only lead to rework later.
2. Plan Your Structure on Paper (or the Floor)
Even if you're assembling a simple structure (like a small material rack), sketching a quick diagram or laying out the pipes and joints on the floor can help you visualize the final setup. Note where clamps will go—for example, on a workbench, you might need clamps at the corners to secure the top shelf to the legs, and additional clamps midway up the legs for stability.
Pro Tip:
Use masking tape on the floor to mark the length and width of your structure. This helps ensure pipes are aligned before clamping, reducing the need for adjustments later.
3. Clean the Surfaces
Grease, oil, or dirt on pipes or profiles can prevent the clamp from gripping tightly. Wipe down all contact surfaces with a clean rag (or a degreaser for heavy grime). For aluminum profiles, avoid abrasive cleaners—they can scratch the finish and lead to corrosion.
Step-by-Step Installation: How to Install Lean Pipe Clamp Chrome
Now that you're prepped, let's dive into the installation process. We'll use a common scenario—building a simple workbench with aluminum profiles and lean pipe clamp chrome—to walk through the steps. The same principles apply to flow racks, trolleys, or any other lean system.
Step 1: Assemble the Frame with Lean Pipe Joints
Start by building the basic frame using your aluminum profiles and lean pipe joints. For a workbench, this might mean connecting four vertical legs to two horizontal rails (front and back) using 90° lean pipe joints. Here's how:
- insert pipes into joints : Slide one end of a horizontal aluminum profile into the opening of a 90° joint. Push firmly until it hits the stop inside the joint—this ensures a tight fit.
- Hand-tighten the joint bolt : Most lean pipe joints have a setscrew (usually hex-head) that secures the pipe. Use your hex key to tighten it just enough to hold the pipe in place—you'll fully tighten later.
- Repeat for all corners : Connect the remaining vertical and horizontal profiles to form a rectangular frame. Stand the frame upright to check for squareness—opposite corners should be equal in distance (measure diagonally with your tape measure).
If the frame is "racked" (one corner is higher than the others), gently push or pull the corners until the diagonals match. A rubber mallet can help tap joints into alignment, but be gentle—aluminum profiles can bend if struck too hard.
Step 2: Position the Lean Pipe Clamp Chrome
Once the frame is square, it's time to add the clamps. For our workbench, we'll use lean pipe clamp chrome to attach a top shelf (made of aluminum honeycomb panel) to the frame. Here's how to position the clamps:
- Mark clamp locations : Place the top shelf on the frame and use a pencil to mark where the clamps will go (typically 2–3 clamps per side for stability).
- Align clamps with profiles : Slide the lean pipe clamp chrome over the horizontal frame profile, aligning the clamp's mounting hole with your pencil mark. The clamp should sit flush against the profile—no gaps between the clamp and the pipe.
- Check orientation : Most clamps have a "fixed" and "movable" jaw. The fixed jaw should face the direction of the load (e.g., toward the center of the shelf to prevent it from sliding off).
Common Mistake:
Skipping the marking step. Eyeballing clamp positions often leads to uneven spacing, which can cause the shelf to sag in the middle. Take the extra 30 seconds to measure and mark—your back (and your tools) will thank you later.
Step 3: Secure the Clamp to the Profile
With the clamp in position, it's time to tighten it to the aluminum profile. This step is critical—too loose, and the shelf wobbles; too tight, and you risk damaging the profile or stripping the clamp's threads.
- insert the clamp bolt : Thread the hex bolt through the clamp's mounting hole and into the threaded hole on the movable jaw. Start by hand to avoid cross-threading (where the bolt doesn't align with the threads, causing damage).
- Tighten with a hex key : Use your hex key to turn the bolt clockwise. Apply steady pressure until you feel resistance, then give it a 1/4-turn more. This is called "snug" tightness—enough to hold the clamp firmly without distorting the profile.
- Check for movement : Grab the clamp and try to twist or slide it along the profile. If it moves, tighten the bolt another 1/8-turn. If it still moves, the clamp may be the wrong size for your profile.
Repeat this for all clamps on one side of the shelf, then move to the opposite side. Tightening clamps in a "cross" pattern (like tightening lug nuts on a car) helps distribute pressure evenly, preventing warping.
Step 4: Attach the Shelf (or Accessory) to the Clamps
Now that the clamps are secured to the frame, it's time to attach the shelf. Most lean pipe clamp chrome has a second mounting hole or slot for attaching accessories. For our honeycomb panel shelf:
- Align the shelf with the clamps : Place the shelf on top of the clamps, lining up its pre-drilled holes (or marked positions) with the clamp's accessory holes.
- Secure with bolts or screws : insert bolts through the shelf and into the clamps. Use washers under the bolt heads to prevent the shelf from cracking under pressure.
- Tighten evenly : Again, use a cross pattern to tighten the bolts. Start with hand-tightening, then use your hex key to snug them down—don't overtighten, as this can strip the clamp's threads or crack the shelf.
Step 5: Add Caster Wheels (If Needed)
If your workbench or trolley needs mobility, you'll attach caster wheels to the bottom of the frame using—you guessed it—lean pipe clamp chrome. Here's how:
- Flip the frame upside down : Lay the workbench on its top (use a soft blanket to protect the shelf) so the legs are accessible.
- Clamp caster mounts to legs : Most caster wheels come with a mounting plate that can be secured to the leg using a lean pipe clamp chrome. Position the clamp around the leg and the caster mount, then tighten as before.
- Lock the casters : If your casters have brakes, engage them to keep the frame steady while you work. This prevents the legs from rolling as you tighten the clamps.
Once all casters are attached, flip the workbench upright. Give it a gentle push to test mobility—if it veers to one side, check that the casters are aligned and the clamps are evenly tightened.
Step 6: Final Checks and Adjustments
You're almost done! Before considering the job finished, run through these final checks:
- Levelness : Place your level on the shelf. If it's not level, adjust the caster wheels (if using) or add shims under the legs.
- Stability : Push and pull the structure from different angles. It should feel solid—no wobbling or creaking.
- Weight test : Place a load on the shelf (e.g., a box of tools) and leave it for 10–15 minutes. Check for sagging or loose clamps afterward.
- Joint tightness : Go back through all lean pipe joints and clamps, giving each bolt a gentle 1/8-turn with your hex key—vibration during assembly can loosen them slightly.
Troubleshooting: Fixing Common Installation Issues
Even with careful prep, problems can pop up. Here's how to diagnose and fix the most common issues:
Issue: Clamp Slips Along the Profile
Causes: Wrong clamp size, dirty profile, or under-tightening. Solution: First, check that the clamp matches your profile diameter. If it's the right size, clean the profile with a degreaser and re-tighten the clamp. If slipping continues, wrap a strip of rubber (e.g., from a bicycle inner tube) around the profile before clamping—it adds friction.
Issue: Joints Feel Loose After Assembly
Causes: Pipes not fully inserted into joints, or joint bolts under-tightened. Solution: Disassemble the joint, clean out any debris, and reinsert the pipe until it hits the stop. Tighten the joint bolt until you feel resistance, then add a 1/4-turn. For extra security, apply a drop of thread-locking compound to the bolt before tightening.
Issue: Shelf Sags in the Middle
Causes: Too few clamps, or clamps spaced too far apart. Solution: Add extra clamps midway between existing ones to distribute weight. For heavy loads (e.g., over 50kg), consider adding a center support leg or using thicker aluminum profiles.
Issue: Chrome Plating Chips During Installation
Causes: Using pliers or adjustable wrenches directly on the clamp, or over-tightening. Solution: Always use hex keys on the bolt, not the clamp body. If you need to hold the clamp, wrap it in a cloth to protect the chrome. Damaged chrome can rust over time, so touch up chips with a small amount of chrome spray paint.
Maintenance: Keep Your Clamps (and Structure) Strong for Years
Proper installation is just the start—regular maintenance will extend the life of your lean pipe clamp chrome and the structure it supports. Here's what to do:
- Monthly tightening : Walk through your workspace and give each clamp and joint bolt a gentle 1/8-turn with a hex key. Vibration from daily use can loosen them over time.
- Cleaning : Wipe down clamps and joints with a damp rag to remove dust and debris. For chrome parts, use a mild metal polish annually to prevent tarnishing.
- Inspect for damage : Check clamps for cracks, bent bolts, or stripped threads. replace any damaged parts immediately—don't wait for them to fail.
- Lubricate moving parts : If your structure has roller tracks or caster wheels, apply a drop of lubricating oil to the axles monthly. This reduces friction and prevents wear on the clamps holding them in place.
Pro Tip:
Keep a small toolkit near your lean system (e.g., a hex key, wire brush, and spare clamps) for quick fixes. Catching loose clamps early prevents bigger problems later.
Conclusion: Your Lean System, Built to Last
Installing lean pipe clamp chrome might seem like a small task, but it's a critical one. A well-clamped structure is safer, more efficient, and less likely to need repairs—freeing up your team to focus on what matters: production, not fixing wobbly workbenches. By following the steps in this guide—prepping carefully, using the right tools, and taking time to check alignment and tightness—you'll build lean systems that stand up to the demands of daily use.
Remember, the goal of lean manufacturing is to eliminate waste—and nothing wastes time like a poorly installed clamp that leads to downtime, rework, or injuries. With a little patience and attention to detail, you can ensure your lean pipe clamp chrome does its job quietly and reliably, day in and day out.
Now go out there and build something strong!