- Company Articles
- Products and Technology
- Installation And Maintenance
- Lean Pipe Clamp Chrome Maintenance Guide: Tips for Longevity

Lean Pipe Clamp Chrome Maintenance Guide: Tips for Longevity
Related Product
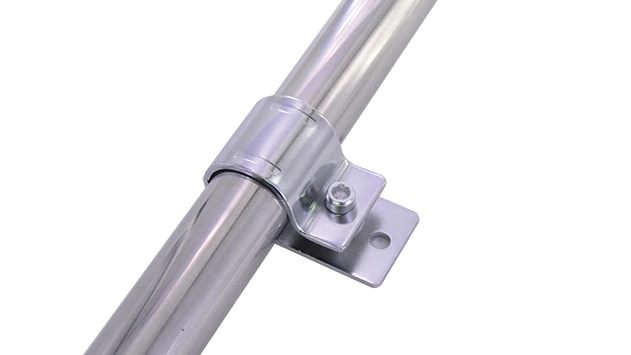
Lean Pipe Clamp Chrome
Lean pipe clamp is used for rack system hang monitor or other panel for workbenck, flowrack in production daily use.
Introduction: The Unsung Heroes of Your Workspace
Walk into any well-organized workshop, factory floor, or assembly line, and you'll likely spot a network of sturdy, modular structures holding tools, materials, and equipment in place. Chances are, those structures are built with lean pipe systems—flexible, cost-effective setups that adapt to your workflow like a second skin. But what keeps these systems standing tall, even when carts bump into them, tools are dropped, and daily chaos unfolds? It's the small but mighty components: the lean pipe clamp chrome, the quiet workhorses that bind pipes, joints, and accessories into a cohesive, functional unit.
If you've ever had a shelf sag, a workstation wobble, or a material rack suddenly give way, you know the frustration of a failed clamp. A loose or damaged clamp isn't just an annoyance—it's a productivity killer. It slows down work, risks damage to tools or products, and even endangers your team. The good news? With a little care and attention, your lean pipe clamp chrome can last for years, keeping your workspace efficient and reliable. This guide isn't just about "maintenance"—it's about protecting the backbone of your operation.
In the sections ahead, we'll dive into the nitty-gritty of keeping your chrome clamps in top shape: from daily checks that take 2 minutes to deep-cleaning routines that prevent corrosion, from lubrication hacks to troubleshooting common issues. Whether you're a facility manager overseeing a busy factory or a small business owner maintaining a single workbench, these tips will help you extend the life of your clamps and, by extension, your entire lean pipe system. Let's get started.
Why Maintenance Matters: The Cost of Cutting Corners
You might be thinking, "Clamps are cheap—why not just replace them when they break?" Here's the thing: the cost of a new clamp is nothing compared to the cost of downtime. Imagine this: a clamp on your main assembly line workbench fails mid-shift. Suddenly, tools slide off, parts scatter, and your team grinds to a halt while someone hunts for a replacement. Multiply that by 10 clamps failing across a month, and you're looking at hours (or days) of lost productivity, not to mention the stress on your team.
Then there's the hidden cost of preventable damage . A rusted clamp doesn't just stop working—it can stain your pipes, weaken your lean pipe joint connections, and even spread corrosion to other parts. Before you know it, a $5 clamp problem becomes a $200 pipe replacement. And let's not forget safety: a loose clamp on a material rack could send heavy boxes crashing down, risking injury or product loss. Maintenance isn't just about saving money—it's about keeping your workspace safe and your team confident in their tools.
Pro Tip: Keep a maintenance log! Jot down when you inspect, clean, or lubricate your clamps. Over time, you'll spot patterns—like clamps near high-moisture areas needing more frequent checks—and adjust your routine accordingly. A simple spreadsheet or even a notebook works wonders.

Daily Inspection: 2-Minute Checks That Save Hours Later
You don't need to be a mechanical engineer to keep your clamps in check—just a keen eye and 2 minutes at the start or end of each shift. Think of it like checking your car's tires before a drive: quick, simple, and critical for avoiding breakdowns. Here's what to look for:
1. Visual Inspection: The "Scan and Spot" Method
Start by standing back and scanning the clamps on your nearest lean pipe structure—maybe a workbench or a material rack. Look for obvious red flags:
- Chrome Peeling or Flaking: Chrome plating protects the underlying metal from rust. If you see tiny bubbles, cracks, or peeling spots, that's a sign the plating is compromised. Moisture and dirt will sneak in here, so note these clamps for closer inspection.
- Rust Spots: Even small specks of rust (they'll look like orange or brown dots) are warning signs. Rust spreads fast, especially in humid environments or areas near water sources (like cleaning stations).
- Bends or Warping: Clamps are designed to hold tight under pressure, but if one looks bent, twisted, or misshapen, it's no longer distributing force evenly. This often happens when someone overtightens the clamp or drops a heavy object on it.
- Loose Connections: Gently wiggle the pipe connected to the clamp. If it moves more than 1-2mm, the clamp is loose. This could be from vibration over time, or the threads on the clamp might be worn.
2. Physical Check: The "Touch and Tighten" Test
After your visual scan, get hands-on. Grab a screwdriver or wrench (the same tool you used to install the clamps) and give each clamp a gentle twist to tighten. You're not trying to crank it to the point of breaking—just snugging it up to eliminate slack. As you do this, feel for:
- Stiffness: If the clamp handle or screw turns with difficulty, it might be seized up from dirt or lack of lubrication. We'll cover how to fix that later.
- Wobbling: If the clamp itself moves on the pipe (not just the pipe moving in the clamp), the clamp's grip is worn. This often happens when the rubber or plastic grip pad inside the clamp is degraded.
- Unusual Noises: A "creaking" or "grinding" sound when tightening means there's debris in the threads or the clamp is misaligned with the lean pipe joint. Stop and check for dirt or damage before forcing it.
Quick Win: Focus on high-stress areas first! Clamps holding heavy loads (like material racks stacked with metal parts) or those in high-traffic zones (near doorways, where carts pass) take more abuse. Inspect these daily—they're your highest risk for failure.
Cleaning: Keeping Chrome Shiny and Rust-Free
Chrome is a champion at resisting corrosion—when it's clean. But fingerprints, grease, dust, and even the oils from our skin can build up over time, creating a film that traps moisture. Left unchecked, that film becomes a breeding ground for rust. The solution? Regular cleaning. It's simple, takes minutes, and pays off in years of extra life for your clamps.
What You'll Need (And What to Avoid)
Before you start, gather your supplies:
- A soft, lint-free cloth (microfiber works best—avoid paper towels, which can scratch chrome).
- Mild dish soap (like Dawn) or a chrome-specific cleaner (avoid abrasive cleaners, bleach, or ammonia—they'll eat away at the plating).
- A small, soft-bristled brush (an old toothbrush works great) for crevices.
- Distilled water (tap water can leave mineral spots, especially if you live in a hard-water area).
- A second dry cloth for buffing.
Step-by-Step Cleaning: The "Gentle but Thorough" Approach
Step 1: Dust First. Wipe the clamp with your dry microfiber cloth to remove loose dust and debris. This prevents scratching during the wet cleaning step.
Step 2: Mix a Mild Solution. Fill a small bowl with warm (not hot) distilled water and add 2-3 drops of dish soap. Swirl to mix—you don't need suds, just enough to lift grease.
Step 3: Wipe Gently. Dip the cloth in the soapy water, wring it out until it's just damp (not dripping), and wipe the clamp in small, circular motions. Pay extra attention to the areas where the clamp meets the pipe and the lean pipe joint—grease and dirt love to hide there.
Step 4: Scrub Crevices. Use the soft-bristled brush to clean tight spots, like the threads on the clamp screw or the gaps between the clamp and the pipe. Be gentle—scrubbing too hard can scratch the chrome.
Step 5: Rinse and Dry. Dip a clean cloth in plain distilled water, wring it out, and wipe away any soap residue. Then, immediately dry the clamp with your second microfiber cloth. Water left on chrome will leave spots, and spots can lead to rust—so don't skip this step!
Step 6: Buff to Shine. For extra protection, give the clamp a quick buff with a dry cloth. This removes any remaining moisture and leaves a slight sheen that repels dust.
How Often Should You Clean?
It depends on your environment:
- High-Dust Areas (e.g., woodworking shops, metal fabrication): Clean clamps weekly. Dust acts like sandpaper, wearing down the chrome over time.
- Humid or Wet Areas (e.g., near washing stations, outdoor workspaces): Clean bi-weekly, and dry thoroughly after each cleaning. Moisture is rust's best friend.
- General Workspaces (e.g., assembly lines, offices): Monthly cleaning is usually enough, but do a quick wipe-down if you notice fingerprints or grease.
Lubrication: Keeping Clamps Moving Smoothly
Ever tried to open a door that's been stuck for years? It creaks, resists, and eventually feels like it might break. The same thing happens to clamps that aren't lubricated—their moving parts (like screws, hinges, or adjustable levers) seize up, making them hard to tighten or loosen. Lubrication keeps these parts sliding smoothly, reduces wear, and even helps prevent rust by creating a barrier against moisture.
What Lubricant to Use (And What to Avoid)
Not all lubricants are created equal—some can actually damage your clamps. Here's what to reach for (and what to steer clear of):
- Best Bets: Silicone-based lubricants (like silicone spray or paste) are ideal for chrome clamps. They're water-resistant, won't damage rubber or plastic grip pads, and leave a thin, non-greasy film that repels dust. Teflon-based lubricants (like dry lubricant sprays) are another good option—they work well in high-friction areas.
- Avoid: Petroleum-based lubricants (like motor oil or WD-40, which is a solvent, not a lubricant!) can degrade the chrome plating over time. They also attract dust and dirt, creating a gunky buildup that's worse than no lubricant at all. Grease is too thick—it will trap debris and make clamps sticky.
Where and How to Lubricate
Focus on the "moving parts" of the clamp—these are the areas that need lubrication most:
- Threads: If your clamp has a screw or bolt (most do), apply 1-2 drops of lubricant to the threads. This makes it easier to tighten/loosen and prevents the threads from stripping or seizing up.
- Pivot Points: Some clamps have hinges or levers that fold or rotate (like quick-release clamps). Put a tiny amount of lubricant on the pivot pin—just enough to make the movement smooth, not dripping.
- Adjustment Knobs: If the clamp has a knob that turns to adjust its size (common for fitting different pipe diameters), lubricate the area where the knob meets the clamp body.
Pro tip: After applying lubricant, work the clamp back and forth a few times (tighten and loosen it) to spread the lubricant evenly. Then, wipe off any excess with a clean cloth—you don't want it dripping onto your workbench or attracting dust.
Lubrication Schedule
Lubricate your clamps every 3-6 months, depending on use. If you notice a clamp is getting stiff or hard to turn, don't wait—lubricate it immediately. For clamps on equipment that's used daily (like movable carts or adjustable workbenches), aim for the 3-month mark—they're moving more, so their parts wear faster.
Handling Wear and Tear: When to Repair, When to replace
Even with perfect maintenance, clamps will wear out eventually. The key is knowing when a clamp can be saved with a quick fix and when it's time to retire it. Here's how to tell the difference:
Minor Issues: Fixable with a Little Effort
Small Rust Spots: If you catch rust early (before it eats through the chrome), you can remove it. Mix equal parts white vinegar and distilled water, soak a cotton ball in the solution, and dab it on the rust spot. Let it sit for 10-15 minutes, then gently scrub with a soft brush. Rinse with water, dry thoroughly, and apply a thin coat of silicone lubricant to prevent recurrence.
Worn Grip Pads: Many clamps have rubber or plastic pads inside that grip the pipe. If these pads are cracked, flattened, or missing, the clamp won't hold tight. Some manufacturers sell replacement pads—check with your lean pipe and accessories supplier. If pads aren't available, wrap the pipe in a thin layer of electrical tape (the rubbery kind) before reattaching the clamp. This adds friction and helps the clamp grip better.
Stripped Threads (Mild): If the screw on the clamp turns but doesn't tighten, the threads might be slightly stripped. Try this trick: apply a small amount of thread-locking compound (like Loctite Blue) to the threads, then tighten the clamp. The compound fills in the gaps and helps the threads grip. Note: This is a temporary fix—if the threads are badly stripped, replace the clamp.
Major Issues: Time to replace the Clamp
Some damage is beyond repair. Here's when to swap out that old clamp for a new one:
- Chrome Plating Completely Worn Through: If you can see the bare metal underneath the chrome (it will look dull, not shiny), the clamp is no longer protected from rust. Even if there's no rust yet, it's only a matter of time.
- Structural Bends or Cracks: A bent or cracked clamp can't hold weight safely. Cracks (even tiny ones) will spread under pressure, and a bent clamp distributes force unevenly, risking failure.
- Severely Stripped Threads: If the screw spins freely and thread-locking compound doesn't help, the threads are too far gone. Using this clamp is like using a broken seatbelt—it might work for a while, but it will fail when you need it most.
- Rust That Won't Budge: If you've tried vinegar, baking soda, and rust remover, and the rust still covers more than 20% of the clamp, it's time to let it go. Rust weakens the metal, making the clamp prone to snapping.
Spare Clamps = Peace of Mind: Keep 5-10 extra lean pipe clamp chrome in your toolbox. That way, if a clamp fails unexpectedly, you can replace it immediately without halting work. Label them by size (e.g., "1-inch pipe clamps") so you can grab the right one fast.
Storage: Protecting Clamps When They're Not in Use
What do you do with extra clamps or ones you're not using (e.g., during a workspace redesign)? Throwing them in a drawer or a bucket might seem easy, but that's a surefire way to damage them. Here's how to store clamps so they're ready to go when you need them:
- Keep Them Dry: Store clamps in a cool, dry place—avoid basements, garages, or sheds with high humidity. If your storage area is damp, place a dehumidifier nearby or toss a few silica gel packets in the storage container.
- Avoid Stacking Heavy Items On Them: Clamps are strong when they're holding pipes, but they're fragile when crushed under a pile of tools. Store them in a shallow tray or a divided toolbox where they won't get bent.
- Separate by Size: Mixing small and large clamps can lead to scratching (the larger ones might rub against the smaller ones). Use dividers or separate containers for different sizes.
- Clean Before Storing: If you're putting clamps away for more than a month, clean and lubricate them first. This prevents dust and moisture from damaging them while they're idle.
Monthly Maintenance Checklist: A Handy Reference
To make maintenance easy, we've put together a quick checklist you can print and keep near your workspace. Stick it on the wall or tuck it in your toolbox—use it to stay on track!
| Task | Tools Needed | Frequency | Notes |
|---|---|---|---|
| Visual inspection for rust, peeling chrome, or bends | None (just your eyes!) | Daily | Focus on high-stress clamps first. |
| Tighten loose clamps | Screwdriver or wrench | Daily | Snug, not over-tightened—you don't want to strip threads. |
| Clean clamps with mild soap and water | Microfiber cloth, soft brush, distilled water | Weekly (high-dust); Monthly (general use) | Dry thoroughly to prevent water spots. |
| Lubricate threads and pivot points | Silicone lubricant, clean cloth | Every 3-6 months | Wipe off excess lubricant to avoid dust buildup. |
| Check for worn grip pads or stripped threads | None | Monthly | replace pads or clamps if needed. |
| Inspect lean pipe joint connections | None | Monthly | Joints and clamps work together—if a joint is loose, the clamp takes extra strain. |
Conclusion: Invest a Little Time, Save a Lot of Trouble
Your lean pipe clamp chrome might seem like a small part of your workspace, but it's a critical one. By taking 5-10 minutes each week to inspect, clean, and lubricate these clamps, you're not just extending their life—you're protecting your productivity, your team's safety, and your bottom line. Remember: maintenance isn't a chore; it's an investment. And like any investment, it pays off in the long run.
So the next time you walk past your lean pipe system, take a second to appreciate those little chrome clamps. Give them a quick check, tighten if needed, and maybe even a wipe-down. They'll repay you by keeping your workspace running smoothly, day in and day out. Here's to clamps that last—and a workflow that never skips a beat.