- Company Articles
- Products and Technology
- Product knowledge
- Lean Pipe Clamp Chrome Manufacturing Process: From Raw Material to Finished Product

Lean Pipe Clamp Chrome Manufacturing Process: From Raw Material to Finished Product
Related Product
Lean Pipe Clamp Chrome
Lean pipe clamp is used for rack system hang monitor or other panel for workbenck, flowrack in production daily use.
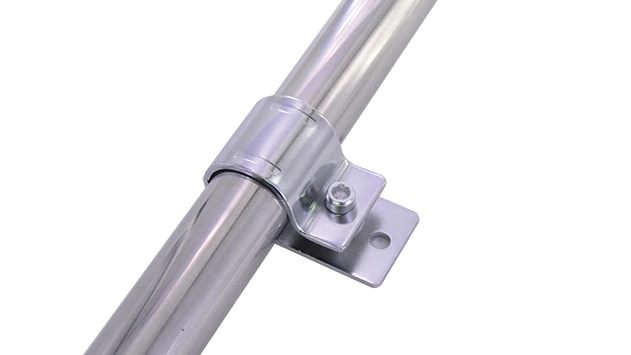
In the bustling world of manufacturing, where every second counts and efficiency is king, there's a silent workhorse that keeps production lines flowing smoothly: the lean pipe clamp chrome . These unassuming components might not grab headlines, but ask any factory manager, and they'll tell you—without reliable clamps, the entire lean system could grind to a halt. Whether it's holding together a lean pipe workbench or securing a flow rack, these clamps are the glue that turns a jumble of pipes and joints into a cohesive, productive workspace. Today, we're pulling back the curtain to explore how these essential tools go from raw metal to the finished, shiny clamps that line factory floors worldwide.
1. Raw Material Selection: The Foundation of Durability
Every great product starts with great materials, and lean pipe clamp chrome is no exception. Manufacturers don't just pick any metal off the shelf—they carefully select materials that can withstand the daily wear and tear of a busy factory. Two materials stand out in this process: stainless steel from the stainless steel pipe series and, occasionally, aluminum profile for lighter-duty applications. Let's dive into why these choices matter.
Stainless Steel Pipe Series: The Gold Standard for Strength
When it comes to durability, stainless steel is hard to beat. Most lean pipe clamps are made from 304 or 316 grade stainless steel, part of the stainless steel pipe series . Why these grades? 304 stainless steel contains chromium and nickel, which form a protective oxide layer on the surface—this layer is what makes stainless steel "stainless," resisting rust and corrosion even in humid or oily factory environments. For factories that deal with chemicals or high moisture, 316 grade adds molybdenum, boosting corrosion resistance further. Imagine a clamp that's exposed to daily spills of coolant or cleaning agents; without stainless steel, it would rust within months, weakening the entire structure. Stainless steel ensures the clamp stays strong for years, even under heavy use.
Aluminum Profile: A Lightweight Alternative?
While stainless steel is the go-to for heavy-duty applications, some manufacturers opt for aluminum profile in specific cases. Aluminum is lighter than steel, which can be an advantage for portable setups, like temporary workstations or turnover trolleys. However, aluminum alone isn't as strong as stainless steel, so it's often alloyed with other metals (like magnesium or silicon) to boost its strength. The downside? Aluminum is more prone to scratching and denting, and it doesn't have the same natural corrosion resistance as stainless steel—unless it's anodized. For most factory settings, though, stainless steel remains the top choice. After all, when you're building a system that needs to last through thousands of assembly cycles, strength and longevity matter more than a little extra weight.
| Material | Key Properties | Best For | Potential Drawbacks |
|---|---|---|---|
| Stainless Steel (304/316 Grade) | High strength, corrosion-resistant, durable | Heavy-duty workbenches, flow racks, ESD workstations | Heavier than aluminum; slightly higher cost |
| Aluminum Profile (Alloyed) | Lightweight, moderately strong, customizable | Portable trolleys, temporary setups | Less scratch-resistant; needs anodizing for corrosion protection |
2. Design & Prototyping: Turning Blueprints into Reality
Once the raw materials are selected, the next step is design. This isn't just about making the clamp "look good"—it's about ensuring it works seamlessly with lean pipe joint and pipes of all sizes. A poorly designed clamp might slip, crack, or fail to grip, which could lead to wobbly workbenches or even accidents. That's why manufacturers invest heavily in precision design and prototyping.
CAD Design: Precision in Every Curve
Modern manufacturers start with computer-aided design (CAD) software. Engineers input specifications: the diameter of the lean pipe (usually 28mm or 30mm), the required clamping force, and the type of joint it will connect to. They model the clamp in 3D, tweaking angles and thicknesses to ensure a snug fit. For example, the inner curve of the clamp must match the outer curve of the pipe exactly—too loose, and it slips; too tight, and it's hard to install. CAD allows engineers to test these variables digitally, avoiding costly mistakes later. They also simulate stress: what happens if a worker leans on the clamp? Will it bend? Using finite element analysis (FEA), they can see where the clamp might weaken under pressure and adjust the design accordingly. It's a bit like building a virtual prototype first, ensuring every curve and edge is optimized for real-world use.
3D Printing: Testing Before Mass Production
Even with CAD, there's no substitute for holding a physical prototype. That's where 3D printing comes in. Manufacturers print plastic or resin versions of the clamp to test fit and function. They'll attach it to a sample lean pipe, twist it, pull it, and see how it performs. Does the screw mechanism tighten smoothly? Does the clamp stay in place when jostled? If something feels off—maybe the handle is too small, or the clamping surface isn't wide enough—they go back to the CAD drawing and tweak it. This iterative process might take weeks, but it's critical. Imagine producing 10,000 clamps only to realize they don't fit standard lean pipes—that's a disaster for both the manufacturer and the lean pipe supplier who ordered them. Prototyping ensures the final design is not just functional, but user-friendly too.

3. Machining: Shaping the Clamp
With the design finalized, it's time to shape the raw material into the clamp's form. This is where the metal really starts to take shape, and precision is everything. Machining involves cutting, drilling, and bending the stainless steel (or aluminum) into the exact dimensions specified in the CAD design.
Cutting and Sizing: Getting the Perfect Blank
The process starts with cutting the raw stainless steel into "blanks"—small, flat pieces that will become the body of the clamp. Manufacturers use shearing machines or laser cutters for this step. Laser cutters are particularly popular because they offer pinpoint accuracy, ensuring each blank is identical. For example, a blank for a standard lean pipe clamp might be 10cm long and 3cm wide, with pre-marked areas for bends and holes. Shearing machines are faster for large batches, but laser cutters are better for complex shapes—like the curved jaw of the clamp that wraps around the pipe.
Bending and Forming: Creating the Clamp's Shape
Next, the blank is bent into the clamp's characteristic C-shape. This is done using a press brake, a machine that uses a punch and die to fold the metal at precise angles. The operator loads the blank into the machine, aligns it with guides, and the press bends it—usually in two steps: first, forming the main curve that grips the pipe, then bending the ends to create the flanges where the screw will attach. It's a bit like bending a paperclip, but on an industrial scale. The press brake applies tons of force, so the metal bends evenly without cracking. After bending, the clamp starts to look like the finished product, but there's still work to do.
Drilling and Threading: Adding the Screw Mechanism
No clamp is complete without a way to tighten it, and that means drilling holes and threading them for screws. Using a CNC drill press, manufacturers drill a hole through one flange of the clamp. Then, they tap the hole—cutting threads into the metal so the screw can twist in securely. The size of the hole and threads depends on the screw: most lean pipe clamps use M8 or M10 screws, which are strong enough to hold the clamp tight without stripping the threads. After drilling, the edges of the hole are deburred (smoothed out) to remove sharp metal bits—no one wants a worker to get a cut while installing the clamp!
4. Surface Treatment: The Chrome Plating Process
Now comes the step that gives the clamp its name—and its signature shine: chrome plating. Chrome isn't just for looks, though; it adds a layer of protection that makes the clamp even more durable. The plating process is a multi-step chemical dance that transforms the dull stainless steel into a bright, corrosion-resistant finish.
Pre-Treatment: Cleaning for Adhesion
Before plating, the clamp must be spotlessly clean. Any oil, dirt, or fingerprints on the surface will prevent the chrome from sticking, leading to peeling or bubbling later. The cleaning process starts with degreasing: clamps are submerged in a hot alkaline solution to dissolve oils and grime. Then, they're rinsed in water to remove the solution. Next, they go through pickling—a bath of nitric acid or hydrochloric acid that etches the surface slightly, creating tiny pores for the chrome to adhere to. Finally, they're rinsed again, this time in deionized water to remove any remaining chemicals. It's a tedious process, but skipping even one step can ruin the plating. As one (senior plating technician) once put it: "You can't plate dirt. If the metal isn't clean, the chrome will let you know—usually by falling off six months later."
Electroplating: Layers of Protection and Shine
Once clean, the clamps are ready for electroplating. They're hung on racks and lowered into a bath of chromic acid solution, along with lead anodes. When an electric current is applied, chromium ions in the solution are attracted to the clamps (which act as cathodes), depositing a thin layer of chrome on the surface. The process is carefully controlled: the temperature of the bath (usually around 45°C), the current density, and the plating time all affect the thickness and quality of the chrome layer. Most lean pipe clamps get a plating thickness of 5-10 microns—thick enough to protect against scratches and corrosion, but not so thick that it interferes with the clamp's fit. After plating, the clamps are rinsed again to remove excess solution, then dried in an oven. The result? A bright, mirror-like finish that not only looks professional but also repels water, oil, and rust.
5. Assembly: Bringing It All Together
With the chrome-plated clamp body ready, it's time to add the finishing touches: the screw, handle, and any other hardware. This step is often done by hand, as it requires a gentle touch to avoid scratching the fresh chrome plating.
Attaching the Screw and Handle
Workers insert the screw into the threaded hole of the clamp, then attach the handle. The handle is usually made of plastic or rubber for a comfortable grip—imagine tightening a metal handle all day; your hands would be sore! Some handles are even ergonomically designed, with grooves that fit the fingers. Once the handle is screwed on, the worker tests the mechanism, twisting the handle to ensure the clamp opens and closes smoothly. If the screw sticks or the handle wobbles, they'll disassemble it and fix the issue. It's a small step, but it makes a big difference for the end user—no one wants to struggle with a clamp that's hard to adjust.
Final Inspection: The Human Touch
After assembly, each clamp undergoes a final visual inspection. Workers check for defects: is the chrome plating even? Are there any scratches or dents? Does the screw tighten all the way? They'll also measure critical dimensions—like the width of the clamp opening—to ensure it fits standard lean pipes (usually 28mm or 30mm). Any clamp that doesn't meet the standards is set aside for rework or recycling. This human touch is crucial; machines can catch big issues, but only a trained eye can spot tiny flaws that might affect performance. As one inspector put it: "I treat every clamp like it's going on my own workbench. If I wouldn't use it, why would I send it to a customer?"
6. Quality Control: Ensuring Reliability
Even after assembly, the clamps aren't ready to ship. They must pass a series of rigorous tests to ensure they can handle the demands of a factory floor. Here's what manufacturers check:
Load Testing: Can It Hold the Weight?
Clamps are attached to a test rig, where a weight is hung from them to simulate the stress of holding a loaded workbench or flow rack. For standard clamps, this might mean applying 50kg of force for 24 hours. If the clamp bends, slips, or the screw strips, it fails the test. Only clamps that hold firm under pressure move on.
Corrosion Resistance: Salt Spray Tests
To test the chrome plating's durability, samples are placed in a salt spray chamber—a closed container where a mist of saltwater is sprayed continuously. After 48 or 72 hours, the clamps are inspected for rust or pitting. Stainless steel combined with chrome plating should resist corrosion entirely, but the test ensures there are no weak spots in the plating.
Cycle Testing: How Many Uses Before It Wears Out?
Clamps are opened and closed repeatedly—sometimes 10,000 times or more—to simulate years of use. This tests the screw mechanism and the clamp's flexibility. If the handle loosens or the clamp starts to slip after repeated cycles, the design is revisited. The goal? A clamp that can be adjusted hundreds of times without losing its grip.
7. Packaging & Distribution: Ready for the Factory Floor
Once the clamps pass all tests, they're packaged and prepared for shipment. Packaging might seem like an afterthought, but for a lean pipe supplier , it's critical. Clamps are often packed in cardboard boxes with dividers to prevent them from scratching each other during transit. Some suppliers even use foam inserts for high-end orders. Each box is labeled with the product name, quantity, and batch number—this helps track the clamps if there's ever a quality issue later. Finally, the boxes are loaded onto pallets and shipped to warehouses, where they wait to be sent to factories, workshops, and assembly lines around the world.
Conclusion: The Clamp That Keeps Lean Systems Moving
From a raw stainless steel blank to a shiny, chrome-plated clamp, the journey is long and meticulous. Every step—from material selection to plating to quality control—is designed with one goal in mind: creating a product that's strong, reliable, and built to last. The next time you walk through a factory, take a moment to look at the lean pipe workbenches and flow racks. Chances are, you'll spot a lean pipe clamp chrome holding it all together. It might not be glamorous, but in the world of lean manufacturing, sometimes the smallest components make the biggest difference.
So, the next time you tighten a clamp to adjust a workbench or secure a flow rack, remember the craftsmanship that went into it. From the engineers who designed it to the workers who assembled it, every person involved played a role in creating a tool that helps factories run faster, safer, and more efficiently. That's the power of a well-made lean pipe clamp chrome—it's not just a part; it's a partner in productivity.