- Company Articles
- Products and Technology
- Installation And Maintenance
- Lean Pipe Fixed Clamp Installation Mistakes to Avoid

Lean Pipe Fixed Clamp Installation Mistakes to Avoid
Related Product
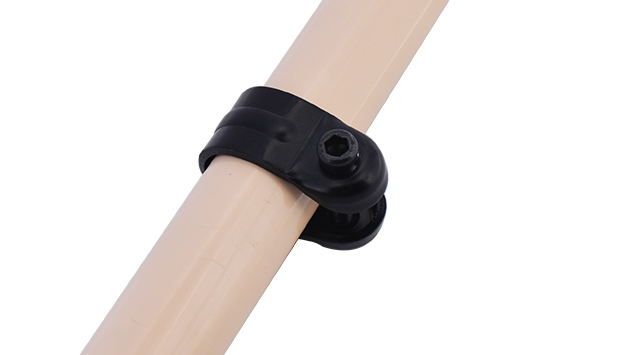
Lean Pipe Fixed Clamp
Lean pipe fixed clamp is used for pipe connector fixing the correct position during workbench flow rack hand trolley assemble work.
In the world of manufacturing and warehouse operations, lean systems have become the backbone of efficiency. They streamline workflows, reduce waste, and keep teams moving like well-oiled machines. At the heart of these systems lies the humble lean pipe—simple, versatile, and surprisingly powerful when paired with the right accessories. But here's the thing: even the best lean pipe setup can fail if one tiny component is overlooked: the fixed clamp. These small but critical pieces hold everything together, ensuring stability, safety, and longevity. Yet, time and again, installers fall into common traps that turn a promising lean setup into a source of frustration, downtime, or even accidents. Let's dive into the most frequent lean pipe fixed clamp installation mistakes, why they happen, and how to steer clear of them—because getting it right the first time saves far more than just time.
1. Choosing the Wrong Clamp Type for the Job
Not all lean pipe clamps are created equal. Walk into any supplier's catalog, and you'll find a dizzying array: two-way clamps, three-way clamps, parallel clamps, rotatory clamps—the list goes on. Each is designed for a specific purpose, whether it's connecting pipes at a 90-degree angle, supporting heavy vertical loads, or allowing for adjustability in a workstation. The mistake? Grabbing the first clamp you see without considering the application.
For example, using a basic two-way lean pipe clamp to secure a horizontal pipe that bears the weight of a loaded material rack is a recipe for disaster. Two-way clamps are great for simple T-joints but lack the structural support needed for heavy, downward pressure. Over time, the clamp will loosen, the pipe will sag, and the entire rack might tilt—putting products (and people) at risk. On the flip side, using a heavy-duty rotatory clamp for a stationary, lightweight workbench leg is overkill. Not only does it add unnecessary cost, but the extra moving parts can introduce instability in a setup that doesn't need adjustability.
Why it happens: Many teams prioritize speed over precision, assuming "any clamp will do." Others may not realize that clamps are engineered for specific load capacities, angles, and environments (like ESD-protected areas where conductive clamps are a must).
The fix: Start by asking: What's the load? Will the joint be stationary or need to rotate? Is the environment corrosive, or does it require ESD protection? Consult your lean pipe supplier's specs—they'll list clamp ratings for weight, angle tolerance, and material compatibility. When in doubt, reach out to their technical team; a 5-minute conversation can prevent hours of rework later.
Real-World Example:
A electronics manufacturer once installed standard plastic clamps on an ESD workstation, unaware that plastic isn't conductive. Static built up on the workbench, frying sensitive circuit boards. The fix? Switching to ESD-safe lean pipe clamps with metal components that grounded the static—costing thousands in damaged parts and downtime that could have been avoided with a quick check of clamp specs.
2. Over-Tightening (or Under-Tightening) the Clamp
Tightening a lean pipe clamp seems straightforward: twist the bolt until it's "snug." But "snug" is subjective—and that's where the trouble starts. Over-tighten, and you risk stripping the threads, cracking the pipe, or warping the clamp itself. Under-tighten, and the joint will wobble, loosen over time, or even come apart under vibration. Both mistakes turn a stable structure into a ticking time bomb.
Let's break it down: Over-tightening is common among installers who think "tighter = safer." Lean pipes, especially aluminum or PE-coated steel, are surprisingly delicate. The threads on lean pipe joints are designed to handle a specific torque—exceed that, and you'll strip them, making the joint permanently weak. Even if the threads hold, over-tightening can compress the pipe, deforming it and creating uneven stress points that lead to cracks down the line.
Under-tightening, on the other hand, often happens when teams rush through installation. A clamp that's "good enough" on day one will loosen with every bump, vibration, or temperature change. In a busy warehouse, that loose joint might not be noticed until a shelf collapses or a workbench leg gives way.
Why it happens: Most installers rely on feel alone, not tools. Without a torque wrench, it's impossible to know if you've hit the manufacturer's recommended torque (usually between 15-25 Nm for standard clamps).
The fix: Invest in a basic torque wrench—they're affordable and pay for themselves in avoided repairs. Check your lean pipe joint and clamp specs for the exact torque rating, and stick to it. For critical joints (like those holding heavy material racks), mark the bolt with a permanent marker after tightening; if the mark shifts later, you'll know it's loosened and needs re-tightening. And remember: Clamps can settle over the first week of use—schedule a quick inspection 3-5 days after installation to retighten any that have loosened.
3. Ignoring Compatibility with Lean Pipe and Accessories
Lean pipe systems thrive on versatility—mixing and matching pipes, joints, clamps, and accessories to build custom workbenches, flow racks, or trolleys. But that versatility can backfire when installers mix components from different brands or material types without checking compatibility. The result? Clamps that don't fit, joints that slip, or even chemical reactions that corrode parts.
For instance, pairing a steel lean pipe clamp with an aluminum pipe might seem harmless, but steel and aluminum are galvanically incompatible. When they touch, especially in humid environments, they create a battery-like reaction that accelerates corrosion. Over time, the clamp will eat away at the pipe, weakening the joint until it fails. Similarly, using a clamp designed for 28mm diameter pipes on a 30mm aluminum profile will leave gaps, making the joint unstable no matter how tight you crank the bolt.
Even within the same brand, accessories matter. A clamp might fit the pipe, but if it's not designed to work with the specific lean pipe joint you're using (like a three-way joint vs. a crossing joint), the load distribution will be off. The clamp might bear more stress than it's rated for, leading to premature wear.
Why it happens: Many teams source components from multiple suppliers to save costs, assuming "lean pipe is lean pipe." Others inherit parts from old systems and repurpose them without checking specs.
The fix: Stick to a single supplier for critical components like pipes, clamps, and joints—they engineer their products to work together seamlessly. If you must mix brands, cross-check dimensions (pipe diameter, clamp opening size) and material compatibility charts. For metals, avoid pairing dissimilar ones (e.g., steel and aluminum) unless you use insulating washers or corrosion-resistant coatings. And always test a small, non-critical joint first to ensure everything fits and holds before building the full structure.

4. Skipping Pre-Installation Inspections of Pipes and Clamps
It's easy to grab a pipe and a clamp from the storage bin and start assembling—but what if that pipe has a hairline crack? Or that clamp has a bent bolt from being dropped? These small defects are invisible to the untrained eye but can turn into big problems once the system is under load. Skipping pre-installation inspections is like building a house with rotting wood—no matter how well you hammer the nails, the foundation is flawed.
Common defects to watch for: dents or cracks in the pipe (especially near the ends, where clamps grip), bent or stripped threads on clamp bolts, cracks in plastic clamp components, or rust on metal parts (a sign of poor storage). Even something as simple as a dirty pipe end can prevent the clamp from gripping properly—grease, dust, or paint buildup creates a slippery barrier between the clamp and pipe, leading to slippage.
Why it happens: In fast-paced environments, "good enough" becomes the norm. Teams assume that if a part looks intact, it is intact. Plus, inspecting every component adds time upfront, which feels like a waste when deadlines are tight.
The fix: Make inspections part of the installation process. Before starting, lay out all pipes, clamps, and joints. Run a gloved hand along pipe surfaces to feel for dents or cracks. Check clamp bolts for straightness and thread condition (a quick test: screw a nut onto the bolt by hand—if it sticks or skips, the threads are damaged). Wipe pipe ends with a clean cloth to remove debris. It might add 5-10 minutes per project, but it's time well spent avoiding a system failure later.

5. Forgetting About Future Adjustments and Maintenance
Lean systems are meant to evolve. A workbench that holds small electronics today might need to be taller next month to accommodate new equipment. A flow rack might need to expand as production increases. But if clamps are installed in a way that makes adjustments impossible—or even just difficult—your lean system becomes rigid, defeating the purpose of lean itself.
The most common mistake here is over-tightening (yes, we're circling back to that!) or using permanent adhesives to "lock" clamps in place. While it might seem like a way to prevent loosening, it makes future adjustments a nightmare. To raise that workbench, you'd have to cut the pipe or destroy the clamp, wasting materials and time. Similarly, installing clamps in hard-to-reach spots—like between two tight shelves—makes routine maintenance (retightening bolts, replacing worn parts) a hassle, so teams skip it, letting small issues snowball.
Why it happens: Installers focus on the "now" of building the system, not the "later" of adapting it. They assume the setup will never change, so they prioritize stability over flexibility.
The fix: Plan for change from the start. Leave 1-2 inches of extra pipe length at joints to allow for height or width adjustments later. Avoid over-tightening clamps (again!) so they can be loosened and repositioned without damage. Use rotatory or swivel clamps in areas where movement might be needed (e.g., adjustable shelves). And when designing the layout, leave clearance around clamps for easy access during maintenance—your future self (and the next shift) will thank you.
| Mistake | Key Consequence | Quick Fix |
|---|---|---|
| Choosing the wrong clamp type | System instability, clamp failure under load | Match clamp specs to load, angle, and environment (check supplier ratings) |
| Over/under-tightening clamps | Stripped threads, cracked pipes, loose joints | Use a torque wrench and follow manufacturer torque specs |
| Mixing incompatible components | Corrosion, poor fit, weak joints | Stick to one supplier; check material and size compatibility |
| Skipping pre-installation inspections | Hidden defects lead to premature failure | Inspect pipes, clamps, and joints for damage or debris before use |
| Ignoring future adjustability | Rigid systems that can't evolve with needs | Leave extra pipe length, use adjustable clamps, and ensure maintenance access |
Lean pipe fixed clamps might be small, but they're the unsung heroes of your lean system. Avoiding these common mistakes isn't just about building a better workstation or rack—it's about creating a safer, more efficient workspace that grows with your team. Take the time to choose the right clamp, tighten it properly, check compatibility, inspect parts, and plan for the future. Your lean system will reward you with stability, longevity, and the flexibility to keep up with whatever comes next. After all, in lean manufacturing, the smallest details often make the biggest difference.