- Company Articles
- Products and Technology
- Installation And Maintenance
- Lean Pipe Systems: 2060 EU Standard Aluminum Profile Installation Guide

Lean Pipe Systems: 2060 EU Standard Aluminum Profile Installation Guide
Related Product
2060 EU Standard Aluminum Profile
2060 is a 2.00 x 4.00CM fractional 20 series square extrusion T-slot profile with four open T-slots, two side with 2.00cm face, the other side with 6.00cm face. The profile has align-a-grooves to assist in aligning connecting profiles.
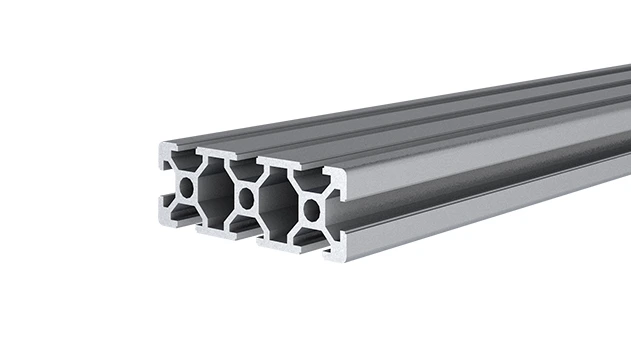
In the world of lean manufacturing and efficient workspace design, the backbone of any well-organized system often comes down to the components that hold it all together. Among these, the 2060 EU Standard Aluminum Profile stands out as a versatile, durable, and highly adaptable solution. Whether you're building a custom workbench, a streamlined flow rack, or a flexible conveyor system, understanding how to properly install this profile is key to unlocking its full potential. This guide will walk you through everything from the basics of the 2060 profile to step-by-step installation, ensuring your lean pipe system is not just functional, but built to last.
What Is the 2060 EU Standard Aluminum Profile?
Before diving into installation, let's start with the basics: what exactly is the 2060 EU Standard Aluminum Profile? Part of the broader family of aluminum extrusion profiles, the "2060" refers to its dimensions—20mm in width and 60mm in height. The "EU Standard" designation ensures it adheres to strict European manufacturing norms, guaranteeing consistency in size, material quality, and compatibility with accessories across brands. Made from high-grade aluminum alloy, this profile is lightweight yet surprisingly strong, resistant to corrosion, and designed with a T-slot structure along its length. Those T-slots are more than just a design quirk; they're the secret to its modularity, allowing you to attach accessories like brackets, guide rails, and panels with ease—no welding or drilling required.
In lean pipe systems, the 2060 profile plays a starring role. It's the building block for everything from workbenches and material racks to production line conveyors. Its flexibility means it can be reconfigured as your needs change, aligning perfectly with lean principles of waste reduction and continuous improvement. Unlike traditional steel pipes, aluminum profiles offer a cleaner look, lighter weight, and easier handling, making them a favorite among manufacturers, warehouses, and workshops aiming for efficiency without sacrificing durability.
Key Benefits of Using 2060 EU Standard Aluminum Profiles
Why choose the 2060 profile over other materials or sizes? Here are a few reasons it's become a staple in lean systems:
- Modularity: T-slots allow for quick attachment and removal of accessories, so you can adjust your setup in minutes, not days.
- Strength-to-Weight Ratio: Aluminum is lighter than steel but still strong enough to support heavy loads, making installation and reconfiguration easier on your team.
- Corrosion Resistance: Aluminum naturally forms a protective oxide layer, so it holds up well in humid or industrial environments without rusting.
- Precision: EU standard dimensions mean parts from different suppliers fit together seamlessly—no guesswork or custom modifications needed.
- Cost-Effective: While initial costs may be slightly higher than basic steel pipes, the long-term savings from reusability and low maintenance make it a smart investment.

Essential Components & Accessories
Installing the 2060 profile isn't a one-part job—it works best when paired with the right accessories. Below are some key components you'll likely encounter, many of which are designed specifically for EU standard profiles:
| Component | Role in Installation | Compatibility Note |
|---|---|---|
| Aluminum Profile Accessories | Includes T-slot nuts, bolts, washers, and end caps; used to secure connections and finish edges. | Look for EU-standard accessories to ensure T-slot fit. |
| 90° Aluminum Profile Connector | Joins two profiles at a right angle (e.g., vertical and horizontal frame members). | Requires T-slot nuts to lock into place. |
| Aluminum Guide Rail A/B | Attaches to profiles to guide materials (e.g., on flow racks or conveyor systems). | Available in yellow/grey plastic or aluminum; choose based on load and environment. |
| Roller Track | Mounts to profiles to create gravity-fed material flow (e.g., for turnover trolleys or racking). | Use roller track placon mounts for secure attachment to 2060 profiles. |
| Caster Wheels | Adds mobility to frames (e.g., workbenches or trolleys); available with brakes for stability. | Ensure caster mounting plates fit 2060's T-slot spacing. |
| 2060 Aluminum Profile End Cap | Covers exposed ends of profiles to prevent injury and protect against dust/debris. | Snap-on or screw-on designs; choose based on your frame's finish needs. |
These are just the basics—depending on your project, you might also use 45° connectors for angled frames, aluminum honeycomb panels for workbench tops, or even ESD (electrostatic discharge) accessories if you're working with sensitive electronics. The key is to check that all accessories are labeled as compatible with EU standard profiles to avoid fit issues.
Pre-Installation Preparation
Like any project, success starts with preparation. Rushing into installation without the right tools or plan can lead to wobbly frames, misaligned parts, or even safety hazards. Here's what you'll need to get ready:
Pro Tip: Lay out all parts on a clean, flat surface before starting. This helps you spot missing or damaged components early—nothing derails a project faster than realizing you're short a connector halfway through!
Tools You'll Need
Hex Key Set:
Most T-slot bolts and connectors use metric hex keys (often M5 or M6 for 2060 profiles). A set with ball-end tips will make it easier to reach tight angles.
Spirit Level:
Critical for ensuring frames are plumb (vertical) and level (horizontal)—a wobbly workbench or rack is useless (and unsafe!).
Tape Measure & Pencil:
For marking cuts (if needed) and verifying dimensions.
Rubber Mallet:
Gently taps connectors into place without damaging the aluminum finish.
Deburring Tool:
To smooth rough edges after cutting profiles (prevents cuts and ensures accessories fit flush).
Safety Gear:
Safety glasses (when cutting or deburring), work gloves, and closed-toe shoes—aluminum shavings can be sharp!
Miter Saw (Optional):
If your profiles need cutting to length. Use a blade designed for aluminum to avoid chipping.
Workspace Setup
Clear a space large enough to lay out your frame (add a few extra feet for moving around). A workbench or sawhorses with a plywood top works well—avoid uneven floors, as they can throw off your level readings. If you're cutting profiles, set up a dust collection system or work outdoors to avoid breathing in aluminum dust.
Inspect Your Parts
Take 5 minutes to check each profile and accessory: Look for dents, bent T-slots, or cracked connectors—damaged parts can weaken your structure. Also, verify that T-slot nuts slide smoothly along the profile's slots; if they stick, the slot may be deformed, and you'll need to replace the profile.
Plan Your Design
Sketch a rough diagram of your project (e.g., a workbench with dimensions: 1200mm long x 600mm deep x 800mm high). Note where each connector, rail, or caster will go—this prevents "measure twice, cut once" mistakes. For complex projects, use free design software (many aluminum profile suppliers offer online tools) to map out parts lists and assembly steps.
Step-by-Step Installation Guide: Building a Workbench with 2060 Profiles
To put theory into practice, let's walk through building a basic workbench using 2060 EU Standard Aluminum Profiles. This is a common project, and the skills you'll learn here apply to almost any 2060-based structure.
Step 1: Cut Profiles to Length (If Needed)
Most suppliers will cut profiles to your specified length, but if you need to adjust on-site:
- Measure & Mark: Use a tape measure and square to mark your cut line. Double-check the length against your design!
- Secure the Profile: Clamp the profile to your workbench so the cut line hangs over the edge (prevents the saw from binding).
- Cut Slowly: Use a miter saw with an aluminum blade, cutting at a low speed. Let the blade do the work—forcing it can bend the profile.
- Deburr: Run a deburring tool along the cut edge to remove sharp burrs. A quick pass with sandpaper (240-grit) will also smooth things out.
Step 2: Assemble the Frame
Start with the basic frame—for our workbench, we'll need four vertical legs (600mm long) and four horizontal rails (1200mm and 600mm for the top/bottom).
- Attach 90° Connectors to Vertical Legs: Slide T-slot nuts into the vertical profiles (one nut per connector hole). Position the 90° connector over the nuts, then thread in bolts (hand-tighten first—you'll finalize later).
- Connect Horizontal Rails: Align the horizontal rail with the connector's open end. Slide T-slot nuts into the rail's T-slots, position the connector over them, and bolt into place. Repeat until you have a rectangular frame (top and bottom).
- Join Top & Bottom Frames with Vertical Legs: Stand the bottom frame upright, then attach the vertical legs to its corners using 90° connectors. Place the top frame on the legs and secure with connectors. You now have a "cube" shape.
- Check for Squareness: Measure the diagonals of the top frame—if they're equal, the frame is square. If not, gently push/pull the corners until the measurements match. Use a spirit level to ensure vertical legs are plumb (no leaning!) and horizontal rails are level.
- Tighten All Bolts: Once square and level, use a hex key to fully tighten all bolts. Don't over-tighten—aluminum threads can strip!
Step 3: Add Cross-Braces for Stability
A basic cube frame is sturdy, but adding cross-braces (diagonal supports) prevents swaying under load.
- Measure & Cut Braces: For a 1200x600mm frame, diagonal braces will be ~1342mm long (use the Pythagorean theorem: a² + b² = c²). Cut two braces per side (front/back).
- Attach with 45° Connectors: Use 45° aluminum profile connectors to join braces to the vertical legs and horizontal rails. Position them high enough to clear the workbench top but low enough to add stability.
- Re-Check Level/Squareness: Adding braces can shift the frame, so double-check with your level and diagonal measurements.
Step 4: Install Accessories
Now it's time to add the finishing touches that make your workbench functional:
- End Caps: Snap or screw end caps onto all exposed profile ends—this is a small step, but it prevents snags on clothing and keeps dust out of T-slots.
- Caster Wheels (Optional): If you want mobility, flip the frame upside down and attach caster mounting plates to the bottom frame using T-slot nuts. Screw casters into the plates, ensuring at least two have brakes for stability.
- Aluminum Guide Rails: For a workbench used in assembly, attach aluminum guide rail A to the back edge to keep tools/materials from sliding off. Use T-slot nuts and bolts to secure the rail along the top rail's length.
- Roller Track (Optional): If you need material to flow across the bench (e.g., for a production line), mount roller track using placon mounts. Tilt the track slightly (1-2°) to use gravity—test with a sample part to ensure smooth movement.
Step 5: Mount the Worktop
Finally, add the work surface—we'll use an aluminum honeycomb panel (lightweight, strong, and flat).
- Position the Panel: Place the panel on top of the frame, centering it so there's equal overhang on all sides (or flush, if preferred).
- Secure with Screws: Drill pilot holes through the panel into the top frame's T-slots (use a drill bit smaller than your screws). Drive screws into T-slot nuts (pre-positioned in the frame) to lock the panel in place. Space screws every 200mm for even support.
Troubleshooting Common Issues
Even with careful planning, you might run into snags. Here's how to fix them:
- Loose Connections: If bolts won't stay tight, add a drop of thread locker (blue, not red—red is permanent!) to the threads before tightening.
- Misaligned T-Slots: If a connector won't line up with T-slot nuts, check that the nuts are centered in the slot. Use a small screwdriver to adjust their position.
- Uneven Frame: Shims (small pieces of aluminum or plastic) under one leg can level out a wobbly frame. Avoid over-shimming—if more than 5mm is needed, your floor may be uneven, and you should adjust the frame's length/width instead.
- Accessories Too Tight/Loose: If a roller track or guide rail doesn't slide smoothly, check for bent rollers or debris in the T-slots. Clean the slots with compressed air and lubricate moving parts with silicone spray (avoid oil-based lubes—they attract dust).
Maintenance & Long-Term Care
Your 2060 profile system will last for years with minimal upkeep:
- Clean Regularly: Wipe profiles with a damp cloth to remove dust and grease. For stubborn grime, use mild soap and water—avoid abrasive cleaners, which can scratch the aluminum.
- Tighten Bolts Quarterly: Vibration from daily use can loosen connections. A quick once-over with a hex key prevents frame wobble.
- replace Worn Parts: Caster wheels and roller tracks take the most abuse—if they start sticking or cracking, swap them out to avoid damaging the profile.
- Protect from Impact: Use corner guards if the frame is near high-traffic areas (e.g., forklift paths) to prevent dents.
Beyond the Basics: Advanced Applications
Once you've mastered the workbench, the 2060 profile's versatility really shines. Here are a few advanced projects to consider:
- Flow Racks: Combine 2060 profiles with roller track and aluminum guide rails to create gravity-fed racks for kanban systems—ideal for lean material handling.
- ESD Workstations: Add ESD mats, grounding straps, and ESD-safe caster wheels to protect sensitive electronics from static damage.
- Adjustable Shelving: Use sliding brackets in T-slots to create shelves that can be repositioned as storage needs change.
Final Thoughts
Installing 2060 EU Standard Aluminum Profiles might seem intimidating at first, but with the right tools, preparation, and a little patience, it's a project anyone can tackle. The key is to take your time with measurements, check for level/squareness at every step, and don't hesitate to adjust if something feels off. Remember, the modularity of these profiles means you can always reconfigure or expand your system later—so don't stress about making it perfect on the first try.
Whether you're building a simple workbench or a full production line, the 2060 profile is more than just a piece of aluminum—it's a foundation for lean, efficient, and adaptable workspace design. Now go grab your hex key, and start building something that works as hard as your team does.