- Company Articles
- Products and Technology
- Installation And Maintenance
- Maintaining Four Way Straight Lean Pipe Joint: Cleaning, Lubrication & Inspection Tips

Maintaining Four Way Straight Lean Pipe Joint: Cleaning, Lubrication & Inspection Tips
Related Product
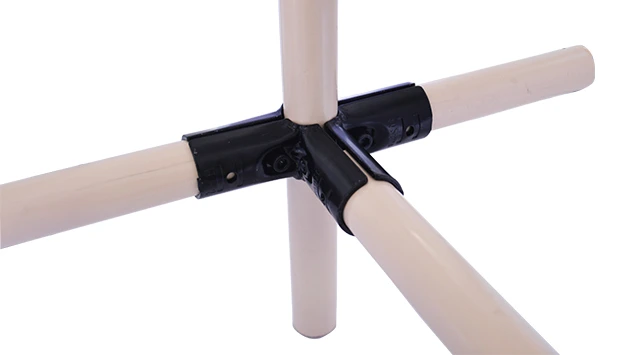
Four Way Straight Lean Pipe Joint
Four way lean pipe joint for 4 pcs 28MM lean pipe connection in straight angle, which used widely in workbench, flow rack, hand trolley frame connection.
Introduction: The Unsung Hero of Lean Workspaces
In the bustling world of manufacturing and production, where every second counts and efficiency is king, there's a quiet workhorse that keeps things moving—literally. The four way straight lean pipe joint might not be the first thing you notice on the factory floor, but it's the backbone of countless structures: from the workbenches where assemblers piece together products to the flow racks that shuttle materials between stations, and even the roller tracks that ensure smooth product movement. This small but mighty component is the glue (or rather, the connector) that holds your lean system together, and like any hardworking team member, it needs a little care to keep performing at its best.
Think about it: a single sticky or damaged joint can throw off an entire production line. Parts get stuck, workflows slow down, and before you know it, deadlines are missed and frustration builds. But here's the good news: with regular cleaning, proper lubrication, and thorough inspections, you can extend the life of your four way straight lean pipe joints, reduce downtime, and keep your operations running like a well-oiled machine. In this guide, we'll walk you through everything you need to know to maintain these critical components, from the tools you'll need to step-by-step best practices. Whether you're a seasoned facility manager or a new team lead tasked with keeping the shop floor in shape, this article is your go-to resource for keeping those joints (and your productivity) in top form.
Understanding the Four Way Straight Lean Pipe Joint
Before we dive into maintenance, let's take a moment to appreciate what makes the four way straight lean pipe joint so essential. As the name suggests, this type of lean pipe joint is designed to connect four pipes at a straight angle, creating stable, customizable structures that form the foundation of lean manufacturing setups. Unlike fixed joints, it allows for flexibility in design—you can adjust pipe lengths, reconfigure layouts, and adapt to changing production needs without overhauling the entire system. This adaptability is why lean pipe systems, and their joints, are a staple in industries ranging from automotive to electronics.
Four way straight lean pipe joints are typically made from durable materials like steel or aluminum, with a coating (often zinc or plastic) to resist corrosion and wear. They feature threaded holes or clamping mechanisms that secure pipes in place, ensuring the structure can handle the weight of materials, tools, and even heavy equipment. Over time, though, these joints face a lot of stress: constant vibration from machinery, exposure to dust and debris, and the wear and tear of daily use. Add to that occasional spills of lubricants or coolants, and it's easy to see why maintenance isn't just optional—it's essential.
Pro Tip: Not all lean pipe joints are created equal! The four way straight joint is just one of many types (think 90-degree elbows, T-joints, or swivel connectors). Always check the manufacturer's specs to ensure you're using the right maintenance techniques for your specific joint type—especially if you're working with aluminum vs. steel components.

Cleaning: Keeping the Joint Free from Gunk and Grime
Why Cleaning Matters
Dust, oil, metal shavings, and even spilled coffee—your four way straight lean pipe joint sees it all. Over time, these contaminants build up in the crevices of the joint, especially around the moving parts or threads. This gunk doesn't just look unsightly; it can interfere with the joint's ability to rotate smoothly, cause threads to seize, or even corrode the metal over time. Regular cleaning prevents these issues, ensuring the joint remains easy to adjust (when needed) and free from damaging buildup.
Tools You'll Need
You don't need a fancy toolkit to clean a lean pipe joint—just a few basic supplies you probably already have on hand:
- Soft-bristle brush: A small paintbrush or toothbrush works great for dislodging dust from tight spaces.
- Microfiber cloths: These are gentle on coatings and won't leave lint behind (avoid paper towels, which can scratch).
- Compressed air can or air compressor: Perfect for blowing out debris from hard-to-reach areas, like the threads or internal channels.
- Mild detergent solution: Mix a few drops of dish soap with warm water for tackling oil or grease (avoid harsh chemicals like bleach, which can damage coatings).
- Cotton swabs: Ideal for cleaning around small components or tight joints.
- Dry rag: For wiping away excess moisture after cleaning.
Step-by-Step Cleaning Process
Step 1: Safety First Before you start, make sure the area around the joint is clear of equipment or materials. If the joint is part of a loaded structure (like a flow rack with materials on it), unload it first to avoid accidents. If the joint is connected to electrical components, turn off the power to that section—water and electricity don't mix!
Step 2: Remove Loose Debris Start by using the soft-bristle brush to gently sweep away any loose dust, dirt, or metal shavings from the surface of the joint. Pay special attention to the crevices where the pipes meet the joint, as this is where debris loves to hide. For stubborn particles, use compressed air to blow them out—hold the can or nozzle a few inches away to avoid damaging the joint's coating.
Step 3: Tackle Grease and Oil If you notice oil or grease buildup (common in areas near machinery or workbenches), dip a microfiber cloth in your mild detergent solution and wring it out well—you want it damp, not soaking. Gently wipe the joint, focusing on the greasy spots. For tight areas, use a cotton swab dipped in the solution to scrub away grime. Avoid saturating the joint, especially if it has moving parts, as excess water can lead to rust.
Step 4: Dry Thoroughly Once the joint is clean, use a dry rag or fresh microfiber cloth to wipe away all moisture. If the joint has internal threads or moving components, use compressed air again to blow out any remaining water—this is crucial for preventing corrosion. Let the joint air-dry for a few minutes before moving on to lubrication (we'll get to that next!).
Common Mistake to Avoid: Using abrasive tools like steel wool or wire brushes. These can scratch the joint's protective coating, making it more vulnerable to rust and wear. Stick to soft brushes and cloths to keep the finish intact.

Lubrication: Keeping the Joint Moving Smoothly
Why Lubrication is Non-Negotiable
Even the cleanest joint can become a problem if it's not properly lubricated. The four way straight lean pipe joint often has moving parts (like swivel mechanisms or adjustable clamps) that rely on smooth motion to function. Without lubrication, friction builds up, leading to stiffness, squeaking, and eventually, wear on metal surfaces. Over time, this can make the joint hard to adjust, or worse, cause it to seize up entirely. The right lubricant reduces friction, protects against corrosion, and ensures the joint moves freely when you need it to—whether you're reconfiguring a workbench or adjusting a flow rack.
Choosing the Right Lubricant
Not all lubricants are created equal, and using the wrong one can do more harm than good. Here's how to pick the best option for your four way straight lean pipe joint:
- Dry Lubricants (e.g., Graphite Powder or PTFE Spray): Great for joints that are exposed to dust or debris. Dry lubricants don't attract dirt like oil-based options, making them ideal for clean rooms or areas with lots of airborne particles (common in electronics manufacturing).
- Silicone Spray: A versatile choice for most lean pipe joints. It's water-resistant, non-corrosive, and works well on both metal and plastic components. Plus, it dries quickly and leaves a smooth, slippery finish without a greasy residue.
- Light Machine Oil: Best for metal-on-metal joints that need long-lasting lubrication. Look for oils labeled "non-detergent" to avoid gumming up moving parts. Avoid heavy oils, which can attract dust and create a sticky mess.
- Anti-Corrosion Lubricants (e.g., WD-40 Specialist Long-Term Corrosion Inhibitor): Perfect for joints in humid environments or areas prone to moisture (like warehouses with poor ventilation). These lubricants add a protective layer that prevents rust and oxidation.
When in doubt, check the manufacturer's recommendations—many lean pipe suppliers provide guidelines on compatible lubricants for their products. Using the right one ensures you don't void warranties or damage the joint.
How to Lubricate Like a Pro
Lubricating a four way straight lean pipe joint is simple, but it requires a light touch—more isn't always better. Follow these steps for optimal results:
Step 1: Clean First (Yes, Again!) Before applying lubricant, make sure the joint is clean and dry (we covered cleaning earlier, remember?). Applying lubricant over dirt or grease traps contaminants, creating a gritty paste that accelerates wear. Take an extra minute to wipe away any remaining dust or moisture—your joint will thank you.
Step 2: Apply Lubricant Sparingly For spray lubricants (like silicone or dry PTFE), hold the can 6–8 inches away from the joint and apply a short, light burst. Focus on the moving parts: the threads, swivel points, or any areas where metal touches metal. For oil-based lubricants, use a small dropper or applicator to place 1–2 drops directly on the moving components. Avoid over-spraying or over-applying—excess lubricant drips onto the floor (creating a slip hazard) or attracts dust, which can clog the joint later.
Step 3: Work the Lubricant In After applying the lubricant, gently move the joint through its range of motion a few times (e.g., rotate a swivel component or adjust the clamp). This helps distribute the lubricant evenly across all moving surfaces, ensuring no spot is missed. Wipe away any excess with a clean cloth—you want a thin, even layer, not a puddle.
Step 4: Set a Schedule How often should you lubricate? It depends on usage. In high-traffic areas (like joints on frequently adjusted workbenches or roller tracks), aim for lubrication every 2–4 weeks. For joints in less active areas (like fixed material racks), monthly lubrication should suffice. If you notice squeaking or stiffness between scheduled checks, don't wait—grab the lubricant and give it a quick touch-up.
Inspection: Catching Problems Before They Escalate
The Importance of Regular Inspections
Cleaning and lubrication keep your joint running smoothly, but inspections are how you catch issues before they turn into costly repairs. Even with proper care, joints can develop cracks, loosen over time, or show signs of excessive wear. Regular inspections help you spot these red flags early, allowing you to fix small problems before they lead to system failures or safety hazards. Think of it like a health checkup for your lean system—better to catch a minor issue now than deal with a major breakdown later.
What to Look For: A Comprehensive Checklist
Inspecting a four way straight lean pipe joint doesn't require advanced engineering knowledge—just a keen eye and a few minutes of your time. Here's a checklist to guide you:
-
Visual Checks:
- Cracks or chips in the joint body (especially around stress points like where pipes connect).
- Rust or corrosion (look for orange or brown spots, even small ones—they can spread quickly).
- Loose or missing components (like screws, washers, or clamping bolts).
- Signs of bending or warping (the joint should sit straight; any could mean it's been overloaded).
-
Functional Tests:
- Movement: Try adjusting the joint (if it's adjustable). Does it move smoothly, or is it stiff/sticky?
- Stability: Gently shake the connected pipes. Does the joint feel loose, or does it hold firm?
- Noise: Listen for squeaking, grinding, or rattling—these are signs of friction or loose parts.
- Accessory Checks: If the joint is connected to other lean pipe and accessories (like roller track and accessories or caster wheels), inspect those too. A loose roller track connector, for example, can put extra stress on the joint, leading to premature wear.
How to Perform the Inspection
Step 1: Start with a Visual Sweep Stand back and look at the joint from all angles. Note any obvious issues like cracks, rust, or misalignment. Use a flashlight to check hard-to-see areas, like the back of the joint or where pipes connect—these spots are easy to miss but prone to hidden damage.
Step 2: Get Hands-On Gently touch the joint and connected pipes. Feel for roughness (a sign of corrosion) or unusual warmth (which could indicate excessive friction). Try moving the joint as you would during normal use—if it's supposed to swivel, rotate it; if it's adjustable, loosen and tighten the clamp. Pay attention to how it feels: smooth and easy, or jerky and resistant?
Step 3: Check Tightness Use a wrench or screwdriver (depending on the joint type) to ensure all bolts, screws, or clamps are tight. Loose fasteners are a common cause of instability, and they're easy to fix—just snug them up (but don't over-tighten, which can strip threads).
Step 4: Document and Act Keep a log of your inspections, noting any issues you find. For minor problems (like a loose screw or light rust), fix them on the spot. For more serious issues (cracks, severe corrosion, or seized parts), mark the joint as "needs replacement" and contact your lean pipe supplier for a new part. Don't delay—damaged joints can compromise the safety of the entire structure, putting your team at risk.
| Inspection Task | Frequency | What to Look For | Action If Issue Found |
|---|---|---|---|
| Visual check for cracks/rust | Daily (quick scan) | Visible cracks, orange/brown spots | Mark for repair/replacement; stop use if severe |
| Functional movement test | Weekly | Stiffness, squeaking, resistance | Clean, lubricate, or adjust as needed |
| Tightness of fasteners | Monthly | Loose bolts, screws, or clamps | Snug with wrench/screwdriver; replace if stripped |
| Stress test (light shaking) | Quarterly | Excessive movement or instability | Reinforce joint or replace if loose |
| Check connected accessories | Monthly | Damaged roller track, loose casters, or broken brackets | Repair/replace accessories to reduce joint stress |
Troubleshooting Common Issues
Even with the best maintenance, problems can pop up. Here's how to troubleshoot some of the most common four way straight lean pipe joint issues:
Problem: Joint is Stiff or Won't Move
Possible Causes: Lack of lubrication, dirt buildup, or rust in moving parts.
Solution: Start by cleaning the joint thoroughly (follow the steps in the cleaning section) to remove dirt and debris. Then apply a liberal amount of the appropriate lubricant and work the joint back and forth to distribute it. If it's still stiff, check for rust—apply a rust-dissolving spray (like WD-40) and let it sit for 10–15 minutes before trying to move the joint again. If all else fails, the joint may be seized and need replacement.
Problem: Joint is Loose or Wobbly
Possible Causes: Loose fasteners, worn threads, or damaged clamping mechanisms.
Solution: Tighten all bolts and screws first—this is often the fix. If the fasteners won't stay tight, check the threads for damage (stripped threads mean the fastener won't grip). In that case, replace the fastener with a new one of the same size. If the clamping mechanism is worn (common in adjustable joints), you may need to replace the joint itself—contact your supplier for a compatible replacement.
Problem: Rust or Corrosion
Possible Causes: Exposure to moisture, poor drying after cleaning, or damaged coating.
Solution: For minor rust, use a wire brush (soft-bristle!) to gently scrub away the rust, then apply a rust-inhibiting spray. For severe corrosion (pitting or large rust spots), the joint is likely compromised—replace it immediately, as corrosion weakens the metal and makes the joint unsafe.
Problem: Squeaking Noises
Possible Causes: Lack of lubrication, dirt in moving parts, or metal-on-metal friction.
Solution: Clean the joint to remove dirt, then apply lubricant to all moving surfaces. If the squeaking persists, check for misalignment—pipes that aren't straight can cause uneven friction. Adjust the pipes to ensure they're properly seated in the joint, then retighten the fasteners.
Long-Term Maintenance: Building a Culture of Care
Maintaining four way straight lean pipe joints isn't a one-time task—it's an ongoing commitment. To ensure your joints (and your entire lean system) stand the test of time, build a culture of care on your shop floor. Train your team to spot signs of trouble (like squeaky joints or loose connections) and encourage them to report issues immediately. Assign specific team members to handle daily checks and scheduled maintenance, and keep a log of all repairs and replacements—this helps you spot patterns (e.g., joints in a certain area failing) and address root causes.
Invest in quality tools and supplies: a good set of brushes, lubricants, and cleaning solutions doesn't cost much, but it makes maintenance easier and more effective. And don't forget to partner with a reliable lean pipe supplier—one who can provide replacement parts quickly when you need them, and offer advice on best practices for your specific setup. A supplier who understands your operations can be a valuable ally in keeping your lean system in top shape.
Final Thought: Your four way straight lean pipe joints might be small, but their impact on your operations is huge. By taking the time to clean, lubricate, and inspect them regularly, you're not just maintaining equipment—you're investing in the efficiency, safety, and success of your team. So grab that brush, spray some lubricant, and give those hardworking joints the care they deserve. Your production line (and your bottom line) will thank you.