- Company Articles
- Products and Technology
- Installation And Maintenance
- Maintenance Guide for 3060 National Standard Profile A: Cleaning & Inspection

Maintenance Guide for 3060 National Standard Profile A: Cleaning & Inspection
Related Product
3060 National Standard Profile A
Workbench, production line, logistic rack, warehouse rack Industry: Manufacturer workshop, Automobile, Electronic, Assembling, logistic
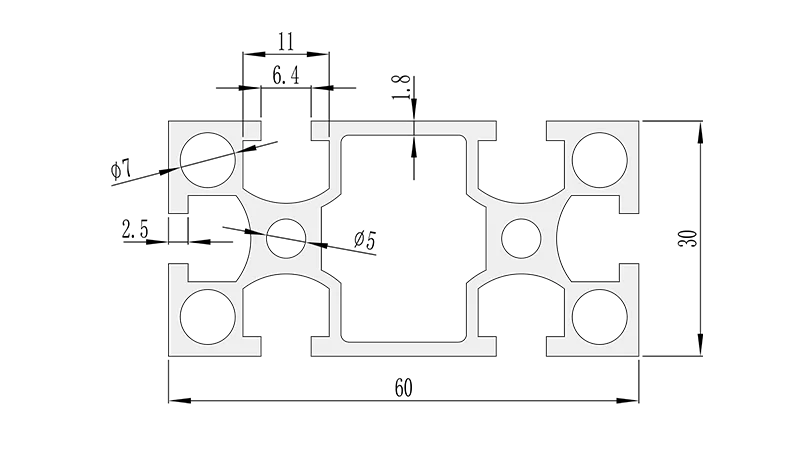
If you've ever walked through a busy factory, a well-organized workshop, or even a sleek retail display area, chances are you've seen the unsung hero of industrial and commercial structures: aluminum profiles. And among these, the 3060 National Standard Profile A stands out as a workhorse. Whether it's forming the frame of a sturdy workbench, holding up shelves in a material rack, or providing the backbone for a conveyor system, this profile is everywhere. But here's the thing—even the toughest profiles need a little TLC. Just like you wouldn't ignore oil changes for your car, neglecting maintenance on your 3060 Profile A can lead to premature wear, wobbly structures, and even safety risks down the line. In this guide, we're breaking down everything you need to know about keeping your 3060 National Standard Profile A in top shape, from daily cleaning habits to quarterly inspections, and even quick fixes using common aluminum profile accessories. Let's dive in.
First Things First: What Even Is 3060 National Standard Profile A?
Before we get into the "how" of maintenance, let's make sure we're all on the same page about the "what." The 3060 National Standard Profile A is a type of aluminum extrusion profile—think of it as a long, hollow beam with a specific cross-sectional shape defined by national standards. The numbers "3060" refer to its dimensions: typically 30mm in width and 60mm in height, though exact measurements can vary slightly by manufacturer (always check the specs if you're ordering replacement parts!). What makes it a "national standard" profile is that it adheres to strict size and quality guidelines, ensuring compatibility with other standard components—like 3030 national standard profile A, which is often used alongside it in modular setups.
Aluminum is the material of choice here for good reason: it's lightweight, corrosion-resistant, and strong enough to handle moderate loads. That's why you'll find 3060 Profile A in everything from production assemble lines to retail display racks. But here's the catch: its durability doesn't make it indestructible. Dirt buildup, scratches, loose aluminum profile rubber strip, or even just daily wear and tear can take a toll. So, let's talk about how to keep it looking and performing like new.
Cleaning 101: Keeping Your Profile Spotless (Without Damaging It)
Cleaning might seem like the simplest part of maintenance, but there's a right way and a wrong way to do it. Scrub too hard with the wrong tool, and you could scratch the aluminum. Use harsh chemicals, and you might strip away protective coatings or damage nearby aluminum profile accessories. Let's break it down step by step.
Tools You'll Need
- Soft microfiber cloths (avoid paper towels—they're too abrasive)
- A soft-bristled brush (an old toothbrush works great for tight spots)
- Mild dish soap or a specialized aluminum cleaner (avoid bleach, ammonia, or acidic cleaners like vinegar)
- Lukewarm water (hot water can cause discoloration)
- A spray bottle (for mixing soap and water)
- Compressed air can (optional, but handy for blowing out dust from T-slots)
Step-by-Step Cleaning Process
- Dust first, then wet clean. Start by wiping down the profile with a dry microfiber cloth to remove loose dust and debris. This prevents scratching when you add water later. Pay extra attention to crevices, like the T-slots (those grooves along the sides where accessories attach) and the edges where the profile meets other components.
- Mix your cleaning solution. In a spray bottle, combine a few drops of mild dish soap with lukewarm water. You don't need much—too much soap can leave a sticky residue. Test the solution on a small, hidden part of the profile first to make sure it doesn't discolor or damage the surface.
- Wipe gently, don't scrub. Spray the solution onto the cloth (not directly onto the profile—excess water can seep into joints and cause corrosion) and wipe the profile in the direction of the extrusion (that's the long, lengthwise direction). For stubborn spots, like dried-on grease or ink, let the soapy cloth sit on the area for 30 seconds before wiping. Avoid circular motions, which can leave swirl marks.
- Clean those tricky T-slots. T-slots are magnets for dirt, lint, and even small screws or debris. Use the soft-bristled brush to loosen dirt, then either wipe it out with a cloth or blast it with compressed air. If there's sticky residue, dip the brush in your soapy solution, scrub gently, then dry immediately.
- Rinse and dry thoroughly. Once you've wiped down the entire profile, dampen a clean cloth with plain lukewarm water and wipe away any soap residue. Then, dry the profile immediately with a dry microfiber cloth—aluminum is prone to water spots, especially in humid environments. Don't let it air-dry!
- Polish (optional, but recommended). For extra shine and protection, apply a small amount of aluminum polish to a clean cloth and buff the profile in gentle, circular motions. This creates a thin protective layer that repels dust and makes future cleaning easier. Skip this step if the profile has a matte finish, as polish can make it look shiny and uneven.
What to Avoid When Cleaning
Steer clear of these common mistakes to keep your profile safe:
- Abrasive tools: Steel wool, scouring pads, or rough sponges will scratch the aluminum surface, making it more prone to dirt buildup and corrosion.
- Harsh chemicals: Bleach, ammonia, oven cleaner, or acidic cleaners (like vinegar or lemon juice) can eat away at the aluminum's protective oxide layer, leading to discoloration or pitting.
- High-pressure washers: While tempting for quick cleaning, the force of the water can drive dirt deeper into T-slots, loosen aluminum profile accessories, or even bend thin sections of the profile.
- Leaving water on the surface: As mentioned, water spots are a hassle, but more importantly, standing water in joints or T-slots can lead to corrosion over time—even on aluminum.
Inspection: Catching Problems Before They Get Worse
Cleaning keeps your profile looking good, but inspection keeps it working well. Regular inspections help you spot small issues—like a loose aluminum profile end cap or a cracked aluminum profile rubber strip—before they turn into big, expensive problems. Aim for a quick daily check, a more thorough weekly inspection, and a deep dive every 3–6 months. Here's what to look for.
Daily Quick Check (2–3 Minutes)
This is all about the basics—no tools needed, just a quick visual scan and a few taps. Focus on:
- Loose or missing end caps. The 3060 aluminum profile end cap is the small cover that plugs the ends of the profile. If it's loose, missing, or cracked, dirt and moisture can get inside the hollow profile, leading to internal corrosion. Give each end cap a gentle wiggle—if it moves, it needs tightening or replacing.
- Visible dirt or debris. A quick glance at T-slots and joints to make sure there's no obvious buildup that could interfere with accessories (like brackets or shelves) fitting properly.
- Wobbly connections. If the profile is part of a structure (like a workbench or rack), gently shake it to check for looseness. Wobbling could mean a loose joint or a damaged profile.
Weekly Inspection (10–15 Minutes)
Take a closer look with a flashlight and a pair of gloves (to protect your hands from sharp edges). Focus on these areas:
- Surface damage. Look for scratches, dents, or dings. Minor scratches are normal, but deep ones (where you can feel the groove with your fingernail) might need touch-ups to prevent corrosion. Dents, especially in load-bearing sections, can weaken the profile—if the dent is deeper than 1mm, consider replacing the section.
- Corrosion or discoloration. Check for white, powdery spots (oxidation) or dark, pitted areas (corrosion). Oxidation is common and can usually be wiped away with a damp cloth, but corrosion means the protective layer is compromised. Pay extra attention to joints and areas near water sources (like sinks in workshops).
- Aluminum profile rubber strip condition. If your profile has rubber strips (used for sealing, cushioning, or reducing noise), check for cracks, brittleness, or gaps. Rubber dries out over time, especially in hot or sunny environments. A cracked strip won't seal properly, letting in dust and moisture.
- T-slot edges. Run your finger along the edges of T-slots (gently!) to feel for burrs or sharp edges. These can catch on aluminum profile accessories, like brackets or bolts, causing them to wear out faster or not fit snugly.
Quarterly Deep Dive (30–45 Minutes)
This is when you'll need a few tools: a small level, a tape measure, and possibly a wrench or screwdriver to check fasteners. Focus on structural integrity and long-term wear:
- Straightness. Use a level or a straightedge to check if the profile is bent or warped. Lay the straightedge along the length of the profile—if there's a gap bigger than 1mm between the straightedge and the profile, it's warped. Warping can happen from heavy loads, impacts, or even temperature changes. Minor warping might not be a problem, but if it's causing the structure to lean or accessories to misalign, replace the profile.
- Accessory fit. If you're using the profile with other components (like 3030 national standard profile A or aluminum profile accessories), check how well they fit. Loose brackets, wobbly shelves, or bolts that won't tighten could mean the T-slots are worn or the accessories are damaged. Try fitting a new accessory into the T-slot—if it slides in too easily or is too tight, the slot might be worn.
- Load-bearing joints. If the profile is part of a structure that holds weight (like a rack with heavy tools), check the joints where it connects to other profiles or supports. Look for cracks in the aluminum, bent fasteners, or gaps between the profile and the joint. These are red flags—over time, they can lead to the structure collapsing.
- End cap seals. Remove a few end caps (gently—don't force them!) and check the inside of the profile for moisture, dirt, or rust. If you find any, clean the inside thoroughly with a dry cloth or compressed air, then replace the end cap with a new one (old ones might not seal as well).
| Inspection Task | Frequency | What to Look For | Action If Issue Found |
|---|---|---|---|
| Check end caps | Daily | Looseness, cracks, missing caps | Tighten or replace immediately |
| Surface scratches/dents | Weekly | Deep scratches (>1mm), dents in load areas | Touch up with polish (shallow) or replace (deep) |
| Rubber strip condition | Weekly | Cracks, brittleness, gaps | replace strip if damaged |
| Profile straightness | Quarterly | Warping, bends >1mm | replace if causing structural issues |
| Inside of profile (via end caps) | Quarterly | Moisture, dirt, rust | Clean and replace end cap |
Quick Fixes: Common Issues and How to Solve Them
You don't need to be a professional to handle most minor issues with your 3060 Profile A. With a few simple tools and some basic aluminum profile accessories, you can fix problems in minutes. Let's walk through the most common fixes.
Fix #1: Replacing a Worn Aluminum Profile Rubber Strip
Rubber strips are used to seal gaps, reduce noise, or protect surfaces from scratches. Over time, they dry out, crack, or get torn. Here's how to replace one:
- Remove the old strip. Gently pull the rubber strip out of its groove. If it's stuck, use a flathead screwdriver (wrapped in tape to avoid scratching the profile) to pry it up. Be careful not to damage the groove—this is where the new strip will sit.
- Clean the groove. Use a soft brush or cloth to wipe out dirt, old adhesive, or debris from the groove. If there's sticky residue, dampen a cloth with rubbing alcohol and wipe it clean. Let it dry completely.
- Measure and cut the new strip. Aluminum profile rubber strip comes in rolls—measure the length of the groove, then cut the strip to size with scissors or a utility knife. Leave a tiny bit of extra length (1–2mm) to ensure a snug fit.
- Install the new strip. Start at one end of the groove and press the strip into place, working your way to the other end. Use your fingers to press it firmly—you should hear a "click" as it locks into the groove. If the strip has adhesive backing, peel off the backing a little at a time as you install to avoid bubbles.
- Trim excess (if needed). If the strip is too long, trim the end with a utility knife, making sure the cut is straight and flush with the profile edge.
Fix #2: Tightening or Replacing 3060 Aluminum Profile End Cap
End caps keep dirt and moisture out of the profile's hollow interior. If yours is loose or cracked, here's how to fix it:
- Remove the old end cap. Gently twist and pull the end cap—most are held in place by friction, so they should come off easily. If it's stuck, tap the edge lightly with a rubber mallet (don't use a metal hammer—you'll dent the cap or profile).
- Clean the end of the profile. Wipe the end of the profile with a dry cloth to remove dirt or debris. If there's old adhesive residue, use rubbing alcohol to clean it off.
- Tighten (if reusable). If the end cap is still in good shape but loose, apply a tiny drop of silicone adhesive to the inside of the cap (too much will ooze out!). Press it back onto the profile and hold for 30 seconds. Wipe away any excess adhesive with a cloth dampened with rubbing alcohol.
- replace (if damaged). If the cap is cracked, bent, or won't stay on, replace it with a new 3060 aluminum profile end cap. Make sure to get the right size—caps are designed to fit specific profile dimensions. Press the new cap onto the end of the profile until it's flush and snug.
Fix #3: Buffing Out Minor Scratches
Minor scratches (less than 0.5mm deep) can be buffed out with a little elbow grease:
- Clean the scratch. Wipe the area with a damp cloth and mild soap, then dry thoroughly.
- Apply aluminum polish. Put a small amount of polish on a soft, clean cloth. Rub the scratch in gentle, circular motions for 1–2 minutes. The polish acts as a mild abrasive, smoothing out the scratch.
- Wipe away excess polish. Use a clean cloth to wipe off any remaining polish. Check the scratch—if it's still visible, repeat the process. For deeper scratches, you may need to use a slightly more abrasive metal polish (labeled "for aluminum")—test it on a hidden area first!
- Protect the area. Once the scratch is gone, apply a thin coat of wax or aluminum sealant to the area to prevent future damage.
Fix #4: Unclogging T-Slots
Dirt and debris in T-slots can prevent accessories from fitting or cause them to wear unevenly. Here's how to unclog them:
- Loosen debris with a brush. Use a soft-bristled brush to sweep out loose dirt. For stubborn clogs, use a pipe cleaner or a piece of stiff wire (wrapped in cloth to avoid scratching) to gently dislodge the debris.
- Vacuum or blow out debris. Use a vacuum with a narrow nozzle attachment or a can of compressed air to suck out the loosened dirt. Hold the vacuum nozzle 1–2cm away from the slot to avoid scratching.
- Clean with alcohol (for sticky residue). If there's sticky residue (like old adhesive or grease), dampen a cloth with rubbing alcohol and wipe the slot. Let it dry completely before using the slot.
- Test with an accessory. insert a spare bracket or bolt into the slot to make sure it slides smoothly. If it sticks, repeat the cleaning process.
When to Call in the Pros
Most maintenance and minor repairs can be done in-house, but some issues require a professional's touch. Here are the red flags that mean it's time to call a supplier or technician:
- Major structural damage. If the profile is bent more than 2mm, has cracks (especially along welds or joints), or is bowed in the middle (in a load-bearing setup), don't try to bend it back yourself—this can weaken it further. A professional can assess if it can be repaired or needs replacement.
- Extensive corrosion. If you see large areas of pitting, dark spots, or the aluminum feels soft to the touch, corrosion has eaten through the protective layer. This isn't fixable with cleaning—you'll need to replace the profile.
- Accessories won't fit, even after cleaning. If T-slots are worn so badly that standard accessories (like bolts or brackets) won't stay tight, the profile may need to be replaced. A professional can also check if the issue is with the accessories (which are cheaper to replace than the profile itself).
- Noise or vibration in the structure. If a rack, workbench, or conveyor made with 3060 Profile A starts making creaking, rattling, or vibrating noises during use, it could mean loose joints, worn profiles, or uneven weight distribution. A professional can inspect the entire structure for safety.
When choosing a professional, look for someone with experience in aluminum extrusion profiles—preferably one who works with national standard profiles like 3060 and 3030. They'll have the right tools, knowledge, and access to genuine aluminum profile accessories to get the job done right.
Wrapping Up: A Little Care Goes a Long Way
Maintaining your 3060 National Standard Profile A might not be the most exciting task, but it's one of the best ways to extend its life, keep your workspace safe, and avoid costly replacements. By sticking to a regular cleaning routine, doing thorough inspections, and tackling minor repairs with basic aluminum profile accessories, you'll ensure your profile stays strong, functional, and looking great for years to come. Remember: even the toughest materials need a little attention. So grab your microfiber cloth, schedule that monthly inspection, and give your 3060 Profile A the care it deserves—your future self (and your budget) will thank you.