- Company Articles
- Products and Technology
- Installation And Maintenance
- Maintenance Schedule: Prolonging Life of Flat Swivel Castor Wheels with Brake

Maintenance Schedule: Prolonging Life of Flat Swivel Castor Wheels with Brake
Related Product
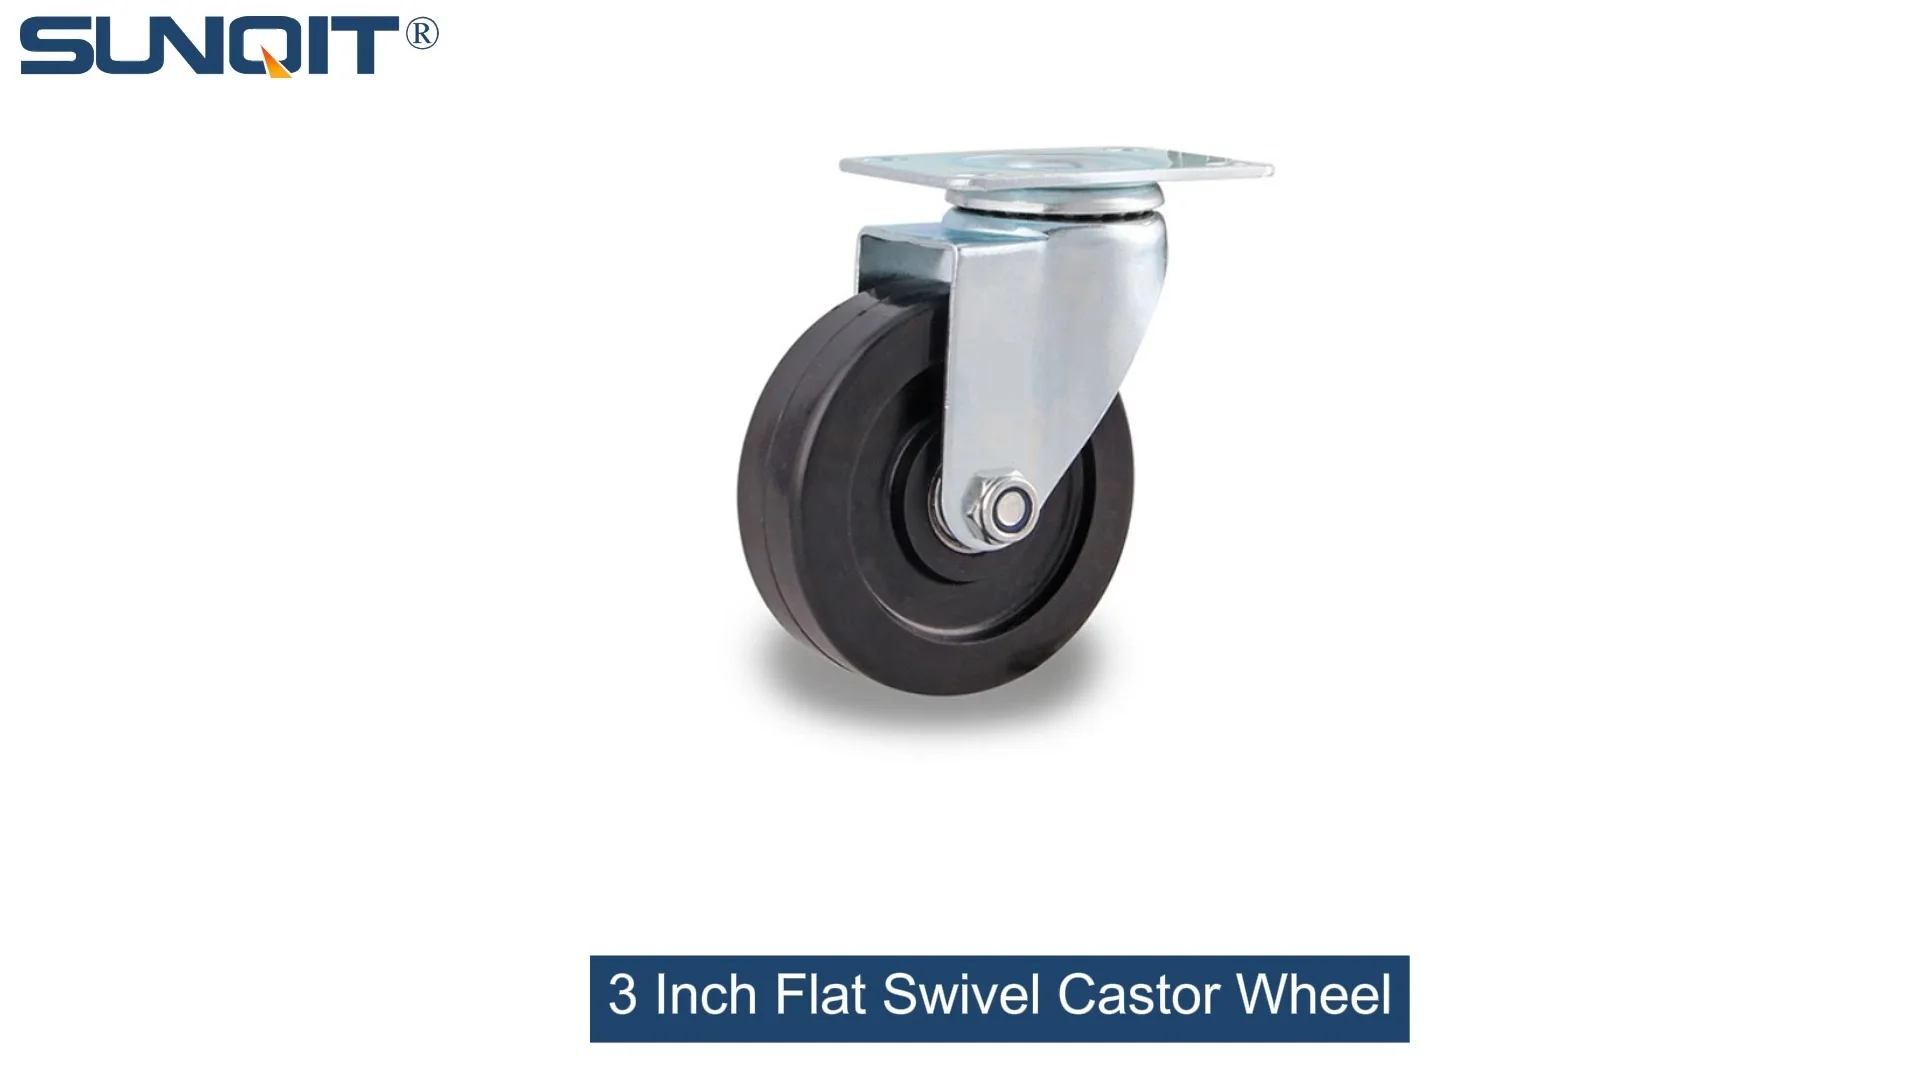
Flat Swivel Castor Wheel
Chair Casters Ball Bearing Wheels Rubber Base. Resistant to abrasion, impact and corrosion. Heavy payload can hold 70-90Kgs per pcs,which can make it works at a stable and smooth status.
Picture this: It's a busy Monday morning in your workshop. The team is rushing to meet a production deadline, and the turnover trolley loaded with parts suddenly jolts to a halt. You kneel down to see what's wrong—and there it is: a flat swivel castor wheel with brake that's seized up, its once-smooth rotation now a (scratchy) grind. Sound familiar? If you've ever dealt with a stubborn caster wheel, you know how quickly it can derail your workflow, slow down productivity, and even risk workplace injuries.
Flat swivel castor wheels with brake are the unsung heroes of countless workspaces—from factory floors and warehouses to assembly lines and retail stockrooms. They're the reason your workbench glides into place, your material rack rolls smoothly between stations, and your turnover trolley stays put when you need it to. But like any hardworking tool, they need a little TLC to keep performing at their best. In this guide, we're breaking down a simple, actionable maintenance schedule to help you extend the life of your castor wheels, avoid costly replacements, and keep your operations running like clockwork.
Why Bother with Maintenance? The Cost of Cutting Corners
Let's start with the basics: Why spend time maintaining something as "simple" as a caster wheel? The answer is simple—neglect costs you more in the long run. A well-maintained flat swivel castor wheel with brake can last 3 to 5 times longer than one that's ignored. Think about it: A high-quality caster might cost $50 to $100. If you replace it every year because of wear and tear, that's $250 to $500 over five years. With proper care? You might only need to replace it once in that time—saving you hundreds of dollars (and the hassle of frequent replacements).
But the costs go beyond money. A faulty caster wheel can:
- Slow down productivity: A stuck or wobbly caster makes moving equipment feel like pushing a boulder uphill. Your team wastes energy and time that could be spent on more important tasks.
- Create safety hazards: A brake that fails could cause a trolley to roll away, risking collisions or falls. Unevenly worn wheels might make equipment tip over, endangering workers and damaging materials.
- Damage your floors: Rough, debris-caked wheels scratch concrete, scuff hardwood, or tear up vinyl floors—adding to your facility maintenance costs.
The good news? Most caster problems are preventable with a little regular attention. Let's dive into the schedule that will keep your flat swivel castor wheels with brake rolling strong for years.
Weekly Checks: The "Quick Glance" Routine
You don't need to spend hours each week maintaining your castor wheels—just 5 to 10 minutes per piece of equipment. Think of it as a "health check" to catch small issues before they become big problems. Here's what to focus on:
1. Visual Inspection: Look for Debris, Cracks, and Wear
Start by giving the caster wheel and its surroundings a once-over. Grab a flashlight if the area is dim—you want to see every nook and cranny. Check for:
- Debris stuck in the wheels: Small rocks, threads, or metal shavings can get trapped in the wheel tread or around the axle. These act like sandpaper, wearing down the wheel and causing it to wobble. Use a small brush (an old toothbrush works great!) to sweep out any gunk.
- Cracks or chips in the wheel: Rubber and plastic wheels can develop cracks from heavy loads or impacts. If you spot a crack—even a tiny one—mark it for closer inspection later. Cracks spread quickly, and a wheel that splits while in use is a major safety risk.
- Uneven wear: Run your finger along the wheel tread. It should feel smooth and even. If one side is noticeably flatter than the other, it could mean the caster is misaligned, the load is unevenly distributed, or the swivel joint is sticking (more on that later).
2. Brake Test: Does It Hold Firm?
The brake is the most critical safety feature of your flat swivel castor wheel with brake—so you need to test it every week. Here's how:
- Push the brake lever down firmly. You should hear a clear "click" and feel resistance—like the lever is locking into place.
- Try to move the equipment by pushing it gently. The caster shouldn't roll at all . If it creaks, slips, or moves even an inch, the brake isn't engaging properly.
- Release the brake lever and check if it pops back up smoothly. If it sticks halfway, that's a sign of dirt or rust in the mechanism.
Pro tip: If your brake lever feels "spongy" or hard to push, don't ignore it. Brake pads wear down over time, and a weak brake is a disaster waiting to happen.
3. Wheel Rotation: Spin It and See
A healthy caster wheel should spin freely and smoothly, without wobbling or grinding. Give the wheel a gentle spin with your hand. It should rotate 2 to 3 times before stopping—if it stops after half a spin, there's resistance somewhere. Common culprits:
- Dirty axles: Debris can build up around the axle, slowing rotation. We'll clean this in the monthly routine, but for now, note it down.
- Worn bearings: If the wheel wobbles from side to side as it spins, the bearings might be loose or damaged. This is a sign to keep an eye on for your annual inspection.
4. Caster Mounting: Are Bolts Tight?
Finally, check where the caster attaches to your equipment (like a workbench or trolley). Over time, vibrations can loosen the mounting bolts or screws. Give each bolt a gentle tug with a wrench—if it turns, tighten it until it's snug (but don't over-tighten, as this can strip the threads).
That's it for weekly checks! Jot down any issues you spot in a notebook or phone app—this will help you track patterns (e.g., "Caster #3 on Trolley B always gets debris stuck") and plan for deeper maintenance.
Monthly Deep Cleaning: Give Your Casters a "Bath"
Weekly checks catch the obvious stuff, but monthly deep cleaning removes built-up grime, grease, and rust that can eat away at your castor wheels over time. Think of it like washing your car—regular rinses keep it looking good, but a deep clean gets rid of the dirt that causes paint damage. Here's how to do it:
Step 1: Gather Your Supplies
You'll need:
- A stiff-bristled brush (a wire brush for metal parts, a plastic brush for rubber/plastic wheels to avoid scratching).
- Compressed air (in a can or from an air compressor) to blow out hard-to-reach debris.
- A bucket of warm water mixed with mild dish soap (avoid harsh chemicals like bleach or solvents—they can damage rubber wheels or brake pads).
- Microfiber cloths (for wiping down parts without leaving lint).
- A small toothbrush or cotton swabs (for cleaning crevices in the brake mechanism).
Step 2: Remove Loose Debris First
Start by using the compressed air to blow out dirt, dust, and hair from the wheel tread, around the axle, and in the swivel joint (the part that lets the caster turn). Hold the air nozzle 3 to 4 inches away from the caster to avoid damaging delicate parts like brake levers.
Next, use the stiff brush to scrub the wheel tread. For rubber wheels, brush in a circular motion to dislodge stuck-on grime (like oil or adhesive). For metal wheels, a wire brush can tackle rust spots (but be gentle—you don't want to scratch the surface).
Step 3: Clean the Brake Mechanism
The brake is one of the most overlooked parts of caster maintenance—and one of the most important. Dirt and grease can gum up the lever, making it hard to engage or disengage. Here's how to clean it:
- Engage the brake to expose the brake pad (the part that presses against the wheel to stop it).
- Dip the toothbrush or cotton swab in soapy water and gently scrub the brake pad and the area around it. You'll likely see black gunk come off—that's a mix of dirt and brake dust.
- Wipe the lever and brake components with a damp microfiber cloth to remove soap residue.
- Test the brake a few times to make sure it moves smoothly now that the gunk is gone.
Step 4: Wipe Down the Entire Caster
Finally, use a damp microfiber cloth to wipe down the entire caster—wheel, swivel joint, mounting plate, and all. This removes any remaining soap, dirt, or moisture that could lead to rust. Pay extra attention to metal parts, as water left on them can cause corrosion.
Let the caster air-dry completely before using the equipment again—this prevents moisture from getting trapped in bearings or swivel joints. If you're in a hurry, pat it dry with a clean cloth.

Quarterly Lubrication: Keep It Rolling Smoothly
Even the cleanest caster wheel will start to grind if its moving parts aren't lubricated. Lubrication reduces friction between metal parts (like axles and bearings) and keeps the swivel joint turning freely. Think of it like oil for your car's engine—without it, parts wear down fast. Here's how to do it right:
Choose the Right Lubricant
Not all lubricants are created equal—using the wrong one can damage your caster wheels. Here's a quick guide:
- Silicone-based lubricant (spray or gel): Best for plastic wheels or casters with rubber components. Silicone won't degrade plastic or rubber, unlike oil-based lubricants.
- Lithium grease (tube or spray): Ideal for metal wheels, axles, and swivel joints. It's thick, water-resistant, and long-lasting—great for heavy-duty casters.
- PTFE (Teflon) spray: Good for high-temperature environments (like near ovens or machinery that generates heat). It dries quickly and leaves a protective film.
Avoid WD-40 as a long-term lubricant—it's a solvent, not a lubricant, and will dry out over time, leaving parts unprotected.
Where to Lubricate (and How)
Focus on these key areas:
1. Axles
The axle is the rod that runs through the wheel, allowing it to spin. Over time, friction here can cause the wheel to slow down or seize. To lubricate:
- Clean the axle with a dry cloth (you did this in monthly cleaning, so it should be grime-free).
- Apply a drop or two of lubricant to each end of the axle (where it meets the wheel hub).
- Spin the wheel back and forth a few times to work the lubricant into the bearing.
2. Swivel Joints
The swivel joint is what lets the caster turn 360 degrees. If it's stiff, moving your equipment feels like steering a boat with a broken rudder. To lubricate:
- Look for the small gap between the caster's top plate (where it mounts to equipment) and the swivel housing (the part that holds the wheel). This is where the joint rotates.
- Apply a thin bead of lithium grease or silicone lubricant around the gap.
- Swivel the caster back and forth 10 to 15 times to distribute the lubricant evenly. You should feel it get smoother with each turn.
3. Brake Mechanism
The brake lever and pivot points also need lubrication to prevent sticking. Apply a tiny amount of lubricant to the lever hinge (where the lever connects to the caster body) and work the lever up and down a few times. Wipe off any excess—you don't want lubricant to attract dirt.
Pro Tip: Less Is More
It's tempting to douse the caster in lubricant, but too much can attract dirt and dust, creating a sticky mess. A little goes a long way—aim for a thin, even coat, and wipe off any drips with a cloth.

Annual Inspections: The "Deep Dive" to Catch Hidden Issues
Weekly checks, monthly cleaning, and quarterly lubrication keep your casters running day-to-day, but an annual inspection is where you'll spot long-term wear and plan for replacements or repairs. Set aside an hour or two once a year to give your flat swivel castor wheels with brake a thorough once-over. Here's what to check:
1. Wheel Tread Depth: Is It Time for New Wheels?
The tread on your caster wheel is like the tread on a car tire—it wears down over time, reducing traction and increasing rolling resistance. To check tread depth:
- Look for wear indicators: Many rubber wheels have small "bars" in the tread—when the tread wears down to the same level as these bars, it's time to replace the wheel.
- If there are no indicators, measure the tread depth with a ruler. Most wheels need replacement when the tread is less than 1/8 inch thick.
- Check for uneven wear: If one side of the tread is significantly more worn than the other, it could mean the caster is misaligned, the equipment is overloaded, or the floor is uneven. Fix the root cause before installing new wheels!
2. Bearings: Are They Still Smooth?
Bearings are the metal rings inside the wheel that allow it to spin on the axle. Worn or damaged bearings cause wobbling, noise, or resistance. To test them:
- Grab the wheel with both hands and try to wiggle it side to side. If there's play (movement) in the wheel, the bearings are loose or worn.
- Spin the wheel and listen—grinding or squeaking sounds are a sign of bearing damage.
Some casters have replaceable bearings (check with your supplier for caster accessories like bearing kits), but for most, it's easier to replace the entire wheel.
3. Brake Pads: Are They Still Gripping?
Brake pads press against the wheel to stop it, and they wear down with use. To check them:
- Engage the brake and look at the pad (it's usually rubber or felt). If it's thin, cracked, or hard (instead of soft and flexible), it needs to be replaced.
- Test the brake on a slight incline—if the trolley rolls even a little, the pads are too worn.
Brake pads are cheap caster accessories that are easy to replace—most suppliers stock them for common caster models. Keep a few spares on hand so you can swap them out quickly.
4. Caster Housing and Mounting: Any Cracks or Rust?
Inspect the metal housing (the part that holds the wheel and swivel joint) for cracks, rust, or bent parts. Rust can weaken the metal over time, and a crack could cause the wheel to fall off under load. If you spot rust, sand it off with fine-grit sandpaper and apply a coat of rust-resistant paint. For cracks or bends, replace the entire caster—safety first!
The Ultimate Maintenance Schedule at a Glance
To make it easy to remember, here's a quick-reference table of your caster maintenance routine:
| Maintenance Task | Frequency | Key Steps | Tools Needed |
|---|---|---|---|
| Visual inspection, brake test, wheel spin, bolt check | Weekly | Check for debris/cracks, test brake engagement, spin wheel for smoothness, tighten loose bolts. | Flashlight, wrench |
| Deep cleaning of wheels, axles, and brake | Monthly | Blow out debris, scrub with brush/soap, wipe down, dry thoroughly. | Compressed air, brush, soapy water, microfiber cloths |
| Lubricate axles, swivel joints, and brake | Quarterly | Apply lubricant to axles, swivel joint, and brake hinge; work parts to distribute. | Silicone/lithium lubricant, cloth |
| Tread depth, bearing, brake pad, and housing inspection | Annually | Measure tread, test bearings for play, check brake pad thickness, inspect for cracks/rust. | Ruler, sandpaper (for rust), replacement parts (if needed) |
Troubleshooting Common Caster Problems
Even with regular maintenance, you might run into issues from time to time. Here's how to diagnose and fix the most common problems:
Problem: Caster Wheel Is Squeaking
Cause: Lack of lubrication, debris in the axle, or worn bearings.
Fix: Start by cleaning the axle and applying lubricant. If the squeak persists, check the bearings—if they're worn, replace the wheel.
Problem: Brake Won't Engage
Cause: Dirty brake mechanism, worn brake pads, or a bent lever.
Fix: Clean the brake with soapy water and a toothbrush. If that doesn't work, replace the brake pads. If the lever is bent, gently straighten it with pliers (or replace the caster if it's badly damaged).
Problem: Wheel Wobbles When Rolling
Cause: Loose bearings, uneven tread wear, or a bent axle.
Fix: Tighten the axle nut (if applicable). If the wobble continues, replace the wheel—bent axles or worn bearings can't be repaired easily.
Problem: Caster Won't Swivel
Cause: Dirt in the swivel joint, lack of lubrication, or a rusted bearing.
Fix: Clean the swivel joint with compressed air and apply lubricant. If it's still stiff, check for rust—sand it off and lubricate again. For severe rust, replace the caster.
Final Thoughts: Your Casters Deserve the Same Care as Your Team
Flat swivel castor wheels with brake might seem like small, parts of your workspace, but they play a huge role in keeping your operations moving. By following this maintenance schedule—weekly checks, monthly cleaning, quarterly lubrication, and annual inspections—you'll extend their life, reduce costs, and create a safer, more efficient environment for your team.
Remember: Maintenance isn't just about fixing problems—it's about preventing them. A few minutes each week can save you hours of downtime, hundreds of dollars in replacements, and countless headaches. And when you do need to replace parts, don't skimp on quality caster accessories—investing in durable brake pads, bearings, or wheels will pay off in the long run.
So grab your brush, lubricant, and notebook, and start your caster maintenance routine today. Your wheels (and your team) will thank you.