- Company Articles
- Products and Technology
- Installation And Maintenance
- Maintenance Tips for Chrome Four Way Straight Lean Pipe Joints: Prolonging Service Life

Maintenance Tips for Chrome Four Way Straight Lean Pipe Joints: Prolonging Service Life
Related Product
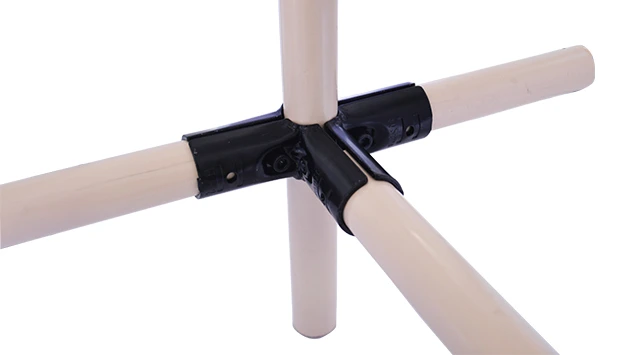
Four Way Straight Lean Pipe Joint
Four way lean pipe joint for 4 pcs 28MM lean pipe connection in straight angle, which used widely in workbench, flow rack, hand trolley frame connection.
Walk through any busy production facility, and you'll likely spot a network of lean pipes and joints working quietly behind the scenes. These unassuming components—often overlooked amid the buzz of machinery—are the backbone of efficient workflows, holding together everything from workbenches to material racks. Among them, the chrome four way straight lean pipe joint stands out as a workhorse, connecting multiple lean pipes at once to create stable, customizable structures that adapt to shifting production needs. But like any hardworking tool, these joints need care to keep performing at their best. In this guide, we'll dive into practical, hands-on maintenance tips to help you extend the life of your chrome four way straight lean pipe joints, ensuring your lean system stays robust, reliable, and ready to support your team's productivity.
Understanding the Role of Chrome Four Way Straight Lean Pipe Joints in Your Lean System
Before we jump into maintenance, let's take a moment to appreciate what makes these joints so crucial. A chrome four way straight lean pipe joint is designed to connect four lean pipes in a straight line or perpendicular arrangement, forming the corners and intersections of structures like flow racks, assembly workstations, and turnover trolleys. Its chrome plating isn't just for looks—it adds a layer of protection against rust and wear, making it ideal for factory environments where dust, moisture, and occasional bumps are part of the daily grind.
In a lean system, every component is meant to eliminate waste—whether that's wasted time, space, or effort. A well-maintained four way joint ensures that structures stay rigid, materials flow smoothly, and workers can focus on their tasks without worrying about wobbly racks or unstable work surfaces. On the flip side, a neglected joint can quickly become a bottleneck: a loose connection might cause a shelf to sag, slowing down material retrieval, or corrosion could weaken the joint, posing safety risks. Simply put, keeping these joints in top shape isn't just about equipment care—it's about protecting your team's efficiency and well-being.
Why Regular Maintenance Matters: The Cost of Cutting Corners
It's easy to push maintenance to the bottom of the to-do list when production deadlines are tight. After all, if a joint looks okay and the structure isn't falling apart, why bother? But here's the thing: small issues with chrome four way straight lean pipe joints rarely stay small. A tiny scratch in the chrome plating might seem insignificant today, but expose it to moisture and factory fumes, and it could turn into rust by next month. A slightly loose bolt might not cause problems now, but over time, vibration from nearby machinery will work it looser, leading to misaligned pipes and uneven weight distribution.
Consider this scenario: A food packaging plant relied on a series of flow racks held together by chrome four way joints. For months, the team skipped regular checks, assuming the joints were "fine." One day, during a peak production run, a joint that had been slowly corroding finally gave way, causing a section of the rack to collapse. Not only did this halt production for hours, but it also damaged thousands of dollars worth of inventory. The root cause? A small patch of rust that could have been addressed with a quick cleaning and touch-up weeks earlier.
The good news? Most joint failures are preventable with consistent, basic maintenance. By investing a little time now, you'll avoid costly downtime, repairs, and replacements later. Plus, well-maintained joints mean safer workspaces—no more wobbly shelves or unexpected collapses—and smoother workflows, since your team can trust that the tools and materials they need will stay exactly where they're supposed to be.

Essential Maintenance Tips for Chrome Four Way Straight Lean Pipe Joints
Now, let's get into the nitty-gritty: the specific steps you can take to keep your chrome four way straight lean pipe joints in prime condition. These tips are designed to be simple, actionable, and adaptable to any production schedule—no need for fancy tools or extensive training.
1. Start with Daily Visual Inspections: Catch Issues Early
You don't need to disassemble joints every day, but a quick visual check can go a long way. Make it part of your team's pre-shift routine to scan the joints for obvious red flags. What should you look for? Start with the chrome plating: are there any scratches, chips, or peeling? Even a small nick can expose the underlying metal to corrosion, so note these spots for closer inspection later. Next, check for rust or discoloration—pay extra attention to areas where the joint meets the lean pipe, as moisture and debris often collect there.
Then, give the joint a gentle wiggle (with permission, of course!). A tight joint should feel solid, with no movement or "play" in the connection. If it shifts or creaks, that's a sign the bolts might be loose. Finally, look at the surrounding area: are there any signs of wear on the lean pipes themselves, like bending or dents? A bent pipe can put extra stress on the joint, so addressing pipe issues early will protect the joint too.
Pro tip: Keep a simple checklist near each workstation or rack, so anyone on the team can mark down concerns. This turns maintenance into a collective effort, ensuring no joint gets overlooked.
2. Deep Clean Weekly: Keep Debris and Grime at Bay
Factory floors are dusty, greasy places, and over time, dirt, oil, and metal shavings can build up on your joints. This isn't just unsightly—grime can trap moisture against the chrome, corrosion, and even interfere with the joint's ability to hold pipes securely. A weekly deep clean will keep these issues in check.
How to do it? Start by wiping the joint with a dry, lint-free cloth to remove loose dust. For stuck-on grime, mix a small amount of mild dish soap with warm water and use a soft-bristled brush (an old toothbrush works great for tight spaces) to gently scrub the joint, focusing on crevices where debris likes to hide. Avoid harsh chemicals like bleach or abrasive cleaners—these can strip the chrome plating, leaving the metal vulnerable. After scrubbing, rinse the joint with a damp cloth and dry it thoroughly with a clean towel. For hard-to-reach areas, use a can of compressed air to blow out dust from between the joint and the pipes.
In particularly dusty or oily environments (like automotive shops or machining areas), you might need to clean joints twice a week. The goal is to prevent buildup, not wait until it's caked on.
3. Lubricate Strategically: Keep Connections Smooth and Rust-Free
Lubrication is key to keeping the moving parts of your four way joint working smoothly, but it's easy to overdo it. Too much lubricant can attract dust and create a sticky mess, while too little can lead to friction and wear. The trick is to lubricate only the parts that need it, and use the right type of lubricant.
Focus on the threads of the bolts and the pivot points where the joint connects to the lean pipes. These areas are prone to corrosion and can seize up if left dry. For chrome joints, a light, silicone-based lubricant or dry film lubricant works best—they won't damage the plating and provide long-lasting protection without attracting debris. Apply a tiny amount (a drop or two per thread) and wipe away any excess with a clean cloth. Do this every 2–4 weeks, or more often if the joint is exposed to moisture or heavy use.
Pro tip: Avoid using oil-based lubricants, which can degrade plastic components if your joint has any (like some lean pipe accessories). Stick to silicone or dry film options to keep everything compatible.
4. Tighten Bolts and Check Torque: Keep Joints Secure
Vibration from machinery, repeated loading and unloading, and even temperature changes can loosen the bolts on your four way joint over time. A loose bolt might not seem like a big deal, but it can cause the joint to shift, putting stress on the chrome plating and other pipes. Eventually, this can lead to cracks or complete failure.
Get into the habit of checking bolt tightness monthly with a torque wrench (or a simple wrench if you don't have a torque tool). Refer to the manufacturer's guidelines for the recommended torque setting—over-tightening can strip threads or warp the joint, while under-tightening leaves it vulnerable. When tightening, do so gradually and evenly: if the joint has multiple bolts, tighten them in a crisscross pattern to ensure even pressure.
If you notice a bolt that won't stay tight, inspect the threads for damage. Stripped or bent threads mean the bolt can't grip properly, so replace it immediately. Keeping a small stock of spare bolts (matching the size and thread type of your joints) on hand will make this quick and easy.
5. Address Corrosion Immediately: Stop Rust in Its Tracks
Chrome plating is resistant to rust, but it's not invincible. Scratches, chips, or even tiny dents can expose the underlying steel, which will start to rust if exposed to moisture. The moment you spot a rust spot—even a small one—act fast to stop it from spreading.
Start by sanding the rusted area gently with fine-grit sandpaper (220-grit or higher) to remove the rust and smooth the surface. Wipe away the dust with a damp cloth, then dry thoroughly. Next, apply a thin coat of chrome touch-up paint (available at most hardware stores) to seal the exposed metal. For larger areas of damage, or if the rust has eaten through the plating, consider replacing the joint entirely—safety should never be compromised for the sake of saving a few dollars.
In humid environments, adding a layer of anti-corrosion spray (like a clear lacquer) to the joint after cleaning can provide extra protection. Just make sure the joint is completely dry before applying, and follow the spray manufacturer's instructions.

Troubleshooting Common Issues with Chrome Four Way Straight Lean Pipe Joints
Even with regular maintenance, you might run into occasional problems. Here's how to diagnose and fix the most common issues:
Issue 1: The Joint Feels Wobbly or Unstable
First, check if the bolts are tight—this is the most likely culprit. If tightening doesn't help, inspect the lean pipes themselves: are they bent or damaged? A warped pipe can throw off the joint's alignment. If the pipes are straight, the issue might be with the joint's internal components. Over time, the plastic or metal sleeves inside the joint (which grip the pipes) can wear down, reducing friction. In this case, replacing the joint is usually the best fix.
Issue 2: Rust Spots Keep Coming Back
If you clean and paint a rust spot only to have it reappear weeks later, moisture is probably getting trapped somewhere. Check if the joint is installed in a low-lying area where water pools, or near a machine that generates steam or condensation. Adding a small rubber gasket between the joint and the pipe can help repel moisture, or you might need to relocate the structure to a drier spot. In extreme cases, switching to stainless steel lean pipe joints (which are more corrosion-resistant) could be a long-term solution.
Issue 3: Pipes Slide Out of the Joint
This is usually a sign that the joint's clamping mechanism is worn. Most four way joints use a combination of bolts and internal sleeves to hold pipes in place. If the sleeves are cracked or the bolts no longer tighten securely, the pipes won't stay put. replace the joint, and make sure to choose a model with high-quality, durable components—investing in a reputable lean pipe supplier here pays off in the long run.
Proactive Maintenance Schedule: A Quick Reference Guide
To make maintenance easy to remember, we've put together a simple schedule you can post in your facility or add to your team's digital checklist. Adjust frequencies based on your environment—dirtier or busier areas may need more frequent checks.
| Maintenance Task | Frequency | Tools Required | Key Notes |
|---|---|---|---|
| Visual Inspection (check for rust, cracks, loose bolts) | Daily (start of shift) | Flashlight, gloved hands | Focus on joints under heavy loads or near moisture sources. |
| Wipe Down with Dry Cloth | Daily (end of shift) | Lint-free cloth | Removes surface dust before it builds up. |
| Deep Clean with Soap and Water | Weekly | Soft brush, mild soap, warm water, clean towels | Pay extra attention to crevices and bolt heads. |
| Lubricate Threads and Pivot Points | Every 2–4 weeks | Silicone-based lubricant, rag | Use a small amount—excess attracts dust. |
| Torque Bolt Check | Monthly | Torque wrench (or adjustable wrench) | Follow manufacturer's torque specs (typically 15–20 Nm for most joints). |
| Rust Treatment (if needed) | As soon as spots appear | Fine-grit sandpaper, chrome touch-up paint | Sand lightly to avoid damaging surrounding plating. |
| Joint Replacement Assessment | Quarterly | — | replace joints with deep cracks, stripped threads, or irreparable corrosion. |
Conclusion: Invest in Maintenance, Reap the Rewards
Chrome four way straight lean pipe joints might not be the most glamorous part of your production line, but they're undeniably essential. By taking the time to inspect, clean, lubricate, and repair them regularly, you'll ensure they keep supporting your lean system for years to come—saving you time, money, and headaches down the line. Remember, maintenance isn't a one-time task; it's an ongoing commitment to your team's productivity and safety.
Start small: pick one or two tasks from this guide and integrate them into your daily routine. As your team gets comfortable, add more until maintenance becomes second nature. Before long, you'll notice the difference: fewer disruptions, smoother workflows, and a production floor that feels more reliable and in control. After all, in a lean system, every detail counts—and that includes the humble four way joint.
So grab your cloth, your wrench, and your checklist, and give your joints the care they deserve. Your future self (and your bottom line) will thank you.