- Company Articles
- Products and Technology
- Installation And Maintenance
- Maintenance Tips for Parallel Lean Pipe Joints: Prolonging One Side Rotatory Mechanism Life

Maintenance Tips for Parallel Lean Pipe Joints: Prolonging One Side Rotatory Mechanism Life
Related Product
Parallel Lean Pipe Joint
Parallel lean pipe joint used for 2 pcs 28MM lean pipe connection in parallel direction to enhance frame structure, usually for heavy payload requirement for workbench. flow rack, hand trolley.
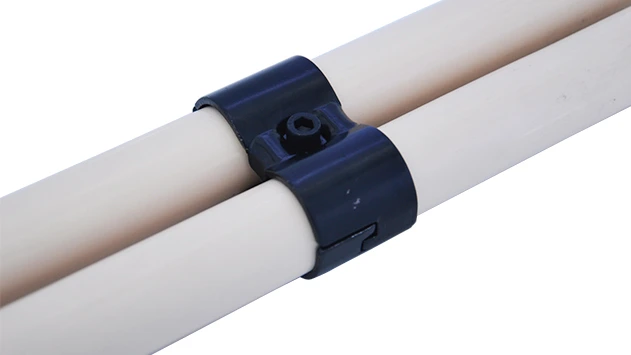
In the bustling world of manufacturing and production, where every second counts and efficiency is king, there's a silent workhorse keeping things moving: the parallel lean pipe joint. These unassuming components are the backbone of workbenches, flow racks, turnover trolleys, and conveyor systems—critical tools in lean systems designed to streamline operations. But among their many variants, the parallel lean pipe joint with a one side rotatory mechanism stands out for its unique ability to balance rigidity with flexibility. It's the joint that lets your workbench adjust, your flow rack pivot, and your assembly line adapt to shifting needs. Yet, like any hardworking tool, it demands care. Neglect it, and you'll soon face squeaky rotations, stuck mechanisms, or worse—unplanned downtime that grinds production to a halt. Today, we're diving into the art of maintaining these joints, sharing practical tips to extend their lifespan and keep your lean system running like a well-oiled machine.
Understanding the Parallel Lean Pipe Joint: More Than Just a Connector
Before we grab the lubricant and wrench, let's get to know our subject. A parallel lean pipe joint is exactly what it sounds like: a connector designed to join two lean pipes (often aluminum or steel) in a parallel arrangement, with one side featuring a rotatory mechanism that allows controlled movement. Unlike fixed joints that lock pipes in place or 90-degree crossing joints that change direction, this variant is all about dynamic adjustability. Imagine a workbench where one section can swivel to align with an adjacent conveyor, or a material rack that tilts to feed parts directly into an assembly station—that's the one side rotatory mechanism in action.
At its core, the joint consists of a few key parts: a metal housing (usually aluminum or steel), a rotatory axle or bushing, washers to reduce friction, and fasteners to secure it to the lean pipe. Many also include rubber or plastic gaskets to dampen vibration. What makes it unique is the precision of that rotatory component—it needs to be tight enough to hold heavy loads but smooth enough to rotate without force. And while it's built to last, it's not invincible. Dust, grease, rust, and everyday wear can take a toll, turning a smooth rotation into a jerky, noisy struggle.
Why Maintenance Matters: The Cost of Cutting Corners
Let's be honest: maintenance can feel like a chore. When deadlines loom and production targets are tight, it's easy to skip "small" tasks like inspecting a joint or lubricating a mechanism. But here's the truth: neglecting your parallel lean pipe joints costs far more than the few minutes it takes to care for them. A seized rotatory mechanism can bring a flow rack to a standstill, forcing workers to manually move materials and slowing down the entire line. A loose joint might compromise the stability of a workbench, risking damage to products or even injury to staff. Over time, unmaintained joints wear unevenly, leading to premature failure—and replacing a joint is always pricier than maintaining it.
Consider this scenario: A manufacturer of electronic components relies on a series of aluminum workbenches, each outfitted with parallel lean pipe joints to adjust the height of tool holders. Over six months, the team skips lubrication, assuming the joints "don't need it." One morning, a critical joint seizes mid-shift. The workbench can't adjust, so the operator struggles to reach tools, slowing assembly by 30%. By the time a technician arrives to fix it, two hours of production are lost—costing the company thousands in labor and delayed orders. All because of a $5 can of lubricant and 10 minutes of care.

Daily Inspection: Catch Problems Before They Start
The first line of defense in joint maintenance is daily inspection. This doesn't have to be a lengthy process—just a quick check during your pre-shift walkthrough. Think of it like checking your car's tires before a drive: a little attention prevents big headaches later.
Visual Checks: What to Look For
- Cracks or deformation: Examine the joint's housing for hairline cracks, especially around the rotatory mechanism. Even small cracks can spread under load.
- Rust or corrosion: For steel joints, rust is a red flag (literally). For aluminum, look for white, powdery oxidation—signs of moisture damage.
- Loose fasteners: Check the bolts or screws securing the joint to the lean pipe. Are they backed out? Stripped? Missing? A loose fastener is a ticking time bomb for joint stability.
- Debris buildup: Dust, metal shavings, or product residue can clog the rotatory mechanism. Pay extra attention to joints near cutting or grinding stations—they're magnets for debris.
Tactile Checks: Feel for Trouble
Sometimes, problems aren't visible—they're felt. Gently rotate the one side rotatory mechanism by hand. It should move smoothly, with consistent resistance. Watch for:
- Grinding or squeaking: These sounds mean parts are rubbing where they shouldn't—often due to dry lubrication or debris.
- Stiff spots: If the joint catches or sticks mid-rotation, there's likely a blockage or misalignment.
- Excessive play: Wiggle the joint side-to-side. A little movement is normal, but if it rocks or shifts more than 1-2mm, the internal components may be worn.

Cleaning: Keep the Mechanism Free and Clear
Even with daily inspections, debris will find its way into your parallel lean pipe joints. Metal shavings from machining, dust from packaging, or even spilled coolant can gum up the rotatory works. That's why regular cleaning is non-negotiable. Here's how to do it right:
Step 1: Disassemble (If Needed)
For light debris, you might not need to take the joint apart. A soft-bristled brush (like an old toothbrush) can dislodge dust from crevices. For heavier buildup, though, partial disassembly may be necessary. Use a hex key to remove the fasteners securing the joint to the pipe—just be sure to keep track of small parts like washers or gaskets (a small bowl works wonders for this).
Step 2: Choose the Right Cleaner
Avoid harsh chemicals like bleach or industrial solvents—they can damage plastic components or strip protective coatings on aluminum. Instead, use:
- Mild detergent and water: Mix a few drops of dish soap with warm water for greasy residue. Apply with a soft cloth, then wipe clean.
- Isopropyl alcohol (70%): Great for cutting oil or coolant. Use a cotton swab to reach tight spots in the rotatory mechanism.
- Compressed air: A quick blast of air (from a can or air compressor) blows out loose dust without touching sensitive parts.
Step 3: Dry Thoroughly
Moisture is the enemy of metal components. After cleaning, dry the joint with a lint-free cloth. For hard-to-reach areas in the rotatory mechanism, use a hairdryer on the "cool" setting to evaporate leftover water. Never reassemble a damp joint—rust and corrosion will set in faster than you think.
Lubrication: The Secret to Smooth Rotation
If daily inspection is the "eyes" of maintenance, lubrication is the "lifeblood." The one side rotatory mechanism relies on smooth movement between metal parts, and without proper lubrication, friction takes over—wearing down components and causing jams. But not all lubricants are created equal, and over-lubricating is just as bad as under-lubricating.
Choosing the Right Lubricant
Stick with silicone-based lubricants for parallel lean pipe joints. They're water-resistant, won't degrade plastic or rubber parts, and work well in both high and low temperatures—perfect for factory environments. Avoid petroleum-based greases, which can attract dust and harden over time, turning into a gritty paste that gums up the mechanism. A good rule of thumb: if your joint has plastic washers or gaskets, silicone is the way to go.
How and When to Lubricate
Frequency depends on usage. For joints in constant motion (like those on a busy conveyor), lubricate weekly. For less active joints (e.g., a workbench adjusted once a shift), monthly is usually enough. Here's the process:
- Clean first: Always lubricate a clean joint—dirt mixed with lubricant is abrasive.
- Apply sparingly: A little goes a long way. Use a precision applicator (like a needle-nose oiler) to target the rotatory axle. One or two drops are usually enough.
- Work it in: Rotate the mechanism back and forth 5-10 times to distribute the lubricant evenly.
- Wipe excess: Use a clean cloth to remove any overflow—excess lubricant attracts dust and debris.
Tightening and Adjustment: Keeping It Secure
Vibration is the silent enemy of fasteners. Over time, the constant hum of machinery, the movement of materials, and even the act of rotating the joint can loosen bolts or screws. A loose joint isn't just inefficient—it's dangerous. A workbench or flow rack held together by loose fasteners can collapse under load, risking injury or equipment damage.
Tools You'll Need
Invest in a quality hex key set (most lean pipe joints use metric sizes like M5 or M6) and a torque wrench for precision. Avoid using adjustable wrenches or pliers—they can round off fastener heads, making future adjustments impossible.
The Right Torque: Not Too Tight, Not Too Loose
Overtightening is a common mistake. It can strip threads, crack the joint housing, or warp the rotatory mechanism—making rotation stiff or impossible. Most manufacturers recommend a torque of 12-15 Nm (newton-meters) for steel fasteners and 8-10 Nm for aluminum (aluminum is softer and more prone to stripping). If you don't have a torque wrench, use the "finger-tight plus a quarter turn" rule: tighten the fastener until it's snug by hand, then give it a 90-degree turn with the hex key.
| Frequency | Task | Tools Needed | Key Notes |
|---|---|---|---|
| Daily | Visual/tactile inspection for cracks, looseness, or debris | Flashlight, gloves | Focus on high-use joints (e.g., conveyor components) |
| Weekly | Clean rotatory mechanism with brush/compressed air | Soft brush, compressed air can | Avoid getting moisture in the joint during cleaning |
| Monthly | Lubricate rotatory axle with silicone lubricant | Silicone spray/oil, precision applicator | Wipe excess to prevent dust buildup |
| Quarterly | Torque check fasteners; replace stripped/worn parts | Hex key set, torque wrench | Use genuine lean pipe and accessories for replacements |
Troubleshooting Common Issues: Fixing Sticky, Squeaky, or Loose Joints
Even with regular maintenance, joints can act up. Here's how to diagnose and fix the most common problems:
Problem: Stiff or Stuck Rotation
Cause: Debris in the mechanism, dried lubricant, or misalignment. Solution: Disassemble the joint, clean all parts with alcohol, then relubricate. If the axle is bent (rare but possible), replace it with a new part from a reputable lean pipe supplier .
Problem: Excessive Wiggle or Play
Cause: Worn washers, stretched fasteners, or a cracked housing. Solution: replace washers first—they're cheap and often the culprit. If play persists, check the housing for cracks. If cracked, replace the entire joint (a cracked housing can't be repaired safely).
Problem: Rust or Corrosion
Cause: Exposure to moisture or chemicals. Solution: For light rust, scrub with a wire brush and apply a rust-inhibiting spray. For severe corrosion, replace the joint—rust weakens metal, making failure likely under load.
When to replace: Knowing When It's Time to Let Go
Even with perfect maintenance, parallel lean pipe joints don't last forever. On average, they'll serve you 3-5 years under heavy use. But how do you know when repair isn't enough? Look for these signs:
- Cracks in the housing: As mentioned, cracks compromise structural integrity—no amount of glue or tape will fix this.
- Seized axle: If the rotatory mechanism won't budge even after cleaning and lubrication, the axle is likely seized and needs replacement.
- Stripped threads: If fasteners won't tighten (they just spin), the threads in the joint are stripped. replace the joint—stripped threads can't hold tension.
When replacing, always use genuine parts from a trusted supplier. Off-brand joints may not fit properly, leading to more problems down the line. And keep a few spares on hand—nothing kills productivity like waiting for a replacement joint to ship.
Final Thoughts: Small Efforts, Big Results
Maintaining parallel lean pipe joints isn't glamorous work, but it's the kind of work that makes a big difference. A few minutes of daily inspection, a weekly cleaning, and a monthly lubrication session can extend a joint's life by years—saving you time, money, and stress. Remember, your lean system is only as strong as its weakest link, and the parallel lean pipe joint is often that link. Treat it well, and it will keep your production line moving, your workers safe, and your operations efficient.
So the next time you walk past that workbench or flow rack, take a second to check the joints. Give them a spin, wipe off the dust, and add a drop of lubricant. Your future self (and your bottom line) will thank you.