- Company Articles
- Products and Technology
- Installation And Maintenance
- Maintenance Tips to Extend Life of 4080 Aluminum Profile End Caps

Maintenance Tips to Extend Life of 4080 Aluminum Profile End Caps
Related Product
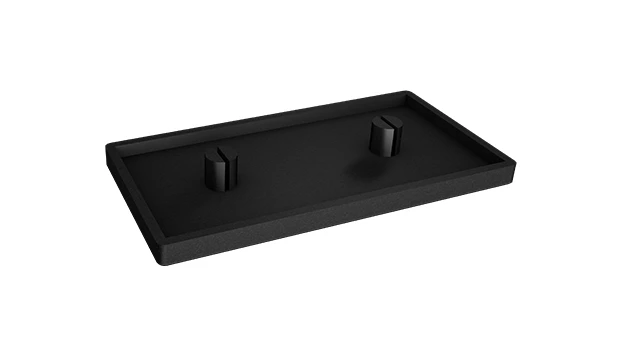
4080 Aluminum Profile End Cap
The aluminum profile end cap adds a finishing touch to your project and closes off profile ends to limit dust and debris buildup, also it can avaid some scratch for material and labor during the assemble work.
Introduction: The Unsung Hero of Aluminum Profiles
Walk into any modern workshop, manufacturing plant, or logistics facility, and you'll likely spot aluminum profiles hard at work. These versatile structures form the backbone of workbenches, material racks, conveyor systems, and production lines—quietly supporting the day-to-day operations that keep businesses running. But while the profiles themselves get most of the attention, it's the smaller components—the aluminum profile accessories—that often make the biggest difference in durability, safety, and functionality. Among these unsung heroes is the 4080 aluminum profile end cap: a small, unassuming piece that plays a critical role in protecting your investment and ensuring your setup stands the test of time.
If you've ever installed or maintained aluminum profiles, you know that the ends of these extrusions are often left exposed. Without proper protection, those raw edges can collect dust, debris, and moisture, leading to corrosion, structural weakening, or even safety hazards like cuts from sharp corners. That's where end caps come in. Designed to fit snugly over the open ends of 4080 aluminum profiles (named for their 40mm x 80mm dimensions), these caps act as a barrier, shielding the profile's interior from contaminants while smoothing out rough edges for a cleaner, safer workspace.
But like any component, 4080 aluminum profile end caps don't last forever—especially if they're neglected. Cracks, loosening, discoloration, and warping are common issues that can compromise their effectiveness, turning a simple accessory into a costly headache. The good news? With the right maintenance routine, you can significantly extend the life of these end caps, reducing replacement costs, minimizing downtime, and keeping your aluminum profiles in top shape for years to come. In this guide, we'll dive into everything you need to know about caring for your 4080 aluminum profile end caps, from daily upkeep to troubleshooting and proactive care.
What Are 4080 Aluminum Profile End Caps, and Why Do They Matter?
Before we jump into maintenance, let's start with the basics: What exactly is a 4080 aluminum profile end cap, and why should you care about keeping it in good condition? At first glance, it might seem like a trivial part—after all, it's just a small plastic or rubber cover. But looks can be deceiving. Let's break down its role and importance.
The Basics: Design and Function
4080 aluminum profile end caps are typically made from durable plastics (like ABS or polypropylene) or rubber, designed to fit precisely over the open ends of 40mm x 80mm aluminum extrusions. Most feature a snap-on or friction-fit design, with small tabs or ridges that grip the interior of the profile's T-slots, ensuring a secure hold. Some may also include a thin lip that overlaps the profile's edge, adding an extra layer of protection against moisture and debris.
Their primary functions are threefold: protection , safety , and aesthetics . First, they protect the profile's interior from dust, dirt, and liquids that can accumulate in the hollow core, leading to corrosion or blockages in T-slots (which are critical for attaching other accessories like brackets or shelves). Second, they smooth out sharp, unfinished edges, reducing the risk of cuts or scrapes for workers handling the profiles. Finally, they give your setup a polished, professional look—no more unsightly exposed ends to detract from an otherwise clean workspace.
The Cost of Neglect: Why Maintenance Isn't Optional
It's easy to overlook end caps when you're focused on larger, more "important" components like the profiles themselves or heavy-duty equipment. But neglecting these small accessories can have surprisingly big consequences. For example, a cracked end cap might seem harmless, but it can allow water or cleaning fluids to seep into the profile, leading to rust or oxidation (even in aluminum, which is corrosion-resistant, prolonged exposure to moisture can cause pitting). A loose end cap, on the other hand, can vibrate loose over time, leaving the profile end exposed and increasing the risk of injury or damage to nearby tools.
Consider this real-world scenario: A manufacturing plant in the automotive industry recently reported higher-than-usual maintenance costs for their assembly line workbenches. Upon inspection, the team discovered that over half of the 4080 aluminum profile end caps were cracked or missing, allowing coolant and lubricants from the production line to seep into the profiles. Over time, this moisture had corroded the T-slots, making it difficult to attach tools and accessories—a problem that required expensive profile replacements. The root cause? A lack of routine end cap maintenance. What could have been a simple $5 fix per end cap turned into a $5,000 repair bill for new profiles.
The lesson here is clear: Caring for your 4080 aluminum profile end caps isn't just about preserving a small accessory—it's about protecting your entire aluminum setup from unnecessary wear and tear. Now that we understand why they matter, let's explore the common issues that can plague end caps and how to address them.

Common Issues: What Can Go Wrong with End Caps?
4080 aluminum profile end caps are built to be tough, but they're not indestructible. Over time, exposure to environmental factors, physical stress, and everyday wear and tear can take a toll. Recognizing the signs of trouble early is key to preventing minor issues from becoming major problems. Here are the most common issues you're likely to encounter, along with what causes them:
1. Cracking
Cracks are one of the most frequent problems with end caps, and they can range from tiny hairline fractures to large splits that render the cap useless. What causes them? Physical impact is a top culprit—think accidentally bumping a forklift into a rack, dropping tools on the end cap, or even overtightening when installing. UV exposure is another factor: If your aluminum profiles are used outdoors or near windows with direct sunlight, the plastic in the end caps can degrade over time, becoming brittle and prone to cracking. Chemical exposure is a third risk—harsh cleaning agents, oils, or solvents can weaken the plastic, making it more susceptible to damage.
2. Loosening
A loose end cap might not seem urgent, but it's a red flag. When end caps fit poorly, they fail to seal the profile properly, allowing debris and moisture to sneak in. The most common cause is vibration: Machinery, conveyor belts, or even foot traffic near the profiles can shake the end caps loose over time, especially if they weren't installed tightly initially. Debris buildup is another factor—dust, dirt, or small particles can get trapped between the end cap and the profile, creating a gap that prevents a snug fit. Finally, worn tabs or ridges on the end cap (the parts that grip the T-slots) can cause loosening; these tabs can wear down with repeated removal and reinstallation.
3. Discoloration
While discoloration doesn't always affect functionality, it's a sign that the end cap is deteriorating. Yellowing, fading, or dark spots are common, and they're often caused by UV exposure (which breaks down the plastic's pigments) or chemical staining from oils, greases, or cleaning products. In some cases, heat can also cause discoloration—for example, end caps near industrial ovens or heat sources may darken over time as the plastic's molecular structure changes.
4. Warping
Warped end caps—those that no longer lie flat or fit the profile's shape—are usually the result of extreme temperatures. High heat can cause the plastic to soften and deform, while cold temperatures can make it shrink or crack. For example, end caps used in freezers or cold storage facilities may contract, creating gaps, while those near furnaces or welding stations may warp from excess heat. Poor storage is another cause: Leaving extra end caps in a hot garage or cold warehouse can damage them before they're even installed.
5. Debris Buildup
Even if the end cap itself isn't damaged, debris trapped between the cap and the profile can cause problems. Dust, dirt, metal shavings, or even small tools can wedge their way into the gap, pushing the end cap outward and creating a seal that's no longer tight. Over time, this debris can also scratch the profile's interior or trap moisture, leading to corrosion. This is especially common in busy workshops where cleaning takes a backseat to production.

Step-by-Step Maintenance Guide: Keeping End Caps in Top Shape
Now that we know what can go wrong, let's focus on how to keep your end caps in great condition. A little regular maintenance goes a long way, and this step-by-step guide will walk you through everything from daily upkeep to deep cleaning and repairs.
Daily Quick Checks: 2-Minute Inspections
You don't need to spend hours each day maintaining end caps—just a quick 2-minute check can catch issues before they escalate. Here's what to do:
Visual Scan: Walk around your aluminum profiles and glance at the end caps. Look for obvious signs of damage like cracks, looseness, or missing caps. Pay extra attention to high-traffic areas (e.g., near doorways, conveyor entrances) where impacts are more likely.
Light Tap Test: Gently tap each end cap with your finger or a soft tool (like a rubber mallet). A secure cap will make a solid, "thud" sound, while a loose one will rattle or sound hollow. If you hear a rattle, note it for a closer inspection later.
Debris Wipe: Use a dry cloth to quickly wipe away dust or loose debris from the end cap and the surrounding profile edge. This prevents buildup that can lead to loosening or corrosion.
Weekly Deep Cleaning: Removing Grime and Contaminants
Once a week, set aside 10–15 minutes to give your end caps a more thorough cleaning. This removes stubborn dirt, oils, and residues that daily checks might miss. Here's how:
Tools You'll Need: A soft microfiber cloth, mild detergent (like dish soap), warm water, a soft-bristled brush (old toothbrushes work great for crevices), and a dry towel.
Step 1: Mix a Cleaning Solution Fill a small bucket with warm water and add a few drops of mild detergent. Avoid harsh chemicals like bleach, ammonia, or abrasive cleaners—these can damage the plastic or rubber in the end caps.
Step 2: Wipe the End Cap Dip the microfiber cloth in the soapy water, wring it out so it's damp (not soaking), and gently wipe the end cap. Focus on areas with visible grime or oil stains. For textured end caps, use the soft-bristled brush to scrub crevices where dirt hides.
Step 3: Rinse and Dry Dampen a clean cloth with plain water and wipe away any soap residue. Immediately dry the end cap and the surrounding profile with a dry towel—moisture left on the profile can lead to corrosion, even with the end cap in place.
Pro Tip: If you're dealing with greasy or oily residue (common in manufacturing settings), add a drop of isopropyl alcohol to your cleaning cloth—just be sure to test it on an inconspicuous area first to ensure it doesn't discolor the end cap.
Monthly Detailed Inspection: Catching Small Issues Early
Once a month, perform a detailed inspection of each end cap to identify minor damage that might not be visible during daily or weekly checks. Use the table below to track your findings and stay organized:
| End Cap Location (e.g., "Workbench A, Left End") | Condition (Cracked, Loose, Clean, etc.) | Action Needed (Clean, Tighten, Repair, replace) | Date Completed |
|---|---|---|---|
| Material Rack B, Top Shelf Right | Clean, Secure | None | 10/05/2025 |
| Assembly Line Workbench, Front Left | Hairline Crack on Edge | Repair with Plastic Glue | 10/05/2025 |
| Conveyor Support Profile, Bottom End | Loose, Rattles | Tighten and Clean T-Slot | 10/05/2025 |
| Storage Rack D, Rear Right | Missing End Cap | replace with New 4080 Cap | 10/06/2025 |
What to Look For During Inspection:
- Cracks: Use a flashlight to check for hairline fractures, especially around the edges or where the cap meets the profile. Even tiny cracks can grow over time.
- Looseness: Try gently pulling the end cap—if it moves more than 1–2mm, it's too loose. Press firmly to see if it re-seats; if not, check for debris in the T-slot.
- Warping: Place a straightedge (like a ruler) across the end cap's surface. If it rocks or doesn't lie flat, the cap is warped.
- Discoloration: Note any yellowing, dark spots, or fading—this can indicate UV or chemical damage, even if the cap still functions.
- Tab Wear: If the end cap has plastic tabs that grip the T-slot, inspect them for signs of wear or bending. Worn tabs won't hold the cap securely.
Repairing Minor Damage: When to Fix Instead of replace
Not all end cap damage requires replacement. Small cracks, minor loosening, or light discoloration can often be repaired with simple tools and materials. Here's how to tackle common issues:
Fixing Small Cracks
For hairline cracks (less than 5mm long), plastic glue or epoxy can work wonders. Choose a glue designed for plastic (like super glue formulated for ABS or polypropylene) and follow these steps:
Step 1: Clean the Area Use rubbing alcohol to wipe the cracked area and remove any dirt or oils. Let it dry completely.
Step 2: Apply Glue Apply a tiny amount of glue to the crack—less is more, as excess glue can squeeze out and create a mess. Use a toothpick to spread the glue evenly along the crack.
Step 3: Clamp and Cure Gently press the cracked edges together and hold them for 30–60 seconds. If the crack is on a vertical surface, use a small clamp (with a soft cloth to avoid damaging the cap) to hold it in place. Let the glue cure for at least 24 hours before using the profile.
Tightening Loose End Caps
If an end cap is loose but undamaged, the fix is often simple:
Step 1: Remove the Cap Gently pull or twist the end cap to remove it from the profile. If it's stuck, use a flat tool (like a plastic putty knife) to pry it loose—be careful not to crack it.
Step 2: Clean the T-Slot Use a brush or cloth to remove debris, dust, or old glue from the T-slot and the inside of the end cap. This ensures a tight fit when re-installing.
Step 3: Re-Seat the Cap Align the end cap with the profile end, making sure any tabs or ridges fit into the T-slot. Press firmly around the edges until you hear a "click" or feel it seat securely. For extra hold, apply a small dot of glue to the tabs before re-installing (just don't overdo it—you still want to be able to remove the cap later if needed).
Reducing Discoloration
For yellowing caused by UV exposure, a plastic restorer (like those used for car dashboards) can help. Apply a small amount to a cloth and rub it into the end cap in circular motions. Let it sit for 5–10 minutes, then wipe away excess. This won't reverse severe damage, but it can brighten the cap and slow further discoloration.
When to replace: Knowing When It's Time for a New Cap
While repairs work for minor issues, some damage is beyond fixing. replace your end cap if:
- The crack is longer than 10mm or spans the entire cap edge.
- The cap is warped so badly it no longer fits the profile.
- The tabs or gripping mechanisms are broken or worn beyond repair.
- The cap is loose even after cleaning and re-seating.
- Discoloration is accompanied by brittleness (the cap cracks when pressed gently).
When replacing, always choose a genuine 4080 aluminum profile end cap from a reputable supplier. Generic caps may not fit properly, leading to premature failure. Look for caps made from high-quality plastic (rated for UV resistance if used outdoors) and ensure they're designed specifically for 40mm x 80mm profiles.
Troubleshooting Common Problems: Quick Fixes for Frustrating Issues
Even with regular maintenance, you might run into unexpected issues with your end caps. The table below outlines common problems, their causes, and step-by-step solutions to get your end caps back in working order:
| Problem | Common Cause | Solution |
|---|---|---|
| End cap falls off repeatedly | Debris in T-slot, worn tabs, or incorrect cap size |
1. Remove cap and clean T-slot with a brush and alcohol.
2. Inspect tabs—if worn, replace the cap. 3. Ensure cap is labeled for 4080 profiles (not 4040 or 3030). |
| Cap cracks immediately after installation | Overtightening, forcing a misaligned cap, or using a brittle cap |
1. replace with a new cap.
2. Align tabs with T-slot before pressing—don't force it. 3. Press firmly but gently; avoid hitting with a hard tool. |
| Cap is discolored and sticky to the touch | Exposure to oils, solvents, or UV degradation |
1. Clean with mild detergent and warm water.
2. If sticky residue remains, wipe with rubbing alcohol. 3. If discoloration is severe, replace the cap and move the profile away from chemical sources. |
| Cap warps in cold weather | Plastic contraction in low temperatures |
1. Remove cap and warm it gently with a hair dryer (low heat) to reshape.
2. Reinstall and press firmly to seat. 3. For outdoor use, switch to UV/weather-resistant end caps. |
| Debris gets trapped under the cap | Poor sealing, gaps from warping, or loose fit |
1. Remove cap, clean T-slot and cap interior.
2. If cap is warped, replace it. 3. Apply a thin bead of silicone sealant (clear) around the cap edge before reinstalling (avoid blocking T-slots). |
Proactive Care: Going Beyond Maintenance to Extend Lifespan
Maintenance is about reacting to issues—but proactive care is about preventing them from happening in the first place. By making a few small adjustments to how you use and store your aluminum profiles, you can significantly extend the life of your end caps. Here are our top tips:
1. Pair End Caps with Aluminum Profile Rubber Strips
For profiles that experience heavy vibration (like those near conveyor belts or machinery), adding aluminum profile rubber strips along the edges can reduce movement and protect end caps from loosening. These strips act as a buffer, absorbing shock and minimizing the rattling that wears down tabs and causes cracks. Install them along the profile's length, near the end caps, for extra stability.
2. Secure Profiles with Quality Aluminum Profile Fixings
Loose profiles vibrate more, which means looser end caps. Ensure your aluminum profiles are securely fastened to frames, floors, or walls using high-quality aluminum profile fixings like brackets, screws, or clamps. Tighten fixings during monthly inspections to prevent movement that can shake end caps loose.
3. Store Extra End Caps Properly
If you keep spare end caps on hand (which we recommend!), store them in a cool, dry place away from direct sunlight and chemicals. A sealed plastic bin works great. Avoid stacking heavy objects on them, as this can cause warping. Label the bin clearly with "4080 Aluminum Profile End Caps" to avoid mixing sizes.
4. Train Staff on Proper Handling
Many end cap issues stem from accidental damage by employees. Take 5 minutes to train your team on proper handling: Avoid pushing or pulling on end caps, don't use them as "handles" to move racks, and report damage immediately instead of ignoring it. A quick training session can reduce accidental impacts and extend cap life.
5. Consider Environmental Upgrades
If your end caps are consistently failing due to UV exposure, chemicals, or extreme temperatures, consider upgrading to more durable options. For outdoor use, look for UV-stabilized end caps. For chemical-heavy environments, choose caps made from chemical-resistant plastics. For high-heat areas, metal end caps (though less common) may be a better fit.
Conclusion: Small Investment, Big Returns
At the end of the day, 4080 aluminum profile end caps are small components, but their impact on your aluminum setup is huge. By taking the time to inspect, clean, repair, and replace them as needed, you're not just extending the life of an accessory—you're protecting your entire investment in aluminum profiles, reducing downtime, and creating a safer, more efficient workspace. The best part? It doesn't take much effort: A few minutes of daily checks, a weekly cleaning, and a monthly inspection are all it takes to keep these unsung heroes doing their job.
Remember, maintenance isn't just about fixing problems—it's about preventing them. By staying proactive, you'll avoid costly repairs, minimize frustration, and ensure your aluminum profiles and accessories (including those all-important end caps) serve you well for years to come. So the next time you walk past your workbench or material rack, take a second to look at the end caps. They might be small, but they're working hard to keep your operation running smoothly—give them the care they deserve.