- Company Articles
- Products and Technology
- Product knowledge
- Material Rack B Assembly: Using One Side Rotatory Parallel Lean Pipe Joints for Quick Reconfiguration

Material Rack B Assembly: Using One Side Rotatory Parallel Lean Pipe Joints for Quick Reconfiguration
Related Product
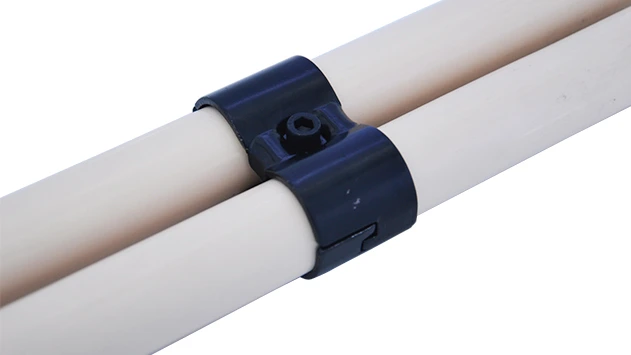
Parallel Lean Pipe Joint
Parallel lean pipe joint used for 2 pcs 28MM lean pipe connection in parallel direction to enhance frame structure, usually for heavy payload requirement for workbench. flow rack, hand trolley.
Walk into any busy factory, warehouse, or production line, and you'll notice one thing immediately: the right tools make or break efficiency. When it comes to organizing parts, components, and materials, material racks are the unsung heroes. But not all racks are created equal. Fixed racks, with their rigid shelves and permanent structures, often become bottlenecks when production needs change—whether that's a new product line, larger components, or a shift in workflow. That's where Material Rack B (3 row and 3 floor) comes in, and its secret weapon? The One Side Rotatory Parallel Lean Pipe Joint . In this guide, we'll walk through how to assemble this game-changing rack and why its reconfigurable design is a game-changer for lean manufacturing.
Why Reconfigurable Material Racks Matter in Modern Production
Let's start with a scenario we've all lived (or worked) through: You've just received a new batch of components, but they're bulkier than the last order. Your current material rack's shelves are too close together, and the fixed metal frame won't budge. You end up stacking boxes on the floor, creating a tripping hazard, or wasting hours disassembling the entire rack to adjust one shelf. Sound familiar? This isn't just frustrating—it's a drain on productivity, space, and morale.
In lean manufacturing, the goal is to eliminate waste, and inflexible equipment is a major source of waste. That's where lean pipe systems shine. Lean pipes—often made of steel with a plastic coating or lightweight aluminum—are designed to be modular, meaning they can be easily adjusted, extended, or reconfigured without specialized tools. When paired with smart joints and accessories, they form the backbone of adaptable workspaces. Material Rack B (3 row and 3 floor) takes this a step further by prioritizing quick reconfiguration, thanks in large part to the One Side Rotatory Parallel Lean Pipe Joint.
Quick Fact: Traditional fixed racks require an average of 2–4 hours to reconfigure for new storage needs. With rotatory joints like the ones used in Material Rack B, that time drops to under 30 minutes—saving teams 80% of setup time annually.
Getting to Know Material Rack B (3 Row and 3 Floor)
Before we dive into assembly, let's break down what makes Material Rack B (3 row and 3 floor) unique. As the name suggests, it features 3 horizontal rows and 3 vertical floors, creating 9 distinct storage spaces—perfect for separating different components, tools, or work-in-progress items. But its real strength isn't just the number of shelves; it's the flexibility to adjust those shelves on the fly.
Standard dimensions for Material Rack B typically range from 1200mm (width) x 450mm (depth) x 1800mm (height), but these can vary based on your needs. The frame is built using lean pipes, which are lightweight yet sturdy enough to hold up to 50kg per shelf (depending on pipe thickness and joint quality). The 3-row design ensures items are easily visible and accessible from both sides, reducing the time workers spend searching for parts. And with 3 floors, you can separate materials by stage of production—raw components on the bottom, partially assembled parts in the middle, and finished goods on top, for example.
But what truly sets this rack apart is its use of the One Side Rotatory Parallel Lean Pipe Joint. Unlike fixed joints that lock pipes into a permanent angle, these rotatory joints let you pivot shelves, adjust heights, or even reposition entire sections without fully disassembling the rack. Let's take a closer look at this star component.

Meet the Star Component: One Side Rotatory Parallel Lean Pipe Joint
At first glance, the One Side Rotatory Parallel Lean Pipe Joint looks like a simple metal connector—and in many ways, that's the beauty of it. But don't let its simplicity fool you. This joint is engineered to solve a common problem: how to adjust parallel pipes (like shelf supports) without disconnecting them from the main frame. Here's how it works:
Most lean pipe joints have two ends that connect to pipes, and both ends are fixed in place once tightened. The One Side Rotatory Parallel Lean Pipe Joint, however, has a "fixed" side and a "rotatory" side. The fixed side attaches securely to the vertical frame of the rack, while the rotatory side—connected to the horizontal shelf pipe—can rotate up to 180 degrees when loosened. This means you can pivot the entire shelf up or down to adjust its height, or even swing it out of the way temporarily to load oversized items, without detaching it from the frame.
The joint's design includes a central locking nut. When tightened, it clamps the rotatory side firmly in place, ensuring the shelf stays stable under load. When loosened (just enough to release tension, not fully removed), the rotatory side glides smoothly, allowing for precise adjustments. It's a small innovation, but it eliminates the need for tools like wrenches or screwdrivers in most cases—just a hex key (included with most joint kits) to tweak the nut.
Pro Tip: When shopping for joints, look for ones with a durable zinc-plated finish. This resists rust and wear, ensuring smooth rotation even after months of frequent adjustments. Cheaper plastic joints may save money upfront but often crack or seize up, defeating the purpose of a reconfigurable system.

Tools and Materials You'll Need Before Starting
Before diving into assembly, let's gather everything you'll need. The beauty of lean pipe systems is that you don't need a workshop full of tools—just a few basics. Here's a checklist:
| Item | Quantity | Purpose |
|---|---|---|
| Lean pipes (1.5mm PE coated) | 12–15 pieces (varies by rack size) | Main structural components (vertical frames, horizontal shelves, cross-braces) |
| One Side Rotatory Parallel Lean Pipe Joints | 18–24 pieces | Connecting vertical frames to horizontal shelves (3 rows x 3 floors = 9 shelves, 2 joints per shelf end) |
| 90° Fixed Lean Pipe Joints | 8 pieces | Reinforcing corners of the vertical frame (4 corners x 2 joints per corner) |
| Hex key set (4mm and 5mm) | 1 set | Tightening/loosening joint nuts |
| Measuring tape (3m+) | 1 | Ensuring even shelf heights and frame squareness |
| Rubber mallet | 1 | Gently tapping pipes into joints (avoid damaging pipes or joints) |
| Level (spirit or digital) | 1 | Checking vertical frames for plumb and shelves for level |
| Casters (optional) | 4 pieces | Adding mobility to the rack (use locking casters for stability) |
Pro tip: Lay out all components on a flat surface (like a workbench) before starting. This helps you spot missing parts early—no one wants to pause assembly halfway to hunt for a joint!
Step-by-Step Assembly: Building Material Rack B (3 Row and 3 Floor)
Now, let's get hands-on. We'll break assembly into five phases: building the vertical frame, attaching the base, adding shelves with rotatory joints, reinforcing for stability, and testing reconfiguration. Take your time—assembly should take 1–2 hours for first-timers, but gets faster with practice.
Phase 1: Building the Vertical Frame
Start by assembling the main vertical frame—the "backbone" of the rack. For a standard Material Rack B (3 row and 3 floor), you'll need 4 vertical lean pipes (typically 1800mm long for a 3-floor design). Lay two pipes parallel on the ground, spaced the width of the rack (e.g., 1200mm apart). These will be the front two vertical posts.
Next, connect the top and bottom of these posts using horizontal lean pipes (same length as the width) and 90° fixed joints. Place a 90° joint on the bottom end of one front post, slide a horizontal pipe into the joint, then attach the other end of the pipe to a 90° joint on the bottom end of the second front post. Repeat this for the top of the posts. You now have a rectangular "front frame."
Repeat the process for the "back frame" (two more vertical posts and two horizontal pipes). Now you have two rectangles: front and back frames. Stand them upright and connect them with horizontal cross-braces (using 90° joints) at the top, middle, and bottom. This ensures the frame is square and stable. Use your level to check that the vertical posts are plumb (no leaning!)—adjust as needed by loosening joints slightly and tapping with the rubber mallet.
Phase 2: Adding the Base (Optional Casters)
If you're adding casters (highly recommended for mobility), now's the time. Flip the frame upside down so the bottom horizontal pipes are facing up. Attach caster mounting plates (included with caster kits) to the bottom corners using short lean pipes and 90° joints. Screw the casters into the plates, ensuring they're tight. Lock the caster brakes to keep the frame steady during the rest of assembly.
Phase 3: Attaching Shelves with One Side Rotatory Parallel Lean Pipe Joints
This is where the magic happens. Let's start with the bottom floor, first row. Take two One Side Rotatory Parallel Lean Pipe Joints and attach their "fixed" sides to the front vertical frame posts. Position them at your desired height (e.g., 300mm from the ground for the bottom shelf). Tighten the fixed side nuts with the hex key—these should be snug, but not over-tightened yet.
Now, take a horizontal lean pipe (the shelf itself) and slide its ends into the "rotatory" sides of the two joints. The pipe should now be parallel to the ground, held loosely by the joints. Repeat this on the back vertical frame posts: attach two more rotatory joints at the same height, then connect the other end of the horizontal pipe to these back joints. Now your first shelf is floating between the front and back frames, held by four rotatory joints (two front, two back).
Check the shelf with your level. If it's uneven, loosen the rotatory side nuts on the higher end and gently lower the pipe until it's level, then retighten. Once level, fully tighten all four joint nuts—this locks the shelf in place. Repeat this process for the remaining 8 shelves (3 rows x 3 floors), spacing them evenly (e.g., 450mm apart vertically for a 1800mm tall rack). Pro tip: Use your measuring tape to mark heights on the vertical posts first—this ensures all shelves line up evenly.
Phase 4: Reinforcing for Heavy Loads
While the rotatory joints are strong, adding cross-braces between shelves adds rigidity, especially if you'll be storing heavy items. Cut short lean pipes (300–400mm) and use 90° fixed joints to connect the front and back shelf pipes in the middle of each row. This prevents shelves from sagging under weight. For extra stability, add diagonal braces (using 45° lean pipe joints) from the top corner of the frame to the bottom opposite corner—this resists tipping.
Phase 5: Testing Reconfiguration
Now for the fun part: testing how easy it is to adjust. Let's say you need to raise the middle shelf by 100mm. Grab your hex key and loosen the rotatory side nuts on all four joints holding that shelf (front left, front right, back left, back right). You don't need to remove the nuts—just turn them 2–3 times counterclockwise until the joint releases tension. Gently lift the shelf to the new height, use your level to ensure it's even, then retighten the nuts. Done! Total time: under 5 minutes.
Want to swing a shelf out of the way to load a large box? Loosen the rotatory nuts, pivot the shelf upward 90 degrees, and tighten the nuts to hold it in place. When you're done, pivot it back down. No disassembly, no extra parts—just smooth, quick adjustment.
The Benefits of This Setup for Your Lean System
By now, you can see why Material Rack B with One Side Rotatory Parallel Lean Pipe Joints is a favorite among lean manufacturing teams. But let's quantify the benefits:
1. Time Savings: From Hours to Minutes
As we mentioned earlier, traditional racks take hours to reconfigure. With rotatory joints, even complex changes (like adjusting all 9 shelves for a new product line) take under an hour. Multiply that by how often your needs change, and you're looking at hundreds of saved labor hours annually.
2. Adaptability: One Rack, Endless Uses
Material Rack B isn't just for one product or department. Today, it might hold small electronics components; tomorrow, larger automotive parts; next month, tools and maintenance supplies. The ability to adjust shelf heights, angles, and even remove shelves entirely means one rack replaces multiple fixed racks, saving space and cost.
3. Ergonomics: Safer, Happier Teams
Bending, reaching, and straining to access items on poorly positioned shelves leads to workplace injuries and fatigue. With rotatory joints, shelves can be adjusted to match each worker's height (e.g., raising a shelf for a taller team member, lowering it for someone shorter). This reduces strain and boosts morale—happy workers are more productive workers.
4. Cost Efficiency: Grow as You Go
Lean pipe systems are modular, so you can start small (e.g., a single Material Rack B) and expand later by adding more pipes and joints. Unlike fixed racks, which require buying new units when you outgrow them, you can extend your existing rack with minimal investment. This aligns perfectly with lean principles: invest only in what you need, when you need it.
Real-World Example: How a Electronics Manufacturer Cut Setup Time by 75%
Let's put this into context with a real (hypothetical but representative) example. Acme Electronics, a mid-sized manufacturer of circuit boards, used to rely on fixed wooden shelves for storing small components. When they introduced a new line of larger circuit boards, the shelves were too narrow, and the team spent 4 hours disassembling and rebuilding the racks. Production delays piled up, and overtime costs skyrocketed.
After switching to Material Rack B (3 row and 3 floor) with One Side Rotatory Parallel Lean Pipe Joints, their process changed dramatically. When the next product line came in—with even larger components—the team adjusted all 9 shelves in 30 minutes. No overtime, no delays, and the racks were reused instead of replaced. "It's like having a storage system that thinks on its feet," said Maria, Acme's production manager. "We haven't bought a new rack in two years, and we've launched three new product lines."
Maintenance Tips to Keep Your Rack in Top Shape
Like any tool, your Material Rack B will last longer with a little care. Here's how to keep it reconfiguring smoothly for years:
- Clean the joints monthly: Dust and debris can gunk up the rotatory mechanism. Wipe joints with a dry cloth, then a damp cloth if needed. Avoid harsh chemicals, which can damage the coating.
- Lubricate joints quarterly: A drop of machine oil on the rotatory pivot points keeps them turning smoothly. Wipe away excess oil to prevent attracting dust.
- Check for loose nuts: Tighten any joint nuts that feel wobbly—vibration from daily use can loosen them over time.
- replace worn joints: If a joint starts to stick or the rotation feels rough, replace it. Most suppliers sell replacement joints individually, so you don't need to buy a whole new rack.
- Don't overload shelves: Even with cross-braces, lean pipes have weight limits (typically 50–80kg per shelf). Check the manufacturer's specs and distribute weight evenly.
Why This Isn't Just a Rack—It's Part of Your Lean System
At the end of the day, Material Rack B with One Side Rotatory Parallel Lean Pipe Joints is more than just a storage solution. It's a tangible example of lean system thinking: eliminating waste (time, space, labor), empowering teams to adapt quickly, and focusing on continuous improvement. In a world where production needs change faster than ever, flexibility isn't a nice-to-have—it's a necessity.
So, whether you're setting up a new workspace, upgrading outdated storage, or just tired of fighting with fixed racks, give this system a try. Assemble it once, reconfigure it a hundred times, and watch how it transforms your workflow from frustrating to frictionless. Your team (and your bottom line) will thank you.