- Company Articles
- Products and Technology
- Product knowledge
- Material Rack B Construction: Using 4040E EU Standard Aluminum Profile for Optimal Storage

Material Rack B Construction: Using 4040E EU Standard Aluminum Profile for Optimal Storage
Related Product
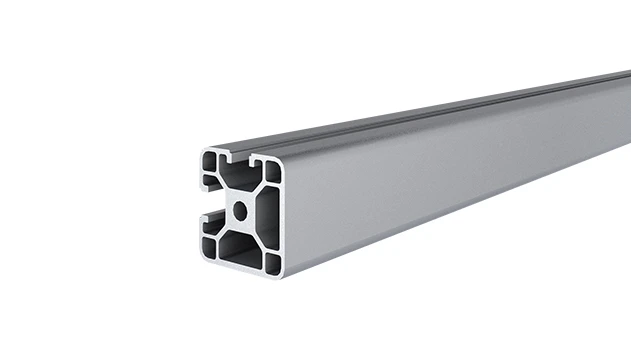
4040E EU Standard Aluminum Profile
4040E is a 4.00x4.00 CM fractional 40 series square extrusion T-slot profile with two side open T-slots, two side with closed face, each side with 4.00cm face. The profile has align-a-grooves to assist in aligning connecting profiles.
Walk into any busy warehouse or manufacturing facility, and you'll quickly spot the unsung hero of productivity: storage. It's not glamorous, but how you organize, access, and manage materials can make or break your team's efficiency. Cluttered shelves, wobbly racks, and hard-to-reach supplies don't just waste space—they drain time, increase frustration, and even risk workplace safety. That's where material rack b (3 row and 3 floor) comes in. Built with 4040E EU standard aluminum profile and designed for flexibility, this rack isn't just a storage solution; it's a tool to streamline workflows, cut waste, and keep your operations running like a well-oiled machine. Let's dive into how to build it, why it works, and the difference it can make for your facility.
Why Aluminum Profile? The Case for Ditching Traditional Racks
Before we get into the nuts and bolts of constructing Material Rack B, let's talk about why aluminum profile is the right choice. For decades, warehouses relied on heavy steel racks or flimsy wooden shelves. Steel is durable, sure, but it's also bulky, hard to adjust, and prone to rust if not maintained. Wood? It warps, splinters, and can't handle heavy loads without sagging. Aluminum, though? It's a game-changer. Lightweight but surprisingly strong, resistant to corrosion, and infinitely customizable—especially when you use profiles like the 4040E EU standard.
Aluminum profiles are designed with T-slots along their length, which means you can attach accessories—like shelves, brackets, or even wheels—without drilling holes or welding. That flexibility is key in today's fast-paced facilities, where storage needs change as quickly as inventory. Need to raise a shelf by a few inches? Swap out a connector. Add a new level? Slide in a new crossbeam. It's storage that grows with you, not against you.
And let's not overlook cost. While aluminum might have a slightly higher upfront price than wood, it lasts longer, requires less maintenance, and avoids the hidden costs of steel (like repainting or replacing rusted parts). Over time, it's not just a purchase—it's an investment in long-term efficiency.
Meet the Star: 4040E EU Standard Aluminum Profile
Not all aluminum profiles are created equal. The 4040E EU standard aluminum profile is a workhorse for a reason. Let's break down what makes it ideal for Material Rack B. First, the "4040" refers to its dimensions: 40mm wide and 40mm tall. That's a sweet spot—wide enough to support heavy loads but narrow enough to keep the rack from feeling bulky. The "E" denotes its European standard design, which means it's compatible with a wide range of aluminum profile accessories (think connectors, end caps, and brackets) from suppliers across the globe. No more hunting for proprietary parts!
But numbers only tell part of the story. The 4040E profile has a wall thickness of 2mm, which gives it an impressive load capacity. Each vertical beam can easily support 200kg or more, and when combined with crossbeams, the entire rack can handle the weight of tools, raw materials, or finished products without bending. Even better, the T-slots run the full length of the profile, so you can attach accessories anywhere—not just at fixed intervals. That means you can customize the rack's layout to fit odd-sized items, from small components to larger boxes.
Another perk? It's lightweight. A 1-meter length of 4040E profile weighs just 1.8kg, making it easy for a single person to carry and assemble. Compare that to a steel beam of the same size, which might weigh 10kg or more, and you'll see why aluminum cuts down on installation time (and back strain).

What You'll Need: Components for Material Rack B
Building Material Rack B (3 row and 3 floor) is a bit like putting together a high-quality puzzle—every piece has a purpose, and they all fit together seamlessly. Here's a quick rundown of the key components you'll need, beyond the 4040E profiles:
- Aluminum Profile Accessories: These are the "glue" that holds the rack together. Look for 90° aluminum profile connectors (to join vertical and horizontal beams), end caps (to cover sharp edges and prevent dust buildup), and gusset plates (to reinforce corners for extra stability).
- Shelf Panels: For Material Rack B, you'll need 9 shelf panels (3 rows x 3 floors). Aluminum honeycomb panels are a great choice—lightweight, strong, and resistant to dents. They fit perfectly into the T-slots of the 4040E profiles.
- Leveling Feet: Even the most even floors have small bumps. Adjustable aluminum leveling feet screw into the bottom of the vertical profiles, ensuring the rack stands straight and steady.
- Label Holders: Okay, this isn't mandatory, but it's a pro tip. Attach small label holders to each shelf to mark what's stored where. Trust us—your team will thank you when they're not hunting for parts.
Pro tip: Buy a kit! Many suppliers offer pre-packaged Material Rack B kits that include all the profiles, accessories, and even tools (like hex keys) you need. It saves time shopping for individual parts and ensures everything is compatible.
Step-by-Step: Building Your Material Rack B
Ready to roll up your sleeves? Building Material Rack B is straightforward, even if you're not a DIY expert. Just follow these steps, and you'll have a sturdy, functional rack in a few hours.
1. Prep Your Space
Start by clearing a flat, level area. Lay out a tarp or cardboard to protect the floor (and your aluminum profiles from scratches). Gather all your components and sort them by type—profiles, connectors, shelf panels, etc. Having everything organized will save you from hunting for parts mid-project.
2. Build the Frame: Vertical Beams First
Material Rack B is a cube-like structure, so you'll need 4 vertical corner beams. Cut your 4040E profiles to your desired height—most facilities use 180cm (about 6 feet) for a 3-floor rack, but adjust based on your ceiling height and storage needs. Screw a leveling foot into the bottom of each vertical beam; this will let you tweak the height later if needed.
3. Add Horizontal Beams: Creating the "Rows"
Now, it's time to connect the vertical beams with horizontal crossbeams to form the rack's width (the "3 rows" part of Material Rack B). For each level (there are 3 floors), you'll need 2 horizontal beams per row. So, for the bottom floor, attach a horizontal beam between the front-left and front-right vertical beams, and another between the back-left and back-right. Repeat this for the middle and top floors.
To attach the beams: Slide a 90° connector into the T-slot of the vertical beam, align the horizontal beam, and tighten the connector with a hex key. Make sure the beams are level—use a spirit level to check. A wobbly frame now means a wobbly rack later!
4. Install Shelf Supports: The "Floors" Take Shape
With the frame up, it's time to add supports for the shelves (the "3 floors"). These are shorter horizontal beams that run from front to back, between the left and right crossbeams. For each floor, you'll need 3 supports (one per row), spaced evenly to hold the shelf panel. Attach them using the same 90° connectors, making sure they're flush with the crossbeams.
5. Add Shelf Panels and Finishing Touches
Lay the aluminum honeycomb panels on top of the shelf supports. They should fit snugly, but if there's a gap, use small brackets (another type of aluminum profile accessory) to secure them in place. Finally, snap end caps onto the top of the vertical beams to cover the T-slots and add a clean, professional look.
6. Test and Adjust
Give the rack a gentle shake to check stability. If it wobbles, tighten any loose connectors or adjust the leveling feet. Then, load a few boxes onto the shelves to test weight capacity—start light, then add more gradually. You want to ensure the shelves don't sag and the frame stays steady.
Why 3 Rows and 3 Floors? The Genius of Material Rack B's Design
You might be wondering: Why 3 rows and 3 floors? Why not 4x4, or something smaller? The answer lies in balance. A 3x3 layout is large enough to hold a significant amount of inventory without being overwhelming. Each shelf is small enough to keep items organized (no more "junk drawer" shelves) but large enough to fit standard boxes or bins. It's also human-centered—most people can reach the top shelf of a 3-floor rack without a ladder, and the 3-row width means you don't have to stretch across the rack to grab something from the back.
This design also aligns perfectly with lean principles. In a lean system , the goal is to eliminate waste—whether that's time, space, or effort. A 3x3 rack ensures every inch of space is used intentionally. You can sort items by frequency of use: top floor for rarely used supplies, middle for daily essentials, and bottom for heavy or bulky items. No more climbing or bending unnecessarily—just efficient, intuitive access.
To put it in perspective, let's compare Material Rack B to a traditional wooden shelf unit. A typical 6-foot wooden shelf might have 3 fixed shelves, no adjustability, and a max load of 50kg per shelf. Material Rack B, with its 4040E aluminum profile, offers 9 adjustable shelves (3x3), each supporting up to 150kg, and the ability to reconfigure on the fly. That's 3x more storage space, 3x the load capacity, and endless flexibility. It's not just a rack—it's a storage upgrade.
Material Rack B vs. Traditional Racks: A Quick Comparison
| Feature | Traditional Steel/Wood Racks | Material Rack B (4040E Aluminum Profile) |
|---|---|---|
| Load Capacity (per shelf) | 50-100kg | Up to 150kg |
| Adjustability | Fixed shelves (no adjustment without tools) | Fully adjustable shelves (no tools needed) |
| Weight | Heavy (hard to move or reposition) | Lightweight (2-3 people can move it) |
| Maintenance | Repainting, rust removal, or replacing warped wood | Minimal (wipe clean, tighten connectors occasionally) |
| Compatibility with Lean Systems | Limited (static design doesn't support workflow changes) | Excellent (flexible, supports 5S and waste reduction) |
Real-World Impact: How One Facility Transformed with Material Rack B
Let's take a look at a real example to see Material Rack B in action. A mid-sized electronics manufacturer in Germany was struggling with disorganized component storage. Their old steel racks were rusted, shelves were fixed at awkward heights, and workers spent 15-20 minutes searching for small parts like resistors or capacitors. Production delays were common, and frustration was high.
They switched to Material Rack B, built with 4040E aluminum profiles. Here's what happened:
- Faster Access: By organizing components into the 3x3 layout (e.g., row 1 for resistors, row 2 for capacitors, row 3 for diodes; floor 1 for small values, floor 2 for medium, floor 3 for large), workers could find parts in 2-3 minutes. That's a 75% reduction in search time!
- Less Waste: The adjustable shelves meant they could fit more components per rack, reducing the need for extra storage units. They freed up 150 sq. ft. of floor space—enough for a new workbench.
- Happier Team: No more climbing ladders or wrestling with rusted shelves. The lightweight aluminum made it easy to reconfigure racks when new components arrived, and the clean, organized space boosted morale.
After 6 months, the manufacturer reported a 12% increase in production output and a 20% drop in errors (fewer wrong parts used). All from a simple change in storage.
Caring for Your Material Rack B: Maintenance Tips
Like any tool, Material Rack B works best when you take care of it. Luckily, aluminum profiles are low-maintenance, but a little TLC goes a long way:
- Clean Regularly: Wipe down the profiles and shelves with a damp cloth and mild detergent every few weeks. This prevents dust buildup and keeps the T-slots clear for accessories.
- Check Connectors Quarterly: Over time, connectors can loosen from vibrations or heavy use. Tighten them with a hex key to keep the rack stable.
- replace Worn Parts: If an end cap cracks or a shelf panel gets damaged, replace it promptly. Most suppliers sell replacement aluminum profile accessories individually, so you don't have to buy a whole new rack.
- Reconfigure as Needed: Don't let the rack become stagnant! If your inventory changes (e.g., new products, seasonal items), adjust the shelves or even add new beams to create more space. That's the beauty of aluminum profiles—they adapt.
Final Thoughts: More Than a Rack—A Foundation for Efficiency
Material Rack B, built with 4040E EU standard aluminum profile, is more than just a place to store boxes. It's a statement about how you value efficiency, your team, and continuous improvement. In a world where every second counts, having a storage system that's durable, flexible, and designed for people can transform your operations from chaotic to calm, from wasteful to streamlined.
Whether you're running a small workshop or a large warehouse, this rack proves that the right tools don't just hold things—they hold the key to better productivity, happier teams, and a stronger bottom line. So why settle for clunky, outdated storage? Invest in Material Rack B, and build a foundation for success.