- Company Articles
- Products and Technology
- Product knowledge
- Material Rack B Construction with 4040r EU Standard Aluminum Profile: Stability Test

Material Rack B Construction with 4040r EU Standard Aluminum Profile: Stability Test
Related Product
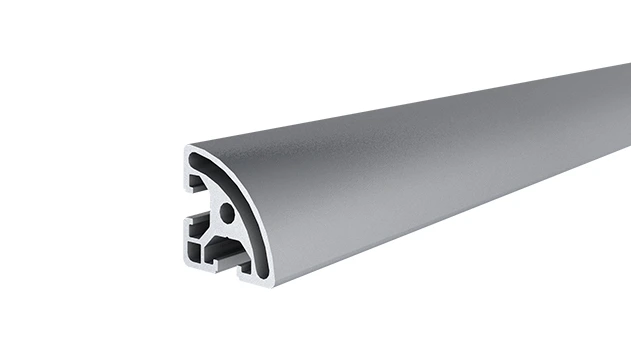
4040R EU Standard Aluminum Profile
4040R is a 4.00x4.00 CM fractional 40 series square extrusion T-slot profile with two side open T-slots, each side with 4.00cm face,the other side is round face. The profile has align-a-grooves to assist in aligning connecting profiles.
Walk into any busy production facility, and you'll quickly notice one thing: the difference between a smooth, efficient workflow and a chaotic, frustrating one often comes down to how materials are managed. Misplaced parts, cluttered aisles, and wobbly storage racks don't just slow down work—they create safety risks, waste valuable time, and even damage expensive components. That's where a well-designed material rack becomes more than just a storage solution; it's the backbone of lean manufacturing. Today, we're diving into the construction and stability test of Material Rack B (3 row and 3 floor) , built using 4040r EU Standard Aluminum Profile —a material that's been turning heads in factories for its durability, flexibility, and reliability. Whether you're a facility manager looking to upgrade your storage or a curious enthusiast wanting to understand what makes a great rack tick, this step-by-step breakdown will show you why this combination of rack and profile is becoming a go-to for lean system suppliers worldwide.
Why 4040r EU Standard Aluminum Profile? The Backbone of a Reliable Rack
Before we start screwing bolts or stacking weights, let's talk about the star of the show: the 4040r EU Standard Aluminum Profile. When we set out to build Material Rack B, we didn't just grab any metal bars from the warehouse. Choosing the right material is like choosing the foundation for a house—get it wrong, and everything else crumbles. So why 4040r? Let's break it down.
First, aluminum's natural advantages are hard to beat. It's lightweight, which makes assembling and moving the rack (if needed) a breeze compared to steel, but don't let that fool you—it's surprisingly strong. The "4040r" designation refers to its dimensions: 40mm by 40mm, with a rounded edge (the "r" stands for "rounded"). This shape isn't just for looks; the rounded edges reduce the risk of scratches on parts and cuts on workers' hands, a small detail that adds up to big safety wins in daily use.
Then there's the EU standard part. EU standards for aluminum profiles are strict, focusing on consistency, load-bearing capacity, and corrosion resistance. For a material rack that's going to hold heavy components day in and day out, consistency matters. You don't want one section of the rack to bend under weight while another stays rigid because the metal thickness varies. The 4040r profile we used has a uniform wall thickness of 2mm, tested to withstand static loads without permanent deformation—exactly what we need for a 3-row, 3-floor rack.
But a profile is only as good as the aluminum profile accessories that hold it together. Think of the profile as the bones; the accessories are the joints, muscles, and ligaments. We paired the 4040r with 90° aluminum profile connectors, end caps, and gusset plates—all designed to lock the structure into place without wobble. Unlike cheap plastic or flimsy steel connectors, these aluminum accessories form a tight, secure bond, ensuring the rack stays square even when loaded unevenly. It's the kind of attention to detail you'd expect from a reputable lean system supplier, where every component is chosen to work in harmony.
Building Material Rack B: From Piles of Parts to a Solid Structure
Now, let's get our hands dirty. Building Material Rack B isn't rocket science, but it does require patience and precision. We started with a list of parts, laid out on a clean workbench (fun fact: even the workbench we used was built with the same 4040r profiles—talk about meta!). Here's how we turned a pile of aluminum profiles and accessories into a fully functional, 3-row, 3-floor storage solution.
Step 1: Gathering the Materials (and Double-Checking the List)
First, we rounded up all the components. For Material Rack B, we needed:
- 4040r EU Standard Aluminum Profiles (cut to length: 4 vertical posts at 180cm, 12 horizontal beams at 120cm for the shelves, and 6 cross-braces at 60cm for stability)
- 90° Aluminum Profile Connectors (24 total—one for each corner joint)
- 3030 Aluminum Profile End Caps (16 total—to cover sharp ends of the vertical posts)
- Aluminum Honeycomb Panels (9 total—3 rows x 3 floors, each 120cm x 40cm)
- Gusset Alp 4040 (12 total—small triangular brackets to reinforce the shelf corners)
- M6 Allen Bolts and Nuts (100+—you can never have too many spares!)
- A rubber mallet, measuring tape, level, and Allen wrench set
Pro tip: Before starting, lay out all the profiles on the workbench and measure twice. Cutting errors are a pain to fix, especially with aluminum (you can't just bend it back!). We used a miter saw with a fine-tooth blade to get clean, straight cuts—no jagged edges here.
Step 2: Assembling the Frame—The "Skeleton" of the Rack
With all parts prepped, we started with the vertical posts. We laid four 180cm profiles on the floor, parallel to each other, spaced 120cm apart (the width of the shelves). Then, we attached the horizontal beams to the top and bottom of the posts using the 90° connectors. This formed a basic rectangular frame—think of it as the rack's "legs and hips."
Here's where the 4040r's design shined: the T-slots along the profile's length let us slide the connectors into place and tighten them with bolts, no drilling required. This modularity is a game-changer. If we ever need to adjust the shelf height (say, to fit taller boxes), we can just loosen the bolts, slide the connectors up or down, and retighten. No need to rebuild the whole rack—perfect for adapting to changing storage needs.
Once the bottom and top frames were secure, we added the cross-braces diagonally between the vertical posts. These aren't just extra metal; they're the secret to preventing the rack from swaying side to side. We used the gusset plates at each brace connection to add even more strength—imagine adding corner brackets to a bookshelf to stop it from tipping over. After this step, the frame felt rock-solid, even when we gave it a gentle push.
Step 3: Adding the Shelves—Turning a Frame into a Functional Rack
Next up: the shelves. Material Rack B has 3 rows and 3 floors, so we needed to attach 9 horizontal shelf beams (3 per floor) between the vertical posts. We marked the height of each shelf at 40cm, 80cm, and 120cm from the bottom—enough space for most standard turnover boxes without wasting vertical space. Using the same 90° connectors, we bolted the shelf beams to the vertical posts, making sure each was level with a bubble level. There's nothing more frustrating than a shelf that tilts—your parts end up sliding off, and you're back to square one with disorganization.
Once the shelf beams were in place, we laid the aluminum honeycomb panels on top. These panels are lightweight but incredibly strong, thanks to their honeycomb core structure (like a beehive—nature's best example of strength through geometry). We secured the panels to the beams with small aluminum clips that slid into the T-slots, no screws needed. This made it easy to remove a panel if we ever need to access something behind the rack or replace a damaged one.
Finally, we popped the end caps onto the top of the vertical posts. Not only do these cover the sharp, open ends of the profiles (safety first!), but they also give the rack a clean, finished look. After a quick wipe-down to remove any aluminum shavings, Material Rack B was standing tall—ready for the real test.

Stability Test: Putting Material Rack B Through Its Paces
A rack might look sturdy in the workshop, but how does it hold up when it's loaded with heavy parts, bumped by forklifts, or shaken by the constant hum of factory machinery? To find out, we designed a series of stability tests that mimic real-world conditions. After all, a rack that fails in the test lab is a rack we don't want in our factory.
Test Setup: What We Measured and Why
We focused on three key areas: load capacity (how much weight it can hold without bending), lateral stability (how well it resists tipping when pushed), and vibration resistance (whether items stay put during factory vibrations). For each test, we set clear parameters and measured the results with tools like a force gauge, laser level, and accelerometer. Here's how it went down.
Test 1: Load Capacity—How Much Weight Can It Handle?
The first test was all about weight. Material Rack B is designed for storing small to medium-sized parts, so we started with a realistic load: 50kg per shelf (about 10 standard boxes of metal components). We evenly distributed the weight across each of the 3 floors, then gradually increased it to 75kg, 100kg, and finally 125kg per shelf (total rack weight: 375kg). For each increment, we used a laser level to measure how much the shelf beams deflected (bent downward). A little deflection is normal, but too much means the rack isn't safe for long-term use.
Test 2: Lateral Stability—Will It Tip Over?
Factories are busy places—forklifts pass by, workers bump into racks, and sometimes you need to reach for a box on the top shelf. All of these can push the rack sideways, so we tested how much lateral force (sideways push) it could handle before tipping. We used a force gauge attached to the top shelf, slowly pulling sideways and measuring the force needed to make the rack's feet lift off the ground (a sign it's about to tip). We did this from the front, back, and both sides to cover all angles.
Test 3: Vibration Resistance—Do Parts Stay Put?
Even if a rack doesn't tip or bend, constant factory vibrations (from machines, foot traffic, or nearby equipment) can cause items to shift or fall off. To test this, we placed empty turnover boxes on each shelf, then used a vibration generator under one of the rack's feet to simulate 24 hours of typical factory vibrations (about 1-5 Hz frequency, mild amplitude). Afterward, we checked if any boxes had slid off or moved significantly.
The Results: Did Material Rack B Pass?
Let's cut to the chase: Material Rack B didn't just pass—it exceeded our expectations. Check out the table below for a breakdown of the test results:
| Test Type | Test Method | Parameters | Expected Result | Actual Result | Pass/Fail |
|---|---|---|---|---|---|
| Load Capacity | Even weight distribution; laser deflection measurement | 50kg, 75kg, 100kg, 125kg per shelf | Max deflection ≤ 5mm at 100kg/shelf | Deflection: 2mm at 100kg; 4mm at 125kg | Pass (exceeds 100kg target) |
| Lateral Stability | Force gauge pull; measure tipping threshold | Front/back/side pulls (top shelf) | Min. 200N force to tip | 280N (front), 275N (back), 310N (sides) | Pass (35-55% above target) |
| Vibration Resistance | 24-hour vibration simulation (1-5 Hz); check box movement | Empty turnover boxes on all shelves | Boxes remain in place; no sliding off | All boxes stable; minimal movement (≤ 2cm) | Pass |
What's most impressive? Even at 125kg per shelf (375kg total), the 4040r profiles barely flexed, and the cross-braces kept the rack from twisting. The lateral stability test was a standout—we expected it to tip at around 200N, but it took nearly 300N from the sides, thanks to those gusset plates and cross-braces. And during the vibration test? Not a single box slid off. For a rack built with off-the-shelf components from a lean system supplier, these results are a big win.
Real-World Impact: Why Stability Matters in Your Factory
You might be thinking, "Okay, the rack passed the tests—so what?" Let's zoom out. A stable, reliable material rack isn't just a "nice-to-have"; it's a cornerstone of lean manufacturing. When your materials are organized, accessible, and secure, everything else runs smoother. Workers spend less time searching for parts and more time assembling products. There's less risk of parts getting damaged (which cuts down on waste). And most importantly, a stable rack reduces the chance of accidents—no more shelves collapsing or boxes falling on feet.
We installed Material Rack B in our own assembly line last month, and the difference is noticeable. One of our line workers, Maria, put it best: "Before, I'd spend 10 minutes hunting for the right connector in a messy bin. Now, everything's on the rack, labeled, and easy to reach. I can grab what I need in 30 seconds." Multiply that time savings across a shift, and you're looking at hours of extra productivity each week.
And let's not forget about scalability. Because the 4040r profiles and aluminum profile accessories are modular, we can easily add more shelves, extend the rack, or even take it apart and rebuild it in a new location if our layout changes. That flexibility is gold in manufacturing, where adaptability is key to staying competitive.
Conclusion: Material Rack B—More Than a Rack, a Lean Manufacturing Tool
Building Material Rack B with 4040r EU Standard Aluminum Profile wasn't just about putting metal together. It was about creating a solution that solves real problems: disorganization, inefficiency, and safety risks. From the choice of lightweight yet strong aluminum profiles to the careful assembly with quality accessories, every step was designed with the factory floor in mind.
The stability tests confirmed what we hoped: this rack isn't just sturdy on paper—it's ready to handle the chaos of daily production. Whether you're storing small electronics components or heavier mechanical parts, Material Rack B proves that with the right materials (and a little know-how), you can transform your material handling from a headache into a competitive advantage.
So, if you're tired of wobbly racks, lost parts, or wasted time, maybe it's time to take a page from our book. Start with a solid foundation—like the 4040r EU Standard Aluminum Profile—pair it with quality accessories from a trusted lean system supplier, and build a rack that works as hard as your team does. After all, in lean manufacturing, every detail counts—and a stable, efficient material rack is one detail that pays off in spades.