- Company Articles
- Products and Technology
- Product knowledge
- 2020 Aluminum Profile End Caps: A Guide for First-Time Buyers

2020 Aluminum Profile End Caps: A Guide for First-Time Buyers
Related Product
2020 Aluminum Profile End Cap
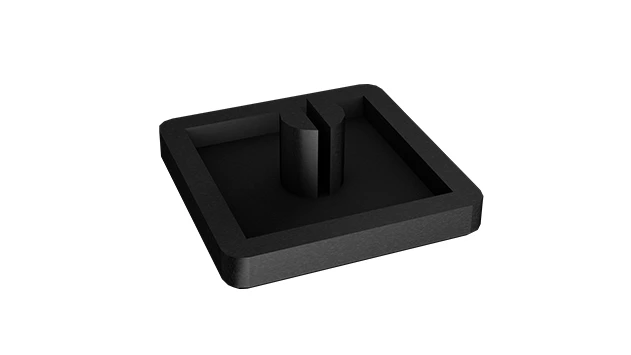
The aluminum profile end cap adds a finishing touch to your project and closes off profile ends to limit dust and debris buildup, also it can avaid some scratch for material and labor during the assemble work.
So, you've decided to dive into a project using aluminum profiles—maybe a workbench for your garage, a shelving unit for your workshop, or even a custom storage system for your small business. Exciting, right? You've spent hours researching the perfect aluminum extrusion profile, comparing brackets and connectors, and maybe even sketching out designs. But here's a tiny detail that's easy to overlook, yet can make or break your project: the 2020 aluminum profile end caps.
If you're new to this, you might be thinking, "End caps? Really? Aren't those just little plastic bits that cover the ends?" Spoiler: They're so much more. Sharp, unfinished profile ends aren't just an eyesore—they're a safety risk. They collect dust, scratch surfaces, and can even damage other parts of your setup over time. And if you've ever tried to slide a panel into a profile with a jagged end, you know how frustrating (and potentially dangerous) that can be.
This guide is for you—the first-time buyer who wants to get every detail right. We'll break down what 2020 aluminum profile end caps are, why they matter, how to choose the right ones, and even walk you through installation. By the end, you'll wonder how you ever planned a project without them. Let's get started.
What Are 2020 Aluminum Profile End Caps, Anyway?
Let's start with the basics. Aluminum extrusion profiles—like the 2020 series—are hollow, rectangular tubes with internal "T-slots" that let you attach accessories (think brackets, shelves, or panels). The "2020" refers to their dimensions: 20mm by 20mm, making them a popular choice for lightweight to medium-duty projects. But here's the thing: those hollow ends? They're raw. No finish, no protection—just the exposed edge of the aluminum extrusion.
That's where end caps come in. A 2020 aluminum profile end cap is a small, often component designed to fit snugly into the open end of a 2020 aluminum profile. Think of it as a "cap" for your profile—hence the name. They're usually made from plastic, rubber, or sometimes aluminum, and they come in a few different styles to suit different needs. Some snap on, some twist into place, and others are held tight with screws. But regardless of the style, their job is simple: seal, protect, and polish the end of your profile.
You might see them called "profile end caps," "extrusion end covers," or even "tube plugs" in some supplier catalogs. But no matter the label, they're all part of the same family: aluminum profile accessories that turn a rough, unfinished project into a professional-looking, safe one.
Why Bother with End Caps? 5 Reasons They're Non-Negotiable
If you're tempted to skip end caps to save a few dollars or cut corners on time, let's hit pause. These small accessories punch way above their weight in terms of value. Here's why you should never start a 2020 aluminum profile project without them:
1. Safety First: No More Sharp Edges
Aluminum extrusion profiles are cut to length during manufacturing, and those cut edges? They're not always smooth. Even if they look okay at first glance, tiny burrs or sharp corners can catch on clothing, scratch skin, or damage tools. If your project is something you'll interact with regularly—a workbench, a cart, or a shelf—those edges become a daily hazard. End caps cover those edges, turning a potential injury risk into a smooth, safe surface.
2. They Keep Dirt, Dust, and Debris Out
The hollow interior of a 2020 profile is like a magnet for dust, dirt, and small debris—especially if your project lives in a garage, workshop, or factory. Over time, that gunk can build up, making it harder to slide accessories into the T-slots or even corroding the aluminum from the inside. A well-fitted end cap acts as a barrier, keeping your profiles clean and functional for years.
3. A Polished Look That Says "Professional"
There's a big difference between a DIY project that looks "thrown together" and one that looks intentional. Exposed profile ends scream "unfinished." End caps, on the other hand, give your project a clean, cohesive look. Whether you're building something for your home or a client, that attention to detail matters. It shows you care about quality—and that goes a long way.
4. Protection Against Moisture and Corrosion
Aluminum is naturally resistant to rust, but it's not immune to corrosion—especially in humid or damp environments. Rain, spills, or even condensation can seep into an open profile end, leading to discoloration or pitting over time. End caps create a seal that blocks moisture, helping your aluminum profiles last longer. This is extra important if your project lives outdoors or in a workshop with frequent water exposure (like a garage with a leaky roof or a kitchen prep station).
5. They Prevent Small Items from Falling In
Ever dropped a tiny screw, a washer, or a piece of gravel into an open tube? It's frustrating—and if the tube is part of a shelving unit or cart, that item might rattle around forever, or worse, jam up moving parts. End caps close off those open ends, so you won't have to fish lost items out of your profiles (or listen to them clink around every time you move the project).

Types of 2020 Aluminum Profile End Caps: Which One Is Right for You?
Not all end caps are created equal. Just like there are different types of aluminum profiles, there are different end caps to match. Let's break down the most common options, so you can pick the best one for your project.
By Material: Plastic, Rubber, or Aluminum?
The material of your end cap affects everything from cost to durability to how it feels in your hand. Here's a quick breakdown of the most popular choices:
| Material | Key Features | Pros | Cons | Best For |
|---|---|---|---|---|
| Plastic (PVC/PP) | Lightweight, affordable, available in colors like black, white, or gray | Budget-friendly, easy to install, won't scratch surfaces | Less durable in extreme heat/cold; can crack if bent | Indoor projects, DIY workbenches, shelving units, or projects on a tight budget |
| Rubber | Flexible, grippy, often black or translucent | Shock-absorbent, water-resistant, great for non-slip applications | Can degrade in direct sunlight; more expensive than plastic | Carts, mobile workstations, or projects that need a little "give" (like bumpers) |
| Aluminum | Matches the profile material, sleek, often silver or anodized | Ultra-durable, heat/corrosion-resistant, blends seamlessly with aluminum profiles | Most expensive option; can be heavy; sharp edges if not finished | High-end projects, industrial setups, or when aesthetics matter most (e.g., client-facing displays) |
By Installation Style: Snap-On vs. Threaded vs. Screw-On
How your end cap attaches to the profile is just as important as what it's made of. Here are the three main installation styles you'll encounter:
Snap-On End Caps
These are the most common type, and for good reason: they're dead simple to install. Snap-on end caps have small, flexible tabs or ridges that "snap" into the inner walls of the 2020 profile. You just line them up with the end of the profile, press firmly, and—*click*—they're in place. No tools, no screws, no hassle. They're perfect for projects where you might need to remove the end cap later (to run wires through the profile, for example), since they pop out just as easily as they go in.
The downside? They're not the most secure option. If your project is subject to a lot of vibration (like a machine tool stand) or frequent movement (like a rolling cart), a snap-on cap might work itself loose over time. But for most DIY projects, they're more than enough.
Threaded End Caps
Threaded end caps have external threads that screw into the inner walls of the profile. They're less common than snap-on caps, but they're great for applications where you need a super-tight seal. To install them, you twist them into the profile until they're snug—no tools required, but you'll need to make sure the threads match your profile's inner diameter (more on measuring later).
These are ideal for projects in high-vibration environments, or if you want to ensure the end cap never falls out. The tradeoff? They're harder to remove than snap-on caps, and they're not compatible with all 2020 profiles—only those with threaded inner walls (which are less common in standard DIY profiles).
Screw-On End Caps
Screw-on end caps are the most secure option. They have a small hole in the center, and you use a tiny screw (usually self-tapping) to fasten them to the inside of the profile. Some even have a countersunk hole, so the screw head sits flush with the cap, giving a clean look. These are perfect for heavy-duty industrial projects, outdoor setups, or any scenario where "permanent" is the goal.
The downside? They require tools to install and remove, and if you over-tighten the screw, you could crack the end cap (especially if it's plastic). They're also more expensive than snap-on caps, since they include the screw.
Specialty End Caps: When Standard Isn't Enough
Most projects will do fine with standard snap-on plastic end caps, but sometimes you need something a little extra. Here are a few specialty options to keep in mind:
- Vented end caps: These have small holes to allow air circulation, which is useful if your profile is housing wires or electronics that need to cool down.
- Colored end caps: Available in bright hues like red, blue, or yellow, these add a pop of color to your project—great for workshops where you want to color-code tools or sections.
- Flanged end caps: These have a small "lip" that sits flush against the outside of the profile, creating a more finished look (think of a bottle cap with a rim).
- Custom-printed end caps: Some suppliers offer end caps with logos or labels (like "CAUTION" or "DO NOT REMOVE")—handy for industrial settings or client projects where branding matters.

How to Measure for a Perfect Fit: Avoid the #1 Mistake First-Time Buyers Make
Here's a horror story we've heard too many times: a DIYer orders a pack of "2020 end caps," only to find they're too loose… or too tight… or they don't fit at all. Why? Because "2020" refers to the profile's outer dimensions (20mm x 20mm), but end caps fit the inner dimensions of the profile. And not all 2020 profiles have the same inner size.
Aluminum profiles have "wall thickness"—the thickness of the aluminum extrusion itself. A standard 2020 profile might have a wall thickness of 1.5mm, which makes the inner dimensions roughly 17mm x 17mm (since 20mm - 2*1.5mm = 17mm). But some heavy-duty 2020 profiles have thicker walls (like 2mm), making the inner dimensions 16mm x 16mm. If you buy a 17mm end cap for a 16mm inner profile, it won't fit. And vice versa: a 16mm cap in a 17mm profile will fall out.
So, how do you measure correctly? Follow these steps:
Step 1: Find the Inner Dimensions of Your Profile
Grab a digital caliper (or a ruler, if you don't have calipers) and measure the inside width and height of your 2020 profile. Measure at the very end of the profile, where the end cap will sit—don't measure the middle, as some profiles have slight tapers (though this is rare with 2020s).
Write down the measurements. For example, you might get 17.2mm x 17.2mm. That's your target inner dimension for the end cap.
Step 2: Check the End Cap's Specs
When shopping for end caps, look for the "inner diameter" or "fit size" in the product description. A good aluminum profile supplier will list this clearly (e.g., "Fits 2020 profiles with inner dimensions 17mm x 17mm"). If the supplier only lists "for 2020 profiles," send them a message and ask for the inner fit size—any reputable supplier will be happy to help.
Step 3: Test with a Sample (If Possible)
If you're buying in bulk, order one or two sample end caps first. Slide them into your profile to check the fit. They should be snug enough that they don't fall out when you shake the profile, but loose enough that you can remove them without breaking them (unless you want a permanent fit, of course).
Pro tip: If you're unsure, round up slightly. A 17.5mm end cap might stretch to fit a 17mm profile (especially if it's plastic), but a 16.5mm cap will never fit a 17mm profile.
Installation 101: How to Put On End Caps Without Breaking Them
Installing end caps is usually straightforward, but there are a few tricks to avoid cracking plastic caps or damaging your profile. Let's walk through the process for the most common type: snap-on plastic end caps (since they're the most popular for first-time buyers).
What You'll Need:
- Your 2020 aluminum profile (cut to length, with clean ends)
- Snap-on end caps (the correct size, of course!)
- A clean cloth (to wipe down the profile end)
- A rubber mallet (optional, for tight fits)
- A flat, hard surface (like a workbench)
Step 1: Clean the Profile End
Before installing, wipe the end of the profile with a clean cloth to remove dust, dirt, or oil. Even a little grime can prevent the end cap from seating properly. If there are any burrs or sharp edges (from cutting the profile), gently sand them down with fine-grit sandpaper—this will make installation smoother and prevent the end cap from tearing.
Step 2: Align the End Cap
Hold the end cap in one hand and the profile in the other. Look for any tabs, ridges, or notches on the end cap—these are designed to grip the inside of the profile. Align the end cap so these features face the correct direction (usually, the tabs should point toward the inside of the profile).
If your end cap is symmetrical (no tabs), just make sure it's centered over the profile end.
Step 3: Press Firmly (But Gently)
Place the end cap against the profile end, making sure it's flush. Then, using the palm of your hand, press firmly and evenly on the end cap. You should feel a slight "give" as the tabs or ridges compress and slide into the profile. Keep pressing until the end cap sits flush with the profile end—no part of it should stick out.
If it's tight, try pressing one corner first, then the opposite corner, to "walk" the end cap into place. Avoid pressing only the center, as this can bend the end cap and cause it to crack.
Step 4: Use a Rubber Mallet (If Needed)
If the end cap still won't seat, place a soft cloth over the end cap (to prevent scratches) and tap it gently with a rubber mallet. Start with light taps, and increase pressure slowly—you don't want to crack the cap or dent the profile.
Step 5: Check the Fit
Once installed, give the end cap a gentle tug. It should stay in place. If it falls out, it's too loose—you might need a larger size. If it's so tight you can't remove it (and you need to), wiggle it gently from side to side while pulling, or use a small flathead screwdriver to pry it out (carefully, to avoid scratching the profile).
For threaded or screw-on end caps, follow the same cleaning step, then twist (for threaded) or screw (for screw-on) until snug. Just don't over-tighten—plastic caps can crack under too much pressure.
Where to Buy: Finding a Reliable Aluminum Profile Supplier
Now that you know what to look for, where do you actually buy 2020 aluminum profile end caps? The best place is usually the same supplier where you bought your aluminum profiles. Why? Because they'll already stock end caps that are guaranteed to fit their profiles. But if you need to shop around, here are a few tips to find a trustworthy aluminum profile supplier:
1. Check for Compatibility Charts
A good supplier will have a compatibility chart that lists which end caps work with which profiles. For example, their website might say, "Our 2020 standard profile (model XYZ) pairs with end cap ABC." If a supplier can't tell you which end caps fit their profiles, that's a red flag.
2. Read Reviews (and Ask for Samples)
Look for reviews from other DIYers or small businesses. Did they mention end caps fitting well? Were the customer service reps helpful when questions arose? If you're unsure, ask for a sample pack—most suppliers will send a few end caps for a small fee (or even free, if you're buying profiles in bulk).
3. Avoid Generic "One-Size-Fits-All" Caps
You might see cheap end caps labeled "fits all 2020 profiles" on Amazon or eBay. These are risky. As we talked about earlier, inner dimensions vary, and a generic cap might not fit your specific profile. Stick with suppliers who specialize in aluminum extrusion profiles and accessories—they'll have the expertise to guide you.
4. Compare Prices (But Don't Skimp on Quality)
End caps are cheap, but that doesn't mean you should buy the cheapest option. A pack of 10 plastic end caps might cost $5 from a reputable supplier, or $2 from a no-name brand. The $2 caps might be thin, brittle, or the wrong size. It's worth spending a little extra to avoid reordering (and re-installing) later.
FAQs: Everything First-Time Buyers Ask (Answered)
Q: Can I reuse end caps if I take apart my project?
A: Usually, yes! Snap-on caps are the easiest to reuse—just pry them out gently with a screwdriver (wrapped in cloth to avoid scratches) and they'll pop right off. Threaded or screw-on caps can also be reused, though screw-on caps might need a new screw if the old one strips. The only exception is if the end cap is cracked or damaged during removal—then it's best to replace it.
Q: My end cap is loose. How can I make it fit tighter?
A: Try wrapping a small piece of electrical tape around the end cap's tabs (for snap-on caps) to add thickness. For threaded caps, apply a tiny drop of thread locker (like Loctite) to the threads (but be careful—this makes removal harder later). If the cap is still loose, you might need a larger size.
Q: Do I need end caps for both ends of my profile?
A: Yes! Even if one end of the profile is hidden (like against a wall), it's still a good idea to cap it. Dust, dirt, and pests can still get in, and it's easier to install both caps during the initial build than to take the project apart later to add one.
Q: Can I paint my end caps to match my project?
A: Absolutely! Plastic end caps take spray paint well—just clean them first with rubbing alcohol, let them dry, and use a paint designed for plastic (like Krylon Fusion). Rubber caps can be painted too, but the paint might crack if the cap flexes. Aluminum caps can be sanded and painted with metal paint. Just note that painted caps might scratch over time, so test a small area first.
Q: Are there eco-friendly end cap options?
A: Yes! Some suppliers offer end caps made from recycled plastic or biodegradable materials (though these are less common). Look for certifications like "PCR" (post-consumer recycled) in the product description. You can also reuse end caps as much as possible to reduce waste.
Final Thoughts: End Caps = Professional, Safe, and Worth Every Penny
At the end of the day, 2020 aluminum profile end caps are one of those small details that make a big difference. They turn a project from "homemade" to "handcrafted," from "rough around the edges" to "polished and professional." And best of all, they're cheap, easy to install, and solve a host of problems—from safety hazards to dust buildup.
As a first-time buyer, you've already invested time and money into choosing the right aluminum profile, learning about aluminum profile accessories, and planning your project. Don't let those efforts go to waste by skipping end caps. They're the final touch that ties everything together—and trust us, once you install them, you'll wonder how you ever finished a project without them.
So, grab your measuring tape, find a reliable aluminum profile supplier, and pick up a pack of end caps. Your project (and your hands) will thank you.