- Company Articles
- Products and Technology
- Installation And Maintenance
- 2020r EU Standard Aluminum Profile Installation Guide: Best Practices for Lean Workstations

2020r EU Standard Aluminum Profile Installation Guide: Best Practices for Lean Workstations
Related Product
2020R EU Standard Aluminum Profile
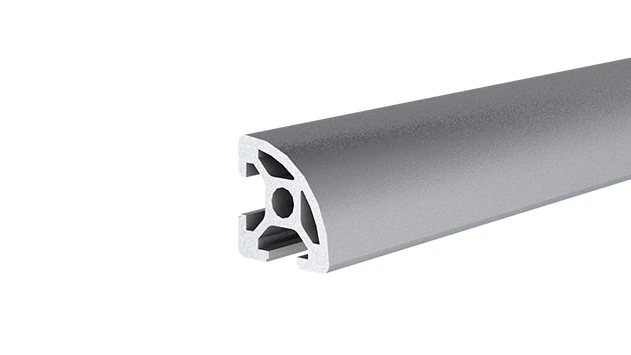
2020R is a 2.00 x 2.00CM fractional 20 series square extrusion T-slot profile with four open T-slots, two side with 2.00cm face, the other side with round face. The profile has align-a-grooves to assist in aligning connecting profiles.
If you've ever stepped into a well-organized manufacturing floor or a streamlined workshop, you've probably noticed something common: workstations that feel like they were designed with *people* in mind. No wasted space, tools within arm's reach, materials flowing smoothly—these are the hallmarks of a lean workstation. And at the heart of many of these setups? Aluminum profiles. Specifically, the 2020r EU Standard Aluminum Profile. Lightweight yet sturdy, adaptable yet reliable, this profile has become a go-to for teams aiming to build workstations that grow with their needs. But installing it right? That's where the magic (and the efficiency) happens. In this guide, we'll walk through how to install 2020r EU Standard Aluminum Profiles like a pro, with tips to ensure your lean workstation isn't just functional, but built to last.
Why 2020r EU Standard Aluminum Profile Stands Out
Before we dive into wrenches and measurements, let's talk about why this profile deserves your attention. The "2020r" in its name refers to its dimensions: 20mm x 20mm cross-section, with rounded edges (the "r" stands for "rounded"). EU standards mean it's tested for consistency—no surprise weak spots or ill-fitting parts. Unlike bulkier steel frames or flimsy plastic alternatives, aluminum extrusion profiles like this one strike a sweet spot: they're light enough to reconfigure without heavy machinery, but strong enough to support tools, materials, and daily wear. Plus, their T-slot design? A game-changer. Those slots let you slide in aluminum profile accessories—brackets, shelves, even cable management clips—without drilling new holes. It's like building with building blocks, but for grown-ups who care about efficiency.
But here's the real kicker: lean workstations thrive on adaptability. A production line might need a taller shelf next month, or a mobile cart to transport parts next quarter. With 2020r profiles, you don't have to tear everything down and start over. Swap out a section, add a lean pipe joint, or attach a caster wheel, and suddenly your workstation evolves. That's lean thinking in action—minimizing waste (time, materials, frustration) and maximizing value.
Pre-Installation Prep: What You'll Need (and Why Skipping This Step Hurts)
Imagine trying to bake a cake without preheating the oven—you might get something edible, but it won't rise right. Installing aluminum profiles is the same. Rushing into assembly without prep leads to wobbly frames, misaligned parts, and a workstation that'll need fixing sooner than later. Let's avoid that. Here's what you'll need to gather before you start:
| Tool/Component | Purpose | Pro Tip |
|---|---|---|
| 2020r EU Standard Aluminum Profiles (cut to length) | The backbone of your workstation frame | Double-check lengths with your design sketch—measure twice, cut once! |
| Aluminum Profile Accessories (joints, brackets, end caps) | Connect profiles and add features like shelves or tool hooks | Sort accessories by type in small bins to avoid hunting mid-project |
| Hex Key Set (metric, 2-5mm) | Tightening T-slot bolts and lean pipe joints | Magnetic hex keys save time—no more dropping bolts in tight spaces |
| Measuring Tape & Carpenter's Square | Ensuring straight lines and square corners | Use a square *after* each joint—even a 1° misalignment adds up fast |
| Level (24" or longer) | Keeping the frame plumb (vertical) and level (horizontal) | Check level on *both* axes (side-to-side and front-to-back) for stability |
| Deburring Tool or Sandpaper | Smoothing rough edges after cutting profiles | Aluminum burrs are sharp! Wear gloves while deburring to avoid nicks |
| Caster Wheels (optional, for mobile workstations) | Adding mobility to your workstation | Choose locking casters—you don't want your workstation rolling mid-task |
Pro move: Lay out all your parts on a clean, flat surface (a plywood sheet works great) before starting. This lets you visualize the build and catch missing pieces early—nothing kills momentum like realizing you're short a bracket halfway through.

Step-by-Step Installation: Building Your Frame (the Right Way)
1. Cutting Profiles (If You Haven't Already)
Chances are, you ordered pre-cut profiles, but if you're cutting them yourself, take it slow. Use a miter saw with a fine-tooth blade (aluminum clogs blades easily—go slow and steady). After cutting, run a deburring tool along the edges to smooth any rough spots. A quick once-over with 120-grit sandpaper ensures no sharp edges will snag gloves or materials later. Pro tip: Mark cut lines with a permanent marker *on the T-slot side*—it's easier to align the saw blade with the slot than a plain edge.
2. Assembling the Base Frame: Start with Stability
Let's start with the foundation—the base frame. Whether your workstation is floor-standing or mobile (with caster wheels), this step sets the tone for everything else. Grab four profile pieces for the base (two long, two short—think of a rectangle). Lay them out on your flat surface, T-slots facing up. Now, it's time to connect them with aluminum profile accessories—specifically, corner joints. These come in different styles: 90° brackets, T-joints, or even swivel joints if you need flexibility. For a standard square base, 90° internal or external joints work best.
Here's the trick: Don't tighten the bolts all the way yet. Screw them in just enough to hold the joint in place (finger-tight plus a quarter turn with the hex key). This "loose assembly" lets you adjust angles and alignment before locking everything down. Once the rectangle is formed, grab your carpenter's square and check the corners. Place the square against two adjacent profiles—if the edges line up perfectly with the square's arms, you're golden. If not, gently nudge the joints until they do. Now, check level: set your level across the long side of the base. If the bubble is off-center, adjust the joints slightly until it's balanced. Only when the base is square and level should you fully tighten the bolts (snug, but don't overdo it—aluminum threads strip easily).
3. Adding Vertical Supports: Reach New Heights (Without Wobbles)
Next up: vertical profiles that raise your workstation to working height. Measure from the floor to your elbow (when standing) to find the ideal height—typically 36-40 inches for most adults. Cut four vertical profiles to this length. Now, attach them to the corners of your base frame using T-joints or flange joints (these have a wider base for extra stability). Again, start with loose bolts. Once all four verticals are in place, check for plumb (vertical straightness) with your level. Hold the level against one vertical profile—if the bubble is centered, that's good. Do this for all four, and adjust the joints as needed. A wobbly vertical support is a workstation disaster waiting to happen, so take the time here.
Pro tip: If your workstation will hold heavy tools (think drills, grinders, or bins of parts), add diagonal braces between the vertical supports. Cut two short profile pieces and attach them from the top of one vertical to the bottom of the opposite vertical (like an "X"). This "bracing" distributes weight and prevents side-to-side sway. Use angle brackets or 45° lean pipe joints to connect the braces—they'll lock the frame into a rigid triangle shape, which is nature's most stable structure.
4. Installing the Workbench Surface: Where the Work Happens
Now for the star of the show: the workbench top. This is where you'll assemble parts, test products, or organize tools, so it needs to be flat, sturdy, and easy to clean. Plywood (3/4" thick) is a budget-friendly option, but for industrial use, consider a metal sheet or even a phenolic resin board (resistant to chemicals and scratches). Cut your top to size (slightly larger than the frame—about 1-2 inches overhang on all sides for comfort). Now, attach it to the vertical supports using brackets or shelf angles. Drill pilot holes through the top into the profiles (T-slots make this easy—just align the bracket with the slot), then secure with bolts. Space brackets every 12-16 inches along the edges to prevent sagging—you don't want the middle of the bench to dip when you lean on it.
If you're adding accessories like tool rails or monitor mounts, now's the time. The T-slots on the vertical profiles let you slide in brackets wherever you need them. Want a pegboard for tools? Mount it to a horizontal profile across the back. Need a cup holder? Screw a small bracket into the side. The beauty of aluminum extrusion profiles is that you're not stuck with a "one-size-fits-all" design—you can tweak as you go.
5. Adding Mobility (Optional): Caster Wheels for Flexibility
If your workstation needs to move (say, to follow a production line or space for cleaning), caster wheels are a must. But not all casters are created equal. Look for heavy-duty casters rated for at least 50 lbs each (four casters = 200 lbs total capacity—err on the side of overkill). Locking casters are non-negotiable—you don't want the bench rolling away while you're working. To install, attach caster mounting plates to the bottom of the base frame using bolts and T-slot nuts. Make sure the plates are centered on the base profiles for even weight distribution. Once the casters are on, test the roll: push the workstation gently—if it veers to one side, check that the casters are aligned straight. Lock the brakes and give the bench a good shake—if it wobbles, tighten the caster bolts. A stable mobile workstation should feel solid, even when moving.
Best Practices: Making Your Lean Workstation *Actually* Lean
Installing the frame is one thing—making it work *lean* is another. Lean principles are all about eliminating waste: time wasted searching for tools, space wasted on unused materials, energy wasted on awkward movements. Here's how to tweak your installation for maximum efficiency:
Keep It "5S" Friendly
The 5S method (Sort, Set in Order, Shine, Standardize, Sustain) is the backbone of lean. Your workstation should make 5S easy. "Set in Order" means tools have a home—use T-slots to mount tool holders at eye level, so you don't have to bend or reach. "Sort" means only what you need daily stays on the bench—use shelves (attached via aluminum profile accessories) above or below for storage. "Shine" (cleanliness) is easier with a smooth workbench top and no nooks for dust to hide. Even small choices, like adding a trash bin bracket under the bench, keep clutter at bay.
Test for Ergonomics
A workstation that hurts to use won't stay lean for long. After installation, spend 10 minutes simulating your typical tasks: assembling a part, typing on a keyboard, reaching for tools. Are your elbows at a 90° angle when working on the bench? Is the monitor at eye level (no craning up or down)? If not, adjust the vertical supports or add a monitor mount. Ergonomics isn't a luxury—it's how you keep your team productive *and* healthy.
Plan for Future Changes
Lean isn't static—your needs will change. Maybe you'll add a second workbench, or need to mount a new tool. That's why the 2020r profile's T-slots are so valuable. Leave extra space in your T-slots (don't fill every slot with bolts) so you can add brackets later. Use swivel joints or adjustable brackets where possible—they let you reposition shelves or tool holders without rebuilding the entire frame. And keep a small stock of extra aluminum profile accessories (joints, bolts, end caps) on hand—you'll thank yourself when inspiration strikes.
Troubleshooting: Fixing Common Headaches
Even with careful planning, things can go sideways. Here's how to fix the most common issues:
- Wobbly Frame: Check if all bolts are tight (but not stripped). If it still wobbles, add diagonal braces (we mentioned this earlier—they're lifesavers). If the base is the problem, ensure it's square and level—even a small dip in the floor can throw off stability (use shims under the base if needed).
- Stuck T-Slot Nuts: If a nut won't slide in the T-slot, check for debris (aluminum shavings love to hide here). Use a small brush or compressed air to clean the slot. If the nut is bent, replace it—cheap nuts aren't worth the frustration.
- Casters Locking Up: Clean the caster wheels and axles—dust and debris can gum up the works. If the brake isn't holding, tighten the brake lever or replace the caster (it's better to replace one than risk an accident).
- Workbench Sagging: Add more brackets under the top, spaced closer together. For heavy loads, use a thicker top or add a support beam (a horizontal profile running the length of the bench, attached to the vertical supports).
Wrapping Up: Your Lean Workstation, Built to Last
Installing 2020r EU Standard Aluminum Profiles isn't just about putting parts together—it's about building a workspace that works *with* your team, not against them. By taking the time to prep, align, and optimize, you're not just creating a workstation—you're investing in efficiency, adaptability, and the kind of daily satisfaction that comes from working in a space that feels *right*.
Remember: lean isn't about perfection. It's about progress. Start with the basics, test how it works, and tweak as you go. With the 2020r profile's flexibility and these best practices, you'll have a workstation that grows with you—one that turns chaos into order, and wasted time into productivity. Now go grab your hex key, and let's build something great.