- Company Articles
- Products and Technology
- Installation And Maintenance
- 2040 National Standard Profile Assembly: Step-by-Step Installation Guide

2040 National Standard Profile Assembly: Step-by-Step Installation Guide
Related Product
2040 National Standard Profile
45° external bending joint, used for 45° external connection of two aluminum pipes.
Introduction: Getting to Know the 2040 National Standard Profile
If you've ever walked into a workshop, manufacturing plant, or even a well-organized garage, chances are you've seen structures built with sleek, modular aluminum frames. From workbenches that hold heavy machinery to material racks that keep tools within arm's reach, these setups often have one thing in common: they're built using aluminum profiles. And among the most versatile of these is the 2040 National Standard Profile—a workhorse in the world of modular construction.
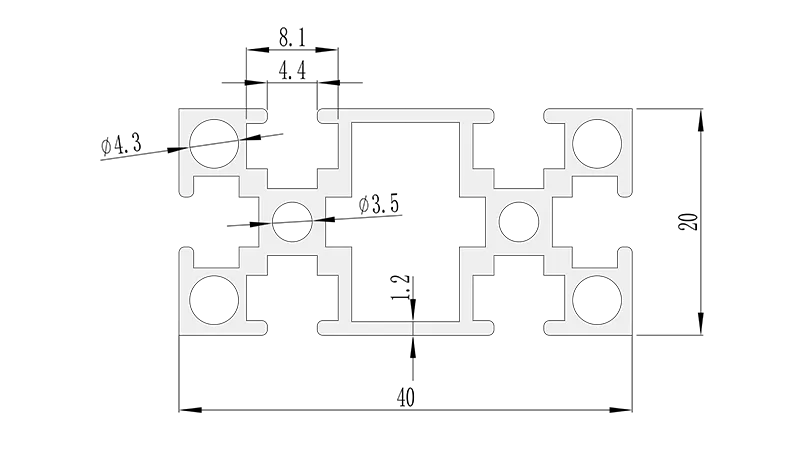
But what exactly is a 2040 National Standard Profile? Let's break it down. The "2040" refers to its dimensions: 20mm in width and 40mm in height. It's an aluminum extrusion profile, meaning it's shaped by forcing heated aluminum through a die to create its distinct T-slot design. Those T-slots are the secret to its flexibility—they let you slide in nuts, bolts, and accessories, turning raw profiles into just about anything you can imagine: a sturdy workbench, a mobile trolley, or even part of a lean system for streamlining production lines.
Whether you're a small business owner looking to build custom workstations, a DIY enthusiast tackling a garage organization project, or a manufacturer aiming to optimize your assembly floor, the 2040 National Standard Profile is a game-changer. It's lightweight yet surprisingly strong, resistant to corrosion, and best of all, it's designed for easy assembly—no welding or specialized tools required. In this guide, we'll walk you through everything you need to know to assemble your own 2040 profile structure, from gathering tools to adding the finishing touches with aluminum profile accessories.
Tools and Materials: What You'll Need to Get Started
Before you dive into assembly, let's make sure you have all the right tools and materials. The beauty of working with 2040 National Standard Profile is that you won't need a workshop full of heavy equipment—but a few essential items will make the process smooth and frustration-free.
Essential Tools
| Tool | Why You Need It |
|---|---|
| Hex Key Set (Allen Wrenches) | Most aluminum profile accessories, like bolts and connectors, use hex-head fasteners. A set with various sizes (common ones are 3mm, 4mm, and 5mm) is a must. |
| Rubber Mallet | For gently tapping profiles and joints into place without damaging the aluminum finish. |
| Measuring Tape & Pencil | To mark cut lines (if you need to trim profiles) and ensure your structure is square and level. |
| Level (Bubble or Digital) | To keep your assembly straight—no wobbly workbenches allowed! |
| Hacksaw or Miter Saw (with Aluminum Blade) | If your profiles are longer than needed, you'll need to cut them to size. A miter saw with a fine-tooth blade for aluminum works best for clean cuts. |
| Sandpaper (Fine Grit, 240+) | To smooth any rough edges after cutting, preventing snags or scratches. |
| Clean Cloth & Rubbing Alcohol | To wipe down profiles and accessories, removing dust or oil that could interfere with connections. |
Materials: Profiles and Accessories
Of course, you'll need the star of the show: the 2040 National Standard Profile itself. But to turn those profiles into a functional structure, you'll also need aluminum profile accessories. Here are the basics:
- 2040 National Standard Profile Lengths: Measure your project first to determine how many meters you'll need. They're often sold in 1m, 2m, or 3m lengths.
- Connectors: These join profiles at different angles. Common types include 90° aluminum profile connectors (for corners), 45° connectors (for slopes or angled supports), and straight connectors (for extending lengths).
- T-Slot Nuts & Bolts: These slide into the T-slots of the profile and secure accessories. Look for flange bolts (they distribute pressure better) and matching nuts.
- End Caps: Small plastic or aluminum caps that snap onto the ends of profiles, covering sharp edges and giving a clean, finished look. For 2040 profiles, you'll need 2040 aluminum profile end caps.
- Mounting Plates or Panels: If building a workbench, you might want a top surface—options include aluminum honeycomb panels (lightweight and strong) or plywood (budget-friendly).
- Leveling Feet or Casters: For structures that need to stay put, leveling feet adjust for uneven floors. For mobile setups (like trolleys), add casters (swivel or fixed) to the base.
Pro Tip:
Always buy a few extra accessories—like an extra connector or set of bolts—just in case. It's better to have spares than to pause your project halfway through!
Pre-Assembly Prep: Safety, Planning, and Inspection
Before you start tightening bolts, let's cover the basics to ensure your project goes off without a hitch. Assembly is straightforward, but a little prep work saves time (and headaches) later.
Safety First
Even though 2040 profiles are lightweight, safety should always come first. Here's what to keep in mind:
- Gloves: Aluminum edges can be sharp, especially if you've cut profiles. A pair of work gloves will protect your hands.
- Eye Protection: When cutting profiles or tapping joints, small metal shavings might fly. Safety glasses are a must.
- Stable Work Surface: Assemble your structure on a flat, level area—like a garage floor or sturdy table—to prevent tipping.
Inspect Your Parts
Unpack all your profiles and aluminum profile accessories and give them a quick once-over. Check for:
- Dents or bends in the profiles (these can throw off alignment).
- Cracks or damage to connectors (a broken joint will weaken your structure).
- Clean T-slots: Dirt or debris can block nuts from sliding smoothly. Use a cloth and rubbing alcohol to wipe them out.
If you spot any damaged parts, contact your supplier to replace them before starting.
Plan Your Design
It's tempting to jump right in, but a quick sketch or diagram will save you from mistakes. Ask yourself:
- What's the purpose of your structure? (e.g., a workbench needs a flat top; a material rack needs shelves.)
- What are the dimensions? (Measure the space where it will go—you don't want to build something too big to fit!)
- How will the weight be distributed? (Heavier items should sit on lower shelves or closer to the base for stability.)
For example, if you're building a workbench, your design might include four vertical 2040 profiles (legs), horizontal profiles connecting the legs at the top and bottom, and a top panel. Sketching this out (even roughly) helps you visualize how the pieces fit together.
Step-by-Step Assembly: Building Your 2040 Profile Structure
Now, let's get to the fun part: putting it all together! We'll walk through assembling a basic frame, using a simple workbench as an example. You can adapt these steps for other projects—like a material rack or trolley—by adjusting the number of profiles and accessories.
Step 1: Cut Profiles to Length (If Needed)
1. Measure and mark:
Use your measuring tape and pencil to mark where you need to cut the profiles. For our workbench, let's say we need four legs (each 800mm long), four horizontal side rails (each 1200mm long for the top and bottom), and four cross rails (each 500mm long to connect the sides). Double-check your measurements—measure twice, cut once!2. Cut carefully:
If using a hacksaw, clamp the profile to a workbench to keep it steady. Saw slowly, following your marked line. If using a miter saw, set the blade to 90° and align the mark with the blade. Let the saw do the work—don't force it.3. Smooth edges:
After cutting, use fine-grit sandpaper to smooth any rough edges. This prevents cuts and ensures accessories fit snugly.Step 2: Assemble the Base Frame
Start with the bottom frame—it's the foundation of your structure, so take time to get it square.
1. Lay out the profiles:
Arrange two 1200mm side rails and two 500mm cross rails on the floor in a rectangle. The ends of the cross rails should meet the ends of the side rails, forming corners.2. Attach 90° connectors:
Take a 90° aluminum profile connector and slide it into the T-slot of one end of a side rail. Position it so the connector's other arm lines up with the end of the cross rail. insert a T-slot nut into the cross rail's T-slot, aligning it with the connector's hole. Thread a bolt through the connector and into the nut, then tighten with a hex key—just enough to hold it in place (you'll fully tighten later).3. Repeat for all corners:
Attach connectors to the remaining three corners, forming a rectangular frame.4. Check for square:
Measure the diagonals of the frame. If they're equal, the frame is square. If not, gently push or pull the corners until the measurements match. Once square, fully tighten all bolts with your hex key.Step 3: Add Vertical Legs
Now, attach the legs to the base frame. For stability, we'll use corner brackets or vertical connectors.
1. Position the legs:
Stand one 800mm leg at each corner of the base frame. The bottom of the leg should sit flush against the frame's corner.2. Secure with connectors:
Use a 90° aluminum profile connector (or a vertical corner bracket, if you have one) to attach the leg to the frame. Slide the connector into the leg's T-slot and the frame's T-slot, insert nuts and bolts, and hand-tighten.3. Check for plumb:
Use a level to ensure each leg is straight up and down (plumb). Adjust as needed, then fully tighten the bolts.Step 4: Build the Top Frame
Just like the base, the top frame will connect the legs at the top, adding rigidity.
1. Attach side and cross rails:
Using the same method as the base frame, attach 1200mm side rails and 500mm cross rails to the tops of the legs with 90° connectors. Again, check for square by measuring diagonals.2. Add bracing (optional but recommended):
For extra stability, especially if your workbench will hold heavy loads, add diagonal braces. Cut two 550mm profiles and attach them from corner to corner on the back and sides using 45° aluminum profile connectors.Step 5: Install the Workbench Top
Now it's time to add the surface. For this, we'll use an aluminum honeycomb panel (lightweight and durable) or a plywood sheet cut to 1200mm x 500mm.
1. Position the panel:
Place the panel on top of the frame, centering it so there's equal overhang on all sides (if desired).2. Secure the panel:
Use panel-mounting brackets or T-slot bolts with washers. Slide T-slot nuts into the top frame's T-slots, aligning them with the panel's edges. Drill small pilot holes in the panel (if using wood), then thread bolts through the panel and into the nuts. Tighten gently to avoid cracking the panel.Step 6: Add Finishing Touches with Aluminum Profile Accessories
Now that the basic structure is done, it's time to customize with accessories:
- End caps: Snap 2040 aluminum profile end caps onto any exposed profile ends. They'll cover sharp edges and give your workbench a polished look.
- Leveling feet: If your floor is uneven, screw leveling feet into the bottom of the legs. Adjust them until the workbench is stable.
- Tool hooks or shelves: Use T-slot brackets to add hooks for tools or small shelves for parts. Slide the brackets into the frame's T-slots, tighten, and you're done!
Pro Tip:
When tightening bolts, use a "star pattern"—tighten opposite bolts first—to ensure even pressure. This prevents warping the frame.
Real-World Application: From Workbench to Lean System
Your 2040 National Standard Profile workbench is just the beginning. These profiles are the building blocks of lean systems—manufacturing setups designed to minimize waste and maximize efficiency. Let's see how your basic assembly skills can scale up to larger projects.
Lean Systems: Streamlining Production
A lean system might include workstations, material racks, and conveyors—all built with aluminum profiles. For example, imagine a production line where parts move from one workstation to the next on a roller track (another aluminum profile accessory). Each workstation is a 2040 profile workbench, customized with tool holders, bins, and ESD (electrostatic discharge) features to protect sensitive electronics. The material racks, built with 2040 and other profiles, keep parts organized and within easy reach, reducing time wasted searching for tools.
The beauty of using 2040 profiles here is adaptability. If your production needs change—say, you need to add a new workstation or reconfigure the line—you can disassemble and rebuild the profiles in hours, not days. No welding, no permanent modifications—just loosen the bolts, rearrange, and tighten.
Material Racks: Organizing with Ease
Another common project is a material rack, like the "material rack B (3 row and 3 floor)" mentioned in our keyword list. Using 2040 profiles, you can build a rack with adjustable shelves—simply add cross rails at different heights using 90° connectors. Add roller track to the shelves, and you've got a system where boxes or bins slide smoothly, making it easy to access materials from either side.
Mobile Trolleys: Moving Materials Safely
Want to make your workbench mobile? Swap out the leveling feet for casters (another aluminum profile accessory). Choose swivel casters with brakes, and you've got a trolley that can move heavy loads around the workshop, then lock in place when needed. It's a simple upgrade that turns a stationary workbench into a versatile tool.
Troubleshooting Common Issues
Even with careful planning, you might run into small hiccups during assembly. Here's how to fix them:
Loose Joints
If a joint feels wobbly, check if the bolt is tight enough. If it is, the T-slot nut might have slipped out of position. Loosen the bolt, push the nut back into alignment with the connector hole, then retighten.
Misaligned Holes
Sometimes, the holes in the connector and profile don't line up perfectly. Gently wiggle the profiles until the holes align—don't force it, as this can bend the connector. If the misalignment is severe, double-check that you're using the right connector for your profile size (2040 connectors are designed for 20x40mm profiles).
Uneven Structure
If your workbench rocks, check the leveling feet (if using) or the floor. Adjust the feet to level it out. If you didn't use leveling feet, place shims (small pieces of wood or metal) under the legs until it's stable.
Accessories Won't Slide into T-Slots
Dirt or debris in the T-slots can block accessories. Use a cloth or compressed air to clean out the slots. If the T-slot nut is stuck, apply a little lubricant (like WD-40) and slide it back and forth to loosen it.
Maintenance and Care: Keeping Your 2040 Profile Structure in Top Shape
Aluminum profiles are durable, but a little maintenance goes a long way in keeping them looking and performing their best.
- Clean regularly: Wipe down profiles with a damp cloth to remove dust and grime. For stubborn dirt, use mild soap and water—avoid harsh chemicals that can damage the finish.
- Tighten bolts periodically: Over time, vibrations can loosen bolts. Check them every few months and tighten as needed.
- replace worn accessories: If a connector cracks or a caster wheel wears out, replace it promptly. Damaged accessories weaken the structure.
- Prevent corrosion: Aluminum is naturally resistant to rust, but if you live in a humid or coastal area, consider applying a clear coat of sealant to extra-protect the profiles.
Conclusion: Your 2040 Profile Journey Begins Here
Assembling a structure with 2040 National Standard Profile is more than just a DIY project—it's about creating something tailored to your needs. Whether you're building a simple workbench for your garage or a complex lean system for your factory, the process is the same: start with a plan, gather your aluminum profile accessories, and take it step by step.
What will you build next? Maybe a conveyor system using roller track and 2040 profiles? Or a custom ESD workstation for electronics assembly? The possibilities are endless, and with the skills you've learned here, you're ready to tackle them all.
So grab your hex keys, gather your profiles, and start building—your perfect structure is just a few bolts away.