- Company Articles
- Products and Technology
- Installation And Maintenance
- 3030 National Standard Profile A Assembly Tutorial: Connecting with Inner Rotating Aluminum Joints

3030 National Standard Profile A Assembly Tutorial: Connecting with Inner Rotating Aluminum Joints
Related Product
3030 National Standard Profile A
Workbench, production line, logistic rack, warehouse rack Industry: Manufacturer workshop, Automobile, Electronic, Assembling, logistic
If you've ever tackled a DIY project—whether it's building a garage workbench, a material rack for your small business, or even a custom shelf for your home—you know the frustration of dealing with flimsy connections, misaligned parts, and that sinking feeling when your creation wobbles the first time you use it. But what if there was a way to build sturdy, flexible structures without the guesswork? Enter the 3030 National Standard Profile A and Internal Rotating Aluminum Joints. These two components are like the peanut butter and jelly of modular assembly: simple, versatile, and better together. In this tutorial, we'll walk through how to assemble them step by step, so you can create everything from workbenches to turnover trolleys with confidence. No advanced tools, no engineering degree—just a little patience and the right know-how.
First Things First: What Are These Components, Anyway?
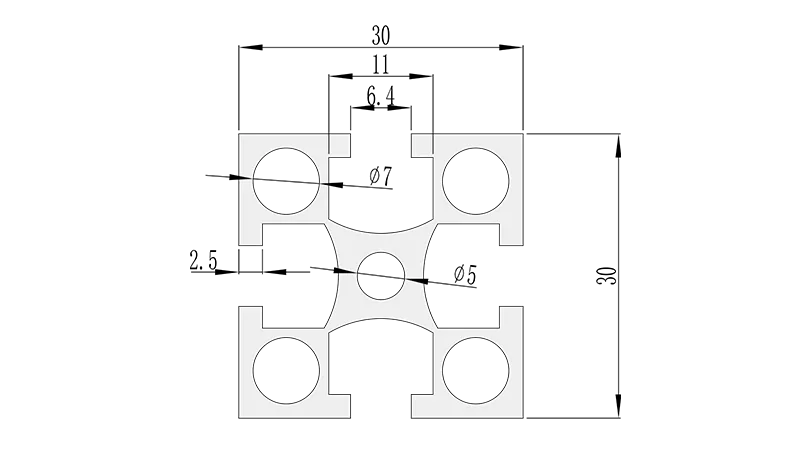
Before we dive into assembly, let's get familiar with our stars. The 3030 National Standard Profile A is an aluminum extrusion—think of it as a super-strong, lightweight beam with built-in slots. Those slots, called T-slots, run the length of the profile and let you attach all sorts of accessories: bolts, brackets, shelves, you name it. Unlike wood, which splits, or steel, which rusts and weighs a ton, aluminum profiles are corrosion-resistant, easy to cut, and surprisingly tough. They're why factories, workshops, and even hobbyists swear by modular aluminum systems.
Now, the Internal Rotating Aluminum Joint. If the 3030 profile is the "bones" of your structure, this joint is the "joint" (pun intended) that lets those bones move. What makes it special? It rotates. Inside the joint, there's a clever mechanism that allows the two ends to swivel, so you can set angles from 0 to 180 degrees. Need a 90-degree corner for a square frame? Lock it. Want a 45-degree slope for a slanted shelf? Tilt it. Building a straight line? Spin it to 180. Once you dial in the angle, a bolt tightens it down, keeping it solid. It's like having a universal connector in your toolbox.
And let's not forget Aluminum Profile Accessories—the unsung heroes that make your build functional and polished. We're talking end caps to cover sharp edges, T-slot nuts that slide into the profile's slots to hold bolts, and even aluminum pipe clamps to secure panels. These little parts turn a pile of profiles into a finished project.
Gather Your Gear: Tools You'll Actually Need
You don't need a workshop full of power tools for this. Here's what you'll grab from your toolbox (or pick up at the hardware store for under $50):
| Tool | Why You Need It | Pro Move |
|---|---|---|
| Metric Hex Key Set | Tightens the bolts on joints and accessories | Get a set with ball-end keys—they work at angles, which is a lifesaver in tight spots. |
| Measuring Tape & Pencil | Marks where to cut profiles (if needed) | Measure twice, cut once. Oldie but goodie—avoids wasting expensive profiles! |
| Rubber Mallet | Gently seats joints into profiles without denting them | Plastic mallets work too. Avoid metal hammers—aluminum dents easily! |
| Spirit Level | Checks if your structure is straight/level | A 2-foot level is perfect for most projects. Skip this, and your shelf might lean like the Tower of Pisa. |
| Deburring Tool | Smooths sharp edges after cutting profiles | Trust me—you'll thank me when you don't slice your hand on a ragged aluminum edge. |
| Safety Gloves | Protects hands from cuts and sharp edges | Nitrile or leather gloves work best. Aluminum can leave surprisingly deep scrapes. |
Optional extras: If you need to cut profiles to length, a fine-tooth hacksaw or miter saw will do the job. A bench vice helps hold profiles steady while cutting, but a friend's help (or clamping it to a table) works too.
Step-by-Step Assembly: Let's Build Something!
We'll start simple: assembling a basic L-shape with two 3030 profiles and one Internal Rotating Aluminum Joint. This is the building block for bigger projects—master this, and you can build just about anything.
Step 1: Prep Your 3030 Profiles
Unbox your profiles and peel off any protective plastic (it's satisfying, I promise). If your project needs specific lengths, measure and mark the profiles now. For example, if you're building a 2-foot horizontal beam, mark 24 inches on the profile. Cut with a fine-tooth saw—aluminum cuts easily, but go slow to keep the edge straight. After cutting, grab your deburring tool and run it along the cut edge, inside and out. Sharp burrs here are no joke—you'll regret skipping this step when you brush against it later!
Step 2: Get to Know Your Internal Rotating Joint
Take the joint and give it a spin. See how the two ends rotate independently? That's the magic. At the center, there's a bolt—loosen it with your hex key, and the joint swivels; tighten it, and it locks. The ends of the joint are cylindrical, designed to slide into the open ends of the 3030 profile. Each end has a small hole—this is where a bolt will secure it to the profile. Play with it for a minute—get a feel for how it moves. It should rotate smoothly, not loosely. If it's stiff, a tiny spritz of silicone spray (not WD-40—oil attracts dust!) on the pivot will help, but wipe off excess.
Step 3: Attach the Joint to the First Profile
Take one 3030 profile and slide one end of the joint into its open end. Push until the joint's hole lines up with one of the T-slots on the profile. You might need to twist the joint a little—no biggie. Now, grab a T-slot nut (from your Aluminum Profile Accessories) and slide it into the T-slot, right behind the joint's hole. insert a bolt through the joint's hole and into the nut. Tighten with your hex key—snug, but not death-grip tight. You want the joint to stay in place, but you'll tighten it fully later.
Pro tip: If the T-slot nut keeps slipping, tilt the profile up so gravity holds it. Or use a small screwdriver to push the nut into place. It's a tiny hassle, but worth it for a solid connection.
Step 4: Set Your Angle and Attach the Second Profile
Now, decide your angle. Let's go with 90 degrees for a corner (most common for frames). Loosen the joint's center bolt, rotate the free end until it's perpendicular to the first profile, then tighten the center bolt just enough to hold the angle (you'll lock it later). Take your second profile and slide it onto the joint's free end—same as before. Align the joint's hole with the profile's T-slot, add a T-slot nut, bolt it in, and snug. Now you have an L-shape! Give it a gentle shake—wobbly? Don't worry, we're not done.
Step 5: Tighten Everything (But Don't Overdo It!)
This is make-or-break. Grab your hex key and tighten the bolts that attach the joint to the profiles—firm, but stop when you feel resistance. Now, tighten the center rotation bolt until the joint won't move. Here's the golden rule: Aluminum is soft. Overtightening strips threads or bends the joint. Tighten until secure, then a quarter-turn more. That's it.
Shake the L-shape again. It should feel rock-solid—no creaks, no wobbles. If it moves, check if the joint is fully seated in the profile (a tap with the rubber mallet helps) or if the bolts are tight. You've just built your first modular connection—pat yourself on the back!
Step 6: Add Accessories for the Finishing Touch
Now, let's make it look and work better. Snap on end caps to cover the profile ends—they're plastic or aluminum, and they pop on easily. No more sharp edges! If you're building a shelf or workbench, use Aluminum Pipe Clamps to secure a top. Slide the clamps into the T-slots, place your top (plywood, aluminum honeycomb panel, whatever), and tighten the clamps. The top won't budge—even with heavy tools on it.
Pro Tips to Avoid Headaches (We've Made These Mistakes So You Don't Have To)
- Test angles before locking them. It's easy to rush and set a joint at 85 degrees instead of 90. Hold your structure up, visualize its use, and adjust. A 2-second check now saves hours of rebuilding later.
- Use a template for repeated angles. Building a shelf with 4 corners? Cut a cardboard template at 90 degrees and use it to set each joint. Consistency = no lopsided shelves.
- Clean the T-slots! Dust, metal shavings, or even a stray sticker can block T-slot nuts. Wipe slots with a dry cloth before assembly—compressed air works for tough gunk.
- Don't mix metals. Stick to aluminum or stainless steel bolts and nuts. Using steel on aluminum causes corrosion (galvanic corrosion, if you want to sound fancy)—your joints will get weak and crumbly over time.
- Add bracing for big builds. A 4-foot square frame might wobble. Fix it with diagonal bracing: add a short 3030 profile between two corners using 45-degree joints. It's like adding a backbone—suddenly, it's rigid.
What Can You Build Now? Let's Get Creative
Now that you've nailed the basics, the sky's the limit. Here are a few ideas to spark your next project:
1. Mobile Workbench
Build a frame with 3030 profiles and Internal Rotating Joints (square corners, of course). Add a plywood or aluminum top, then attach casters (from Aluminum Profile Accessories) to the bottom legs. Now you've got a workbench that rolls to where you need it—perfect for garages or small workshops.
2. Material Rack for Parts
Need to organize small parts or tools? Build vertical 3030 legs, then add horizontal shelves using joints set at 90 degrees. For extra convenience, attach Roller Track (another handy accessory!) to one shelf—slip parts bins onto the track, and they glide forward when you need them. No more digging through messy piles.
3. Turnover Trolley for a Small Business
If you run a bakery, workshop, or retail shop, a trolley moves goods between stations. Build a rectangular frame, add a flat top, and casters. Use joints to add a lower shelf for extra storage. Customize the height—no more bending to load heavy boxes!
Troubleshooting: Oops, That Didn't Work. Now What?
Even pros make mistakes. Here's how to fix common issues:
- Joint won't rotate: Loosen the center bolt—duh. If it's still stuck, debris might be inside. Blow it out with compressed air or wipe with a dry cloth. Avoid water—aluminum loves to oxidize (read: get ugly spots).
- Profile won't slide onto the joint: The joint's end might be misaligned with the profile's opening. Wiggle the profile as you push, or rotate the joint slightly. If the profile's end is bent (it happens!), gently tap it straight with a rubber mallet—don't hit the T-slots directly.
- Bolt spins forever: The T-slot nut is probably sideways. Loosen the bolt, push the nut into the slot with a screwdriver, and try again. If the bolt is stripped, replace it—cheap bolts = stripped bolts. Spend a little more for quality.
- My structure is wobbly! Check all bolts—even one loose joint causes wobble. If tight, add diagonal bracing (see Pro Tips). If it's a tall structure (like a 6-foot rack), add a base wider than the top—physics, people!
You're Ready to Build—Now Go Make Something Awesome
The best part about 3030 National Standard Profile A and Internal Rotating Aluminum Joints is that they grow with you. Start small—a simple shelf or tool holder—and work your way up to bigger projects. Since the joints are reusable, you can take apart old builds and rebuild them into something new. No waste, no regret.
Remember, even if your first try isn't perfect, you're learning. That wobbly shelf? Next time, you'll add bracing. That crooked corner? You'll use your template. Modular assembly is all about flexibility—both in the structure and in your skills.
So grab your profiles, your joint, and your hex key. Your next project is waiting—and this time, it's going to be sturdy, custom, and totally you. Happy building!