- Company Articles
- Products and Technology
- Installation And Maintenance
- 3030a EU Standard Aluminum Profile Conveyors: Assembly & Maintenance

3030a EU Standard Aluminum Profile Conveyors: Assembly & Maintenance
Related Product
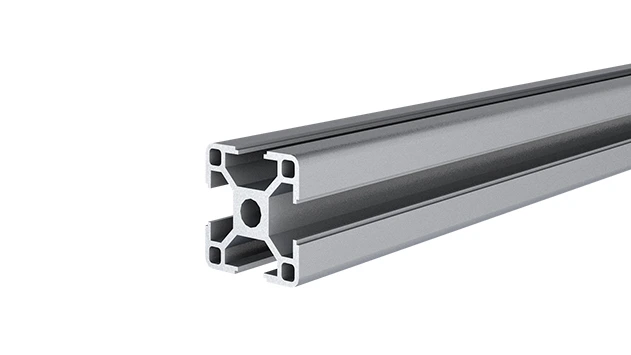
3030A EU Standard Aluminum Profile
3030 is a 3.00 x 3.00CM fractional 30 series square extrusion T-slot profile with four open T-slots, each side with 3.00cm face. The profile has align-a-grooves to assist in aligning connecting profiles.
In the fast-paced world of manufacturing and production, every second counts. The difference between a smooth, efficient workflow and a bottlenecked, frustrating day often lies in the equipment that keeps materials moving. Enter the 3030a EU Standard Aluminum Profile Conveyor—a workhorse designed to streamline material handling, reduce manual labor, and adapt to the unique needs of modern production lines. But what makes this conveyor stand out? It starts with the foundation: high-quality aluminum extrusion profiles and a ecosystem of aluminum profile accessories that transform simple components into a dynamic, reliable system. Whether you're running a small workshop or a large-scale factory, understanding how to assemble and maintain these conveyors isn't just about keeping machines running—it's about empowering your team to work smarter, not harder.
The Backbone: Understanding 3030a EU Standard Aluminum Profiles
Before diving into assembly or maintenance, let's get to know the star of the show: the 3030a EU standard aluminum profile. At first glance, it might look like just another metal bar, but its design is a masterclass in functionality. The "3030" refers to its dimensions—30mm in width and 30mm in height—making it compact enough for tight spaces yet robust enough to handle daily wear. Crafted from aluminum extrusion profile, it benefits from the material's natural advantages: lightweight (so it's easy to maneuver during assembly), corrosion-resistant (ideal for factories with humidity or occasional spills), and surprisingly strong (capable of supporting consistent loads without bending). Unlike heavier steel alternatives, the 3030a profile reduces the strain on your facility's floor and makes reconfiguring your conveyor line a breeze—no need for heavy machinery or a team of to shift sections.
But a profile alone is just a piece of metal. What brings it to life are the aluminum profile accessories. Think of them as the "glue" that turns individual parts into a cohesive system. From 90° aluminum profile connectors that lock sections at right angles to gusset plates that reinforce joints under stress, these accessories are engineered for precision. Even small components like T-slot rubber seal covers play a role—they fill the profile's slots to prevent dust buildup and protect workers from sharp edges. When you choose genuine 3030a compatible accessories, you're ensuring a snug fit that minimizes wobble, reduces noise, and extends the conveyor's lifespan. It's the difference between a rickety DIY setup and a professional-grade system that your team can trust.
Building Your Conveyor: A Step-by-Step Assembly Guide
Assembling a 3030a EU Standard Aluminum Profile Conveyor might sound intimidating, but with the right parts and a little patience, it's a project that even a small team can tackle. The key is to approach it systematically—start with the frame, then add the guiding elements, and finish with the moving components. Let's break it down, step by step.
Pre-Assembly Prep: Gather Your Tools and Parts
First things first: lay out all your components to avoid last-minute scrambles. You'll need:
- 3030a EU standard aluminum profile sections (cut to your desired conveyor length)
- Aluminum profile accessories: 90° aluminum profile connectors, end caps, and gusset plates (for frame stability)
- Aluminum guide rail A (to keep materials on track)
- Roller track (the moving surface—opt for steel or aluminum based on your load needs)
- Roller track placon mount for aluminum profile flat (these brackets secure the roller track to the 3030a frame)
- End supports with stops (to prevent materials from sliding off the conveyor)
- Tools: Allen wrench set (most connectors use hex bolts), a rubber mallet (for gentle tapping to align parts), and a level (to ensure the conveyor sits flat)
| Assembly Step | Key Tools | Essential Parts | Pro Tip |
|---|---|---|---|
| Frame Construction | Allen wrench, rubber mallet | 3030a profiles, 90° connectors, gusset plates | Hand-tighten bolts first, then use the wrench—over-tightening can strip threads. |
| Guide Rail Installation | Level, measuring tape | Aluminum guide rail A, T-slot bolts | Align rails parallel using the level to avoid material jams later. |
| Roller Track Attachment | Allen wrench, pencil (for marking positions) | Roller track, roller track placon mount for aluminum profile flat | Space placon mounts 12-18 inches apart for even weight distribution. |
| End Support & Stop Setup | Screwdriver, level | End supports, rubber stops | Stops should be 1-2 inches from the roller track end to cushion impacts. |
Step 1: Building the Frame—Your Conveyor's Skeleton
Start by constructing the main frame. Lay two 3030a profiles parallel to each other—these will be the conveyor's sides. Then, cut shorter profile sections to act as cross-braces (space them every 2-3 feet for stability). Use 90° aluminum profile connectors to join the cross-braces to the side rails. For extra strength, add gusset plates at each corner—these small triangular brackets prevent the frame from wobbling under heavy loads. Once all joints are connected, stand the frame upright and use a level to ensure it's not leaning. A wobbly frame now means uneven roller track later, which can lead to materials getting stuck or sliding off-center.
Step 2: Installing Aluminum Guide Rail A—Guiding the Way
With the frame stable, it's time to add the "guardrails": aluminum guide rail A. These rails run along the length of the conveyor, keeping boxes, parts, or products centered as they move. Measure the width of your typical materials to determine how far apart the rails should be—you want a snug fit, but not so tight that materials scrape. Attach the rails to the frame using T-slot bolts (these slide into the 3030a profile's slots, allowing easy adjustments later). Use a measuring tape to ensure both rails are parallel, then tighten the bolts just enough to hold them in place—you can fine-tune the position after testing with a sample material.
Step 3: Attaching Roller Track—The Heart of the Conveyor
Now for the moving part: the roller track. This is where materials glide, so precision here is critical. Lay the roller track sections along the frame, aligning them with the aluminum guide rail A. To secure the track to the frame, use roller track placon mount for aluminum profile flat—these brackets are designed to fit perfectly into the 3030a profile's T-slots. Slide the placon mounts into the slots, position them under the roller track, and tighten the bolts to lock them in place. Space the mounts evenly (about 12-18 inches apart) to prevent sagging in the middle. If your conveyor is longer than 10 feet, add a center support bracket (another type of placon mount) to keep the track stable. Once all sections are attached, give the rollers a spin—they should move freely without sticking. If a roller feels jammed, check for debris or misaligned brackets.
Step 4: Adding End Supports and Stops—Safety First
No conveyor is complete without end supports to keep it elevated (if needed) and stops to prevent materials from sliding off the end. Attach end support brackets to the frame's corners, adjusting the height so the conveyor sits at a comfortable working level (typically 30-36 inches for most assembly lines). Then, install rubber stops at the discharge end—these cushion the impact when materials reach the end, preventing damage to both the product and the conveyor. For extra safety, consider adding side guards along the length if you're moving small parts that might fall through the roller gaps.

Deep Dive: Key Components That Make It Work
While the 3030a profile is the backbone, several components work together to make your conveyor efficient. Let's zoom in on two unsung heroes: roller track and aluminum guide rail A.
Roller Track: More Than Just Wheels
Roller track comes in various materials—steel for heavy loads, aluminum for lightweight items, and even plastic for delicate products. For most 3030a conveyors, steel roller track with black or yellow wheels is a popular choice; it balances durability and smooth movement. The magic, though, is in how it's mounted. Roller track placon mount for aluminum profile flat brackets are specially designed to cradle the track and lock it into the 3030a profile. Unlike generic brackets, these placon mounts have a low profile, so they don't interfere with material flow, and their T-slot design means you can reposition the track later if your needs change. For example, if you start moving wider boxes, simply loosen the placon mounts, slide them apart, and retighten—no need to rebuild the entire frame.
Aluminum Guide Rail A: Precision in Motion
Aluminum guide rail A might look like a simple strip of metal, but its role is crucial. Made from the same corrosion-resistant aluminum as the 3030a profile, it features a smooth, rounded edge that guides materials without scratching them. What sets it apart is its compatibility with the 3030a's T-slots—using T-slot bolts, you can adjust the rail's height and angle to accommodate different material sizes. For instance, if you're moving tall boxes, raise the guide rail slightly to prevent tipping; for flat packages, lower it to keep the surface flush. This flexibility is why aluminum guide rail A is a staple in custom conveyor setups—it adapts to your workflow, not the other way around.
Maintenance: Keeping Your Conveyor Running Like New
A well-assembled conveyor is only as good as its maintenance routine. Even the sturdiest 3030a aluminum profile and highest-quality roller track will wear down without care. The good news? With a few simple daily and weekly tasks, you can extend your conveyor's life and avoid costly downtime.
Daily Checks: Quick Wins for Smooth Operation
Start each shift with a 5-minute walkaround. Focus on:
- Cleaning roller track: Wipe away dust, debris, or spilled liquids (especially oil or coolant) that could gum up the rollers. A dry cloth or compressed air works well—avoid harsh chemicals that might damage plastic wheels.
- Tightening loose joints: Give a gentle tug to 90° connectors and roller track placon mounts. If anything wobbles, grab your Allen wrench and snug up the bolts. Loose joints are the #1 cause of noisy, inefficient conveyors.
- Testing movement: Place a sample material on the track and push it through. It should glide smoothly—no sticking, jerking, or tilting. If it catches, check the aluminum guide rail A alignment or for a jammed roller.
Weekly Tasks: Preventative Care
Once a week, dedicate 15-20 minutes to deeper maintenance:
- Lubricate moving parts: Apply a small amount of light machine oil to roller bearings (check the manufacturer's guidelines—some sealed bearings don't need lubrication). Avoid over-oiling, as excess can attract dust.
- Inspect for wear: Look for signs of damage on roller track wheels (cracks, flat spots) and aluminum guide rail A (dents or bent edges). replace worn parts immediately—waiting can lead to bigger issues, like a wheel breaking mid-shift.
- Check level and alignment: Over time, floors can settle or bolts can loosen, throwing the conveyor out of level. Use your level to ensure the frame is still flat and the guide rails are parallel.
Troubleshooting Common Issues
Even with regular maintenance, problems can pop up. Here's how to fix the most common ones:
- Jammed rollers: First, turn off the conveyor (if motorized) and remove any debris. If the roller still won't move, check if the roller track placon mount is loose—tightening it might realign the roller. If the bearing is seized, replace the roller.
- Materials sliding off track: This usually means the aluminum guide rail A is misaligned or too low. Loosen the T-slot bolts, adjust the rail's position, and retest with a sample material.
- Frame wobbling: Tighten all 90° connectors and add gusset plates to weak joints. If the wobble persists, check if the end supports are uneven—use shims under the feet to level the frame.
Why 3030a EU Standard Conveyors Are a Game-Changer
So, what makes investing in a 3030a EU standard aluminum profile conveyor worth it? Let's look at the real-world benefits:
- Flexibility: With aluminum profile accessories, you can reconfigure the conveyor in hours, not days. Need to add a curve? Swap straight 3030a sections for angled ones. Want to extend the length? Connect new profiles with 180° swivel joints. This adaptability is a lifesaver for businesses that evolve quickly.
- Cost-effective: Aluminum is lighter than steel, so shipping and installation costs are lower. Plus, the modular design means you only buy the parts you need—no overspending on one-size-fits-all systems.
- Worker-friendly: Lightweight profiles and smooth-rolling track reduce physical strain, lowering the risk of injuries. Employees can focus on assembly, not wrestling with heavy materials.
- Durability: Aluminum's resistance to rust and corrosion means the conveyor holds up in harsh environments—think food processing plants, automotive shops, or warehouses with high humidity. With proper maintenance, a 3030a conveyor can last 10+ years.
Take the example of a small electronics manufacturer I worked with a few years back. They were using manual carts to move circuit boards between stations, leading to frequent delays and occasional drops. After installing a 3030a conveyor with aluminum guide rail A and roller track, their material handling time dropped by 40%, and product damage decreased to near zero. The best part? A year later, when they expanded their production line, they simply added more 3030a sections and roller track—no need to buy a whole new system.
Conclusion: Invest in the Basics, Reap the Rewards
3030a EU Standard Aluminum Profile Conveyors aren't just pieces of equipment—they're investments in your team's efficiency, your products' quality, and your business's growth. By understanding the basics of assembly (using quality 3030a profiles, aluminum profile accessories, and roller track placon mounts) and sticking to a simple maintenance routine, you can keep your conveyor running smoothly for years. Remember: the key is in the details—choosing genuine aluminum extrusion profiles over cheap knockoffs, taking the time to align components properly, and never skipping those daily checks. After all, a conveyor that works for you is one less thing to worry about, leaving you free to focus on what really matters: growing your business.
So, whether you're building your first conveyor or upgrading an old system, start with the 3030a EU standard aluminum profile. It's not just a profile—it's the foundation of a smarter, more efficient workflow.