- Company Articles
- Products and Technology
- Installation And Maintenance
- 3030a EU Standard Aluminum Profile Material Rack B: Assembly Instructions

3030a EU Standard Aluminum Profile Material Rack B: Assembly Instructions
Related Product
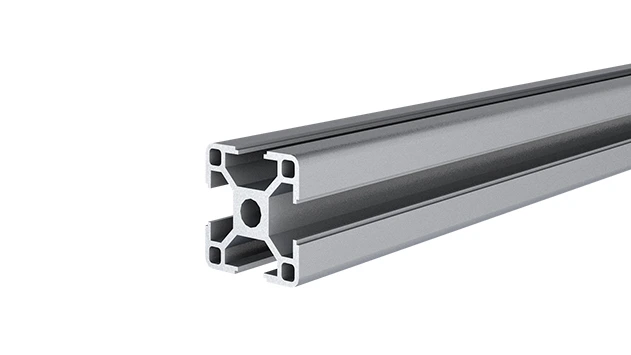
3030A EU Standard Aluminum Profile
3030 is a 3.00 x 3.00CM fractional 30 series square extrusion T-slot profile with four open T-slots, each side with 3.00cm face. The profile has align-a-grooves to assist in aligning connecting profiles.
Let's be real—workshops and warehouses can get chaotic. When tools, parts, and materials are scattered everywhere, even simple tasks turn into frustrating hunts for what you need. That's where a reliable storage solution like the Material Rack B (3 row and 3 floor) comes in. Built with durable 3030a EU Standard Aluminum Profile , this rack isn't just about organization—it's about making your daily workflow smoother, your space tidier, and your team more efficient. And the best part? You don't need to be a DIY expert to put it together. In this guide, we'll walk through every step, from unboxing the parts to loading up your first batch of materials. Let's dive in!
What You'll Need Before Getting Started
Before we grab our tools, let's make sure we have everything we need. Nothing kills momentum like realizing halfway through that you're missing a part or a key tool. Here's a quick checklist to get you prepared:
Tools (Most Are Included—We've Got You Covered!)
The great thing about working with aluminum profiles is that they're designed for easy assembly, and the aluminum profile accessories that come with Material Rack B are no exception. You'll need:
- A hex key (Allen wrench) – this should be included in your accessory pack. If not, a standard 4mm or 5mm hex key will work.
- A rubber mallet (optional but helpful) – for gently tapping joints into place without damaging the aluminum.
- A spirit level – to make sure your rack stands straight (no wobbly shelves here!
- A measuring tape – to double-check distances if you're extra cautious (we won't judge).
- A clean, flat workspace – clear a spot on the floor or a large table. You'll need about 6ft x 4ft of space to lay out parts.
Parts List: Let's Identify What's in the Box
Unbox everything carefully and lay the parts out on your workspace. It might seem overwhelming at first, but we'll break it down. Here's a handy table to reference—you can even check off parts as you go:
| Part Name | Quantity | Description |
|---|---|---|
| 3030a EU Standard Aluminum Profile (Uprights) | 4 | Vertical supports (typically 180cm long—check your specific model!) |
| 3030a EU Standard Aluminum Profile (Horizontal Shelf Supports) | 12 | Horizontal beams for shelves (6 for front/back, 6 for sides) |
| 90° Aluminum Profile Connectors | 24 | Right-angle connectors to join uprights and horizontal supports |
| Roller Track (Shelf Surfaces) | 9 | 3 rows x 3 floors = 9 tracks. These let materials slide smoothly—perfect for heavy boxes or tools. |
| Roller Track Placon Mount for Aluminum Profile Flat | 36 | Brackets to attach roller track to horizontal supports (4 per track) |
| End Caps for Aluminum Profiles | 16 | Plastic caps to cover sharp ends of aluminum profiles (safety first!) |
| M5x16 Socket Head Cap Screws | 100+ | Fasteners for securing connectors (extra included, just in case!) |
Pro Tip:
Take a minute to sort the parts into piles by type (uprights, connectors, roller tracks, etc.). It'll save you time later when you're hunting for that specific bracket. A few small bins or even paper towels to separate parts work wonders!
Step-by-Step Assembly: Building Your Material Rack B
Now that we're prepped, let's start building! We'll take this one step at a time, starting with the frame and working our way up to the shelves. Trust us—take it slow, and you'll have a sturdy rack in no time.
Step 1: Build the Base Frame (The Foundation Matters!)
Every strong structure starts with a solid base, and your Material Rack B is no different. We'll start by assembling the bottom frame, which will support the entire rack. Here's how:
- Lay out the base profiles: Take 4 horizontal shelf supports (these will be the bottom front, bottom back, and two sides). Arrange them on the floor in a rectangle. For most models, the front/back pieces are longer (e.g., 120cm) and the sides are shorter (e.g., 60cm)—check your measurements if unsure.
- Attach the 90° connectors: Grab 4 90° aluminum profile connectors and slide one onto each corner of your rectangle. The connectors should fit snugly into the T-slots of the aluminum profiles. If they're tight, gently tap them with your rubber mallet (don't whack—just a firm nudge).
- Secure with screws: Take your hex key and a screw, and tighten it through the hole in the connector into the T-slot of the profile. You'll feel resistance when the screw bites into the aluminum—tighten until it's snug, but don't overdo it (stripping threads is a rookie mistake we can avoid!).
- Check for squareness: Once the base frame is assembled, measure the diagonals. Both should be equal—if not, gently push the corners until they are. A square base = a stable rack!
Step 2: Add the Uprights (Time to Stand Tall)
With the base frame done, it's time to add the vertical uprights. These are the "legs" of your rack, so we need to make sure they're straight and secure.
- Flip the base frame: Carefully flip the rectangle you just built so the connectors are facing up. This will make it easier to attach the uprights.
- Attach uprights to base corners: Take one of the 3030a aluminum profile uprights and slide its end into the top of a 90° connector on the base frame. Make sure it's flush with the bottom of the connector, then insert a screw through the connector and into the upright. Repeat this for all 4 uprights.
- Double-check height: Stand back and look at the uprights. Are they all the same height? If one is taller, loosen the connector and adjust. Consistency here will make adding shelves much easier later.
Step 3: Install Horizontal Supports for Shelves (The "Bones" of the Rack)
Now we'll add the horizontal beams that will hold up the shelves. Since this is a 3-row, 3-floor rack, we'll need supports at 3 different heights (for the floors) and across the width (for the rows). Let's break it down:
- Mark shelf heights: Decide how tall you want each shelf to be. A common setup is 40cm between floors (top shelf at 120cm, middle at 80cm, bottom at 40cm). Use a measuring tape and a pencil to mark these heights on each upright—this keeps everything aligned.
- Attach front/back supports first: Take a horizontal support and attach a 90° connector to each end. Then, line up the connectors with the marks on the front uprights and secure with screws. Do the same for the back uprights. Now you should have front and back supports at each shelf height.
- Add side supports to connect rows: Since there are 3 rows, we need 2 additional horizontal supports per floor to divide the rack into sections. Measure the distance between the front and back supports, cut your side supports to length (if needed), and attach them using 90° connectors. Now each floor has 3 rows—perfect for separating different materials!
Pro Tip:
If you're working alone, prop the uprights against a wall or have a friend hold them steady while attaching supports. A little help goes a long way in keeping things straight!
Step 4: Install Roller Track Shelves (Make Materials Slide Like Butter)
Here's where the magic happens: adding the roller track to the shelves. These tracks turn static shelves into dynamic surfaces where boxes, tools, or parts glide with minimal effort—ideal for busy workshops where time is money.
- Attach roller track brackets: Take the roller track placon mount for aluminum profile flat brackets and secure them to the horizontal supports. Space them about 30cm apart along each shelf beam—this ensures the roller track doesn't sag under weight.
- Slide roller track onto brackets: Most roller tracks have a groove that fits into the brackets. Gently slide the track into place until it clicks. If it's tight, check that the brackets are aligned—misaligned brackets are the #1 cause of stuck tracks.
- Test the slide: Once the track is in place, give it a gentle push with your hand. It should roll smoothly from one end to the other. If it sticks, adjust the brackets or clean the track with a dry cloth (dust happens!)
- Repeat for all 9 tracks: 3 rows x 3 floors = 9 tracks. Take your time—consistency here means every shelf works as well as the first.
Step 5: Secure All Joints and Add Finishing Touches
We're almost done! Now it's time to double-check all connections and add a few final touches to make the rack safe and polished.
- Tighten all screws: Go through every connector with your hex key and give each screw a gentle tighten. Over time, vibrations can loosen joints, so a quick once-over now prevents wobbles later.
- Add end caps: Pop the plastic end caps onto the open ends of all aluminum profiles. This keeps fingers safe from sharp edges and gives the rack a clean, professional look.
- Level the rack: Use your spirit level to check if the rack stands straight. If it leans, adjust the feet (some models have adjustable leveling feet—check your accessory pack!). A level rack is a stable rack, and stable racks last longer.

Pro Tips for Making Your Rack Last (Because Quality Matters)
You've put in the work—now let's make sure your Material Rack B stays in top shape for years. Here are some quick tips to maximize its lifespan:
- Don't overload the shelves: The 3030a aluminum profile is strong, but every material has limits. Check the weight rating (usually around 50kg per shelf) and stick to it. Overloading bends profiles and weakens joints.
- Clean the roller track regularly: Dust, dirt, and small debris can gunk up the roller track over time. Wipe it down with a dry cloth every month, and use a small brush to clean between rollers.
- Tighten joints seasonally: Temperature changes and daily use can loosen screws. A quick check every 3-6 months with your hex key will keep everything tight.
- Label your shelves: This isn't about the rack itself, but about keeping your space organized. Use labels or color-coded bins to mark what goes where—your future self (and your team) will thank you.
Troubleshooting: Common Issues (and How to Fix Them Fast)
Even with careful assembly, hiccups happen. Here's how to solve the most common problems:
My Rack Wobbles Side to Side—What's Wrong?
Wobbling is usually caused by one of two things: either the base isn't square, or the uprights aren't properly secured. Try this:
- Check the base diagonals again—if they're not equal, gently adjust the corners until they are.
- Make sure all upright-to-base connectors are tight. A loose upright is a wobbly upright!
The Roller Track Isn't Sliding Smoothly
Sticky tracks are annoying, but fixable:
- Check for debris between the rollers—even a small screw or piece of plastic can cause a jam.
- Ensure the brackets are aligned. If they're tilted, the track will bind. Loosen the brackets, realign, and retighten.
- WD-40 (or a similar lubricant) can help—just a tiny spray on the roller axles, then wipe off excess.
A Connector Won't Slide Into the Aluminum Profile
Aluminum profiles have precise T-slots, and sometimes connectors can be tight. Try this:
- Clean the T-slot with a dry cloth—dust or burrs from manufacturing can block the connector.
- Gently sand the end of the connector with fine-grit sandpaper (just a few swipes!) to remove any rough edges.
- Use the rubber mallet to tap the connector into place—firm, even taps, not hard whacks.
Final Thoughts: Enjoy Your Organized Space!
Congratulations—you've built your very own Material Rack B! Take a step back and admire your handiwork. What was once a pile of aluminum profiles and aluminum profile accessories is now a sturdy, functional storage solution that will transform how you work. Whether you're storing tools, raw materials, or finished products, this rack is designed to grow with your needs. And if you ever want to add more shelves, expand the width, or even repurpose it later, the modular nature of aluminum profiles makes it easy (hint: extra aluminum profile accessories are available from your supplier!).
At the end of the day, organization isn't just about looks—it's about reducing stress, saving time, and creating a workspace where you can focus on what matters. With your new rack, you're one step closer to that goal. Now go load it up, and get back to doing what you do best.