- Company Articles
- Products and Technology
- Installation And Maintenance
- 3030b EU Standard Aluminum Profile Assembly: Tools & Techniques for Efficiency

3030b EU Standard Aluminum Profile Assembly: Tools & Techniques for Efficiency
Related Product
3030B EU Standard Aluminum Profile
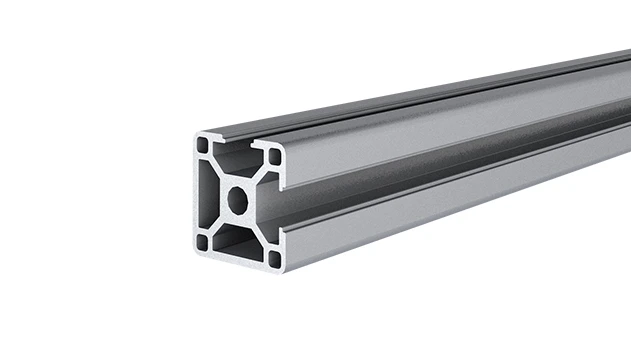
3030 is a 3.00 x 3.00CM fractional 30 series square extrusion T-slot profile with two side open T-slots, each side with 3.00cm face, 2 side with open slot, 2 side with closed face. The profile has align-a-grooves to assist in aligning connecting profiles.
In the world of manufacturing and workshop setups, aluminum profiles have become the unsung heroes of versatility and durability. Whether you're building a workbench, a material rack, or a custom machine guard, these lightweight yet sturdy structures form the backbone of efficient workflows. Among the countless options available, the 3030b EU standard aluminum profile stands out as a favorite for its balance of strength, adaptability, and compatibility with a wide range of accessories. But here's the thing: even the best materials fall short if assembled with haphazard tools and sloppy techniques. That's why mastering the art of 3030b profile assembly isn't just about putting parts together—it's about creating systems that save time, reduce frustration, and align with lean system principles to eliminate waste. Let's dive into the tools, techniques, and insider tips that will turn you from a hesitant assembler into a confident builder.
Understanding the 3030b EU Standard Aluminum Profile
Before we grab our tools, let's get intimate with the star of the show: the 3030b EU standard aluminum profile. At first glance, it might look like just another metal extrusion, but its design is a masterclass in functionality. Measuring 30mm by 30mm in cross-section, this profile is crafted from 6063-T5 aluminum alloy—a material known for its excellent strength-to-weight ratio and resistance to corrosion. The "EU standard" label ensures consistency in dimensions, slot sizes, and tolerances, meaning you can mix and match accessories from different suppliers without worrying about compatibility issues.
What really sets the 3030b apart is its T-slot design. Running along each of its four sides, these slots (typically 8mm wide) act as anchors for connectors, brackets, and other aluminum profile accessories. Think of them as the profile's "attachment points"—they let you add shelves, wheels, panels, or even custom components anywhere along the length, no drilling required. This flexibility is why the 3030b is a staple in everything from small workshop workbenches to large-scale production line setups.
Another key feature is its rounded edges, which not only enhance safety (no sharp corners to snag gloves or skin) but also give the profile a clean, professional look. Whether you're building something that needs to blend into a modern factory floor or a DIY project at home, the 3030b's aesthetic versatility is hard to beat.
Essential Tools for the Job
You wouldn't try to bake a cake without a mixer, right? The same logic applies to assembling aluminum profiles. Using the wrong tools can lead to stripped slots, bent connectors, or hours of frustration. Here's a breakdown of the must-haves to keep your assembly process smooth and efficient:
- Hex Keys (Allen Wrenches): The backbone of any profile assembly. Most connectors use M5 or M6 bolts, so a set of long-arm hex keys (ball-end for hard-to-reach angles) is non-negotiable. Avoid cheap, flimsy sets—they'll strip easily and slow you down.
- Torque Wrench: Over-tightening bolts is a common mistake that can warp profiles or strip T-slots. A small torque wrench (adjustable to 4-6 Nm) ensures you apply just the right amount of force—critical for both stability and longevity.
- Deburring Tool: After cutting profiles to length, sharp edges and burrs are inevitable. A deburring tool smooths these out, preventing cuts and ensuring connectors slide into T-slots without jamming.
- Speed Square & Tape Measure: Precision matters. A speed square helps check 90° and 45° angles quickly, while a tape measure (preferably with metric markings) ensures profiles are cut to the exact length needed.
- Rubber Mallet: Sometimes, connectors or profiles need a gentle nudge into place. A rubber mallet delivers soft, even force without damaging the aluminum's finish.
- Magnetic Parts Tray: Small parts like bolts, washers, and aluminum profile accessories have a knack for disappearing. A magnetic tray keeps them organized and within arm's reach.

Aluminum Profile Connectors: Choosing the Right Fit
Connectors are the glue that holds your aluminum profile projects together—literally. With so many types available, picking the right one for the job can feel overwhelming. To simplify, let's focus on the most common options and when to use them. The table below compares three essential connectors you'll likely encounter with 3030b profiles:
| Connector Type | Use Case | Installation Time | Strength Rating | Best For |
|---|---|---|---|---|
| 90° Aluminum Profile Connector | Joining two profiles at a right angle (e.g., workbench legs to top frame) | 2-3 minutes | High (handles heavy vertical loads) | Structural frames, load-bearing shelves |
| 45° Aluminum Profile Connector | Angled joints (e.g., bracing for stability, sloped shelves) | 3-4 minutes (requires precise alignment) | Medium (good for lateral stability) | Diagonal bracing, inclined conveyors |
| 135° Aluminum Profile Connector | Creating "corner brackets" or offset joints (e.g., L-shaped workbenches with overhangs) | 2-3 minutes | Medium-High (handles uneven loads) | Offset frames, ergonomic workstations |
The 90° aluminum profile connector is perhaps the most versatile of the bunch. It slides into the T-slots of two perpendicular profiles, then tightens with a bolt to lock them in place. Pro tip: Apply a tiny drop of thread locker to the bolt before tightening—this prevents loosening over time, especially in high-vibration environments.
Step-by-Step Assembly: Building an Aluminum Workbench
Let's put theory into practice by walking through the assembly of a basic aluminum workbench using 3030b profiles. This project is perfect for beginners and covers all the core techniques you'll need for larger builds.
1. Gather Your Materials & Pre-Cut Profiles
For a standard 1200mm (length) x 600mm (depth) x 800mm (height) workbench, you'll need:
- 4x 3030b profiles (800mm long) for legs
- 4x 3030b profiles (1200mm long) for the top frame (2 lengths, 2 widths)
- 4x 3030b profiles (600mm long) for the bottom shelf frame (2 lengths, 2 widths)
- 8x 90° aluminum profile connectors (for leg-to-frame joints)
- 1x aluminum honeycomb panel (1200x600mm) for the worktop
- Assorted M5 bolts, washers, and T-nuts (aluminum profile accessories)
- 4x adjustable leveling feet (to stabilize the workbench on uneven floors)
If you don't have a saw to cut profiles, many suppliers offer pre-cutting services—take advantage of this! Pre-cut profiles save time and ensure accuracy, which is key for a level workbench.
2. Assemble the Top Frame
Lay out the two 1200mm and two 600mm profiles on a flat surface to form a rectangle. insert a 90° connector into the end of each 1200mm profile, then slide the 600mm profiles into the connectors. Use your speed square to check that all corners are 90°, then hand-tighten the bolts. Once the frame is square, go back with your torque wrench and tighten each bolt to 5 Nm—snug, but not so tight that the profile warps.
3. Attach the Legs
Flip the top frame upside down. insert 90° connectors into each corner (pointing downward), then slide the 800mm leg profiles into the connectors. Again, use the speed square to ensure legs are perpendicular to the frame. Tighten the bolts with the torque wrench, then attach the adjustable leveling feet to the bottom of each leg—this will let you fine-tune the height later.
4. Add the Bottom Shelf
Repeat step 2 to assemble the bottom shelf frame (using the remaining 600mm and 1200mm profiles). Attach it to the legs using 90° connectors, positioning it about 200mm from the floor for easy access. This shelf adds rigidity to the workbench and provides extra storage—perfect for tools or materials.
5. Install the Worktop
Flip the workbench upright and adjust the leveling feet until it's stable and level. Place the aluminum honeycomb panel on top of the frame. Use T-nuts and bolts (inserted through the T-slots in the frame) to secure the panel—space them every 200mm along the edges for a secure fit. The honeycomb core keeps the top lightweight but rigid, ideal for heavy tools or assembly work.
Efficiency Tips for Lean System Integration
Assembling profiles efficiently isn't just about working fast—it's about working smart. Here are some tips to align your assembly process with lean system principles, reducing waste and maximizing productivity:
- Kit Your Parts: Before starting, gather all required profiles, connectors, bolts, and aluminum profile accessories into a "kit" for each project. This eliminates time wasted hunting for parts mid-assembly.
- Use Jigs for Repetitive Tasks: If you're building multiple identical structures (e.g., several workbenches), create a simple jig to hold profiles at the correct angle. This ensures consistency and cuts assembly time by up to 30%.
- Pre-Tap T-Slots: For connectors that require T-nuts, pre-insert the nuts into the T-slots before assembly. A quick tap with a rubber mallet seats them in place, so you don't have to fumble with them during setup.
- Inspect as You Go: Check for square corners, tight connections, and level surfaces after each step. Catching a misalignment early prevents having to disassemble and rework later—saving tons of time.
- Label Profiles: If your project has multiple profile lengths, label each piece with its intended location (e.g., "Left Leg" or "Top Frame Front"). This avoids mix-ups and speeds up assembly.
By integrating these tips, you'll transform assembly from a tedious chore into a streamlined process—one that aligns with the lean system goal of minimizing waste (time, effort, materials) while maximizing value.
Troubleshooting Common Headaches
Even with the best tools and techniques, issues can pop up. Here's how to tackle the most common problems:
- Stripped T-Slots: Caused by over-tightening or using bolts that are too large. Fix: Use a file to gently widen the slot (if minor), or replace the profile (if severe). Prevent by using the correct bolt size and torque wrench.
- Loose Connectors: Often due to under-tightening or debris in the T-slot. Fix: Clean the slot with a brush, then retighten the bolt to the recommended torque. Add thread locker for extra security.
- Misaligned Profiles: Happens when frames aren't squared before tightening. Fix: Loosen the connectors slightly, realign with a speed square, then retighten in a diagonal pattern (e.g., top-left, bottom-right, top-right, bottom-left) to distribute tension evenly.
Final Thoughts: From Parts to Productivity
Assembling 3030b EU standard aluminum profiles is more than just connecting metal pieces—it's about building systems that empower your workflow. With the right tools, a solid understanding of connectors like the 90° aluminum profile connector, and a commitment to lean system principles, you can turn raw profiles into functional, durable structures that stand the test of time.
Whether you're a hobbyist building a garage workbench or a manufacturer optimizing production lines, the skills you've learned here will save you time, reduce frustration, and help you create assemblies that truly work for you. So grab your hex keys, organize your aluminum profile accessories, and start building—your next project (and your productivity) will thank you.