- Company Articles
- Products and Technology
- Installation And Maintenance
- 3C Assembly Workbench Construction with Two Way Lean Pipe Joint: Step-by-Step

3C Assembly Workbench Construction with Two Way Lean Pipe Joint: Step-by-Step
Related Product
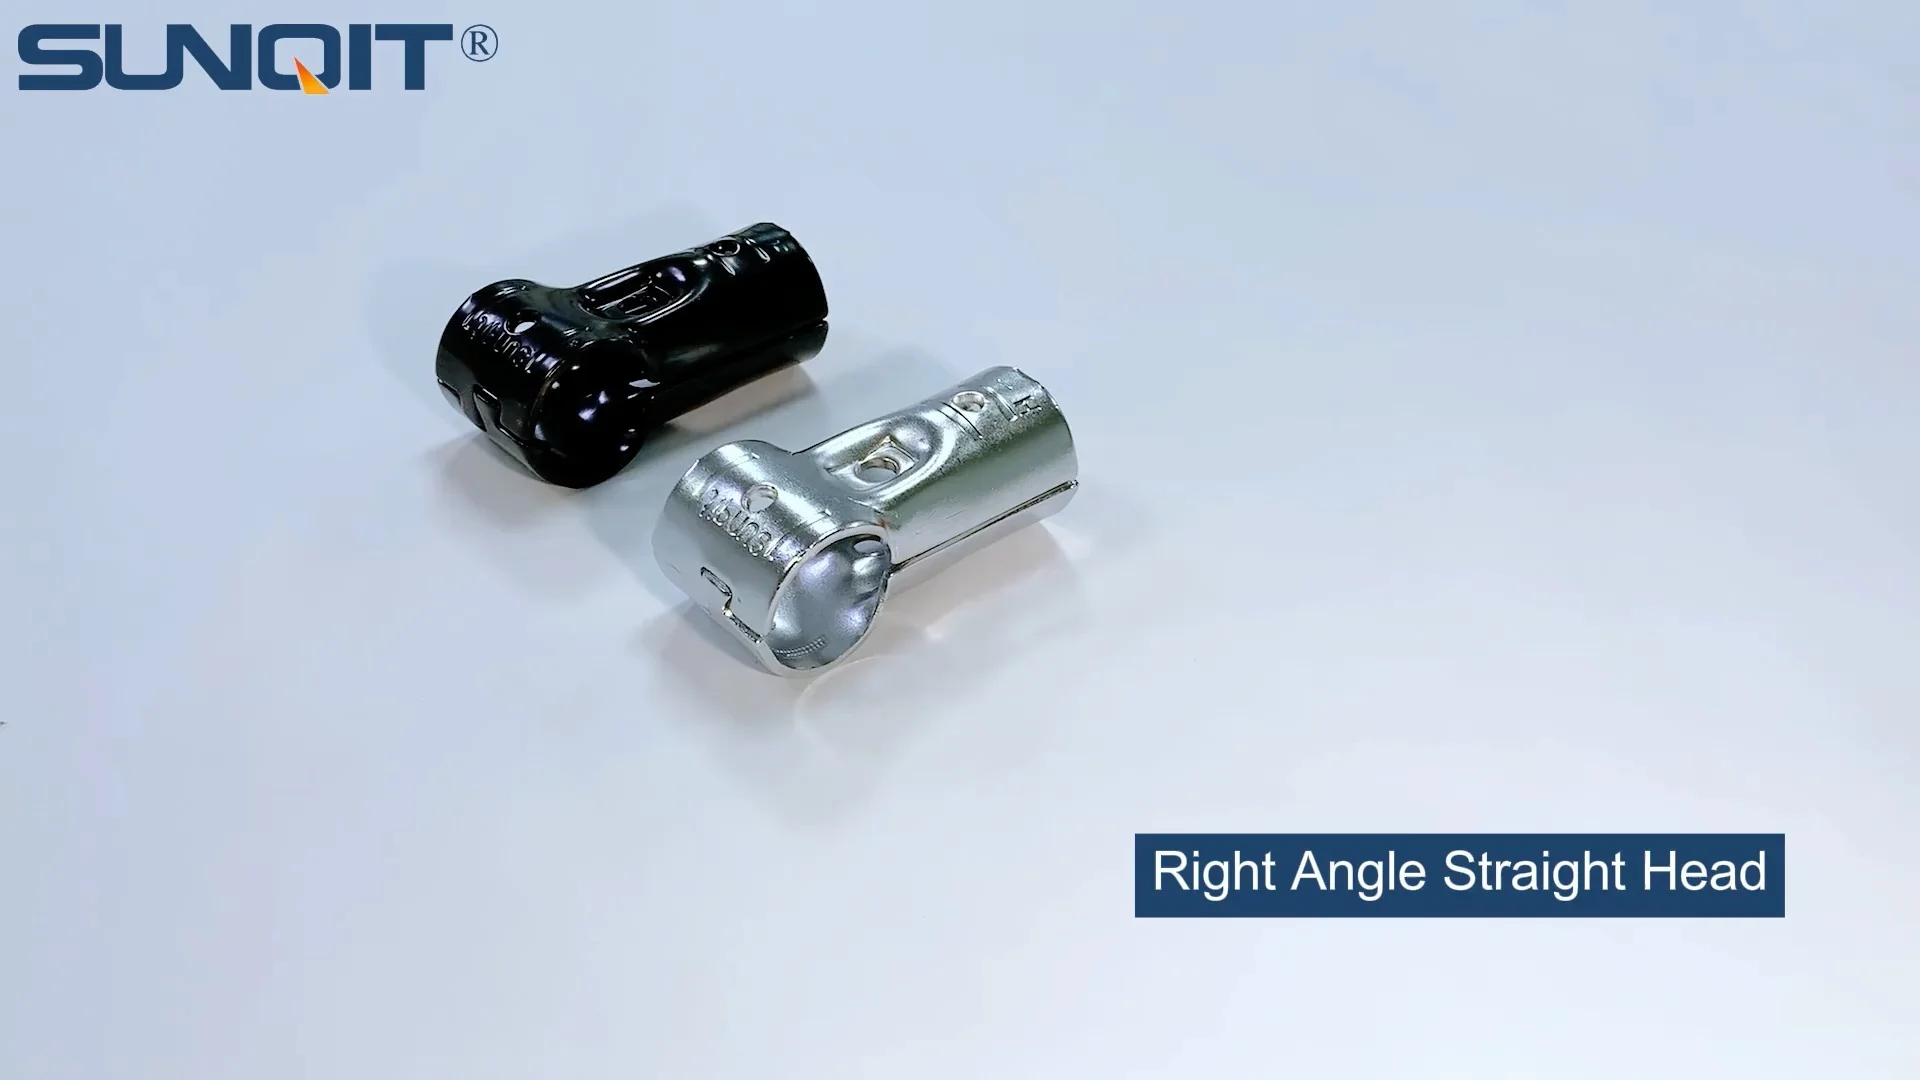
Two Way Lean Pipe Joint
Two way lean pipe joint for 2 pcs 28MM lean pipe connection in straight angle, which used widely in workbench, flow rack, hand trolley frame connection.
If you've ever stepped into a 3C (Computer, Communication, Consumer Electronics) assembly line, you know how critical organization and flexibility are. Tiny components, precision tools, and fast-paced workflows demand workspaces that can keep up—without slowing down production. That's where a custom lean pipe workbench comes in. Built with lean pipe and two way lean pipe joints, these workbenches are lightweight, adaptable, and surprisingly easy to construct yourself. In this guide, we'll walk through every step of building a 3C assembly workbench that fits your exact needs, from planning to final touches. No prior engineering experience required—just a few basic tools and a willingness to get hands-on.
Why Lean Pipe for 3C Assembly Workbenches?
Before we dive into the build, let's talk about why lean pipe is the go-to material here. Lean pipe—often made of steel with a plastic coating—is strong yet lightweight, resistant to scratches, and affordable. But the real magic is in the joints, especially the two way lean pipe joint. These simple connectors let you attach pipes at 90-degree angles (and sometimes more, with adjustable variants), making it easy to build, modify, or disassemble your workbench as your needs change. For 3C assembly, where product lines shift frequently and tool layouts evolve, this flexibility is a game-changer. Plus, lean pipe systems are compatible with a wide range of lean pipe accessories—think caster wheels for mobility, shelves for storage, and tool hooks—so you can truly customize your workspace.
Tools and Materials You'll Need
Let's gather your supplies first. You don't need a fully stocked workshop, but having the right tools and materials on hand will make the process smooth. Here's a breakdown:
| Essential Tools | ||
|---|---|---|
| Name | Purpose | Notes |
| Adjustable wrench | Tightening joints | A 10-12 inch wrench works best for most lean pipe joints. |
| Hacksaw or pipe cutter | Cutting lean pipes to length | A pipe cutter gives cleaner edges than a hacksaw—worth renting if you don't own one. |
| Tape measure | Measuring pipe lengths and workbench dimensions | Get a 25-foot retractable tape for accuracy. |
| Level (2-foot or longer) | Ensuring the workbench is flat and stable | A bubble level is affordable and easy to use. |
| Rubber mallet | Seating joints onto pipes | Soft enough to avoid damaging pipes but firm enough to secure connections. |
| Deburring tool | Smoothing rough edges after cutting pipes | Prevents cuts and ensures joints fit snugly. |
| Materials | ||
|---|---|---|
| Item | Quantity (Example for 4ft x 2ft Workbench) | Specifications |
| Lean pipe | 8 pieces | 1.5-inch diameter, 1.2mm thickness (standard for workbenches). Lengths: 4×4ft (top/bottom rails), 4×30in (legs). |
| Two way lean pipe joint | 8 pieces | Chrome-plated steel, compatible with 1.5-inch lean pipe. |
| Workbench top | 1 piece | 4ft x 2ft plywood, MDF, or aluminum honeycomb panel (ESD-safe options available for 3C work). |
| Caster wheels | 4 pieces | Locking casters, 3-inch diameter, 150lbs load capacity each. |
| Lean pipe accessories | As needed | Shelf brackets, tool hooks, or cable management clips (optional but recommended). |
Pro tip: Buy a few extra two way lean pipe joints and a spare length of lean pipe. Mistakes happen—better to have backups than pause mid-project to order more parts.
Step 1: Plan Your Workbench Design
Before cutting a single pipe, take time to plan. 3C assembly workbenches vary based on what you're building—assembling smartphones might need more tool storage, while testing circuit boards could require anti-static surfaces. Ask yourself:
- Height: Standard workbench height is 36 inches, but adjust based on your team's average height. For seated work (common in 3C), 30-32 inches is better.
- Width and depth: A 4ft (width) x 2ft (depth) workbench works for most 3C tasks, but measure your space first. Will it need to fit through doorways if you move it?
- Weight capacity: 3C components are lightweight, but if you'll place heavy tools (like soldering stations), aim for a frame that supports 200-300lbs.
- Mobility: Do you need caster wheels? Locking casters let you move the workbench for cleaning or reconfiguration but keep it stable during use.
- Extras: Shelves above or below? Tool rails along the back? Cable management holes? Sketch a rough diagram—even a napkin sketch helps.
For this guide, we'll build a 4ft x 2ft workbench with a lower shelf, locking caster wheels, and a plywood top. Adjust dimensions in the next steps if your plan differs.

Step 2: Cut and Prepare the Lean Pipes
Now, let's cut the pipes to length. Measure twice, cut once—this old adage saves frustration later. Using your tape measure, mark the pipes based on your design. For our 4ft x 2ft workbench with 30-inch legs, you'll need:
- 4 horizontal rails (top frame): 2 pieces at 4ft, 2 pieces at 2ft
- 4 vertical legs: 4 pieces at 30 inches
- 4 lower shelf rails: 2 pieces at 4ft, 2 pieces at 2ft (if adding a shelf)
Use a pencil to mark the cut lines. If using a pipe cutter, clamp the pipe securely in a vice (or have a helper hold it steady). Rotate the cutter around the pipe, tightening slightly with each turn, until it cuts through. If using a hacksaw, apply gentle pressure and let the blade do the work—don't force it. After cutting, use the deburring tool to smooth the inside and outside edges. Rough edges can tear the plastic coating on lean pipe or make joints hard to attach.
Pro tip: Lay all cut pipes on the floor in their final arrangement before assembling. This lets you double-check lengths and spot mistakes early.

Step 3: Assemble the Frame with Two Way Lean Pipe Joints
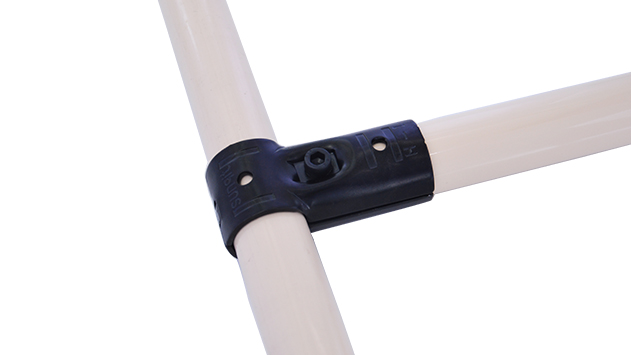
Now the fun part: building the frame. The two way lean pipe joint is your best friend here—it's designed to connect two pipes at a right angle, forming the corners of your workbench. Here's how to do it:
3.1 Build the Top Frame
Start with the top rectangular frame. Take one 4ft pipe and one 2ft pipe. Slide a two way lean pipe joint onto each end of the 4ft pipe—make sure the joint's open ends are facing the same direction (up and towards the 2ft pipe). Now, insert the 2ft pipe into one of the joint's open ends. Push firmly—you should feel it seat into the joint. Repeat with the remaining 4ft and 2ft pipes to form a rectangle. Tighten the joint screws with your adjustable wrench—snug, but not so tight you strip the plastic coating on the pipe.
Check that the frame is square by measuring diagonally from corner to corner. Both measurements should be equal. If not, gently push the corners until they align—lean pipe frames are flexible enough to adjust slightly.
3.2 Add the Vertical Legs
Flip the top frame upside down on a flat surface (like your garage floor). At each corner, slide a two way lean pipe joint onto the bottom of the frame's pipes. These joints will hold the vertical legs. insert a 30-inch leg pipe into each joint, pointing downward. Tighten the screws just enough to hold the legs in place—we'll fully tighten later.
Now, check the legs for plumb (vertical straightness). Use your level against each leg—adjust the joints if they're leaning. If the legs are wobbly, it's usually because the top frame isn't square, so double-check those diagonal measurements again.
3.3 Add the Lower Shelf (Optional)
A lower shelf adds storage for bins, tools, or completed components. To build it, measure up from the bottom of the legs—6-12 inches is standard. Mark the legs, then attach two way lean pipe joints at those marks. Assemble another 4ft x 2ft frame (same as the top) and connect it to the leg joints. Tighten all screws now—firm but not over-tightened (over-tightening can crack the joint's plastic coating).
Step 4: Attach the Caster Wheels
If you're adding mobility, now's the time to install caster wheels. Most caster wheels for lean pipe workbenches have a plate with holes that align with the bottom of the legs. Flip the frame upside down so the legs are pointing up. Place a caster wheel plate against the bottom of each leg, mark the holes, then drill pilot holes (1/8 inch diameter) through the leg pipes. Use self-tapping screws (included with most casters) to secure the plates. Tighten until the caster doesn't wobble.
Pro tip: Lock one or two casters while assembling to keep the frame from rolling away. Once all casters are on, test the wheels—they should roll smoothly, and the locks should engage firmly.
Step 5: Mount the Workbench Top
Now, let's add the work surface. If using plywood or MDF, cut it to your workbench's top frame dimensions (4ft x 2ft in our example). Sand the edges to avoid splinters. For 3C assembly, consider an ESD (electrostatic discharge) top to protect sensitive components—many suppliers sell ESD-ready tops that fit lean pipe frames.
Place the top on the frame. To secure it, you can use lean pipe accessories like pipe clamps (attached to the frame rails) or drill small holes through the top and into the frame pipes, then use zip ties or screws. For a temporary setup, just resting the top on the frame works, but securing it prevents sliding during use.
Step 6: Customize with Lean Pipe Accessories
This is where your workbench truly becomes yours. Lean pipe accessories let you tailor it to 3C assembly tasks. Here are some ideas:
- Tool rails: Attach a horizontal lean pipe along the back of the workbench, then add tool hooks for screwdrivers, pliers, or soldering irons.
- Shelves: Use shelf brackets (another lean pipe accessory) to add a second shelf above the top frame for bins of small components (resistors, capacitors, etc.).
- Cable management: Clip-on cable organizers keep power cords and USB cables from tangling—critical for 3C work with multiple devices.
- Bin holders: Mount plastic bin rails under the top shelf to store frequently used parts within arm's reach.
Take time to arrange accessories based on workflow. For example, place your most-used tools (like a hot air gun) on the side of your dominant hand, and bins of parts near the assembly area to minimize reaching.
Step 7: Test and Adjust
You're almost done! Give the workbench a final check:
- Stability: Push gently on all sides—does it wobble? If so, check that all joints are tight and the legs are plumb.
- Level: Place your level on the worktop. If it's uneven, adjust the caster wheels (some have height-adjustable legs) or add shims under the legs.
- Mobility: Roll it around—casters should move smoothly, and locks should hold when engaged.
- Accessibility: Sit or stand at the workbench and mimic assembly tasks. Can you reach tools and parts easily? Adjust shelves or hooks if needed.
Maintenance Tips for Longevity
A well-maintained lean pipe workbench will last for years. Here's how to care for it:
- Tighten joints monthly: Lean pipe joints can loosen over time with use. A quick wrench check prevents wobbling.
- Clean the surface: Wipe the worktop with a mild soap solution—avoid harsh chemicals that might damage ESD coatings.
- Lubricate casters: If wheels start squeaking, add a drop of silicone lubricant to the axles.
- replace worn parts: If a caster wheel cracks or a joint breaks, swap it out—lean pipe parts are affordable and easy to replace.
Why Build Your Own? The Benefits of Customization
You might be wondering: why not just buy a pre-made workbench? For 3C assembly, off-the-shelf options rarely fit perfectly. By building with lean pipe and two way lean pipe joints, you get:
- Cost savings: DIY lean pipe workbenches cost 30-50% less than pre-built industrial workbenches.
- Flexibility: Need to add a shelf next month? Just buy a few more joints and pipes. Change the height? Swap out the legs.
- Team buy-in: Involving your assembly team in designing the workbench makes them more likely to use and care for it.
Finding Quality Parts: Choosing a Lean Pipe Supplier
The key to a durable workbench is quality parts. When sourcing lean pipe, two way lean pipe joints, or caster wheels, look for a lean pipe supplier with good reviews—check for mentions of sturdy joints, consistent pipe diameters (so parts fit together), and responsive customer service. Avoid ultra-cheap parts; flimsy joints or weak casters will lead to a wobbly workbench that needs constant repairs.
Final Thoughts
Building a 3C assembly workbench with lean pipe and two way lean pipe joints is more than a DIY project—it's an investment in efficiency. By tailoring the workspace to your team's needs, you'll reduce wasted motion, keep tools organized, and adapt quickly to new assembly tasks. And when your next product line launches? Disassemble, reconfigure, and rebuild—lean pipe makes it easy. So grab your tools, gather your parts, and start building—your assembly line (and your team) will thank you.