- Company Articles
- Products and Technology
- Installation And Maintenance
- 4040 Aluminum Profile End Caps in Material Racks: Material Rack B Installation Guide

4040 Aluminum Profile End Caps in Material Racks: Material Rack B Installation Guide
Related Product
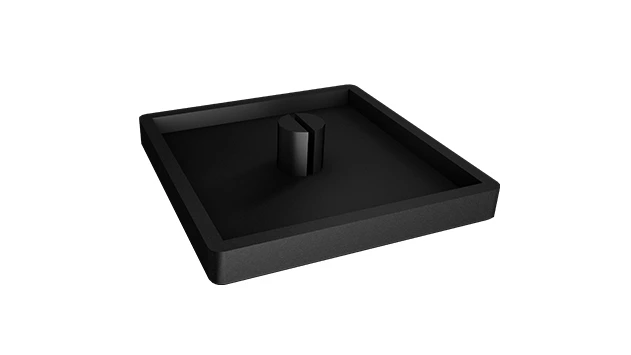
4040 Aluminum Profile End Cap
The aluminum profile end cap adds a finishing touch to your project and closes off profile ends to limit dust and debris buildup, also it can avaid some scratch for material and labor during the assemble work.
Introduction: Why Material Rack B Matters in Your Workspace
Walk into any well-organized warehouse, factory floor, or workshop, and you'll notice one thing right away: the difference a good storage system makes. Cluttered shelves, misplaced tools, and materials scattered haphazardly don't just slow down work—they create frustration, waste time, and even risk accidents. That's where lean systems come in, and at the heart of many lean setups is the humble yet mighty material rack. Today, we're zeroing in on Material Rack B (3 row and 3 floor) —a workhorse designed to streamline your material handling, keep inventory visible, and turn chaos into order.
But here's the thing: even the best rack is only as strong as its smallest components. You might be focused on the big parts—the aluminum profiles, the shelves, the connectors—but have you thought about the little details that make a big difference? Enter the 4040 aluminum profile end cap . These unassuming plastic or rubber caps might seem trivial, but they're the unsung heroes that protect your rack, your materials, and even your team. In this guide, we're going to walk through everything you need to know about installing Material Rack B, with a special focus on how 4040 end caps fit into the process. Whether you're a seasoned warehouse manager or setting up your first lean workspace, this step-by-step breakdown will make sure your rack is safe, sturdy, and built to last.
Understanding the Basics: What You're Working With
Before we dive into installation, let's get familiar with the star players here: Material Rack B and the 4040 aluminum profiles that form its backbone. Material Rack B is a 3-row, 3-floor storage solution designed for versatility. It's perfect for holding everything from small parts bins to larger components, with each shelf adjustable to fit your needs. But what makes it so reliable? The frame is built from aluminum profiles—specifically, 4040 aluminum profiles. If you're new to aluminum profiles, "4040" refers to their dimensions: 40mm by 40mm. These profiles are lightweight, corrosion-resistant, and incredibly strong, making them a staple in lean manufacturing and industrial setups.
Now, the 4040 aluminum profile end cap is exactly what it sounds like: a cap that fits snugly over the exposed ends of 4040 aluminum profiles. Why does this matter? Imagine running your hand along the edge of an uncapped aluminum profile. Those sharp, raw edges can catch on gloves, scratch materials, or even cut skin. End caps smooth those edges, turning a potential hazard into a safe, finished surface. They also keep dust, debris, and moisture from getting inside the profiles, which can cause corrosion over time. And let's not forget aesthetics—end caps give your rack a clean, professional look, showing that you care about the details.
Of course, end caps are just one part of the broader family of aluminum profile accessories that make Material Rack B work. You'll also be using connectors, fasteners, and shelf supports, but today, we're putting end caps in the spotlight. Let's gather our tools and get started.

Tools and Materials You'll Need
Before you start assembling, let's make sure you have everything within arm's reach. Nothing slows down a project like stopping halfway to hunt for a missing tool. Here's a quick checklist to get you prepared:
| Tools | Materials | Safety Gear |
|---|---|---|
| Rubber mallet (soft-faced) | Material Rack B kit (includes 4040 aluminum profiles, shelves, connectors) | Work gloves (to protect hands from sharp edges) |
| Measuring tape (2m or longer) | 4040 aluminum profile end caps (check your kit—they should be included!) | Safety glasses (in case of flying debris during assembly) |
| Level (bubble or digital) | Hex keys (Allen wrenches—usually included with the rack kit) | Knee pads (optional, but helpful if you'll be kneeling during setup) |
| Pencil or marker (for marking alignment points) | Clean cloth (for wiping down profiles) | |
| Deburring tool (optional, but useful for smoothing rough edges) |
Pro tip: Lay out all your materials on a clean, flat surface before starting. This helps you verify that nothing is missing from the kit. Most Material Rack B packages come with a parts list—take 5 minutes to cross-check each item. Missing an end cap or a connector? Better to order it now than halfway through installation!

Step 1: Preparing Your Workspace
You've got your tools, your materials are laid out, and you're ready to go. But before you start screwing profiles together, let's talk about workspace prep. Even the most straightforward assembly job can go sideways if you're working in a cramped, cluttered area. Here's how to set yourself up for success:
Clear the area: Find a spot with enough space to lay out all the rack components. Material Rack B (3 row and 3 floor) isn't tiny—you'll need at least 6 feet of horizontal space to assemble the frame, plus room to move around. Push aside any boxes, tools, or debris that might get in the way. A clean floor also ensures you won't lose small parts like end caps or screws.
Check the floor level: This might seem nitpicky, but trust us—an uneven floor will throw off your entire rack. Use your level to check the surface where you'll place the rack. If there are dips or bumps, consider placing shims under the rack's feet later to stabilize it. For now, just note any problem areas so you can adjust during installation.
Protect the surface: If you're working on a concrete floor, you might not care about scratches, but if you're assembling the rack on a finished surface (like a workshop floor with epoxy coating), lay down a drop cloth or cardboard. Aluminum profiles are tough, but dragging them across a hard surface can leave marks. Plus, it's easier to keep small parts like 4040 aluminum profile end caps from rolling away on a non-slip surface.
Step 2: Unpacking and Inspecting the Components
Now that your workspace is ready, let's dig into the Material Rack B kit. Start by carefully opening the box—use a box cutter if needed, but be gentle to avoid slicing through any components inside. Once unpacked, separate the parts into groups: aluminum profiles, shelves, connectors, end caps, and hardware (screws, bolts, etc.).
Inspect the 4040 aluminum profiles: Take a close look at each profile. Are there any dents, bends, or scratches? Check the ends—sometimes during shipping, the cut edges can get burrs (tiny metal splinters). If you spot burrs, use a deburring tool or even a piece of fine sandpaper to smooth them out. Sharp edges here are exactly why we need end caps later, but a little prep now will make installing the caps easier.
Locate the 4040 end caps: These should be in a small bag or separate compartment in the kit. They're usually made of plastic (often black, white, or gray) and shaped like a small cup that fits over the end of the 4040 profile. Count them—you'll need one end cap for every exposed end of the 4040 profiles in your rack. Material Rack B has a 3-row, 3-floor design, so do a quick mental count: each vertical support, each horizontal beam—every end that isn't connected to another profile needs a cap. If you're short, now's the time to track down extras (your aluminum profile accessories supplier should have them in stock).
Check the connectors and fasteners: Most racks use T-slot connectors that slide into the aluminum profiles and secure with screws. Make sure the connectors are free of cracks, and the screws aren't stripped. If any hardware looks damaged, contact your supplier before proceeding—using faulty parts is a safety risk.
Step 3: Installing 4040 Aluminum Profile End Caps
Now, let's get to the star of the show: installing the 4040 aluminum profile end caps . This step is simple, but doing it right ensures your rack is safe and professional-looking. Here's how:
Clean the profile ends: Before attaching the end caps, wipe the ends of the 4040 profiles with a clean cloth. Dust, oil, or debris can prevent the caps from fitting snugly. A quick wipe-down ensures a tight seal.
Align the end cap: Take one end cap and hold it up to the end of a 4040 profile. You'll notice the cap has a slightly flexible design—this allows it to stretch just enough to fit over the profile. Make sure the cap is oriented correctly: some end caps have a lip or a specific shape that matches the profile's T-slot. If it doesn't seem to fit, rotate it 90 degrees—you'll feel when it lines up.
Press or tap into place: For most end caps, a firm press with your hand is enough to seat them. Place your palm over the cap and push evenly until you hear a soft "click" or feel it lock into position. If the cap is tight (which is a good thing!), don't force it with your hand—grab your rubber mallet. Hold the cap in place with one hand, and gently tap the top of the cap with the mallet. Start with light taps, increasing pressure slowly, until the cap is flush with the end of the profile. Avoid hitting too hard—you don't want to crack the cap or damage the profile.
Check the fit: Once the cap is on, give it a gentle tug. It should stay firmly in place. If it falls off easily, it might not be seated all the way—tap it again with the mallet. If it's still loose, check for debris in the profile end or a warped cap (replace if necessary).
Repeat this process for all exposed ends of the 4040 profiles. Take your time here—rushing through end cap installation can lead to caps popping off later, which defeats their purpose. Remember: these caps aren't just for looks. They prevent dust from getting inside the profiles, protect anyone who brushes against the rack from sharp edges, and even extend the life of the aluminum by shielding the ends from moisture.
Step 4: Assembling the Frame of Material Rack B
With your end caps installed, it's time to build the frame of Material Rack B. This is where the lean system magic happens—turning individual profiles into a sturdy, functional rack. Let's break it down:
Start with the vertical supports: Lay out the four vertical 4040 profiles (these are the tallest ones in your kit) on the floor, parallel to each other, with their end caps facing up. Space them according to the rack's dimensions—check the instruction manual for the exact width and depth (usually around 1200mm wide by 600mm deep for a standard 3-row rack). Use your measuring tape to ensure they're evenly spaced, then mark the floor with a pencil to keep them in place.
Attach horizontal beams to the bottom: Take the shorter horizontal profiles (these will form the base of the rack) and connect them to the vertical supports using T-slot connectors. Slide a connector into the T-slot of a vertical profile, align it with the hole in the horizontal profile, and secure with a screw using a hex key. Tighten until snug, but don't over-tighten—you can strip the threads in the aluminum. Repeat this for all four corners to form a rectangular base frame.
Add the middle and top horizontal beams: Now, attach horizontal beams at the middle and top of the vertical supports, following the same process. These beams will support the shelves (3 floors, remember?). Make sure each beam is level—use your bubble level across the top of the beams to check. If one side is higher, loosen the connector and adjust until it's even. A wobbly frame now means a wobbly rack later, so take the time to get this right.
Check for square: Once the frame is assembled, measure the diagonals. From corner to corner, both measurements should be equal—this ensures the frame is square (not skewed). If they're off, gently push or pull the corners until the diagonals match. Tighten all connectors again once squared up.
Step 5: Installing Shelves and Final Adjustments
With the frame standing (you might need a helper to hold it upright now), it's time to add the shelves. Material Rack B has 3 floors, so you'll be installing three sets of shelves across the 3 rows.
Position the shelf supports: Most racks use shelf brackets or angle connectors that attach to the horizontal beams. Slide these into the T-slots of the horizontal beams at the desired height. For a 3-floor rack, spacing the shelves evenly (e.g., 400mm apart) is a good starting point, but adjust based on what you'll be storing. Taller items? Leave more space between shelves. Small parts bins? You might want them closer together.
Secure the shelves: Place the shelf boards (usually made of plywood, metal, or plastic) on top of the supports. Depending on the kit, the shelves might snap into place, or you might need to secure them with screws through the brackets. Make sure each shelf is level—again, use your bubble level. A shelf that slopes could cause materials to slide off!
Double-check all connections: Walk around the rack and give each connector, each screw, a gentle tug. Are any loose? Tighten them. Check the end caps again—did any pop off during assembly? If so, press them back on (you might need to tap with the mallet again). Stand back and look at the rack from all angles—does it lean? If yes, check the floor level and adjust the feet (some racks have adjustable leveling feet) until it's stable.
Troubleshooting Common Issues
Even with careful prep, things can go wrong. Here are some common hiccups and how to fix them:
End caps won't stay on: If an end cap pops off repeatedly, the profile end might be too smooth (unlikely) or the cap is damaged. Try cleaning the profile end again with rubbing alcohol to remove any oil, then reattach. If that fails, replace the cap— aluminum profile accessories like end caps are cheap and easy to replace.
Rack wobbles when loaded: This is usually due to loose connectors or an uneven floor. Tighten all screws first—often, that's the culprit. If it still wobbles, check the floor level and use shims under the feet. For extra stability, you can anchor the rack to the wall (if allowed in your workspace) using angle brackets.
Shelves sag under weight: Don't overload the shelves! Check the rack's weight capacity (usually listed in the manual) and distribute heavy items evenly across the shelves, not concentrated in one spot. If shelves still sag, add extra supports in the middle.
Maintenance Tips: Keeping Your Rack (and End Caps) in Top Shape
Your Material Rack B is installed, and it looks great. But to keep it that way, a little maintenance goes a long way:
Clean end caps regularly: Dust and grime can build up on the end caps, especially in busy workshops. Wipe them down with a damp cloth every few weeks to keep them looking new.
replace damaged end caps: If an end cap cracks or falls off and gets lost, replace it ASAP. A missing end cap leaves the profile end exposed, which is a safety hazard and can let moisture in.
Tighten connectors quarterly: With regular use, vibrations can loosen screws. Do a quick check every 3 months to tighten any loose connectors—this prevents the rack from becoming unstable over time.
Inspect for rust or corrosion: Aluminum profiles are corrosion-resistant, but if you're in a humid environment, check for signs of rust on metal components (like screws or brackets). A little WD-40 can help prevent rust from spreading.
Conclusion: Small Parts, Big Impact
There you have it—your Material Rack B (3 row and 3 floor) is installed, and those 4040 aluminum profile end caps are quietly doing their job. It's easy to overlook the small components in a project like this, but as we've seen, end caps play a crucial role in safety, durability, and even the overall look of your rack. They're a perfect example of how aluminum profile accessories turn a basic frame into a polished, functional system.
By following this guide, you've not only built a rack—you've invested in a lean workspace that will save you time, reduce frustration, and keep your team safe. Whether you're storing raw materials, finished products, or tools, Material Rack B is now ready to be the backbone of your organization system. And the next time someone walks into your workspace and comments on how tidy everything is, you can smile and know that even the smallest parts (like those end caps) played a part in making it happen.
So go ahead—load it up, organize your inventory, and enjoy the efficiency of a well-built material rack. You've earned it!