- Company Articles
- Products and Technology
- Installation And Maintenance
- 4040B EU Standard Aluminum Profile Maintenance: Cleaning & Scratch Repair Tips

4040B EU Standard Aluminum Profile Maintenance: Cleaning & Scratch Repair Tips
Related Product
4040B EU Standard Aluminum Profile
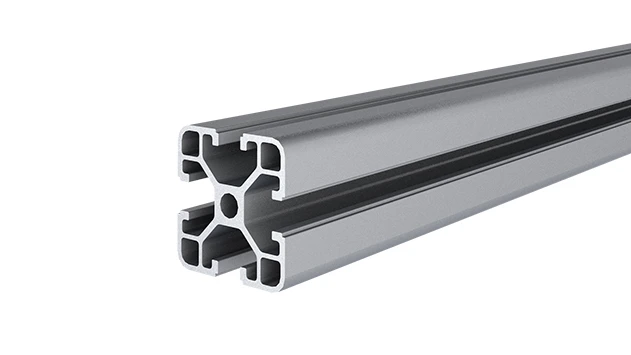
4040B is a 4.00x4.00 CM fractional 40 series square extrusion T-slot profile with four open T-slots, each side with 4.00cm face. The profile has align-a-grooves to assist in aligning connecting profiles.
Introduction: Why Your 4040B Profiles Deserve a Little TLC
Walk into any well-organized workshop, manufacturing plant, or even a tech lab, and you'll likely spot the unsung heroes holding everything together: aluminum profiles. Specifically, the 4040B EU Standard Aluminum Profile has become a staple in these spaces, and for good reason. These sturdy, lightweight extrusion profiles form the backbone of workbenches, material racks, conveyor systems, and so much more. They're durable, versatile, and designed to handle the daily grind of industrial life. But here's the thing: even the toughest profiles need care. Dirt builds up, scratches happen, and over time, that wear and tear can slow down your operations, make your workspace look unprofessional, and even shorten the lifespan of your equipment. The good news? Maintaining your 4040B profiles is easier than you think. With a little routine cleaning, some simple scratch repair tricks, and attention to the aluminum profile accessories that keep them functioning, you can keep these workhorses in top shape for years. Let's dive in.
Understanding Your 4040B EU Standard Aluminum Profile
Before we get into maintenance, let's make sure we're all on the same page about what makes the 4040B EU Standard Aluminum Profile so special. As an aluminum extrusion profile, it's created by forcing heated aluminum through a die, resulting in a consistent, precise shape with a smooth surface finish. The "4040" refers to its dimensions—40mm by 40mm—making it a medium-duty profile that's perfect for everything from workbenches (like the aptly named Workbench E) to material racks (think Material Rack B with its 3 rows and 3 floors). What sets the 4040B apart is its European standard design, which means it's compatible with a wide range of aluminum profile accessories, from end caps to connectors, ensuring you can customize and expand your setup with ease.
But even with all that durability, the 4040B's surface is still vulnerable. Its smooth finish shows fingerprints, grease, and dust easily, and while aluminum is resistant to rust, it can corrode if exposed to harsh chemicals or prolonged moisture. Scratches, too, aren't just cosmetic—deep ones can trap dirt, leading to further damage. That's why understanding how to care for it is key.

The Importance of Regular Maintenance: More Than Just Looks
You might be thinking, "Why bother? It's just a metal profile." But regular maintenance goes way beyond keeping your workspace looking neat. Here's why it matters:
- Efficiency: A clean profile glides better. If you're using your 4040B in a conveyor system or roller track setup, dirt and grime can slow down movement, making tasks take longer and frustrating your team.
- Safety: Loose or damaged aluminum profile accessories—like end caps that have cracked or come off—can create sharp edges or trip hazards. Regular checks catch these issues before they become accidents.
- Cost Savings: Replacing a scratched or corroded profile is far more expensive than spending 15 minutes a month cleaning it. Maintenance extends lifespan, so you get more value from your investment.
- Professionalism: Clients, inspectors, or new hires notice a clean, well-maintained workspace. It sends a message that you care about quality—and that translates to trust in your work.
Now that we know why it's important, let's get into the how-to.
Step-by-Step Cleaning Guide: Making Your Profiles Shine
Cleaning your 4040B aluminum profiles isn't rocket science, but there's a right way and a wrong way. Let's break it down.
What You'll Need
- Microfiber cloths (avoid paper towels—they can scratch!)
- Soft-bristle brush (like a clean paintbrush or makeup brush for tight spots)
- Mild dish soap (unscented, no abrasives)
- Distilled water (tap water with high mineral content can leave spots)
- Isopropyl alcohol (for tough grease or adhesive residue)
- Toothpicks or cotton swabs (for crevices and around accessories)
- A bucket or spray bottle
The Cleaning Process
Step 1: Dry Dust First Start by removing loose dirt and dust. Grab your soft-bristle brush and gently sweep along the profile's surface, paying extra attention to grooves, corners, and around aluminum profile accessories like connectors and end caps. If you skip this step, wet cleaning can turn dust into mud, which is harder to remove and might scratch the surface.
Step 2: Prepare Your Cleaning Solution Mix a few drops of mild dish soap into a bucket of distilled water. For larger areas, you can put this solution in a spray bottle—just make sure it's a fine mist, not a heavy stream, to avoid soaking the profile.
Step 3: Wipe Gently Dip a microfiber cloth into the soapy water, wring it out well (you want it damp, not dripping), and wipe the profile in the direction of the extrusion (along the length, not across). This prevents streaks and ensures you're lifting dirt rather than pushing it around. For stubborn spots—like dried-on grease—dampen a cloth with isopropyl alcohol, let it sit for 30 seconds, then wipe gently. Avoid scrubbing; let the alcohol do the work.
Step 4: Rinse (If Needed) If you used soapy water, dampen a clean microfiber cloth with distilled water and wipe away any soap residue. This is especially important if your workspace is humid, as soap left behind can attract more dirt.
Step 5: Dry Immediately Use a dry microfiber cloth to buff the profile dry. Pay attention to corners and under accessories—moisture trapped here can lead to corrosion over time. For extra shine, you can buff in small circular motions once dry.
Step 6: Detail the Accessories Don't forget the small parts! Use a toothpick or cotton swab to clean out dirt from the edges of aluminum profile end caps, around joints, and in the T-slots where accessories attach. A quick wipe with alcohol here keeps them functioning smoothly and prevents dirt from migrating back to the profile.
Do's
- Test any cleaning solution on a small, hidden area first (like the back of a profile) to ensure it doesn't discolor the finish.
- Clean up spills immediately—especially oils, chemicals, or acidic substances (like battery fluid), which can etch the aluminum.
- Use separate cloths for cleaning and drying to avoid re-depositing dirt.
Don'ts
- Never use abrasive cleaners (like scouring pads, steel wool, or bleach) – they'll scratch the surface.
- Avoid harsh chemicals (ammonia, vinegar, or industrial solvents) – they can damage the anodized finish.
- Don't pressure wash profiles—high pressure can force water into accessories, causing rust or loosening parts.
Scratch Repair: Fixing the Oops Moments
Even with the best care, scratches happen. Maybe a tool slipped, a heavy part was dragged across the profile, or someone leaned a metal object against it. The good news is most scratches can be fixed with a little patience. Let's tackle different types of scratches.
Light Scratches: Surface-Level Marks
These are the tiny scratches you can barely feel with your fingernail—think fine lines from dust or minor friction. They're cosmetic but can collect dirt if left untreated.
How to Fix:
- Clean the area first (using the steps above) to remove any dirt in the scratch.
- Apply a small amount of aluminum polish (like Mothers Mag & Aluminum Polish) to a clean microfiber cloth.
- Gently rub the polish into the scratch using circular motions. Apply light pressure—you don't want to remove more material than necessary.
- After 30 seconds, wipe away the excess polish with a dry microfiber cloth. Repeat if the scratch is still visible.
Pro tip: Anodized 4040B profiles have a thin protective layer, so avoid over-polishing—you don't want to wear through it!
Moderate Scratches: You Can Feel These
These are deeper scratches where your fingernail catches. They're more noticeable but still fixable at home.
How to Fix:
- Clean the area thoroughly and dry it.
- Use fine-grit sandpaper (800 to 1200 grit) – the higher the number, the finer the sandpaper. Wet the sandpaper with distilled water to create a slurry (this reduces friction and prevents further scratching).
- Lightly sand the scratch in the direction of the extrusion (not back and forth!). Keep the sandpaper moving to avoid creating a dip.
- After 10-15 strokes, wipe away the slurry and check progress. Repeat until the scratch is no longer felt with your nail.
- Follow up with aluminum polish (as in the light scratch method) to restore shine.
Deep Scratches: Gouges or Dents
These are serious—visible grooves, maybe even exposing raw aluminum. For these, you might need professional help, especially if the scratch is structural (like on a load-bearing part). But for non-structural deep scratches:
How to Fix (Temporary):
- Clean and dry the area.
- Apply a small amount of aluminum filler (available at hardware stores) to the scratch, following the product instructions.
- Once dry, sand with 800-grit sandpaper, then 1200-grit, to smooth the filler.
- Polish with aluminum polish. Note: This won't match the anodized finish perfectly, but it will prevent further damage and make it less noticeable.
When in doubt, contact your aluminum extrusion profile supplier—they might have touch-up kits or recommend a professional service.
Caring for Aluminum Profile Accessories: The Little Things That Matter
Your 4040B profile is only as good as the accessories that go with it. Aluminum profile accessories like end caps, connectors, and brackets not only hold your setup together—they protect the profile itself. Here's how to care for them:
Aluminum Profile End Caps: The First Line of Defense
End caps snap or screw onto the ends of your 4040B profiles, keeping dust, debris, and even insects out of the hollow core. Over time, they can crack, loosen, or fall off—so check them monthly.
- Tighten loose end caps: If they're screw-on, use a small screwdriver to tighten (don't over-tighten—you might strip the threads). If they're snap-on, press firmly until you hear a "click."
- replace cracked or missing end caps: A cracked end cap can't protect the profile, and a missing one leaves the end exposed to damage. Most suppliers sell replacement end caps for a few dollars—worth the investment.
Connectors and Joints: Keeping It All Together
Whether you're using internal rotatary aluminum joints, 90° aluminum crossing joints, or parallel fixation aluminum pipe joints, these accessories take a lot of stress. Dirt and corrosion can make them stick or loosen, so:
- Clean around joints: Use a soft brush to remove dust, then wipe with a damp cloth. For stuck joints, a drop of silicone lubricant (avoid oil-based lubes—they attract dirt) can help them move smoothly.
- Check for corrosion: Aluminum doesn't rust, but if your accessories have steel parts (like screws), they can corrode. Wipe with a cloth dampened in isopropyl alcohol to remove rust, then apply a thin layer of anti-seize lubricant to prevent future issues.
- Tighten loose fasteners: Use the right size wrench or screwdriver to tighten any bolts or screws that have come loose. Loose joints can put extra strain on the profile, leading to bending or scratching.
Other Accessories: Brackets, Guides, and More
From roller track placon mounts to caster wheels, these small parts keep your setup functional. Inspect them during your monthly clean: look for cracks, wear, or misalignment. If a bracket is bent, replace it—using a damaged accessory can damage the profile it's attached to.
Prevention: Keeping Your Profiles in Top Shape Long-Term
The best maintenance is prevention. Here's how to keep your 4040B profiles looking and working like new for years:
Set a Schedule
Create a simple maintenance calendar:
- Weekly: Quick dusting with a microfiber cloth—takes 5 minutes per workstation.
- Monthly: Deep clean (using the steps above) and check aluminum profile accessories for damage.
- Quarterly: Inspect joints and fasteners for tightness, test movement in conveyor/roller setups, and replace any worn accessories.
Handle with Care
Teach your team to:
- Wear gloves when moving parts that touch the profile—fingerprints contain oils that attract dirt.
- Lift, don't drag, heavy items across profiles. Dragging = scratches.
- Store tools and materials away from profiles to avoid accidental bumps.
Control the Environment
Small changes in your workspace can make a big difference:
- Humidity: If you're in a damp area, use a dehumidifier to prevent corrosion. Aluminum resists rust, but high humidity can speed up wear on accessories.
- Spills: Keep a spill kit handy (absorbent pads, microfiber cloths) to clean up oils or chemicals immediately.
- Storage: If you have extra profiles or disassembled setups, store them in a dry area with a cover to keep dust off.
Pro Tip: Label It!
Put a small sticker near each 4040B setup with a quick reminder: "Clean me weekly! Dust + Wipe = Happy Profile." It sounds silly, but visual cues work—your team will be more likely to stick to the routine.
Conclusion: A Little Care Goes a Long Way
Maintaining your 4040B EU Standard Aluminum Profile doesn't have to be a chore. With a few simple tools, a regular schedule, and attention to detail, you can keep these profiles shining, scratch-free, and functioning at their best. Remember: it's not just about the profile itself—it's about the efficiency, safety, and professionalism of your entire workspace.
So grab a microfiber cloth, round up your team, and start that maintenance routine today. Your 4040B profiles (and your budget) will thank you. And who knows? You might even find that a clean, well-maintained workspace makes the day feel a little brighter—for everyone.