- Company Articles
- Products and Technology
- Installation And Maintenance
- 4040D EU Standard Aluminum Profile Installation: Step-by-Step Tutorial

4040D EU Standard Aluminum Profile Installation: Step-by-Step Tutorial
Related Product
4040D EU Standard Aluminum Profile
4040D is a 4.00x4.00 CM fractional 40 series square extrusion T-slot profile with two side open T-slots, two side with closed face, each side with 4.00cm face. The profile has align-a-grooves to assist in aligning connecting profiles.
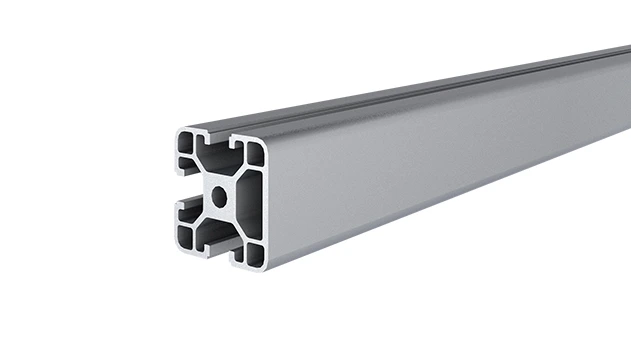
Walk into any modern workshop, manufacturing plant, or even a home garage turned DIY haven, and you'll likely spot the unsung hero of modular design: aluminum profiles. These sleek, T-slotted rails are the backbone of everything from sturdy workbenches to efficient material racks, offering a blend of strength, flexibility, and affordability that's hard to beat. Among the many profiles available, the
4040D EU Standard Aluminum Profile
stands out as a crowd favorite. Its 40x40mm cross-section hits the sweet spot between load capacity and adaptability, making it ideal for projects big and small—whether you're building a custom workstation, a shelving unit, or a production line material rack. But here's the thing: even the best materials fall flat without proper installation. That's why we've put together this detailed, hands-on guide to help you master the art of assembling 4040D profiles like a pro. By the end, you'll not only have a rock-solid structure but also the confidence to tweak, expand, or repurpose it down the line. Let's dive in!
Why 4040D EU Standard Aluminum Profile?
Before we grab our tools, let's take a quick detour to understand why the 4040D deserves a spot in your project. First off, it's built to the EU standard, which means consistent dimensions, high-quality aluminum extrusion, and compatibility with a wide range of
aluminum profile accessories
—think connectors, end caps, and brackets from most major suppliers. Its T-slotted design is a game-changer: those grooves running along its length let you slide in nuts, bolts, and accessories without drilling holes, making adjustments a breeze. And at 40mm square, it's tough enough to support heavy loads (we're talking up to 150kg per linear meter for many setups) but lightweight enough to handle solo assembly. Common uses? You'll find it in workbenches (more on that later), material racks, machine guards, and even automated conveyor systems. Simply put, it's the Swiss Army knife of industrial framing.
Tools & Materials You'll Need
Gearing Up for Success
Like any DIY project, installing 4040D profiles starts with having the right gear. Skip this step, and you'll end up with misaligned frames, stripped bolts, or worse. Here's your checklist:
Tools
- Measuring Tape & Square: Accuracy is king—you'll need these to mark cuts and ensure right angles.
- Hacksaw or Miter Saw: For cutting profiles to length. A miter saw with a non-ferrous metal blade speeds things up, but a hacksaw works in a pinch (just steady those hands!).
- Deburring Tool: Aluminum edges are sharp after cutting—this little tool smooths them out to avoid snags (or cuts!).
- Hex Key Set (Allen Wrenches): Most aluminum profile accessories use hex bolts, so stock up on sizes from 2mm to 6mm.
- Rubber Mallet: Gentle taps to seat connectors without damaging the aluminum.
- Level (Bubble or Digital): To keep your frame straight and stable—no wobbly workbenches here!
- Marker or Pencil: For marking cut lines and accessory positions.
- Clamps: To hold profiles steady while cutting or assembling.
Materials
- 4040D EU Standard Aluminum Profile: Measure twice, buy once! Order lengths slightly longer than your project needs to account for cutting errors.
- Aluminum Profile Accessories: The stars of the show! You'll need connectors (90° angle brackets, T-joints), 4040 aluminum profile end caps (to cover sharp ends), T-slot nuts, and bolts (M5 or M6 are standard for 4040D).
- Workbench or Flat Surface: A sturdy workspace to assemble on—ironically, you might even use a 4040D-built workbench for this (meta, right?)
- Lubricant (Optional): A dab of silicone spray in the T-slots can make sliding accessories smoother, especially if you're using tight-fitting nuts.
Pro Tip:
Lay out all your materials and tools before starting. Nothing kills momentum like hunting for a missing hex key halfway through assembly!

Step-by-Step Installation Guide
Now for the fun part: building! We'll walk through assembling a simple but practical structure: a 120cm tall x 80cm wide x 40cm deep material rack—perfect for storing tools, parts, or finished products. Feel free to adapt the dimensions to your needs, but the steps will stay the same.
Step 1: Plan Your Design & Measure Twice
"Measure twice, cut once" isn't just a cliché—it's the golden rule of aluminum profiling. Start by sketching your design on paper or using a free design app (we like SketchUp for 3D visualization). For our material rack, we'll need:
- 4 vertical posts: 120cm each (these are the legs).
- 4 horizontal beams (top and bottom): 80cm each (connecting the legs width-wise).
- 4 horizontal beams (middle shelves): 80cm each (we'll add two shelves at 40cm and 80cm height).
- 8 side beams: 40cm each (connecting the front and back legs depth-wise, at the top, bottom, and shelf levels).
Grab your measuring tape and mark these lengths on your 4040D profiles. Use a square to draw straight, 90° lines across the profile—wobbly lines lead to crooked cuts, and crooked cuts lead to wobbly frames. Pro tip: label each cut piece with its purpose (e.g., "vertical post – left front") to avoid mix-ups later.
- 4 vertical posts: 120cm each (these are the legs).
- 4 horizontal beams (top and bottom): 80cm each (connecting the legs width-wise).
- 4 horizontal beams (middle shelves): 80cm each (we'll add two shelves at 40cm and 80cm height).
- 8 side beams: 40cm each (connecting the front and back legs depth-wise, at the top, bottom, and shelf levels).
Grab your measuring tape and mark these lengths on your 4040D profiles. Use a square to draw straight, 90° lines across the profile—wobbly lines lead to crooked cuts, and crooked cuts lead to wobbly frames. Pro tip: label each cut piece with its purpose (e.g., "vertical post – left front") to avoid mix-ups later.
Step 2: Cut the Profiles (Slow & Steady Wins the Race)
Now it's time to cut those marked profiles. If you're using a miter saw, set the blade to 90° and clamp the profile firmly to the saw table—aluminum can slip, so don't skip the clamp! Let the blade do the work; forcing it will cause rough edges. If you're using a hacksaw, use long, smooth strokes and follow your marked line closely. Once cut, grab your deburring tool and run it along the edges—those sharp burrs can tear gloves, scratch surfaces, or even cut skin. A quick pass with sandpaper (120-grit) will smooth things out even more.
Test Fit: After cutting, lay out all pieces to ensure they match your design. A 120cm vertical post should line up with an 80cm horizontal beam—if not, double-check your measurements before moving on.
Test Fit: After cutting, lay out all pieces to ensure they match your design. A 120cm vertical post should line up with an 80cm horizontal beam—if not, double-check your measurements before moving on.
Step 3: Prep the T-Slots
Those T-slots are the heart of your profile's versatility, but they can trap dust, metal shavings, or factory residue. Grab a dry cloth or a small brush and wipe out each slot—you don't want debris gumming up your accessories later. If you're using T-slot nuts (the kind that slide into the grooves), give the slots a quick spray of lubricant (silicone or WD-40 works) to make insertion easier. Trust us: fighting a stuck nut in a tight slot is no fun.
Step 4: Assemble the Frame with Connectors
Now we're ready to start building the skeleton of our material rack. For this, we'll use
90° aluminum profile connectors
—the most common type for joining profiles at right angles. Here's how:
1. Start with the base: Take two 80cm horizontal beams (width) and two 40cm side beams (depth). Lay them on your workbench to form a rectangle. Slide T-slot nuts into the ends of the horizontal beams (one per corner), then place a 90° connector over each nut. Align the side beam with the connector, insert a bolt through the connector hole, and hand-tighten into the nut. Repeat for all four corners until you have a square base frame.
2. Add vertical posts: Flip the base frame upright. Slide T-slot nuts into the top of each base corner (where the vertical posts will go). Attach a 90° connector to each, then slide a 120cm vertical post into the connector. Tighten the bolts just enough to hold the post in place—we'll fully tighten later.
3. Secure the top frame: Repeat step 1 to build a second 80x40cm frame (the top). Lift it onto the vertical posts, align the corners with the post tops, and attach with 90° connectors. Now you have a tall, rectangular "cage" (minus the shelves).
4. Check for square: Grab your level. The frame should stand straight (vertical posts plumb) and the top/bottom frames should be square (diagonals equal). If it's wobbly, loosen the connectors, adjust, and retighten. A rubber mallet can help nudge posts into alignment—just tap gently!
1. Start with the base: Take two 80cm horizontal beams (width) and two 40cm side beams (depth). Lay them on your workbench to form a rectangle. Slide T-slot nuts into the ends of the horizontal beams (one per corner), then place a 90° connector over each nut. Align the side beam with the connector, insert a bolt through the connector hole, and hand-tighten into the nut. Repeat for all four corners until you have a square base frame.
2. Add vertical posts: Flip the base frame upright. Slide T-slot nuts into the top of each base corner (where the vertical posts will go). Attach a 90° connector to each, then slide a 120cm vertical post into the connector. Tighten the bolts just enough to hold the post in place—we'll fully tighten later.
3. Secure the top frame: Repeat step 1 to build a second 80x40cm frame (the top). Lift it onto the vertical posts, align the corners with the post tops, and attach with 90° connectors. Now you have a tall, rectangular "cage" (minus the shelves).
4. Check for square: Grab your level. The frame should stand straight (vertical posts plumb) and the top/bottom frames should be square (diagonals equal). If it's wobbly, loosen the connectors, adjust, and retighten. A rubber mallet can help nudge posts into alignment—just tap gently!
Step 5: Add Shelves & Strengthen with Braces
A material rack isn't much use without shelves. Let's add two at 40cm and 80cm from the bottom:
1. Mark shelf heights: Use your measuring tape to mark 40cm and 80cm on each vertical post. These are where the shelf beams will go.
2. Install shelf frames: Build two more 80x40cm frames (same as the base and top) using the remaining 80cm and 40cm beams. Slide them onto the vertical posts at your marked heights, and secure with 90° connectors—one at each corner.
3. Add cross-braces (optional but recommended): For extra stability, especially if you're storing heavy items, add diagonal braces. Cut two 56cm beams (using the Pythagorean theorem: 40cm² + 40cm² = ~56cm²) and attach them to the back of the rack, corner to corner, using 45° connectors (if you have them) or 90° connectors with spacer washers.
1. Mark shelf heights: Use your measuring tape to mark 40cm and 80cm on each vertical post. These are where the shelf beams will go.
2. Install shelf frames: Build two more 80x40cm frames (same as the base and top) using the remaining 80cm and 40cm beams. Slide them onto the vertical posts at your marked heights, and secure with 90° connectors—one at each corner.
3. Add cross-braces (optional but recommended): For extra stability, especially if you're storing heavy items, add diagonal braces. Cut two 56cm beams (using the Pythagorean theorem: 40cm² + 40cm² = ~56cm²) and attach them to the back of the rack, corner to corner, using 45° connectors (if you have them) or 90° connectors with spacer washers.
Step 6: Finish with Aluminum Profile Accessories
Now it's time to add the finishing touches that turn a bare frame into a polished, functional tool. Here's where
aluminum profile accessories
shine:
- 4040 Aluminum Profile End Caps: Pop these onto the exposed ends of your profiles to cover sharp edges and give a clean look. They press fit easily—just push until you hear a "click."
- Shelf Boards: Cut plywood, MDF, or aluminum sheets to fit the 80x40cm shelf frames. Use T-slot bolts to secure them to the shelf beams (slide nuts into the slots, drill holes in the board, and bolt through).
- Casters (Optional): If you want your rack to roll, add casters to the base corners. Look for caster mounts that fit 4040 profiles—they'll bolt right into the T-slots.
Pro Tip: Mix and match accessories! Need a tool holder? Add a bracket. Want to label shelves? Slide in a plastic label holder. The beauty of 4040D is that it grows with your needs.
- 4040 Aluminum Profile End Caps: Pop these onto the exposed ends of your profiles to cover sharp edges and give a clean look. They press fit easily—just push until you hear a "click."
- Shelf Boards: Cut plywood, MDF, or aluminum sheets to fit the 80x40cm shelf frames. Use T-slot bolts to secure them to the shelf beams (slide nuts into the slots, drill holes in the board, and bolt through).
- Casters (Optional): If you want your rack to roll, add casters to the base corners. Look for caster mounts that fit 4040 profiles—they'll bolt right into the T-slots.
Pro Tip: Mix and match accessories! Need a tool holder? Add a bracket. Want to label shelves? Slide in a plastic label holder. The beauty of 4040D is that it grows with your needs.
Step 7: Tighten, Test, & Tweak
You're almost there! Grab your hex keys and fully tighten all bolts—start from the bottom and work your way up to avoid warping the frame. Then give the rack a gentle shake: it should feel solid, with no creaking or shifting. If it wobbles, check for loose bolts or misaligned connectors. Finally, load it up with some boxes or tools to test the weight capacity—remember, 4040D is strong, but don't overload it beyond its limits (check the manufacturer's specs for exact load ratings).
Troubleshooting Common Issues
Even pros run into snags. Here's how to fix the most common headaches:
- Misaligned Holes: If a connector's bolt hole doesn't line up with the T-slot nut, loosen the nut, slide it into position, and retighten.
- Stripped Bolts: Avoid over-tightening! If a bolt strips, use a larger size or switch to a higher-quality bolt (stainless steel is more durable than standard steel).
- Wobbly Frame: Check if your vertical posts are plumb (use the level). If not, adjust the connectors or add diagonal braces for stability.
Aluminum Profile Accessories Cheat Sheet
| Accessory | Function | Installation Tip |
|---|---|---|
| 90° Aluminum Profile Connector | Joins two profiles at a right angle (most common use: corners of frames). | Slide T-slot nuts into both profiles before attaching the connector for easier alignment. |
| 4040 Aluminum Profile End Cap | Covers exposed profile ends to prevent cuts and add a finished look. | Warm the end cap slightly with a hair dryer if it's tight—aluminum expands a bit with heat, making insertion easier. |
| T-Slot Nut & Bolt | Secures accessories (shelves, brackets) to the profile's T-slot. | Use a nut with a nylon insert ("nyloc") for vibration resistance—great for moving racks or workbenches. |
| Angle Bracket | Adds extra support to joints or mounts shelves perpendicular to the frame. | Mount brackets on both sides of a joint for maximum strength. |
Final Thoughts: Your 4040D Journey Begins
Congratulations! You've just built a sturdy, customizable material rack using 4040D EU Standard Aluminum Profile. But this is just the start. Now that you know the basics, the possibilities are endless: build a
workbench
by adding a larger top and storage drawers, expand your material rack with more shelves, or even design a mobile cart for your workshop. The key is to start simple, learn from mistakes, and don't be afraid to experiment. And remember: the best part about aluminum profiles is that they're reusable. If you outgrow your rack, take it apart, rearrange the pieces, and build something new. That's the beauty of modular design—flexibility meets durability, all in a 40mm square package. Happy building!