- Company Articles
- Products and Technology
- Product knowledge
- 4040E EU Standard Aluminum Profile Cutting & Machining: Best Practices for Precision

4040E EU Standard Aluminum Profile Cutting & Machining: Best Practices for Precision
Related Product
4040E EU Standard Aluminum Profile
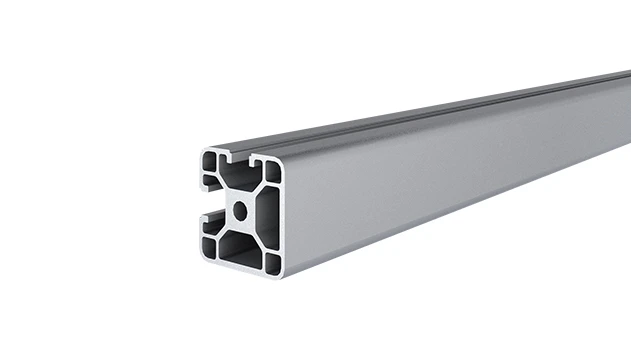
4040E is a 4.00x4.00 CM fractional 40 series square extrusion T-slot profile with two side open T-slots, two side with closed face, each side with 4.00cm face. The profile has align-a-grooves to assist in aligning connecting profiles.
In the world of industrial manufacturing and workspace design, few components are as foundational as the 4040E EU standard aluminum profile . Part of the broader family of aluminum extrusion profiles , this versatile material is the backbone of everything from assembly lines and workbenches to lean system setups and material racks. But here's the thing: its effectiveness hinges entirely on precision. A poorly cut or machined 4040E profile can throw off an entire system—gaps between connections, wobbly structures, or accessories that just won't fit. In this guide, we'll dive into the best practices for cutting and machining 4040E profiles, ensuring your projects aren't just functional, but built to last.
Understanding the 4040E EU Standard Aluminum Profile
Before we pick up a saw or drill, let's get to know the star of the show: the 4040E EU standard aluminum profile. As part of the EU standard series, it's engineered with consistency and compatibility in mind. The "4040" refers to its cross-section dimensions—40mm by 40mm—making it a mid-sized profile ideal for medium-load applications. What sets it apart is its construction: it's an aluminum extrusion profile , meaning it's formed by forcing heated aluminum through a die to create its signature T-slot design. This process ensures uniform thickness, structural integrity, and those all-important slots that make attaching aluminum profile accessories (like connectors, brackets, and panels) a breeze.
Material-wise, 4040E profiles are typically made from 6063-T5 aluminum alloy. This blend offers a sweet spot of strength, lightweight, and corrosion resistance—perfect for industrial environments where durability meets maneuverability. Whether you're building a workbench for a factory floor or a material rack for a warehouse, the 4040E profile's rigidity ensures it can handle daily wear without bending, while its light weight keeps installations manageable.
Common uses? Think workbenches (like the "Workbench E" in many catalogs), lean system workstations, and modular shelving. It's also a favorite in automated setups, where precision alignment is non-negotiable. But to unlock all these benefits, you first need to master cutting and machining.
Tools & Equipment: Setting Yourself Up for Success
Precision starts with the right tools. Cutting and machining 4040E profiles isn't a job for a rusty handsaw and a borrowed drill. To get clean, accurate results, you'll need a toolkit tailored to aluminum's unique properties—soft enough to machine easily, but prone to warping or chipping if mishandled. Here's what you'll need:
Cutting Tools
- Circular Saws with Aluminum Blades: Ideal for straight cuts on smaller batches. Look for blades with 60-80 teeth (more teeth = smoother cuts) and a carbide tip to handle aluminum's abrasiveness.
- Miter Saws: Great for angled cuts (like 45° or 90° joints) thanks to their adjustable bases. A 10-inch miter saw with a fine-tooth blade works well for 4040E profiles.
- CNC Cutting Machines: For high-volume or ultra-precise projects. CNC cutters use computer-aided design (CAD) to execute cuts with micrometer-level accuracy—perfect for complex shapes or repeatable parts.
- Hacksaws (Last Resort): Handy for on-site adjustments, but avoid for critical cuts—they're prone to unevenness and require steady hands.
Machining Tools
- Drill Presses: Essential for drilling holes to mount aluminum profile accessories (think brackets or T-slot nuts). A variable-speed drill press lets you adjust RPM to avoid overheating.
- Milling Machines: For custom slots, grooves, or chamfers. CNC mills are best for precision, but manual mills work for simple tasks if you're careful with measurements.
- Deburring Tools: Files, sandpaper, or dedicated deburring blades to smooth edges after cutting—burrs aren't just unsightly; they can damage accessories or even cause injuries.
Measuring & Marking Tools
- Digital Calipers: To measure lengths, hole diameters, and slot widths with accuracy down to 0.01mm.
- Engineer's Squares & Protractors: For ensuring 90° angles and precise bevels.
- Laser Levels or Straightedges: To mark long, straight cut lines—no more wobbly marks from a freehand pencil.
| Tool Type | Precision Level | Ideal For | Pros | Cons |
|---|---|---|---|---|
| Circular Saw (Aluminum Blade) | ±0.1mm | Straight cuts, small batches | Portable, fast, affordable | Requires steady hands; risk of vibration |
| Miter Saw | ±0.05mm | Angled cuts (45°/90°), medium batches | Adjustable angles, stable base | Less portable; limited to straight/angled cuts |
| CNC Cutter | ±0.01mm | Complex shapes, high-volume production | Ultra-precise, automated, repeatable | Expensive; requires CAD setup |
| Drill Press | ±0.02mm (hole diameter) | Drilling holes for accessories | Stable, adjustable speed | Fixed location; not ideal for large profiles |

Cutting 4040E Profiles: Best Practices for Clean, Accurate Cuts
Cutting is often the first step in working with 4040E profiles, and it's where many projects go wrong. A slight misalignment or a dull blade can lead to uneven ends, which then snowball into bigger issues during assembly. Let's break down the process step by step.
1. Marking: Measure Twice, Cut Once
The oldest rule in woodworking applies here, too—maybe even more so with aluminum. Start by marking your cut line with a pencil or permanent marker. Use a straightedge or laser level to ensure the line is perfectly straight; even a 0.5mm deviation over a 1-meter profile can cause misalignment later. For angled cuts, use a protractor or miter saw's angle guide to mark the line, then double-check with a square to ensure it's true.
Pro tip: If you're cutting multiple profiles to the same length, create a "stop block" on your saw table. Clamp a piece of wood or metal at the desired length, and butt each profile against it before cutting—this eliminates measurement errors and ensures consistency across all pieces.
2. Securing the Profile: No Wiggle Room
Aluminum is soft, and vibration during cutting can lead to rough edges or even bent profiles. Always secure the 4040E profile to your workbench or saw table using clamps. Avoid over-tightening—you don't want to dent the aluminum—but make sure it's snug enough that it won't shift mid-cut. For longer profiles, use additional supports (like sawhorses) at the uncut end to prevent sagging, which can also cause inaccuracies.
3. Choosing the Right Blade & Speed
Blade selection is critical. For circular saws or miter saws, opt for a blade designed specifically for aluminum—look for "non-ferrous metal" on the label. Tooth count matters: 60-80 teeth per inch (TPI) for 4040E profiles. Fewer teeth will tear through the aluminum, leaving burrs; too many can cause friction and overheating. For CNC cutters, a carbide-tipped end mill with a 30° helix angle works best for clean cuts.
Speed is equally important. Aluminum melts at lower temperatures than steel, so high RPM can cause the blade to "weld" to the metal, leaving a messy cut. Aim for a blade speed of 2,000-4,000 RPM for circular saws, and reduce feed rate (how fast you push the saw) to let the blade do the work. If you notice the aluminum turning black or smoking, slow down—you're overheating.
4. Cutting: Steady and Cool
With your profile marked, secured, and tools set, it's time to cut. For manual tools like circular saws, keep the blade aligned with the mark and apply gentle, consistent pressure. Let the blade pull the saw through the material—forcing it will cause vibration. For miter saws, lower the blade slowly into the profile to avoid kickback.
Cooling helps, too. While aluminum doesn't require as much cooling as steel, a light mist of cutting fluid or even compressed air can reduce heat and flush away chips. This is especially important for CNC cutting, where prolonged contact can build up heat.
5. Deburring: The Final Touch
No cut is perfect without deburring. Even the cleanest cut will leave tiny burrs along the edges. Use a deburring tool or a fine-grit sandpaper (240-grit or higher) to smooth these away. Pay extra attention to the T-slots—burrs here can prevent aluminum profile accessories from sliding into place. A quick pass with a file inside the slots ensures they're clean and functional.
Machining 4040E Profiles: Drilling, Milling, and Beyond
Cutting gets the profile to length, but machining—drilling holes, milling slots, or adding custom features—turns it into a functional part. Whether you're attaching a bracket or creating a slot for a panel, precision here ensures your aluminum profile accessories fit like a glove.
Drilling Holes: Accuracy Matters
Holes in 4040E profiles are usually for mounting accessories: think bolts, T-slot nuts, or hinges. To drill accurately:
- Mark the Hole Location: Use a center punch to create a small indent at the mark—this prevents the drill bit from wandering.
- Start Small: Use a pilot hole (smaller diameter than your final hole) to guide the drill. For example, if you need a 10mm hole, start with a 3mm pilot.
- Adjust Speed: Drill presses with variable speed should be set to 1,000-2,000 RPM for aluminum—slower than steel to avoid overheating. Use cutting fluid to lubricate the bit and clear chips.
- Check Perpendicularity: Use a drill press vice to hold the profile, ensuring the drill bit is straight up and down. A tilted hole means screws or bolts won't seat properly.
Milling: Custom Shapes for Custom Needs
Milling is for when you need more than just holes—slots for sliding panels, notches for joints, or chamfers for safety. For manual milling:
- Secure the Profile: Use a milling vice with soft jaws (to avoid marring the aluminum) and ensure the profile is level.
- Use the Right End Mill: A two-flute end mill is best for aluminum—it evacuates chips more efficiently than four-flute mills.
- Take Light Cuts: Aluminum is soft, so heavy cuts can cause the material to "grab" the mill, leading to chatter. Aim for a depth of cut no more than 0.5mm per pass.
For CNC milling, program your design with tight tolerances (±0.02mm for most applications) and use air blowers to keep the cutting area clean of chips. Post-milling, deburr the edges just like you would after cutting—sharp edges have no place in a finished product.
Assembly with Aluminum Profile Accessories: Putting It All Together
You've cut and machined your 4040E profiles—now it's time to assemble them with aluminum profile accessories . This is where all that precision pays off. Whether you're using 90° connectors, T-slot nuts, or end caps, a well-cut profile will make assembly smooth and secure.
Start by dry-fitting all parts before tightening any bolts. This lets you check for alignment: Do the profiles meet flush? Are the holes lining up with the accessories? If something feels off, double-check your measurements—don't force a connection, as this can warp the profile over time. When tightening bolts, use a torque wrench to avoid over-tightening; aluminum threads can strip if you go too hard.
For lean system setups, where stability is key (think workbenches or material racks), precision in assembly is non-negotiable. A 4040E profile with accurately drilled holes will ensure that shelves sit level, casters roll smoothly, and the entire structure can handle the intended load without wobbling.
Quality Control: Checking for Precision
Even the most careful craftsman makes mistakes, so quality control is a must. After cutting and machining, use your digital calipers to measure the length of the profile—should match your target within ±0.1mm. Check hole diameters with a go/no-go gauge to ensure they're the right size for your accessories. For angles, use a protractor to verify 45° or 90° cuts—even a 0.5° can add up over multiple joints.
Visual inspections matter, too. Look for burrs, dents, or warping—these are signs of poor technique. For CNC projects, compare the finished profile to your CAD design using a coordinate measuring machine (CMM) if available. Remember: a profile that passes quality control is one that will perform reliably in the field.
Common Mistakes to Avoid
Even with the best practices, missteps happen. Here are the most common mistakes and how to avoid them:
- Rushing the Marking: A blurry or misaligned mark leads to a blurry or misaligned cut. Take the time to measure twice and mark with a sharp pencil or scribe.
- Using Dull Blades: A dull blade tears aluminum instead of cutting it. replace blades when you notice burrs or rough edges, even if they're "only a little" dull.
- Ignoring Vibration: Unsecured profiles vibrate, leading to uneven cuts. Always clamp, and use supports for long profiles.
- Overheating: High RPM or fast feed rates cause aluminum to melt or gum up the blade. Slow down and cool as needed.
- Skipping Deburring: Burrs aren't just ugly—they can scratch accessories or injure workers. Always deburr after cutting or machining.
Real-World Application: Building a Lean System Workbench
Let's put this all into context with a practical example: building a lean system workbench using 4040E profiles. Lean systems thrive on efficiency, and that starts with a sturdy, well-designed workbench. Here's how precision cutting and machining make it happen:
- Design: Plan the workbench dimensions (say, 1200mm long x 600mm deep x 800mm high) and list the 4040E profiles needed for the frame, legs, and shelves.
- Cutting: Use a miter saw to cut four 800mm legs, four 1200mm side rails, and four 600mm cross rails—all with 90° cuts. Deburr each end to ensure clean joints.
- Drilling: Drill holes in the legs for mounting casters (if mobile) and in the rails for connecting brackets. Use a drill press to ensure holes are perpendicular and spaced evenly.
- Assembly: Use 90° aluminum profile connectors to join the rails and legs. Dry-fit first, then tighten bolts to secure. Add a plywood or aluminum top panel using T-slot nuts in the profile's T-slots.
- Testing: Check for wobble—if the workbench rocks, revisit your cuts or connections. A precise build will sit level and stable, even with tools and materials on top.
The result? A workbench that integrates seamlessly into a lean system , where every component fits perfectly, and the structure supports daily use without fail. That's the power of precision.
Final Thoughts: Precision as a Foundation
Cutting and machining 4040E EU standard aluminum profile isn't just about following steps—it's about respecting the material and the system it will support. Whether you're a hobbyist building a garage workbench or a manufacturer designing an assembly line, the principles remain the same: measure carefully, secure firmly, cut coolly, and machine precisely. With these best practices, your 4040E profiles will do more than hold things together—they'll elevate your entire project, ensuring it's efficient, durable, and ready to tackle whatever the industrial world throws at it.
So, grab your tools, take a deep breath, and remember: precision isn't just a goal—it's the difference between a project that works and one that works exceptionally .